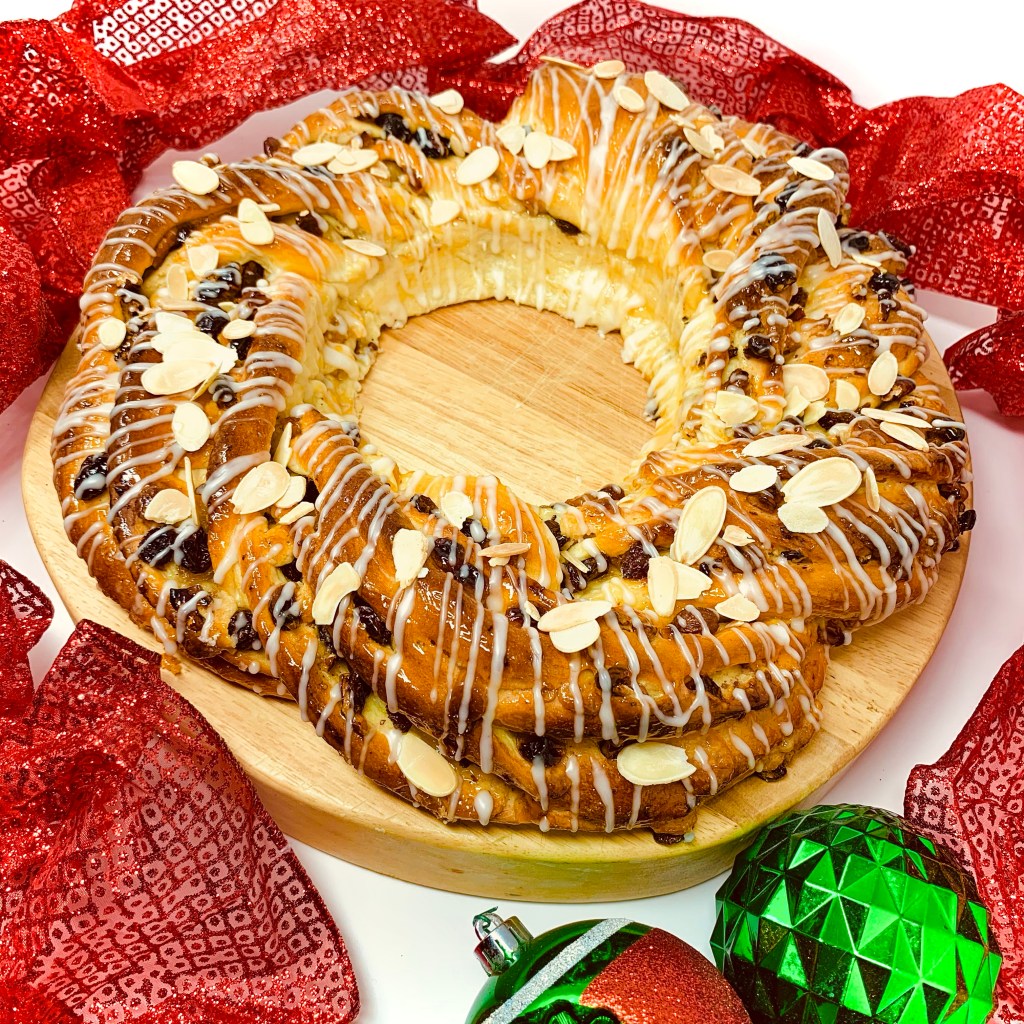
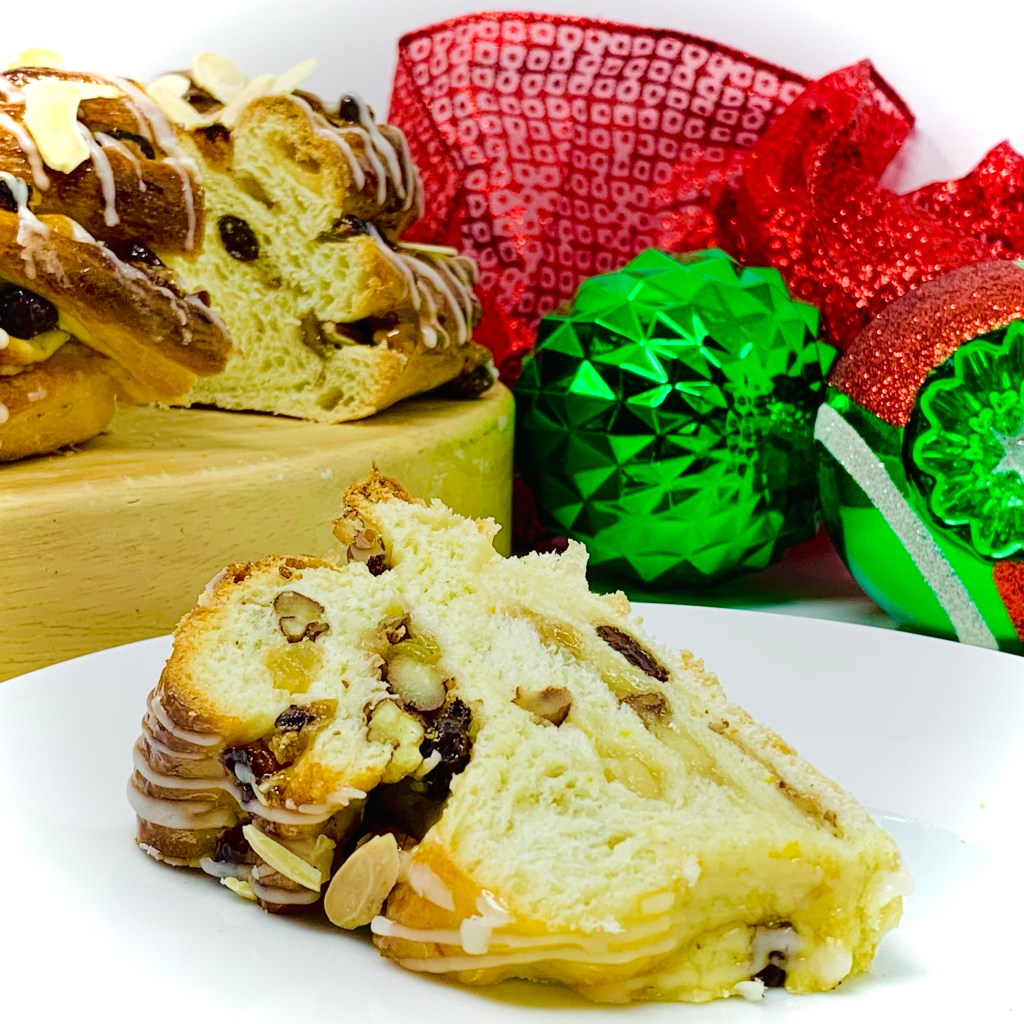
Raspberry & Rose Focaccia

Serves 18-20

Ingredients

For the jam filling

  • 1 cup fresh raspberries
  • 3 Tablespoons sugar
  • 1 Tablespoon lemon juice
  • 2 teaspoons cornstarch
  • 4 teaspoons water

For the dough

  • 4 cups bread flour
  • 2 ¼ teaspoons instant yeast
  • 2 teaspoons kosher salt
  • 3 Tablespoons sugar
  • 1/4 cup freeze dried raspberry powder
  • 2 cups warm tap water
  • 2 tablespoons extra virgin olive oil
  • 1/2 cup fresh raspberries
  • 3 Tablespoons water

To glaze and finish

  • 1 cup powdered sugar
  • 3 Tablespoons Heavy cream
  • 1 teaspoon rose water
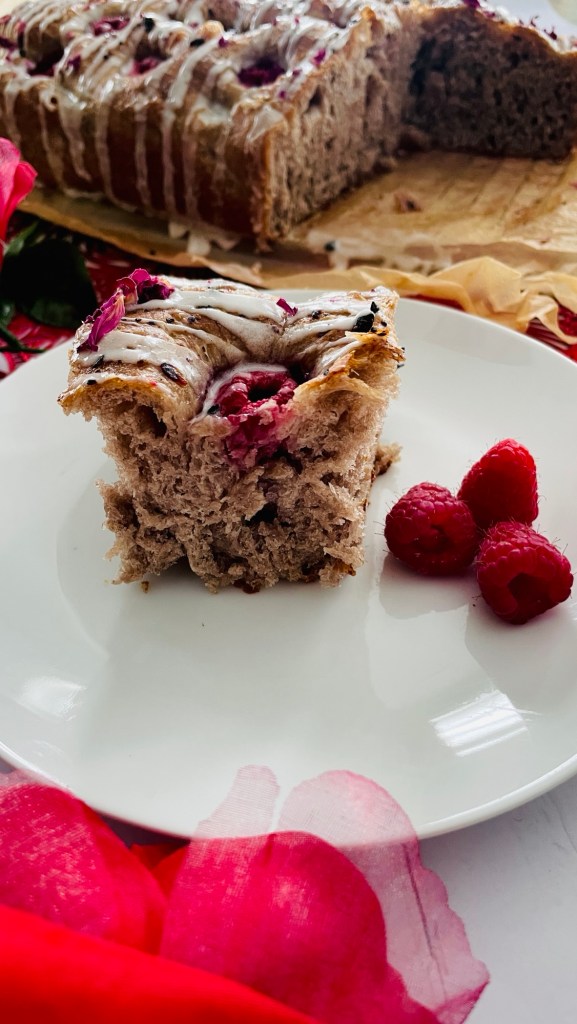
  • 2 Tablespoons food-grade rose petals

Method

Jam Filling

  1. Combine everything but the cornstarch and water in a medium saucepan. Heat over a medium-high heat until boiling and the berries break down to a pulp
  2. Combine the cornstarch and water, add to the raspberry mixture and cook until the mixture has thickened. Remove from the heat and allow to cool

Dough

  1. Combine the flour, salt, yeast, sugar and freeze-dried raspberry powder in a large bowl. Stir well with to combine.
  2. Add approximately half of the water (no need to measure). Stir well to incorporate the water. The mixture will be shaggy and dry at this point. Add most of the remaining water (reserve 2-3 tablespoons) and stir again until the water is well incorporated. If the mixture seems dry add the rest of the water and stir to combine. You’re looking for a thick, shaggy, fluffy wet dough. If the dough still seems dry, add a bit more water, a tablespoon at a time until the thick, shaggy consistency (and no pockets of dry flour) is reached.
  3. Add 2 tablespoons of olive oil and stir until most of the olive oil is incorporated
  4. Cover the bowl with with plastic wrap and set aside to proof for 30 minutes
  5. After 30 minutes, remove the cover and, using either a large spatula or slightly wet hands, pick up one side of the dough, stretch it, and then fold it over onto the rest. Turn the bowl one-quarter turn and repeat the stretch and fold. Repeat the stretch and fold 4-5 more times, turning the bowl one-quarter each time
  6. Cover the bowl and let the dough rise for one hour. During the one-hour rise, use a piece of paper toweling and rub the 2 teaspoons butter over the interior of a 9×13-inch baking pan. Line the bottom of the pan with parchment paper then drizzle with 2 tablespoons extra virgin olive oil. Cover lightly with plastic wrap and set aside
  7. After the one-hour rise, repeat the stretching and folding described in step 2 above, then turn the dough into the prepared pan. Flip the dough over to coat with oil and flatten it out with your hands in the pan. It won’t cover the entire pan at this point but flatten it out as much as you can. Then cover the pan tightly with the plastic wrap. Set aside to rise again for one hour
  8. When the one-hour rise in the pan is completed, oil your fingers and poke them into the dough, dimpling and stretching it in the pan as you go. You’re trying to evenly fill the pan to the edge and into the corners
  9. Once you’ve completed the dimpling, set the pan aside to rest while you preheat the oven. With one rack in the center position, preheat the oven to 425˚F
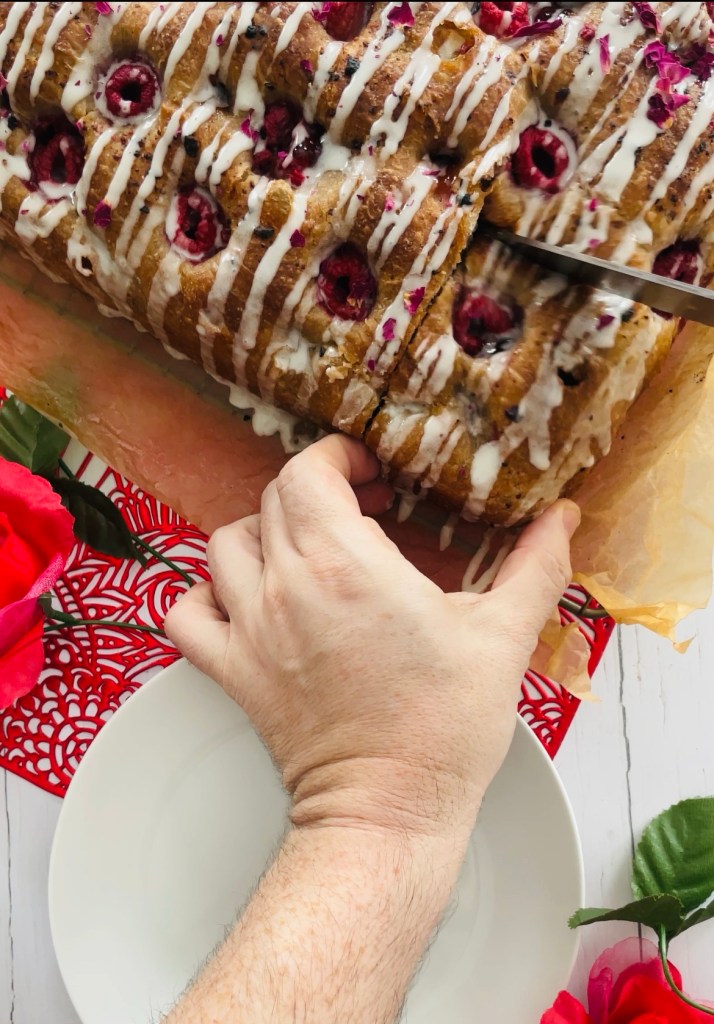
  10. Once the oven reaches 425˚, stud the surface of the dough with the fresh raspberries, filling some of the dimples, then drizzle the dimpled dough with 1 tablespoon extra virgin olive oil, then 2 tablespoons of room temperature tap water
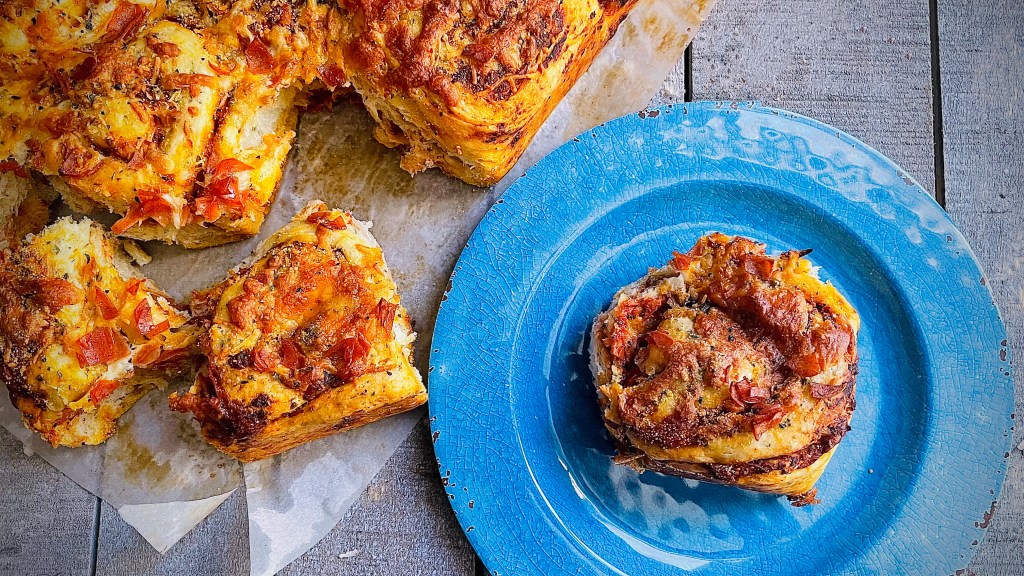
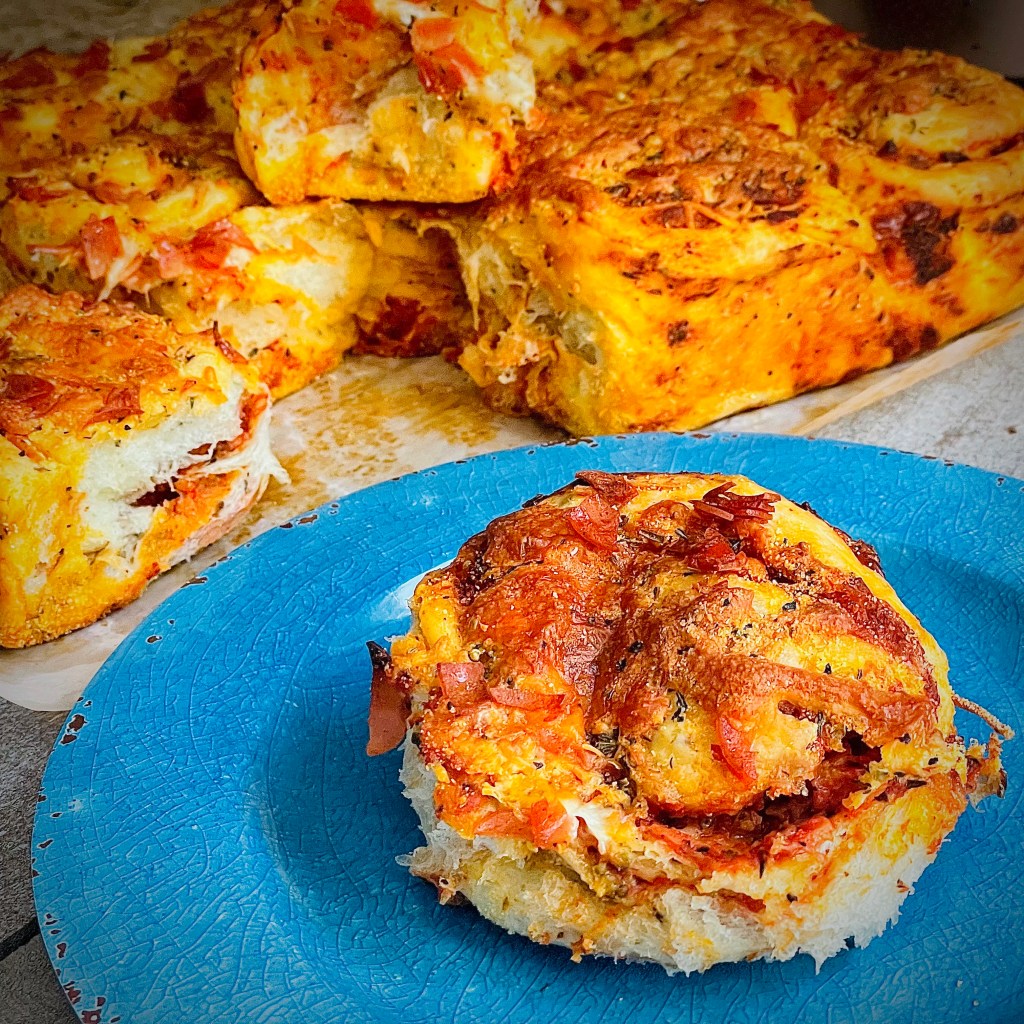
  11. Bake on the center rack in the oven for 15-20 minutes or until nicely browned
  12. Remove the focaccia with a metal spatula to a wire rack and allow to cool for 20 minutes. While the focaccia is cooling make the glaze

To glaze and finish

  1. Fit a piping bag with a Bizmarck tip and fil with the raspberry jam
  2. Using the tip, pierce and fill the focaccia at random locations with the jam, taking care to keep the filling within the loaf
  3. In a bowl combine the glaze ingredients, except the rose petals, and stir until fully smooth
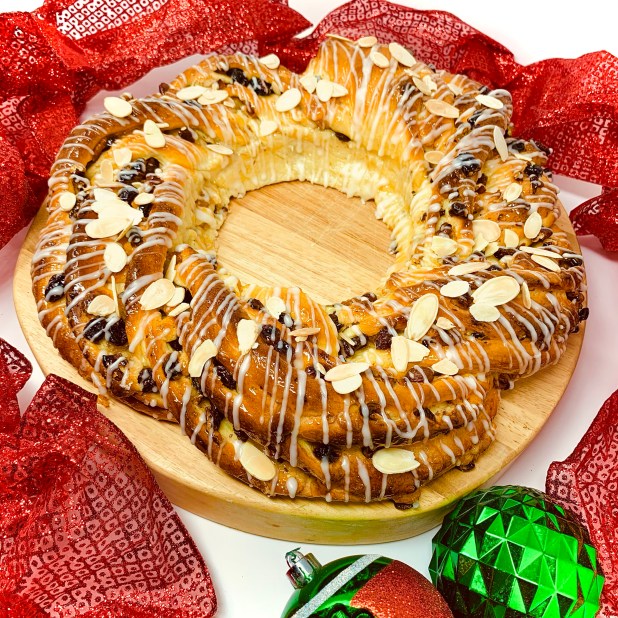
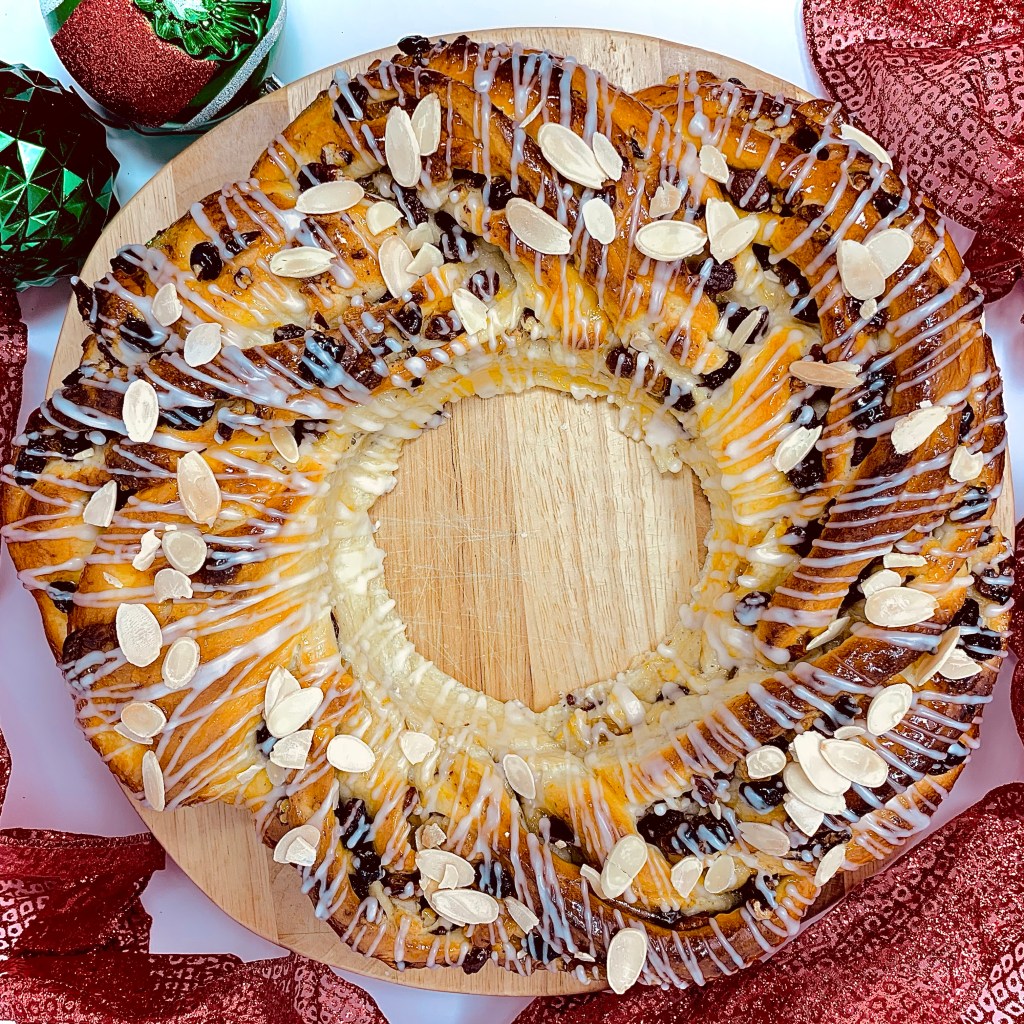
  4. Drizzle over the warm focaccia loaf to your liking, then sprinkle with the rose petals
  5. Slice, serve and enjoy!

Pumpkin Chocolate Babka

Makes 1 large 10” Babka loaf ring

Ingredients

Dough

  • 2 Tablespoons sugar
  • 2 ¼ teaspoons active yeast
  • ¾ cup whole milk
  • 1 egg
  • 1 cup pumpkin puree
  • 2 teaspoons pumpkin spice
  • 1 teaspoon salt
  • 1 stick butter, softened and cubed
  • 5 cups All-purpose flour

Filling

  • 6 Tablespoons butter
  • ⅔ cups sugar
  • 3 oz bittersweet chocolate, coarsely chopped
  • 5 Tablespoons unsweetened cocoa powder

Glaze

  • ¼ cup water
  • ¼ cup sugar

Method

Dough

  1. In the bowl of a stand mixer, with a dough hook, combine the warm milk, yeast, the sugar, mix and allow it to sit until foamy, about 10 mins
  2. Add in the pumpkin, butter, egg, salt, and spices and mix to combine. Add in the flour, bit by bit, until completely incorporated, then knead for 6 minutes at medium-high speed using the dough hook of a stand mixer, until the dough is smooth
  3. Cover the bowl with oiled plastic wrap and set it in a warm place to rise for about an hour, or until doubled in size

Filling

  1. About 10 minutes before your pumpkin dough has done rising, prepare the chocolate filling by melting the butter in a small saucepan over medium heat, then stirring in the sugar until almost completely dissolved.
  2. Remove from heat and add in the chopped chocolate. Stir until melted and smooth, then add the cocoa powder and stir to combine and form a thick filling. Set aside until needed

To Finish

  1. Prepare your baking pan. I use a 10” fluted pan to make this, prepared with brushed baking spray
  2. Take your risen dough and knock it back by punching then turn it onto a lightly floured surface. Roll it into a large rectangle (apx 14x 18 inches) and then spread the chocolate filling evenly across the dough, spreading it all the way to the edges
  3. Roll the long edge of the dough into a tight log, just like when making cinnamon rolls.  Use a sharp knife pr bench scraper to slice the dough in half lengthwise, leaving one end intact. Then with the cut sides facing up, cross one end over the other and repeat all the way down the length of the dough, keeping the cut sides facing up while wrapping the two lengths of dough around each other to form a rope or twist
  4. Gently lift the twisted loaf and squish it into your prepared pan. Cover loosely with oiled cling wrap and allow to rise for about 35-40 minutes
  5. While dough is rising, prepare the syrup by combining the water, sugar and bringing it to a boil in a small saucepan. Let the syrup boil for 4 minutes, then remove from heat and allow to cool to room temperature
  6. Preheat oven to 375 degrees F. When oven is hot, bake the babka for 35-40 minutes.
  7. Remove the cooked babka from the oven and drizzle/ brush it with the room temperature syrup
  8. Allow to cool in pan for 15 minutes, before removing and allow to cool fully on rack
  9. Slice and enjoy!

Bread Making Tips- National Homemade Bread Day

November 17th is National Homemade Bread Making day so I thought to share some tips, tricks and insights into bread making as I’ve learned over the years. Don’t get me wrong- I am by no means saying the I am the fountain of all things bread based- in the beginning I baked some loaves that were frankly crimes against humanity! But one of the lesser known ingredients in a good loaf is…perseverance. Mistakes will be made- try to see them not a signs of failure but rather as chances to learn. Making even a simple loaf of bread can be immensely rewarding, not to mention therapeutic in these hectic times. Its a skill that’s easily learned and long lasting. If you;ve never made a loaf of bread before, congratulations- you have a delicious new word to explore in front of you.

Here are my top tips when it comes to bread making (those that require more information I’ll expand on later in the post)-

  1. Check your yeast expiry date. It may sound obvious but it a mistake often made. Yeast is a living thing and as such can die over time. Using an expired yeast in your bread making is a non-starter from which there is no return.
  2. The water that you use should be warm, just above body temperature. If you use water that is too hot, you’ll probably kill your yeast (remember- it’s a living thing); if you use water that’s too cold you won’t activate the yeast and it’ll remain sleepy.
  3. Try using Autolyse method. More on that later.
  4. When adding yeast to your dough, add it to one side of the bowl. To the other side add your salt and sugar. Adding salt and sugar directly on top of the yeast can cause a reaction and have them kill your yeast.
  5. In your dry ingredients try using a dough enhancer (dough conditioner). This is a dry ingredient which can help boost the properties of your dough mixture. Again more on that later.
  6. Don’t let your dough proof too long. Optimum time is between 60-90 minutes. If you leave it any longer you run the risk of the dough collapsing back on itself. However if you’re proofing it in the refrigerator, you can increase this so it can be done overnight with no ill effects.
  7. When baking your loaf, try adding a baking pan with a couple of inches of water to the bottom of your oven. This creates a steam environment which gives your finished loaf a wonderful, toothsome crust.
  8. Try adding in a pinch of Vitamin C powder, or a splash of leom/ orange juice. This creates a more acidic environment which aids the gluten bonds giving a better structure to your loaf. You don’t need to do this is you’re already using a dough enhancer/ conditioner.
  9. Let your baked loaf cool completely before slicing. The structure of a warm loaf hasn’t set, or fixed, yet and as such if you were to slice it you will squash and unduly tear the slices.
  10. While bread is ideal for freezing for enjoyment at a later date, please don’t keep your bread in the fridge. This does anything BUT keep it fresh for longer. It will in fact dry it out quicker resulting in a less tasty slice at a quicker rate.

The Autolyse Method

This is simply adding your water to your flour, mixing it and letting it rest before adding any remaining ingredients. Once completely mixed, ensuring that there are no pockets of dry flour, the flour/ water mixture is set aside for between 20 to 60 minutes. During this time a number of reactions take place that benefit your bread making.

  • The flour gets properly soaked and hydrated which aids the development of gluten strands. This gluten strand development helps cut down the kneading time required later on
  • Fermentation takes place at a slower pace allowing for a more enhanced flavor and better keeping time to yout baked loaf
  • The carotenoids present remain intact and this helps the final desired color, flavour and aroma of the baked loaf
  • The dough’s elasticity is massively improved allowing better workability, a better rise and a more pleasing, open crumb to your loaf when sliced

*When using the Autolyse method you add instant yeast after the autolyse is complete, dissolve them in a small amount of warm water (1 ounce) reserved from the autolyse

About Dough Enhancer (Dough Conditioner)

This is a dry ingredient added to your dough mix, made up of a number of ingredients which boost your doughs basic properties. Think of it as a “food supplement” to your dough. Typically a dough enchancer/ conditioner will be made up of

  • Gluten- Additional gluten to that already present in your bread flour helps gives your dough some extra muscle. It will amke your dough more elastic and easy to work
  • Acidic Element- Typically Viamain C or Asorbic Acid this acts to strengthen the gluten bonds that from around the bubbles caused from the yeast reaction in the mix. It also acts to boost the effectiveness of your yeast, as well as improving the longevity of the finished loaf.
  • Lecithin- This helps gives your finished load a lighter, softer texture akin to a store bought loaf but within the mass production nasties. Better rising is also a side-effect of this addition. It also helps increase the keeping quality of your bread, giving you some extra time to enjoy.

Fluffiest Pizza Rolls

Who doesn’t love pizza? Yes- that age old question. From my experience a pretty good fan base is kids. I know my two are 100% on board with this, and with these rolls even more so. I think part of the enjoyment for them is knowing that they’ll get to sample the fruits of their labor at the end. Over the years I’ve learned that letting kids take ownership of tasks (no matter how small) can yield bountiful positive results and enjoyment all round. But…I’m here to talk pizza (rolls)!

These pizza rolls are perfect on so many fronts – pizza is popular; you can rope the kids in to helping; guests can eat as much as they like; they’re easily transportable outdoor eating in the summer weather. Like I said- the perfect tear and share popular summer bite. For a snack or appetizer I use one, for a main I use two paired with a leafy, summer salad. Let’s not forget it customizable too. If pepperoni isn’t your thing, swap it in for chicken, or ham.

You’ll notice a couple of things with this recipe. The dough can appear wetter than usual when fully mixed, This is what makes the end baked roll so fluffy. It really is a case of “wetter is better”. You also see that I mention cornmeal in the recipe. Whilst this isn’t an ingredient in the rolls as such, dipping their bases in it and baking them results in a wonderfully toasted, crispy bottom with a delightful crunch.

One last piece of advice before I go. These pizza rolls are at their best fresh out of the oven however if there are any left they can be wrapped, stored in the fridge and reheated for enjoying later.

Makes 12

Ingredients

Pizza Sauce

  • 6oz can tomato puree
  • 1 can (15oz) tomato sauce
  • 1 Tablespoon dried oregano
  • 1 Tablespoon dried thyme
  • 2 Tablespoons Italian seasoning
  • 1 teaspoon garlic powder
  • 1/2 teaspoon garlic salt
  • 1/2 teaspoon onion powder
  • 1/2 teaspoon fresh ground black pepper
  • 1 teaspoon sugar

Pizza Rolls

  • 4 cups bread flour
  • 2 1/4 teaspoons quick yeast
  • 1 Tablespoon Kosher salt
  • 1 Tablespoon sugar
  • 1 Tablespoon Italian seasoning
  • 1 egg
  • 1 1/2 cups warm water
  • 1/4 cup oil

Filling/ Topping

  • 2 cups pizza sauce, recipe above
  • 1 cup shredded mozzarella
  • 1 cup shredded sharp cheddar
  • 1 Tablespoon Italian seasoning
  • 1 cup shredded parmesan
  • 1 cup pepperoni, diced/ shredded
  • 1/2 cup cornmeal
  • Olive oil

Method

Pizza Sauce

  1. Combine all the sauce ingredients in a bowl, stir well, cover and set aside on the counter until needed

Pizza Rolls

  1. In the bowl of a stand mixer, with dough hook attachment, combine the flour, yeast, salt, sugar, and Italian seasoning
  2. Add the egg and combine on low speed
  3. Add in 3/4 of the liquid and mix on speed 2 to to combine. The dough should come together and start “cleaning the sides of the bowl”. If you dough is still “shaggy” gradually add in some of the remaining liquid until it comes together
  4. Knead on this speed for 7 minutes, until it is uniform and spring to the touch. It will be a bit sticky!
  5. Transfer to an oiled bowl, cover and leave in a warm place to rise until doubled in size (mine usually takes between 50mins to 1 hour)
  6. Line a 9″ x 12″ baking tray with baking parchment, leaving about a 2″ overhang all the way around. This will help fish the baked pizza rolls out of the tin
  7. In medium bowl, combine the mozzarella, cheddar, parmesan and Italian seasoning. Set aside
  8. Spread the cornmeal onto a plate and set aside
  9. Once doubled in size, tip out onto a well-floured counter and knock back the air from the risen dough
  10. Form into a rough rectangular shape 20″ x 12″ with long edge facing you
  11. Spread the surface of the dough with 2 cups of the pizza sauce. Next sprinkle over 2/3 of the cheese mixture, followed by 1/2 of the pepperoni
  12. Taking the long edge, roll the dressed dough up into a long log shape. It’ll get messy- there’s no getting away from it but doing it slow and easy helps keep most of the filling inside
  13. Cut the rolled up log into 12 pieces* and dip the bottom of each piece into the cornmeal. Place the rolls into the prepared baking tray, cornmeal side down in 3 x 4 formation allowing a small gap between each
  14. Preheat your oven to 350F
  15. Cover with some oiled cling wrap and set aside to rise for approximately 35 to 40 minutes. By the end of this time you’ll notice they will have risen again and be quite snug in the baking tray
  16. Brush with some olive oil and bake in your preheated oven for 15 minutes, at which point remove from the oven, sprinkle over the remaining cheese mixture, followed by the remaining pepperoni, return to the oven and continue baking for a further 15 to 20 minutes until the crust is golden, the cheese has melted and the pepperoni is nicely crisped up
  17. Remove from the oven and leave in the pan for 5 minutes. After this time remove from the pan using the baking parchment overhang, serve and enjoy with the remaining pizza sauce for dipping

*A handy trick for cutting your individual rolls is to use some dental floss (unflavored and clean) or some fishing line (again clean!). Cut a length, wrap it it around the long dough log at where you want to cut and pull together. Slices will be clean and you don’t run the risk of squashing them. Repeat to cut more.

Christmas Couronne

A Christmas Carol holds a play in my household as a cornerstone of Christmas. In fact the 1984 version starring George C Scott is held in such high esteem as THE quintessential version that it heralds the “official” start of yuletide festivities on December 1st for us. Each time there is a new version I look forward to seeing how each of the ghostly visitors will be portrayed. My favorite being the largest of the all- the bountiful and exhuberant Ghost of Christmas Present. Maybe it’s their jovial grasp of transient life and joie de vivre? Or maybe it’s that they are a harbinger of plentiful – cornucopia overflowing with festive bounty. This is what brings me to this recipe- the couronne.

So many things about it that instantly makes me think of the Ghost of Christmas Present. From it’s wreath shape, to the fluted edges blossoming with sweet, festive fillings, to the sweet, heady flavor of marzipan (always a signature festive flavor for me). Consider it in the same vein as that other Christmas classic- stollen, alebit not as heavy I find. The braiding can be a little bit tricky to master – I’m not kidding when I swore at one point it must be like wrestling an octopus. Filling will fall out- just accept it. It is not a testament as to your prowess, it’s just inevitable. Any loose stray filling can just be sprinkled back over the fully shaped dough and nobody, aside from you and the kitchen walls, will be any the wiser.

Although this couronne is good for a week in an airtight container, it really is at it’s best up to three days after baking.

Ingredients

Dough

  • 3/4 cup milk
  • 1/2 stick butter  
  • 1 cinnamon stick
  • 4 cups Bread Flour 
  • 2 1/4 tspn yeast
  • 1/4 cup warm water
  • 1 Tbspn salt
  • 3 Tbspn and 1 tspn sugar divided
  • Zest 1/2 orange
  • 1/2 cup golden raisins
  • 1/2 cup Thompson raisins
  • 1/4 cup cherry wine (or orange juice for kid-friendly)
  • 1 tspn vanilla extract
  • 1 cup pecans, toasted and roughly copped
  • 1 cup almond marzipan

To glaze and decorate

  • 1/3 cup apricot jam
  • 1 cup icing sugar 
  • 1 tspn water
  • 1/4 tspn rum or rum extract 
  • 2 Tbspn Flaked almonds, toasted 

Method

  1. The night before you want to make the couronne, in an airtight container or jar combine the dried fruits, cherry wine and vanilla extract and mix well. Seal and set aside for the fruit to soak up the liquid, occasionally shaking/ stirring the mixture
  2. The following day, in a small pan combine the milk, butter and cinnamon stick. Heat gently, stirring occasionally until the butter has melted fully. Remove from heat and set aside to cool until tepid
  3. In a small bowl mix together the yeast, warm water and 1 Tbspn sugar until combined. Set aside for 10 minutes until frothy
  4. In the bowl of a stand mixer, combine the flour, remaining sugar and salt
  5. Add in the frothed yeast mixture and the butter/ milk (depending on the humidity of your kitchen you may not need all of the butter/ milk mixture. Start with 3/4 of it and add more slowly if needed)
  6. Knead with the dough hook attachment for 6-7 minutes until it comes together as a dough. Continue mixing until the sides of the bowl are clean and the dough is soft. It should stop feeling sticky and have a smooth exterior
  7. Transfer the dough to a large pre-oiled bowl, cover with cling film and set aside to prove in a warm place approximately an hour
  8. When the dough has about doubled in size, turn it out onto a lightly floured surface. Without knocking it back, roll out the dough into a rectangle roughly 13x10in in size
  9. Sprinkle the soaked plump fruits over the surface of the dough
  10. Scatter the chopped pecans over the surface of the dough
  11. Break/ tear the marzipan in to rough pieces 1/2″ to 1″ in size. Scatter these pieces over the surface as well
  12. By the time you’ve finished the surface of your dough should be covered with soaked fruits, pecans, and marzipan
  13. Roll the dough tightly like a Swiss roll along the long edge so you end up with a sausage shape approximately 13″ long and transfer the roll to a large lined/ prepared baking sheet.
  14. Cut the roll in half lengthways, all the way along it’s length. Turn the roll lengths so that the cut layers are exposed on top. Keeping the cut layers to the top overlap the two lengths of dough together forming a simple braid.
  15. Form the braided length into a circle shape and join/tuck the ends to form a ring shape. *I use a heatproof greased/ oiled can or circular bowl placed in the middle to wrap the dough around to help give the circular shape
  16. Cover the couronne ring and set aside in a warm place for 30-40 minutes to rise, until the dough springs back quickly when lightly prodded
  17. Preheat your oven to 425F
  18. Bake the proved couronne for 25-30 minutes, or until risen and golden-brown. Remove from the oven and leave to cool on the sheet for 10 minutes. Transfer to a wire rack to cool
  19. While the couronne is cooling, heat the apricot jam with a splash of water in a small pan over a medium heat until runny. Pass through a sieve to remove any pieces of fruit, then brush the sieved jam all over the warm couronne to glaze. Set aside to cool completely
  20. For the icing glaze mix together the icing sugar, water and rum (extract) to form a runny glaze. Drizzle over the cooled couronne and scatter with the flaked almonds
  21. The couronne will keep for up to one week at room temperature in an airtight container