#Recipe Brownie Fries w/ Raspberry Ketchup & Yuzu Mayo

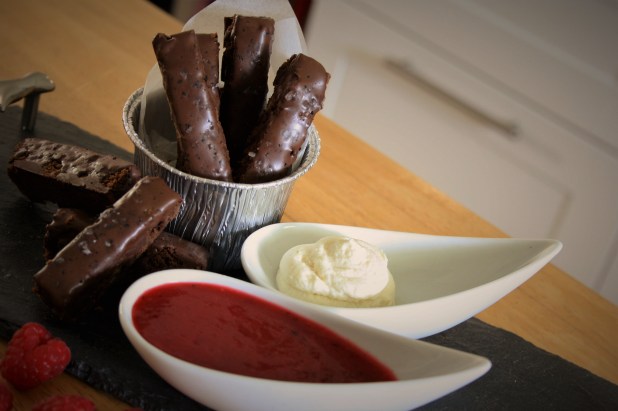
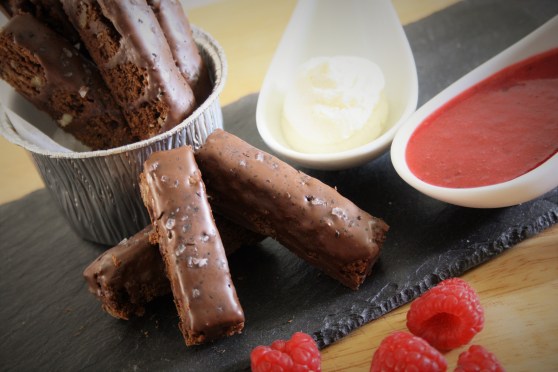
So this recipe originally started as an idea to create smaller “bite-size” brownies with a difference. Sadly after a quick Googling (!) I found someone else had beat me in creating the concept. Oh well, imitation is the best form of flattery as they say. Brownie Fries or “Fruffles” (a portmanteau of Fries + Truffles) as they appear to be called in some places Stateside have been around for a while. Usually they’re served with a berry compote “ketchup” and yogurt “mayo” but not one to let a chance for experimentation go by I decided to mix up the flavours a bit.

Berry ketchup and yogurt mayo? Oh no, no- not for me! So all aboard the “Flavour train” for a raspberry dipping sauce with fresh and spicy notes thanks to basil and black pepper, paired with rich, creamy and zingy mascarpone dip. Here’s my take on Brownie “Fries” and they’re deep-dipping, lip-smacking good!


Brownie Fries (2)

Brownie “Fries”

185g unsalted butter, cubed

185g 70% cocoa dark chocolate, broken into pieces

eggs 3

275g caster sugar

85g plain flour

1 tbsp Espresso powder

50g dark chocolate chips

50g milk chocolate chips

100g pecans, lightly roasted and roughly chopped

To decorate

125g 70% cocoa dark chocolate, broken into pieces

125g milk chocolate, broken into pieces

Coarse sea salt to sprinkle

Freshly ground vanilla (Dr. Oetker do a wonderful grater/grinder)

Raspberry “Ketchup”

75g fresh raspberries

Handful fresh basil leaves, torn

½ tsp black peppercorns

Yuzu “Mayo”

250g Mascarpone cheese

100ml single cream

1 tsp agave syrup

2 tbsp Yuzu juice

  •  Set your oven to 180C/gas mark 4 and line a deep 12″x9″ baking tray with baking parchment, or 9” x9” brownie tray (with short dividers removed).
  • Melt the butter and chocolate in a bowl over a saucepan of simmering water (or bain-marie), stirring occasionally. Once melted, remove from the heat and allow to cool.
  • Beat the eggs and sugar until the mixture is thickened and fluffy, then, in a separate bowl, combine the flour and Espresso powder. Fold the cooled chocolate mixture into the egg mixture. Sieve in the dry ingredients, and fold together until just uniform in color.
  • Fold in the chocolate chips and chopped pecans until fully incorporated.
  • Pour your mixture into the lined tray, or brownie pan, and gently spread to level the surface. Place in the oven for 20-25 minutes, then leave to cool completely in the tin before removing.
  • Start by cutting the brownie slab in to 3” wide strips. If you’re using a brownie pan the long dividers will already have done this for you. Next, rotate the strips 90 degrees and cut strips approximately ¾ inch wide. Arrange on a sheet of baking paper with about 1 inch space between.
  • To finish, melt the dark and milk chocolates in a bowl over a saucepan of simmering water (or bain-marie), stirring occasionally. Once melted, remove from the heat and allow to cool. When cool enough to handle, pour the melted chocolate into a piping bag and snip a small piece from the end to make a fine nozzle.
  • Pipe the melted chocolate over your brownie fries so that it drips down over the sides, forming the “batter coating” to your “fries”.
  • Leave to cool for about 15 mins then sprinkle lightly with seas salt and grind over fresh vanilla.
  • Leave to finally set.

To make the Raspberry “Ketchup”

  • In a bowl combine the fresh raspberries, basil leaves, and black peppercorns.
  • Using a hand blender, blitz until a fine pulp.
  • Pass through a sieve to a bowl below.
  • Set aside until serving.

To make the Yuzu “Mayo”

  • In a bowl combine the mascarpone cheese, cream, agave syrup and yuzu juice.
  • Beat until fully combined.
  • Spoon in to a bowl for serving.

To serve

  • Arrange the brownie fries alongside the ketchup and yuzu mayo.
  • Now dip away to your heart’s content!

Brownie Fries (5)

Cranberry, Pear & Dark Chocolate Hot Cross Buns

IMG_3404

Okay- I’ll come clean. I don’t actually like hot cross buns. Well- hot cross buns in the “traditional” sense. Dried fruits of sultanas, currants and raisins do absolutely nothing for me and hot cross buns I place firmly in the same category as Christmas Cake. I’ll accept them to be civil, I’ll bake them to experiment and I’ll eat them under duress. So it only seems fitting that this Easter season I come up with something  a lot more palatable, even to the those of us prone to outbursts of “inyaphobia” (yes, it’s a thing I jest you not…Google it).

I can’t quite put a finger on where my malaise with dried fruit comes from. It probably has its roots, like all else culinary for me, in my childhood and my mother’s kitchen. Each festive season, whether it be Easter, Christmas or Halloween was heralded with a routine palette of sensory ticks…the flat clanging of baking trays on kitchen surfaces, the heady scent of dried fruit steeping in brandy, cold tea or whatever liquid was to hand, and the frequent blistering blasts of heat from oven. It’s the smell of the dried fruit steeping that sticks with me, permeating memory as much as clothing. Like anything in life familiarity breeds contempt, and boy did my mother like a fruit cake!

Hence my deviation from hot cross buns with their traditional sultana/mixed peel combination. Instead I give you an almost “regal” combination of cranberries and pear (yes, I’m aware they’re dried too but far more tolerable in my view) laced with dark chocolate chunks. Chocolate makes everything better. Except fish- that’s just wrong! So best you stick to making these hot cross buns instead.

*This recipe has been revised in April 2020 to include measurements/ quantities and ingredient names as suitable for Canada and the US. Throughout the recipe I still refer to the ingredients as they were originally drafted.

IMG_3420

Ingredients
500g/ 4 cups All Purpose/ Plain flour
85g/ 1/3 cup (caster) sugar
2 teaspoons mixed spice powder (if you don’t have this you can use pumpkin spice mix)
2 teaspoons ground cinnamon
¼ teaspoon nutmeg
10g/2 teaspoons Kosher salt
14g/ 2 1/4 teaspoons fast-action dried yeast
1 tablespoon vanilla extract
40g/ 2 tablespoons butter
300ml/ 1 1/4 cups whole fat milk
1 egg, beaten
65g/ 1/3 cup dried cranberries, soaked in

2 tablespoons orange juice
65g/ 1/3 cup dried pear, chopped into small pieces
65g/ 40z dark chocolate/ semi-sweet chocolate, chopped in small/ medium chunks

Cross marking
50g/ 1/2 cup All Purpose/ Plain flour
80ml/ 1/3 cup cold water

Glaze
2 tbspn golden syrup/ light corn syrup

Method

  1. Line a baking sheet/ tray with baking parchment and set aside for later
  2. Combine the flour, sugar, spices, salt and yeast into a large bowl. Make sure the salt and yeast are on opposite sides of the bowl
  3. In a pan combine the milk, vanilla extract and butter. Heat over a medium/low heat until the butter has melted. Allow the mixture to cool until tepid
  4. Add 1/3 the tepid milk mixture to the dry ingredients, along with the beaten egg. and use your hands to bring the mixture together. Add in the second 1/3 of the milk mixture and continue forming a dough, taking any stray flour from the sides of the bowl
  5. Finally, slowly add the remaining milk until you form a soft pliable dough. Take note here as you may not need all of the milk
  6. Tip the dough out on to a lightly oiled work surface. Knead by hand for about 7-8 minutes. After this time add the fruit and chocolate chunks into the dough and continue to lightly knead for 3-4 minutes until you have a smooth, elastic dough and the fruit & chocolate has been incorporated (*If you are using a stand mixer please see the note below)
  7. Lightly oil a bowl and place the dough in it, covering with oiled cling film and leave to rest in a warm place until doubled in size (apx 1 hour)
  8. Tip the dough on to a lightly oiled surface and divide into 12 balls. (I usually do this by rolling it into a thick sausage shape, apx 40cms long. Divide into 2, then divide each half into 6 equal pieces and roll them into balls)
  9. Place the balls on the tray, placing them fairly close together and flattening them slightly
  10. Cover the baking tray with oiled cling film and leave for an hour until the balls have doubled in size
  11. Preheat the oven to 350F/170C degrees
  12. For the cross marking, combine the flour and water in a bowl. Mix together to make a paste and spoon into an icing bag
  13. When the buns have risen remove the tray from the bag, snip the end of the piping bag (making a hole about 3mm) and pipe a cross on each bun. Bake for 15-20 minutes until pale golden-brown, turning the baking trays round halfway through

*If you are using a stand mixer for the dough, attach the dough hook and follow steps as follows

  • Combine the flour, sugar, spices, salt and yeast into a large bowl. Make sure the salt and yeast are on opposite sides of the mixer bowl
  • Follow Steps 4 & 5 above to combine the liquid
  • Continue to knead in the mixer for 5 minutes
  • After 5 minutes remove the dough from the mixer, add  the dried fruit & chocolate chunks and continue to lightly knead until you have a smooth, elastic dough and the fruit & chocolate has been incorporated (apx 3-4 minutes)
  • Proceed to Step 7 above and follow remainder of method as above

To finish

  1. Warm the golden syrup in a pan and while the buns are still warm, brush the buns with a little syrup to glaze. Return to the wire rack and allow to cool.
  2. Serve with fresh butter. They can be lightly warmed in an oven for tasty seasonal breakfast treat. Enjoy!

IMG_3422


#Recipe: Chocolate, Guinness & Black Garlic Bundt cake with Smoked Chocolate glaze

So I’ve (eventually) gotten around to posting this recipe- massive apologies for the delay. This cake first started out as an experiment using black garlic and was finished with a salted caramel sauce and served with forest fruits. I wanted to create something that looked and tasted indulgent but had a slight edginess to it- nothing too frou-frou! For me it was a Gothic romance in cake form. Time moved on and so did the recipe development. I replaced the salted caramel with a chocolate glaze but wanted to still keep my (signature) twist. And so liquid smoke was added. Depending on how much you use, this wonderful ingredient adds a tasty smoky flavour and in this case married really well with the black garlic of the bundt. It’s availble online or from good food ingredient stores.

iness; Chocolate and Black Garlic Bundt

The original version of the Chocolate, Guinness & Black Garlic bundt cake

Bundt cake mixture

375g plain flour

1/2 teaspoon baking powder

1/2 teaspoon salt

70g unsweetened cocoa powder

225g butter, softened

110g unsalted butter, chopped and softened

600g caster sugar

1 teaspoon vanilla extract

5 eggs

125ml milk

125ml Guinness stout (from a bottle as opposed to a can)

6 cloves black garlic, chopped

100g dark chocolate chips or pieces

Chocolate glaze

12 Tablespoons icing sugar

4 teaspoons whole milk

1 tablespoon liquid smoke

*this mixtures makes enough for a very ample bundt cake (using a 25cm tin) or 2 standard sized ones (I used Nordicwares Fleur De Lis and Anniversary tins)

2015-11-18 16.52.49

To make the bundt cake

  • Preheat the oven to 170 C. Grease and flour  your Bundt cake tin(s)- or if your like me spray the inside with cake release spray.
  • Sift flour, baking powder, salt and cocoa together into a bowl and place to one side.
  • In a jug combine the milk and the Guinness. Set
  • In the bowl of your stand mixer, cream butter, margarine, sugar and vanilla until light and fluffy. (A tip here is to keep beating until you can no longer feel the sugar grains between you fingers).
  • Add eggs one at a time, beating well after each. Add flour mixture alternately with the milk/Guinness mixture. Mix to combine.
  • Add in the chopped black garlic cloves and chocolate chips. Mix well.
  • Pour into your prepared Bundt tin(s). Bake in the preheated oven for 70 minutes or until a skewer inserted into cake comes out clean. Let cool for 10 minutes in the tin, then turn out onto a wire rack and cool completely before glazing.

To make the glaze

  • Combine all the ingredients in a jug and mix well to combine until smooth. The mixture should fall easily from  your whisk and leave a slowly sinking trail in the bowl. If you find the mixture too stiff add some more milk in 1/2 teaspoon increments.

To finish

  • Place the cake on a cooling rack with some foil or baking parchment underneath to catch the drips.
  • Drizzle or paint the glaze onto the fully cooled cake until coated.
  • Spinkle with finishing decoration of you choice.
  • Slice, serve and enjoy!2015-11-18 16.55.00-1


Recipe Alert…I am The Muffin Man

Whilst you may think that there is always cake available in my house (and to be quite honest you wouldn’t be wrong) there is also always a hearty supply  of fruit- perhaps to ease my conscience for numerous bakes? An influx of bananas of late has lead to a near constant presence of the over-ripening fruit. So much so that my husband commented the other evening, “Why is this place turning into the house of black bananas?!?!” Fair enough- he has a point. I however think it’s not necessarily a bad thing to have some fragrant, burnished fruit lying about. They make for much more interesting and tasty bakes once the process of almost “self-caramelisation” is under way. An earlier post of mine gave the recipe for Banana Bread– a firm memory of mine from the kitchen of my childhood. Having only just finished off out latest batch of this I needed something different to make use of the over-ripe bananas now taking up residence on my butchers trolley. So what better way than muffins- that versatile, anytime treat (but not a treat) bake.

Going slightly off track, I recently made some cookies, Maple Butter Cookies with prosciutto dust, using Moose Maple Butter. I am in fact chomping on some as I type- their gloriously maple sweet crumbs littering the keyboard here- oh dear! However- I digress. As a result of this still have some of the said maple butter left and wanted to try other bakes to use it in. So my muffins to be were to provide the perfect excuse for this as well. Kill two birds with one stone – or bake two pans in one oven (to sound a little less brutal about it all).

2015-03-25 13.51.23

Banana Bran Muffins (feat. Moose Maple Butter)

Makes 9

Ingredients

250g self-raising flour

1 tsp baking powder

1/2 tsp bicarbonate of soda

1/4 tsp pinch of salt

1/2 tsp mixed spice

115g caster sugar

100g oatbran

75g melted Moose Maple butter (if can also use regular unsalted butter)

125ml milk

1 tsp vanilla extract

3 medium, over-ripe bananas

2 medium eggs


Method

  • Heat the oven to 190C electric/ 170C fan.
  • Melt the (maple) butter and allow to cool.
  • Mash the bananas well.
  • Sift the flour, baking powder, bicarbonate of soda, salt, and mixed spice together in a large bowl, add caster sugar and oatbran, stir through to combine.
  • In a separate bowl, beat together the eggs, vanilla extract, melted (maple) butter and milk. Add the mashed banana and mix well.
  • Make a well in the centre of the dry ingredients and add the egg mixture, stirring roughly with a fork. Be careful NOT to overmix at this point. You just want it mixed enough so that no pockets of dry ingredients remain. It should look lumpy and pastey – like how a cake batter ISN’T supposed to look!
  • Line a 12 (or 2 x6 ) muffin tray with 9 muffin cases. Fill the cases to the top .
  • Bake for between 2o- 25 minutes, until muffins are springy to touch. Rest the muffin tray on a wire rack for five minutes then remove the muffins and leave to cool.

Hope you enjoy!

2015-03-25 13.54.06

In the meantime,

“Remember Mom’s the word- that’s Mr. Mom’s!”


There’s a Moose…loose…aboot this hoose

c824b7dfce4e971624deafee594536ee


I recently managed to get my hands on what I predict will be a hit of 2015- Moose Maple Butter. It’s a delicious blend of “organic butter, Grade A maple syrup and a dash of sea-salt”- all the brain child of the wonderful Farrah. As a fan of maple syrup I cannot recommend this highly enough. Not quite the sticky OTT maple hit that you get from syrup, the butter and sea-salt counter what could be a sweetness overload to give a rich, velvety and utterly moreish spread.

absolutely

I tried it first at the weekend, smeared over some hot crumpets. I was in heaven! Anything so simple that tastes that divine is a must have in my book. Sadly I was too overcome with awe (okay, okay I was too busy smearing and stuffing my face) to remember to take a photograph of the crumpets, transformed into shining amulets whafting of sweet maple-y goodness. But fear not! I have not completely abandoned my baking vocation in favourite of crumpets. In addition to its ease of use straight from the jar, Moose Maple Butter also would appear to be a wonderful addition to any bakers list of ingredients.

File 23-03-2015 19 30 11

Rather than go my usual route of cupcakes and soft bakes, I decided to try Moose Maple Butter out in cookies…but with a twist. Are you intrigued? If so carry on…

Maple Butter Cookies with prosciutto dust.

Maple Butter Cookies with prosciutto dust.

Maple Butter Cookies with prosciutto dust

These are my take on the all American breakfast favourite of pancakes, bacon and maple syrup. Crisp, mellow with a wonderful smoky saltiness from the prosciutto dust these are a great treat to snuggle down in front of the TV with. If made to a smaller size they also make a wonderfully different party bite.

Ingredients

185g Self-raising flour

185g Plain flour

1/4 teaspoon salt

1 egg

125g Moose Maple Butter, softened to room temp

125g light brown sugar

3 slices prosciutto ham


Method

  • Preheat oven to 180 C (electric)/ 140 C (fan). Line a baking tray with baking parchment.
  • Cream together maple butter and sugar until light and fluffy. You need to do this for at least between 10- 12mins. The easiest way to check is to feel a little mixture between you thumb and forefinger. If it still feels a little grainy you need to mix some more. If it feels smooth- you’re good to go.
  • Add the egg, sift in the flours and salt and mix together until mixture comes together. At this point you may chill it in the fridge for about 20 mins if you prefer an easier to work with dough.
  • Turn onto lightly floured surface.
  • Roll mixture out to into walnut sized balls. Transfer to prepared tray.
  • Using a fork dipped in water, quickly press into the surface of the ball to flatten slightly and make grooves.
  • Bake in preheated oven until golden brown, about 10-12 minutes.
  • Remove from the oven and transfer, using a fish slice or wide spatula, to a cooling rack.
  • Whilst the cookies are cooling, dry fry the prosciutto slices in a pan until they darken and become crisp.
  • Remove, leave to cool and further crisp up. When fully cooled, the ham will become quite crisp and hard.
  • Break the crisp ham slices into a mortar and grind with a pestle to a fine powder.
  • Sprinkle the prosciutto powder over the cooled cookies, allowing it to catch into the surface grooves.
  • Enjoy!

File 23-03-2015 19 07 15


If you’d like to know more about Farrah, Moose Maple Butter please do head over to the website at www.moosemaple.co.uk I’m sure there’s big things in store for the Moose!

In the meantime,

“Remember Mom’s the word- that’s Mr. Mom’s!”