Sweet dreams are made of these…

Hello again! Now you may think that in my absence I have been swanning around rubbing shoulders with all sorts of celebrities- I wish! In actual fact I have been locked away in my hot and steamy kitchen baking up a storm on some rather new and exciting (well I think so!) flavours. The wonderful folk over at Hope and Greenwood have been terribly generous in sending me some wonderful gifts of their sweet goodies and I thought it only right try out some of them out in baking.

We all know cupcakes are my love so it’s only fitting that I should start there. Not one but two of varieties of cupcake would be inspired by Hope and Greenwood and feature one of their delightful sugary treats.

First out of the starting blocks is my “Salty Dog” cupcake: vanilla sponge studded with chocolate chips and fudge pieces, hiding a salted caramel centre, topped with vanilla buttercream frosting and finished with a H&G Salt Caramel Fudge piece and caramel drizzle. The oozing caramel centre mixing with the salty/ sweet tang of the fudge piece is a marriage made in confection heaven.

2015-03-05 17.43.59

Salty Dog cupcakes feat. Hope and Greenwood Salt Caramel Fudge


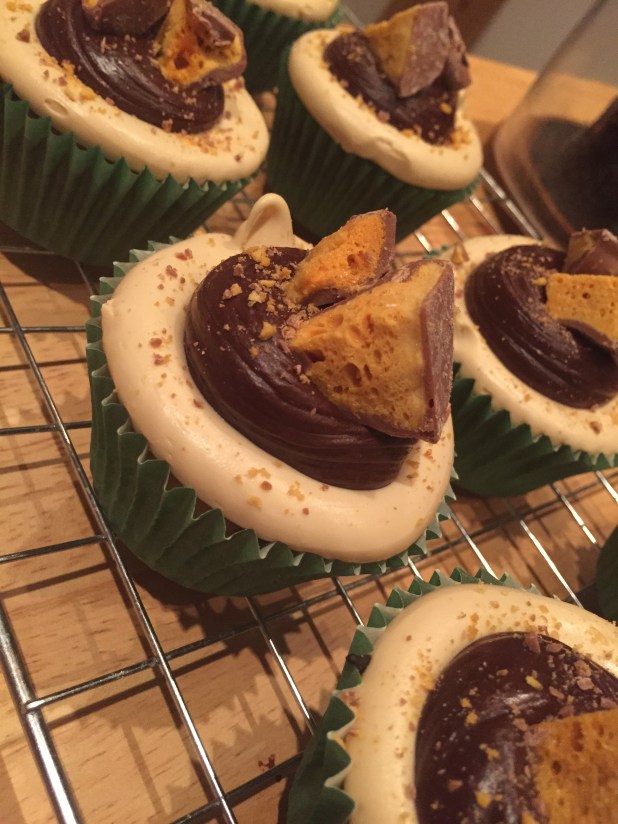
My next cupcake again features the sublime flavour of salted caramel- well, you can never have too much of a good thing can you? The “Caramel Crunch” a decidedly moreish cupcake of vanilla and honeycomb sponge with a duo of chocolate and caramel buttercream frosting, all topped with a golden nugget of Miss Kitty and Mr. G’s best Salt Caramel Honeycomb.

"Caramel Crunch" cupcakes feat. Hope & Greenwood Salt Caramel Honeycomb.

“Caramel Crunch” cupcakes feat.
Hope & Greenwood Salt Caramel Honeycomb.my

Not wanting to be completely biased towards cupcakes I also added brownies into the mix. The inspiration for my “Raspberry Ruffle” brownies came from the sweet of the same name- an indulgent mix of chocolate, coconut and raspberry. A fruity Bounty bar for all intents. So I combined a rich chocolate and coconut brownie with a luscious raspberry cheesecake swirl topping and studded it with Raspberry Jam Coconut Ice from H&G’s kitchen. Never has a brownie tasted so naughty!

"Raspberry Ruffle" brownie feat. Hope & Greenwood's Raspberry Jam Coconut Ice

“Raspberry Ruffle” brownie feat.
Hope & Greenwood’s Raspberry Jam Coconut Ice

For the piece de résistance I chose to work with a new product recently launched from the confectioners extraordinaire. Hope and Greenwood’s new Almond Brittle with Himalayan Sea salt definitely raises the confectionery bar to a new high. Sweet almonds encased in sugary amber have a delectable crunch and a sprinkling of hand-harvested pink Himalayan rock salt and chilli give an unexpected Wonka-esque tongue tingling sensation. A sweet like this definitely deserved some A-grade treatment. With this in mind I set about and created my Caramelised White Chocolate and Tonka Bean tart, with Almond Brittle fringe. What’s more (and as promised!) I’ve included the recipe. It’s a fabulous dessert whose sophisticated and rich taste belies it’s simplicity. This is sure to become a favourite in my house!

2015-03-14 18.54.02

Caramelised White Chocolate & Tonka Bean tart, with Hope & Greenwood Almond Brittle Fringe

Caramelised White Chocolate & Tonka Bean Tart, with Almond Brittle Fringe

For the base:

200g Ratifia biscuits

100g unsalted butter, cubed

For the filling:

200g White chocolate (min. 30% cocoa butter)

25g unsalted butter

300ml double cream

2 Tonka beans, finely grated

For the decoration:

300ml double cream, whipped

75g Hope & Greenwood Almond Brittle with Himalayan Sea-salt


  • Preheat oven to 120C/100C fan.
  • Blitz the biscuits in a food processor until beginning to turn to crumbs, then add the butter and whiz again to make the mixture clump.
  • Press this mixture into a 23cm / 9 inch loose-bottomed tart tin; press a little up the sides to form a slight ridge.
  • Place in the fridge to set for at least 2 hours.
  • Break up the chocolate into pieces and put it on baking tray.
  • Place the baking tray in the preheated oven and bake, giving it a good stir every 10 mins, until it’s a light golden brown. Take the chocolate out when it is the color of peanut butter. If chocolate should start to look chalky or grainy, give it a good, brisk stir and it should return to normal.  Scrape the chocolate into a bowl and set aside.
  • In a saucepan add the grated tonka beam to the double cream and heat until just under boiling.
  • Remove from the heat and add in the caramelised white chocolate and stir until it is fully melted and incorporated.
  • Leave to cool for about 10 mins by which time it should start to thicken.
  • After the cooling time pour the caramelised white chocolate cream into the crumb base.
  • Place in a fridge to set for at least 3 hours, or overnight.
  • When set, remove the tart from the fridge and pipe a “fringe” of whipped cream around the edge.
  • Break the almond brittle into bite-sized pieces and stud the whipped cream fringe all around.
  • Serve and enjoy!

2015-03-14 18.54.34

I do hope you’ve enjoyed this little trip to the “Sweet Shop” and feel intrigued enough to try out not only my recipe but also some of the goodies from Hope & Greenwood.

In the meantime,

“Remember Mom’s the word- that’s Mr. Mom’s!”

Living in the Black

If you follow my social media feeds (Twitter; Facebook and Instagram) you’ve probably noticed I’ve been posting a lot of recipes lately featuring the little known ingredient that is Black Garlic. Whilst it might conjure up not so pleasing images (and not to mention smells!) believe me it’s completely unfounded.
Courtesy of the team at Balsajo Original Black Garlic I’ve been experimenting on both the sweet and savoury fronts with some very tasty results indeed.

bbglogo

If you haven’t heard of Black Garlic yet please, please don’ tbe put off by the name. Yes- it is garlic “…but not as we know it Jim“. Forget the hard, pungent, opalescent nuggets that give us one of the cornerstones of cooking. Black Garlic is instead a case of Kitchen Alchemy made true. By process of heat and humidity (and probably some trade secret) familar white garlic bulbs are transformed into dark, fragrant, nuggets of molasses-like jelly. Again I say stick with me here! Whilst some people might be quick lable it shrivelled and black (well I guess it is black- there’s no fighting nature there!) what you can do with this is practically limitless. I’ve tried using it as an ingredient in sweet and savory dishes (and some in between). Thus far it’s prooved to be a very versatile ingredient indeed. Soft and jelly-like in texture with a flavour which brings to mind treacle, molasses, truffle, and balsamic I definitely recommend getting some of this into your kitchen. Its available in some selected supermarkets and artisan food stores. The guys over at Balsajo Black Garlic have included a handy stockist locator on their website. 

I’ve been wanting to experiment with Black Garlic for a while in order to test the full breadth of it’s uses and here’s what I came up with:

Fennel Seed & Black Garlic Toffee

Originally this came about as some Twitter banter between myself and the wonderful Miss Kitty Hope (yes indeed, she of Hope and Greenwood – purveyors of all things fantastical and sweet!)- but more about that later. We nattered about bacon in sweets/ bakes and somehow ended up challenging each other to creating something with a none-too-common ingredient and so black garlic was suggested. The resulting Black Garlic & Fennel Seed Toffee is a sweet, creamy toffee with a subtle hint of anise from the Fennel Seed and the treacley flavour of the black garlic adding to the creaminess. Surprisingly moreish- even if I do say so myself!

2015-01-09 13.07.32

Blueberry, Balck Garlic & Corriander Traybake

I needed to try the dark beauty of black garlic in a bake. Well- I wouldn’t be Mr. Mom’s without baking something now would I? Blueberry and corriander is a little known combo that works really well. The citrus notes of corriander seed boosting the flavour of the fruity blueberries. Topping the traybake with a limoncello buttercream frosting added an indulgent alcoholic kick (okay I’ll admit it I thought they were sounding just a little too healthy!). The addition of some chopped black garlic baked into the sponge mellows what otherwise might have been citrus overload and layers in nicley with the graduation from mellow to citrus kick.

2015-01-20 14.07.30-1

The adapted recipe in cupcake form was featured in my stint on the Mel & Sue show and you can find the recipe here.

Mel & Sue Cupcakes

Black Garlic & Chilli Oatcakes

So enough with the sweet things I thought. How about a savoury bake? My husband and I are chalk and cheese; oil and water; Yin and Yang when it comes to tastes. Whilst I am a complete an utter sweet-tooth advocate, he’s marches firmly to be beat of the Umami drum. I’ll have pudding and he’ll have cheese. Ah hah! And so I had my next experimental idea for black garlic. The treacley earthiness of the black garlic combines well with the mellow oatiness of these biscuits, before a subtle kick of heat comes in from the chilli. I tried them with a fabulous Epoisses  cheese, while my other half couldn’t get enough of them with a mature cheddar. They’ve definitely been added to my “Must Bake Again” list!

BG Oatcakes

Black Garlic & Matcha Green Tea Cupcakes

As I mentioned earlier on, this trip through the looking glass into the Land of Black Garlic happened because of some rather impromptu Twitter banter between myself and my new BFF Miss Kitty Hope. We challenged each other (I rather foolhardily) to create a bake, or sweet….or something (?) with  an unusual ingredient. I threw black garlic into the ring and Miss Hope picked up the gauntlet. The “competition” was facilitated by the team at Taste PR and kindly judged by the incredible Lily Jones (of Lily Vanilli). My black garlic & Matcha green tea cupcakes draw inspiration from the Asian background of black garlic and combine a number of Oriental flavours. The complete offering was a Matcha green tea & black garlic sponge, with Plum Wine spiked frosting, topped with a Matcha green tea, black garlic & black sesame seed marshmallow, and a candied black garlic clove “dart”. Rather incredibly (and very much to my surprise!) Lily decided on my cupcakes as a winner. I do however have to give kudos to Miss Kitty for providing some rather excellent and challenging competition (not to mention some hilarious Twitter “reading”!)

BG Cupcakes


So enough preaching the wonders of black garlic. As they say, “The proof is in the pudding”…or rather in this case- the toffee. I in no way intend to compete with the skilful mastery of confection that Hope & Greenwood have but I will freely admit to Miss Kitty Hope being the inspiration behind my Black Garlic & Fennel Seed Toffee. After all without her initial challenge in my Twit-stream I’d never have ventured into the realm of boiled sugar at all. So if you’re feeling up for it and fancy a little black garlic experimentation why not try you’re hand at making…

Black Garlic & Fennel Seed Toffee (aka Miss Kitty’s Challenge)

Ingredients:

500g caster sugar

125g salted butter

1 tbsp treacle

3 tbsp golden syrup

1 tsp vanilla extract

397g tin condensed milk 90ml water

1 tbsp fennel seeds

5 cloves black garlic, chopped


You’ll need:

A deep sided pan

A sugar thermometer

A silicone tray, or a baking parchment lined & greased tray


Method:

– In a deep pan, place the butter, sugar, treacle, golden syrup and water into a pan and heat, stirring constantly.

– Once all the ingredients are well mixed and melted, add the condensed milk slowly, stirring occasionally until it boils.

– Continue at a steady boil until the mixture reaches the “Hard crack” stage on a sugar thermometer, again stirring occasionally. Test that the toffee is ready by dropping a spoonful into cold water – if it turns solid, it is ready.

– Remove from the heat and carefully stir in the fennel seeds and black garlic. (Note: The black garlic may clump together as it’s quite sticky. Separate into smaller pieces as you as you add to the toffee mixture.)

– Pour into the prepared tray.  Allow to cool for about 6-7 minutes then score into regular sized pieces with a sharp knife.

– Once fully cooled break along the score lines into pieces.

– The toffee can be wrapped in baking parchment or greaseproof paper and stored in an air-tight container.


If you try my toffee recipe I do hope you enjoy and meantime,

“Remember Mom’s the word- that’s Mr. Mom’s!”