Pumpkin Spice Bark

Yields 30 pieces (depending on final size)

Ingredients

  • 14-16 Graham Cracker Sheets
  • ¾ cup brown sugar
  • ¾ cup butter
  • ¼ cup pumpkin puree
  • 2 teaspoon pumpkin spice
  • 6oz milk chocolate chips
  • 6oz semi-sweet chocolate chips
  • 1 cup pecans, toasted and chopped
  • Sprinkles, optional

Method

  1. Preheat oven to 350°F, and line a large baking sheet (with sides) with non-stick foil
  2. Place the graham crackers side by side on the baking sheet (you may need to break some of the graham crackers into smaller pieces to line the tray completely). Set aside
  3. In a bowl combine both the chocolate chips and stir to combine. Set aside
  4. In a medium sized saucepan, add in butter, pumpkin puree, brown sugar and pumpkin spice
  5. Bring the mixture to a boil, whisking constantly. Once it has reached a boil, reduce the heat to med-low, whisking the mixture for another 4 minutes
  6. Remove from the heat and pour the mixture over the graham crackers. With a rubber spatula, spread the mixture over the graham crackers in an even layer
  7. Bake the graham crackers for 5-6 minutes, or until the liquid is bubbling
  8. Remove from the oven, sprinkle over the chocolate ships and allow to sit on the counter for for 2-3 minutes until the chocolate chips appear “shiny”. Use a spatula to spread the melted chocolate chips over the toffee surface
  9. Top with chopped pecans and sprinkled, if using
  10. Allow the bark to cool fully before breaking or cutting into pieces
  11. Serve and enjoy

Smoked Pumpkin Cheesecake & Bourbon Brownies

Are we sitting comfortably? Yes? Good…because here’s another pumpkin recipe. In the spirit of the season, and let’s face it impending CV-19 induced re-lockdown, I’m going to be trying out the wide and various ways of using that seasonal wonder that is pumpkin. You lucky, lucky people! I’ll say right away that they’ll all be sweet bakes – well that’s the plan at the moment, so if you’re holding out for an orgasmic recipe for pumpkin risotto I’m afraid you’re out of luck.

If you follow my blog and recipes you’ll know that brownies are near and dear to my heart. Some people have comfort blankies ala Linus, I have brownies. So it was only right that I should try weave together in kitchen mysticism (it is Halloween season after all!) my love the fudgey (never cakey) traybakes and that bulbous orange cucurbit.

Using pumpkin in the cheesecake element of these brownies instantly renders them fudgey and decadent. I wanted to add another layer there, something to counter thought of sugar-laden PSL. So why not introduce a smokey element- camp-fires, late night and extra complex earthiness working to counter any lingering memories of saccharine heavy beverages.

And why not make them a little more grown up too? These are, after all, brownies for the aficionado. Let’s chuck in some bourbon while we’re at it! For me the flavors of the sweet whiskey go so well with chocolate that it’s too good an opportunity to miss. I’ve also used some chocolate extract here as I really wanted to elevate the chocolate intensity too – like I said these ain’t no five ‘n’ dime brownies. To really bring out the texture of these brownies I find they taste so much better when served straight form the fridge.

So yes- buckle up people…I’ve got 4 weeks of pumpkin recipes left and so far it’s brownies and nanaimo bars down. Any guesses what’s next?

Ingredients

Brownie Batter

  • 1/2 cup butter
  • 1/2 cup semi-sweet chocolate chips
  • 1 cup sugar
  • 2 eggs
  • 1 tsp chocolate extract, eg Nielsen Massey (optional)
  • 2 Tbsp Bourbon
  • 1/2 cup AP flour
  • 1/2 cup cocoa, Dutched
  • 1/4 tsp Kosher salt

Cheesecake Batter

  • 8oz pack full fat cream cheese
  • 1 egg
  • 1/3 cup sugar
  • 1/2 cup pumpkin puree
  • 1 tsp vanilla extract
  • 1 tsp ground cinnamon
  • 1/2 tsp ground nutmeg
  • 1/2 tsp ground ginger
  • 1/4 tsp ground cloves
  • 1/2 tsp liquid smoke

*All ingredients to be at room temperature unless otherwise stated

Method

  1. Preheat your oven to 350 F degrees. Spray a 9×9 inch baking pan with cooking oil then line it with parchment paper
  2. In a large bowl, add the cream cheese and beat it until smooth and creamy. Add the rest of the cheesecake batter ingredients mix until well combined and smooth. Set aside until needed later
  3. In a small bowl a bowl set over simmering water, combine the butter and chocolate chips to melt, stirring them together to combine. Once fully melted remove the bowl from the heat and set aside to cool
  4. In a large bowl if a stand mixer, combine the eggs and sugar and whisk at high speed until pale, fluffy and increased in volume
  5. While you eggs are whisking in a bowl combine the AP flour, cocoa and salt
  6. Into the melted chocolate/ butter mixture add the chocolate extract and bourbon. Stir well to combine. Add these wet ingredients into your whisked egg mixture. Gently fold in until fully combined and uniform in appearance
  7. Sift in the dry ingredients and again gently fold in until well combined and uniform in appearance
  8. Pour about 2/3 of the chocolate batter into the prepared pan and smooth it out. Spread the cheesecake batter over the brownie batter. Dollop the remaining brownie batter over cheesecake batter by spoonfuls. Swirl the batters together by running aknife or a skewer back and forth through the pan
  9. Place the baking pan in the oven and bake for 40 to 50 minutes, or until center is set. Using a cake tester or skewer test the centre of the brownie pan – it should come out with few crumbs or a little mixture still on it. The brownies will continue to cook once removed from the oven
  10. Remove from the oven and allow to cool completely on wire rack and chill before cutting and serving. I usually cut mine in to 4 x 3 giving me 12 brownies. They’re quite rich so I’ve found this to be the ideal size

Chester Bread (aka Gur Cake)

img_7744

If you’ve followed my recipe blog for some time you’ll have no doubt have noticed that my childhood has various landmarks in the form of baked goods- Soda bread; Cheesecake; Queen of Puddings. This is yet another one of those anchor points with which nostalgia comes crashing in waves.

Known by various names including Gur Cake; Chester Slice; Donkey’s Gudge, it was Chester Bread that I knew this by growing up in South-East Ireland. Many an early adolescent afternoon was spent munching on these en route to my childhood home from school- oblivious to not only the background the baked treat I clutched but also ignorant to dubious history of where I was buying them from. My only preoccupation was how could something so delicious be so cheap!

At the bottom of the hill to my school was a building known simply to us as “The Good Shepherds”. All I knew of it, at the time, was that it was a convent and former orphanage. The expression “If you don’t behave I’ll take ya to The Good Shepherds” was frustratingly hissed by many a Waterford parent to the offspring, uttered in ominous overtones akin to summoning The Boogey Man. A fuller investigation later in life revealed the title of the building to be The Good Shepherd Magdalene Asylum (Laundry) and Orphanage, Without going in to it in too much detail it was one of number of locations of a religious order whose ethos and modus operandi was of a particularly sordid and horrific nature.  A sordid blemish on the hem of Ireland’s pious petticoat. Google it if your’re intreest has been piqued- but consider yourself forewarned.

The main institute had ceased operation in 1982, however there were still some occupant nuns in residence and as a means of charitable support income they ran a small bakery onsite. It was here that myself and many another transient school-goer would purchase our after-school sugar rush. Chester breads; Vanilla Slices (a more rustic version of Mille-feuille with pastry, vanilla custard filling and water icing topping) and cream doughnuts (think Long John doughnuts filled with jam and cream) were all greedily snapped up to the point of selling out.

Whilst they all would bear mentioning, as nostalgia renders them supremely tasty, it’s Chester Bread that brings us here today. I’ve already mentioned that this bake is known throughout Ireland under various monikers such was its popularity. Originally used in the 19th century as a novel, but nonetheless innovative, method to use up stale offcuts and surplus bakes in bakeries, the cake was inexpensive to make using a basic recipe template of filler, binder and sweetener. The finished bakes were then sold cheaply (but not so cheap as to not yield a profit) to youngsters playing truant from school as something to fill the gap until dinner. In Ireland, particularly Dublin, such kids were called “gurriers” who would “mitch”, “mooch” or just generally bunk off school. Hence the ‘Gur Cake” name. I have yet to unearth the link as to why it’s called ‘Chester Bread” where I grew up when that name is apparently derived from it’s place of origin in Chester in the United Kingdom. As for the ‘Donkey’s Gudge” version? I don’t know what a donkey has to do with it, let alone what their gudge is! Feel free to comment should you be able to shed some light here.

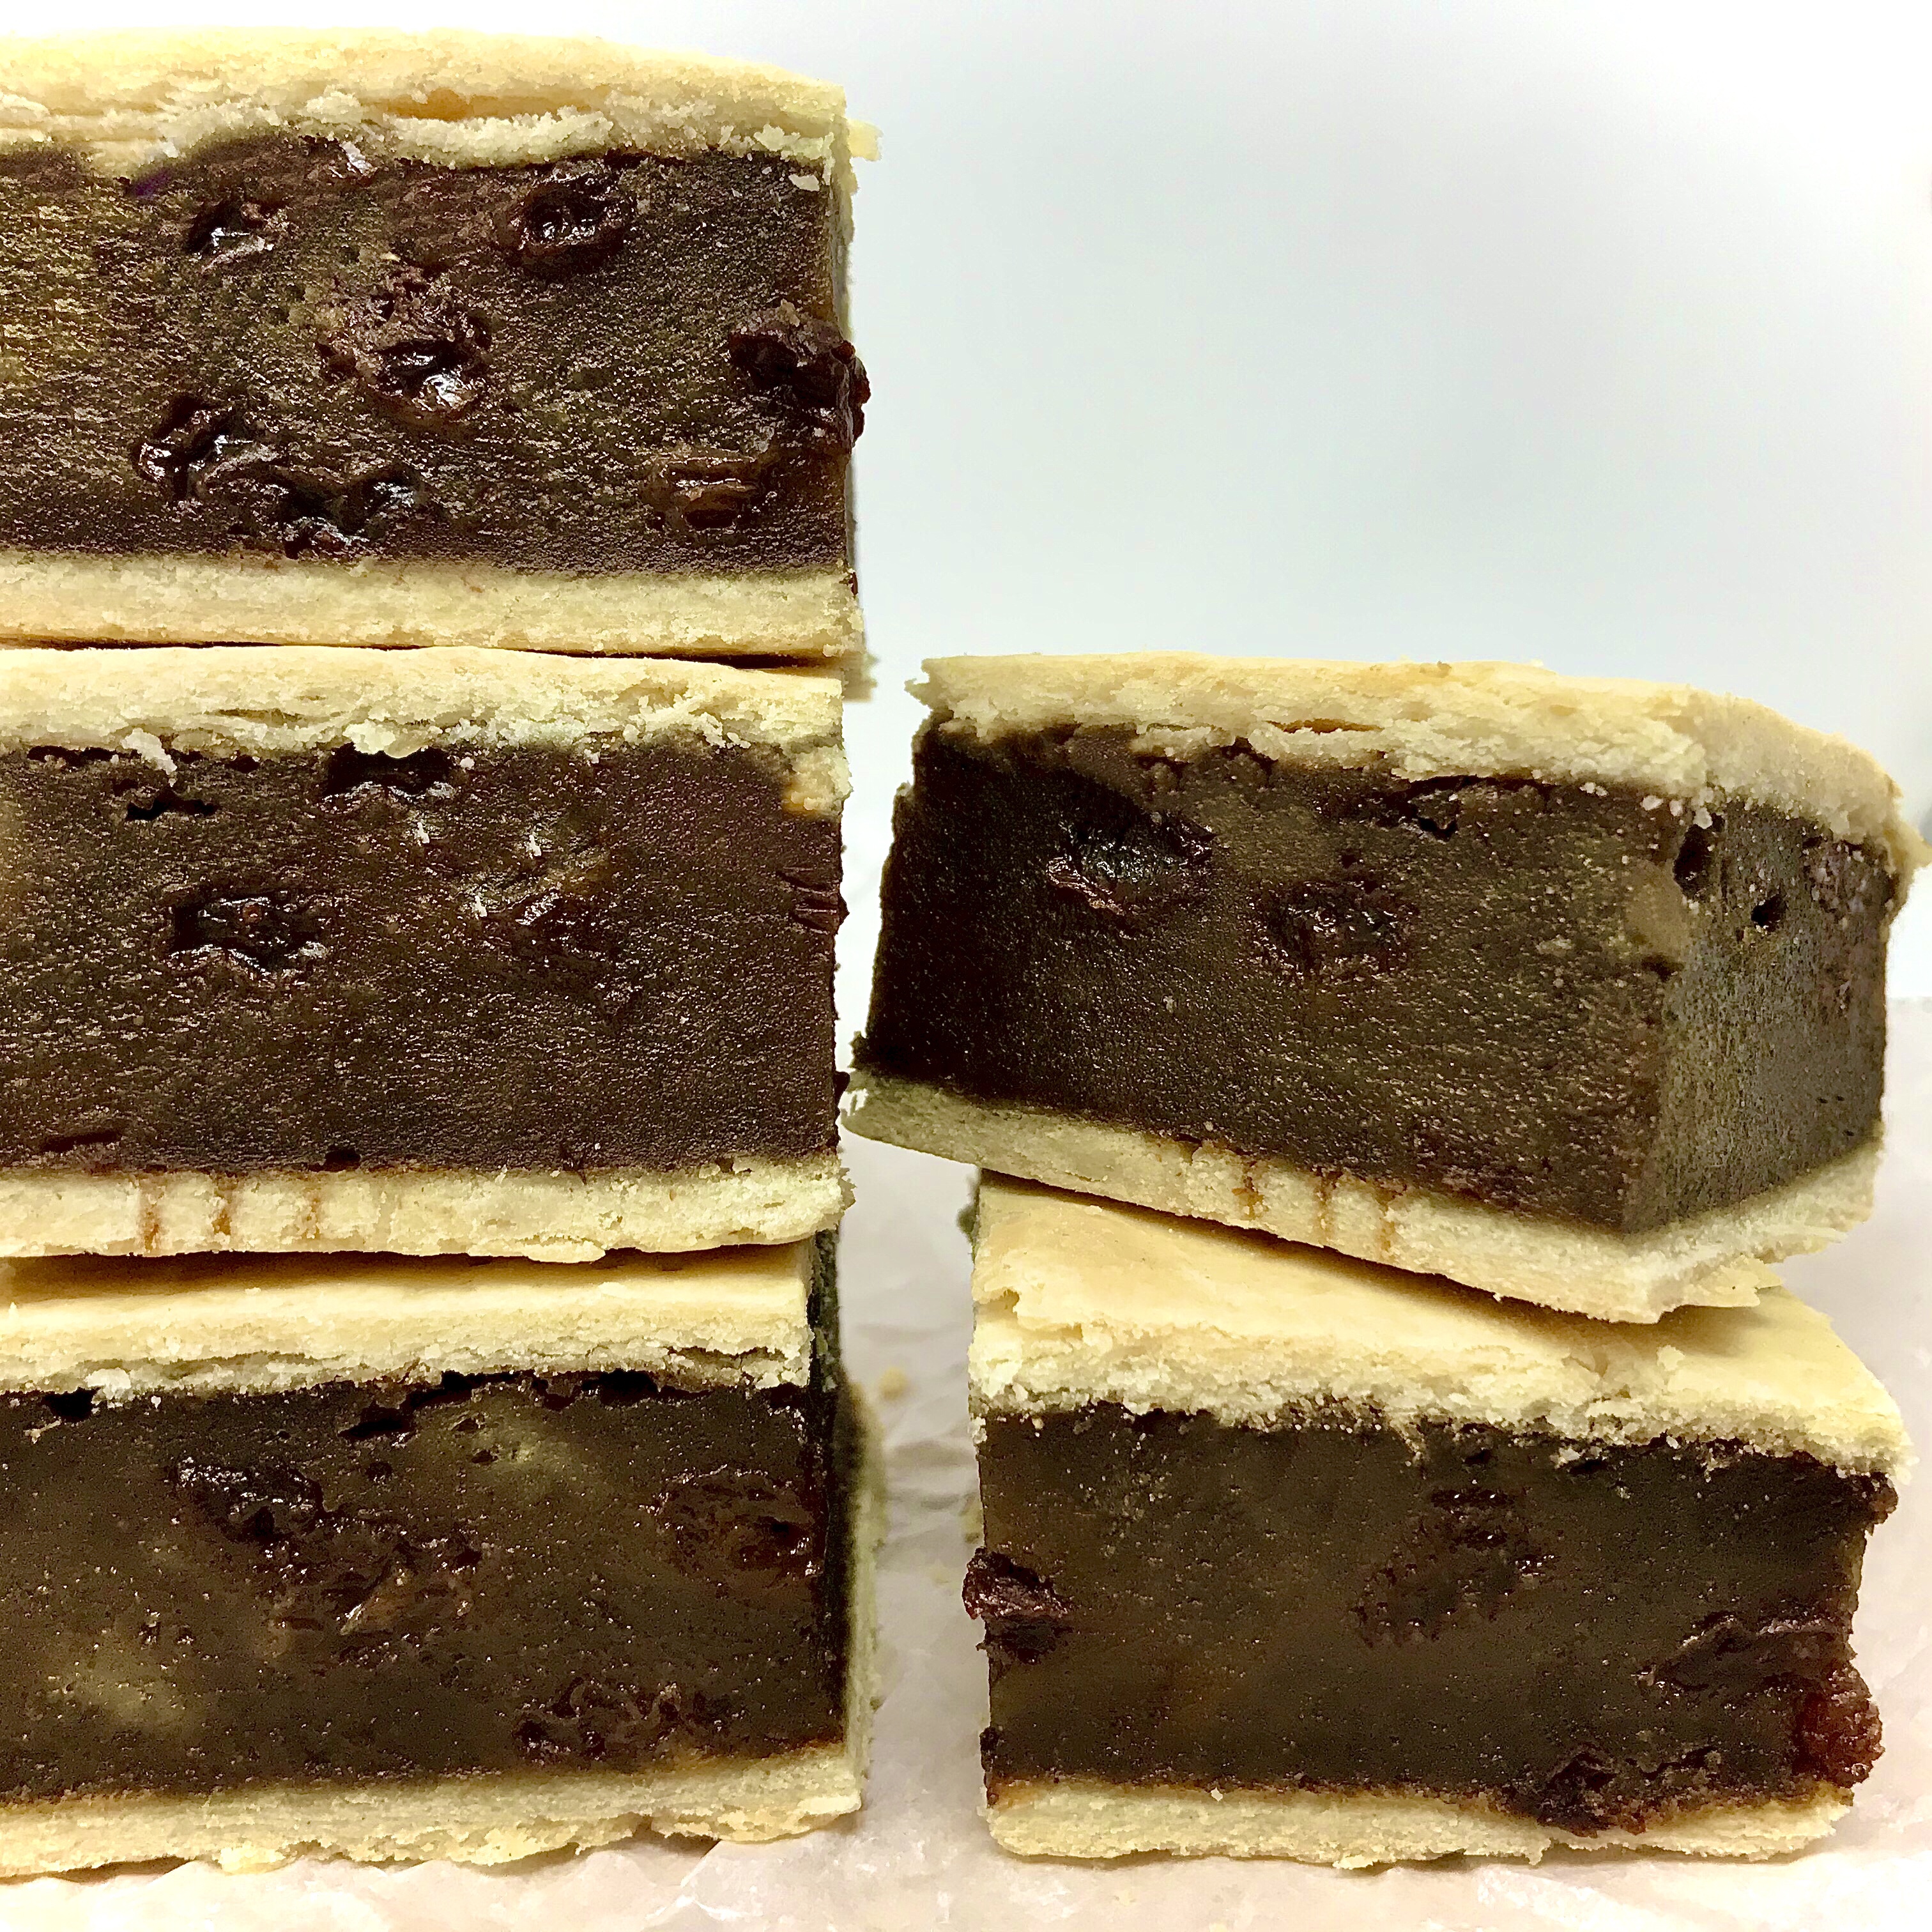
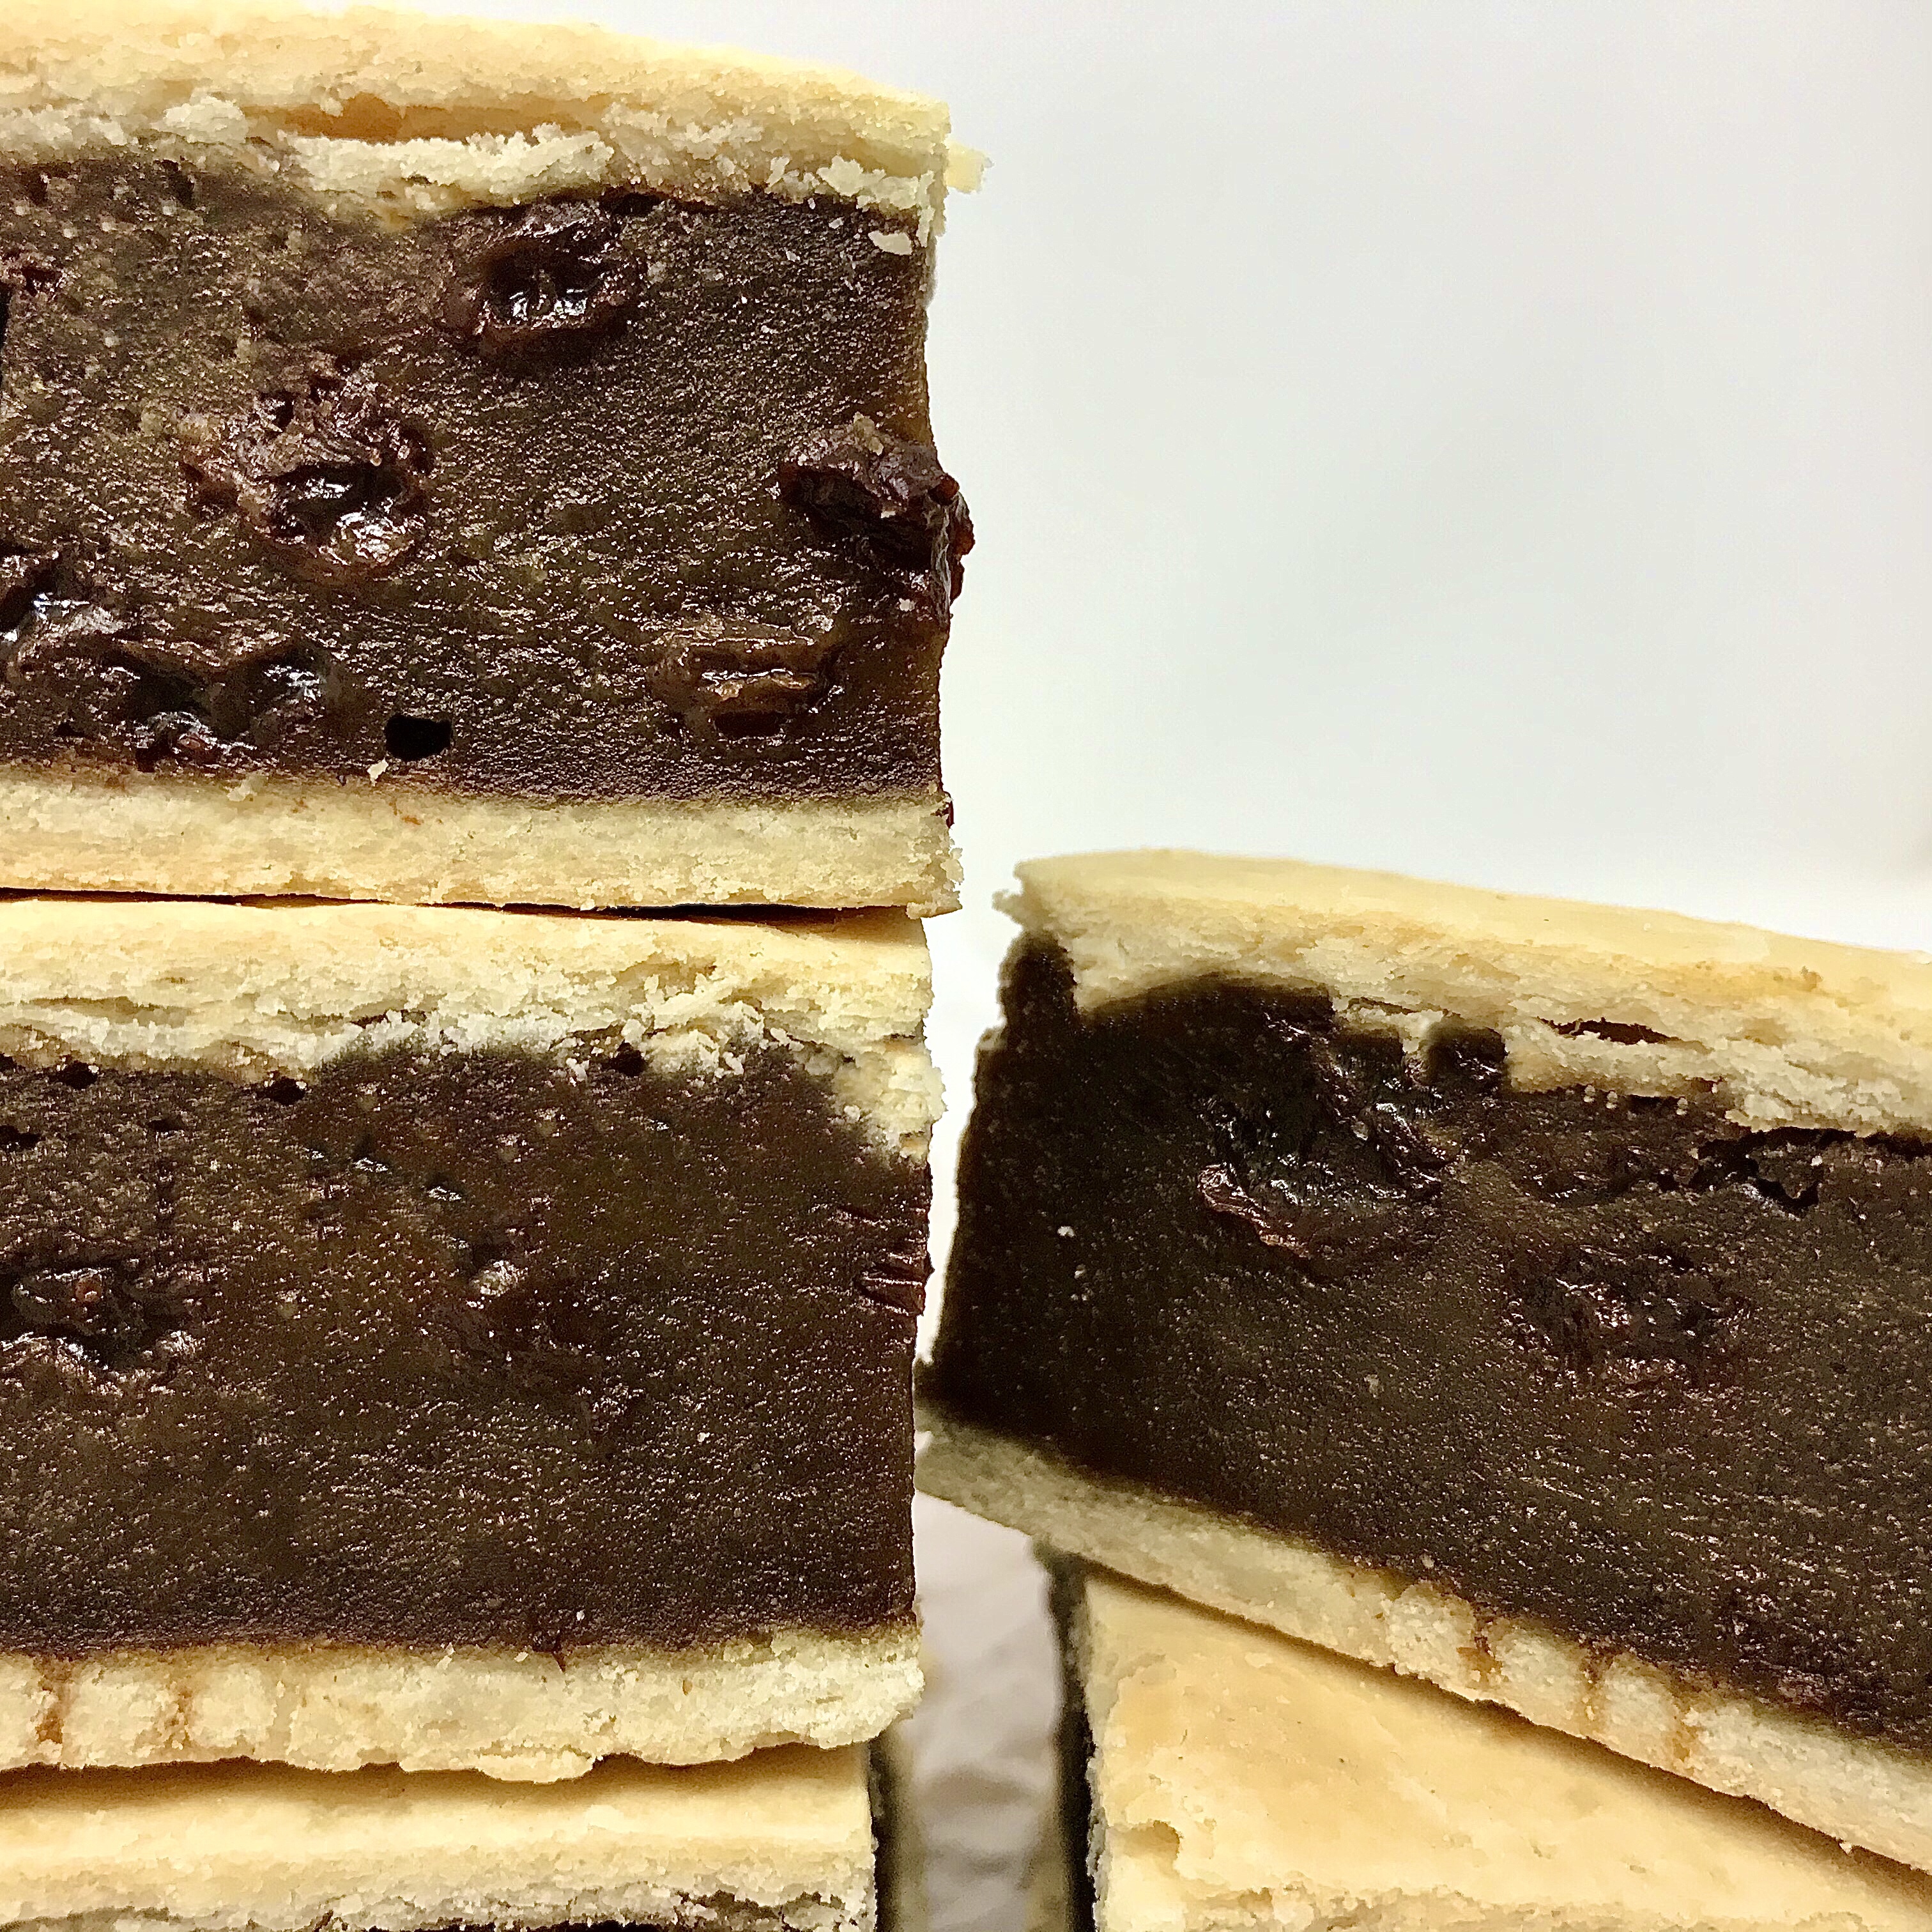
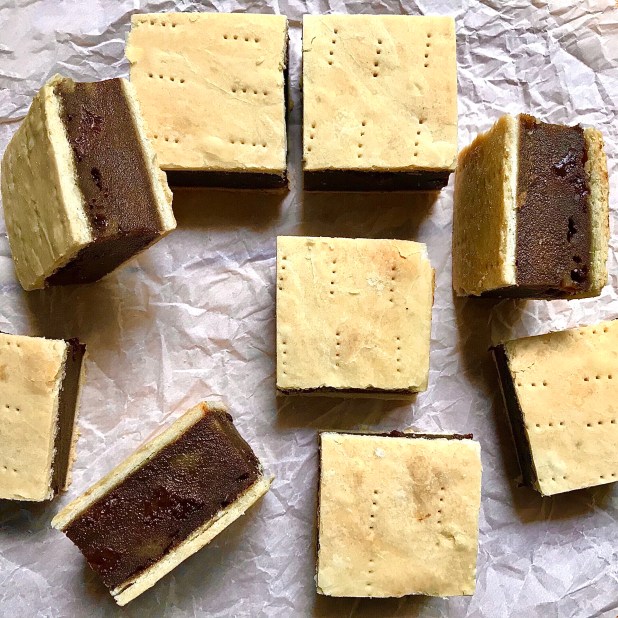
Whatever way you call it, I find that the finished bake is definitely memorable. What starts as simple stale bread is baked to a fudgy, slightly gelatinous, sweetly spiced filling. It’s almost like a dense ginger cake. I’m sure the pastry serves as nothing more than a utilitarian purpose to allow the filling to be handled with minimal mess. Try it out and see what you think. It’s an ideal accompaniment to a cup of tea- perhaps whilst researching The Magdalene Laundries?

Ingredients

Shortcrust pastry

  • 2 1/2 cups All purpose flour
  • 3/4 cup Butter, cold and diced
  • 1/4 tspn salt
  • 3 tbspn ice cold water
  • Flour, for dusting

Filling

  • 15 Slices of bread, at least 1 day old
  • 1 1/2 cups Cold strong tea (preferably Irish)
  • 1 cup, packed Brown sugar
  • 2 tbspns Mixed spice
  • 1 tspn Baking powder
  • 1/2 cup All purpose flour
  • 1/4 cup Salted butter, cut into pieces
  • 1 cup Raisins
  • 2 tbspn Treacle
  • Icing or fine sugar for dusting, optional

img_7752

Method

To make shortcrust pastry

  1. Combine the flour and salt into a bowl, coarsely rub in the butter/margarine. Continue to rub together until you have the texture of coarse meal. Some pea-sized granules of butter may remain
  2. Sprinkle over the water  and bring the ingredients together to make a soft dough. Additional water may be needed depending on your kitchen’s temperature/ humidity
  3. Lightly knead to bring it together in a ball. Flatten to a disc, wrap in cling wrap and refrigerate until needed

*Pastry is best chilled before rolling.

To make filling

  1. Preheat your oven to 375°F
  2. Grease and line a 9′ x 9′ tin (2″ high)
  3. Remove the crusts from the slices of bread and lie in a shallow casserole or baking dish.
  4. Pour over the cold tea and leave to soak for 1 hr
  5. After the hour, drain of any excess tea and using a fork mash the wet bread to thick pulp
  6. In a large bowl combine the flour, baking powder, sugar and mixed spice, stirring well to combine
  7. Rub in the cold diced butter until you have something that resembles coarse meal in texture (similar to making the pastry above)
  8. Add the bread mixture and treacle to the other flour/ sugar/ spice mixture and stir well to combine

To assemble

  1. Remove the pastry from the fridge and divide into 2
  2. Roll one 1/2 of the pastry large enough to fit your baking tin and use to line the bottom of it. Prick the pastry all over with a fork or knife
  3. Pour and spread the bread mixture over this pastry layer
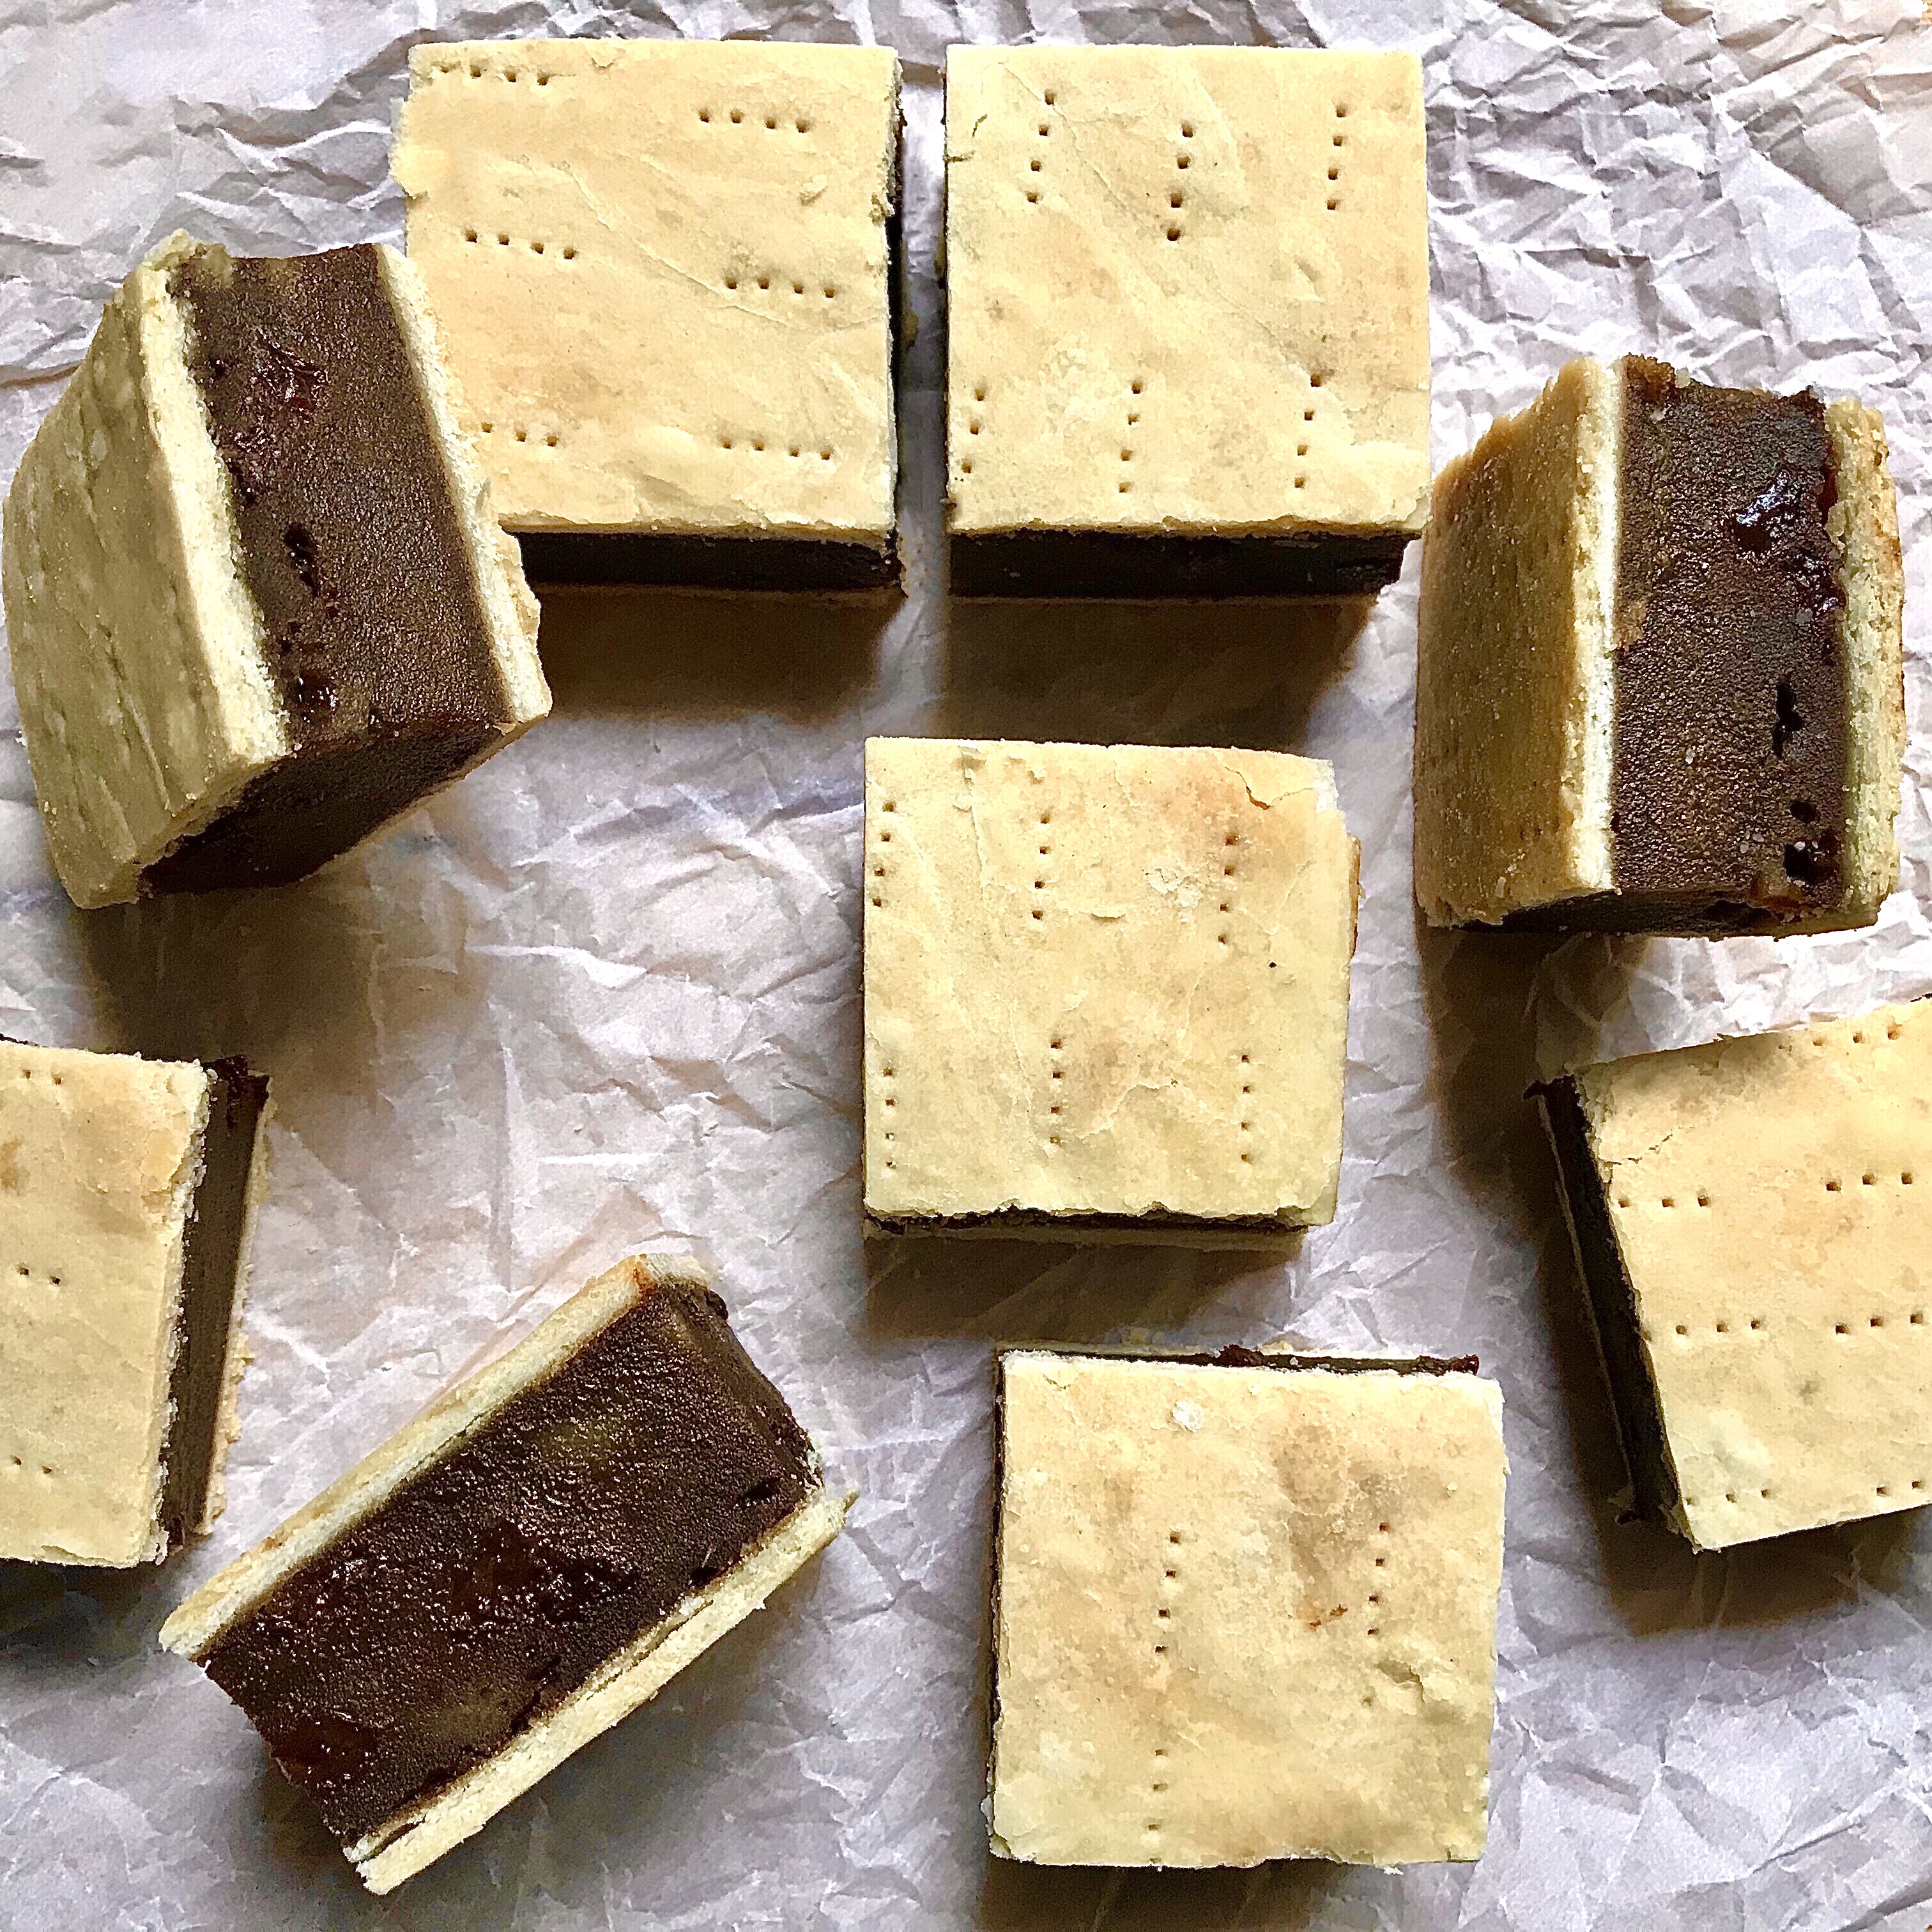
  4. Roll the remaining pastry to fit the top of the tin and place over the filling, pressing to form a lid. Again prick the second layer of pastry all over with a fork or knife (helpful hint: I roll to size and prick BEFORE placing the pastry lid on to the filling. This stops the pastry being pushed down into the soft filling mixture)
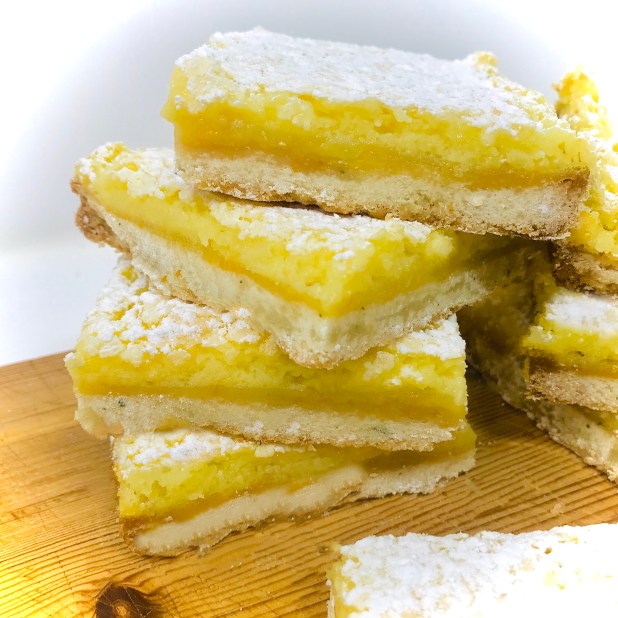
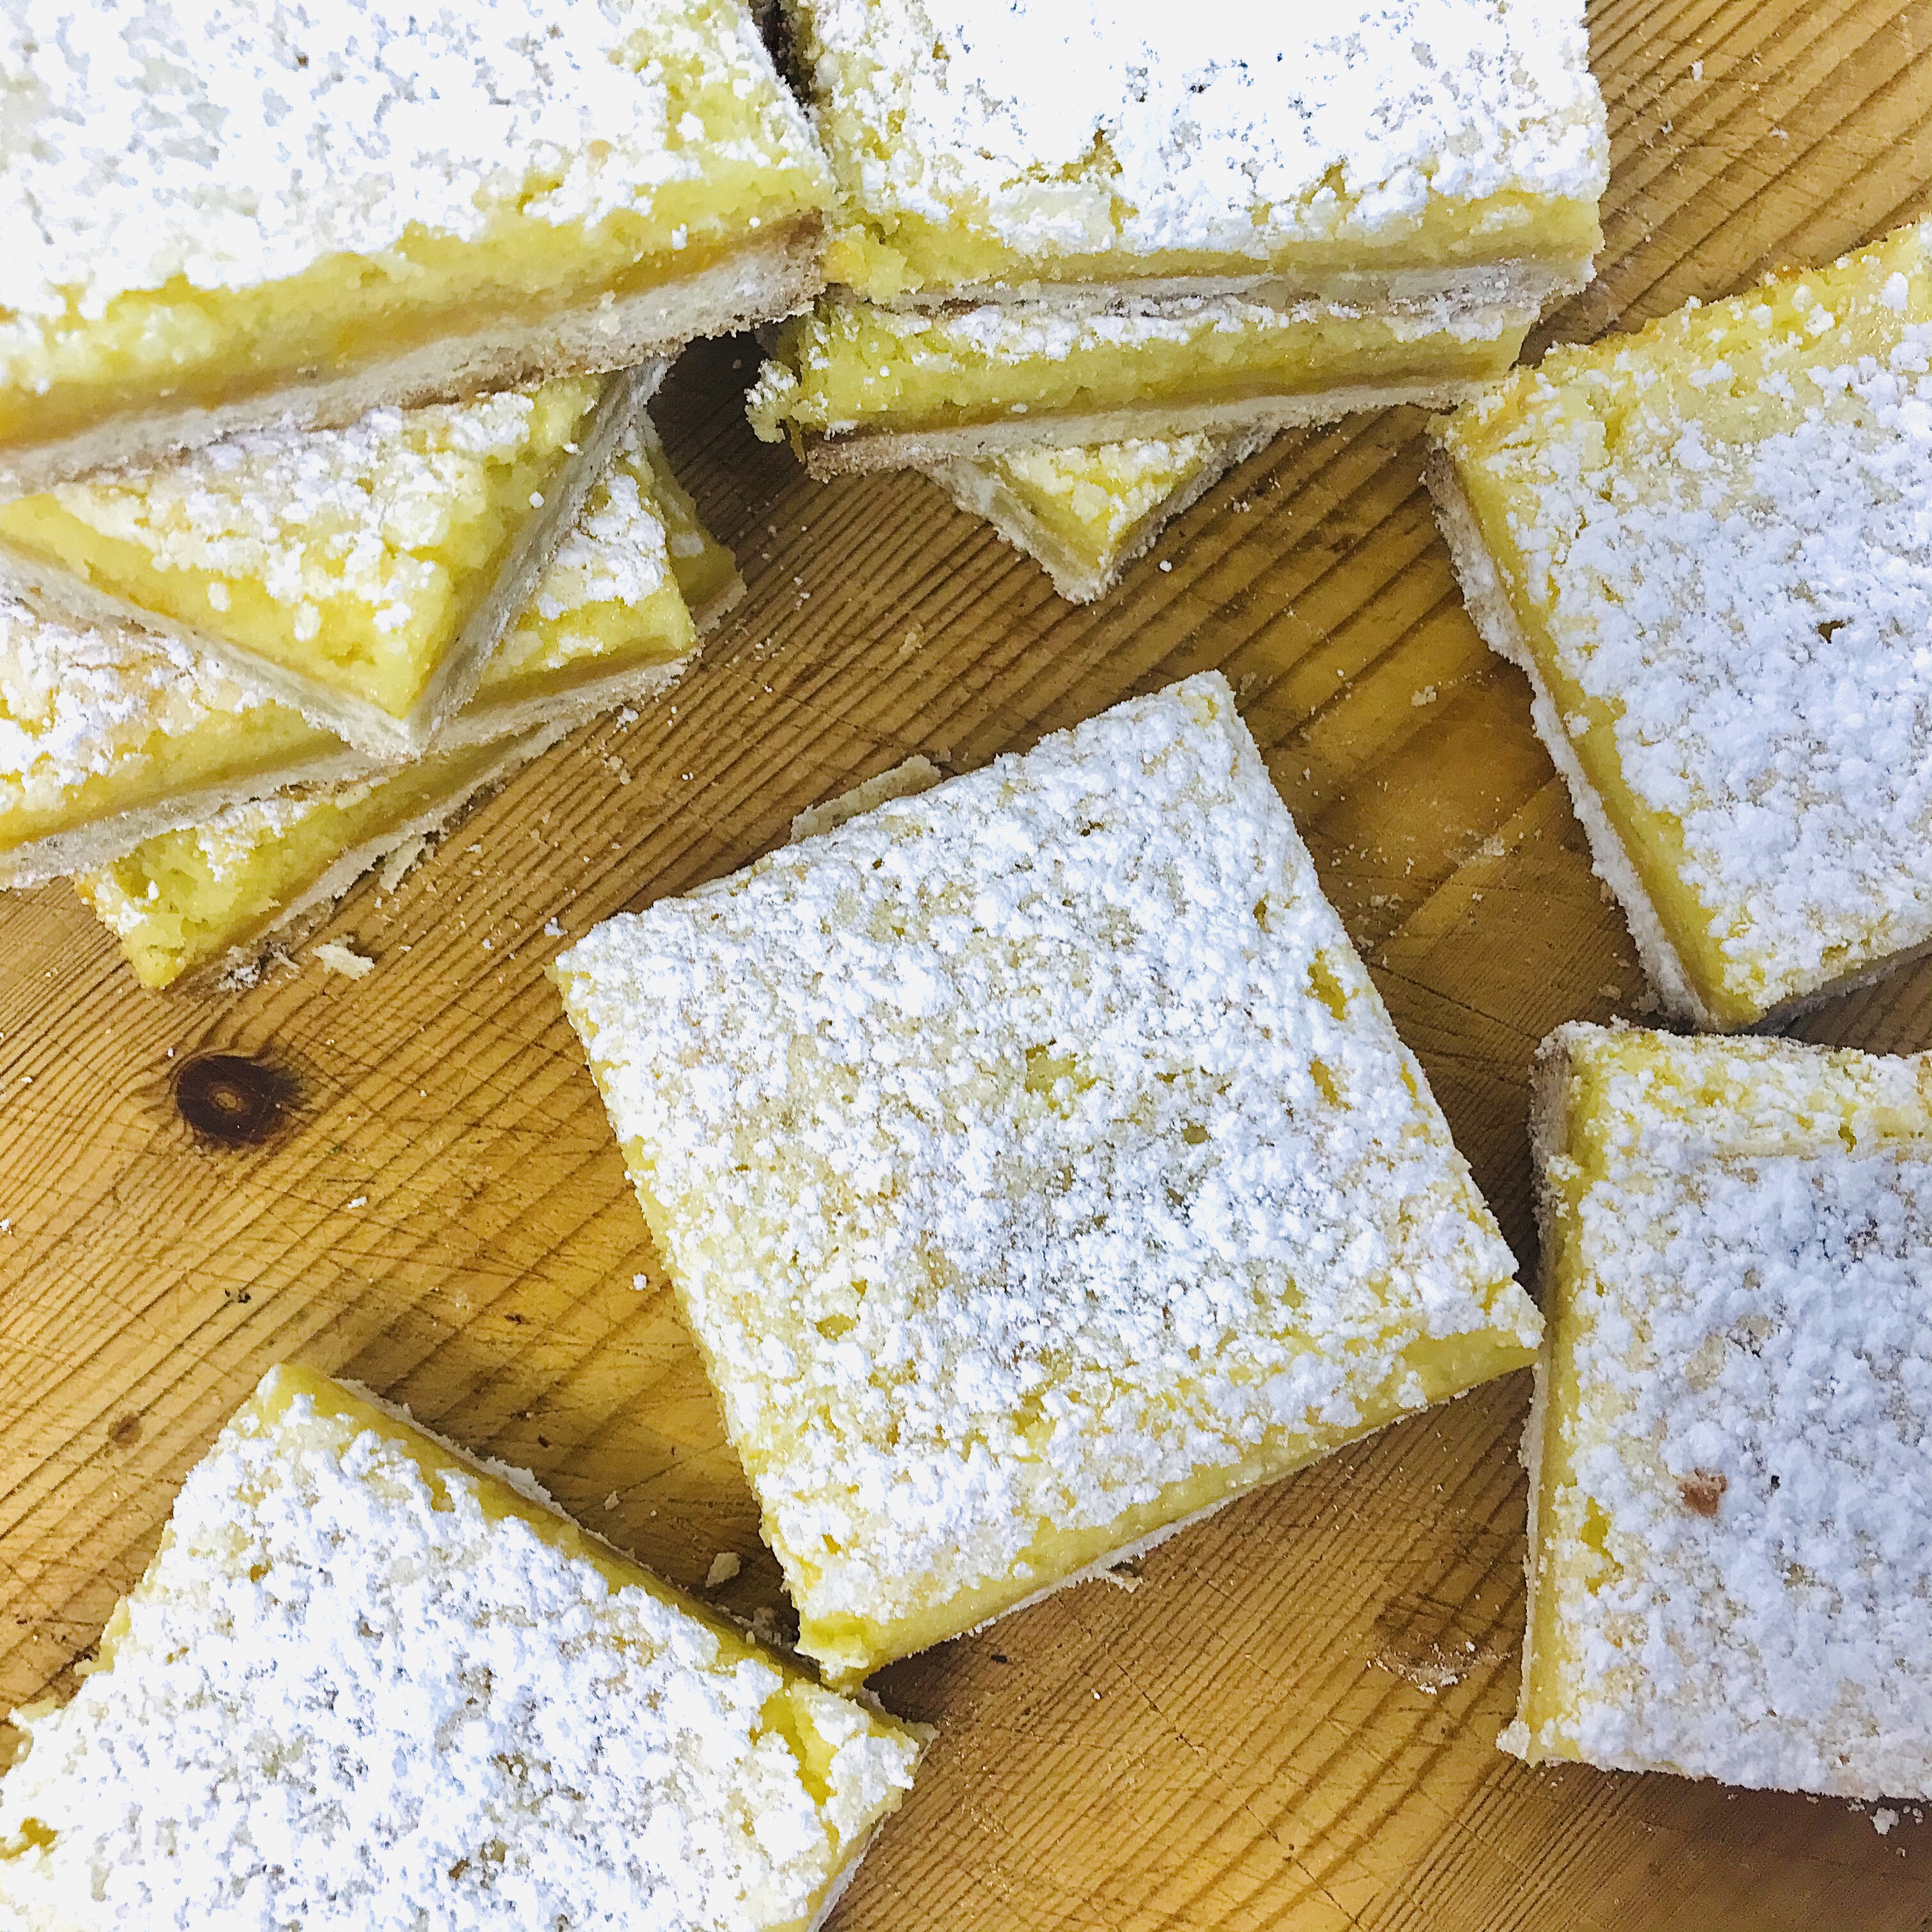
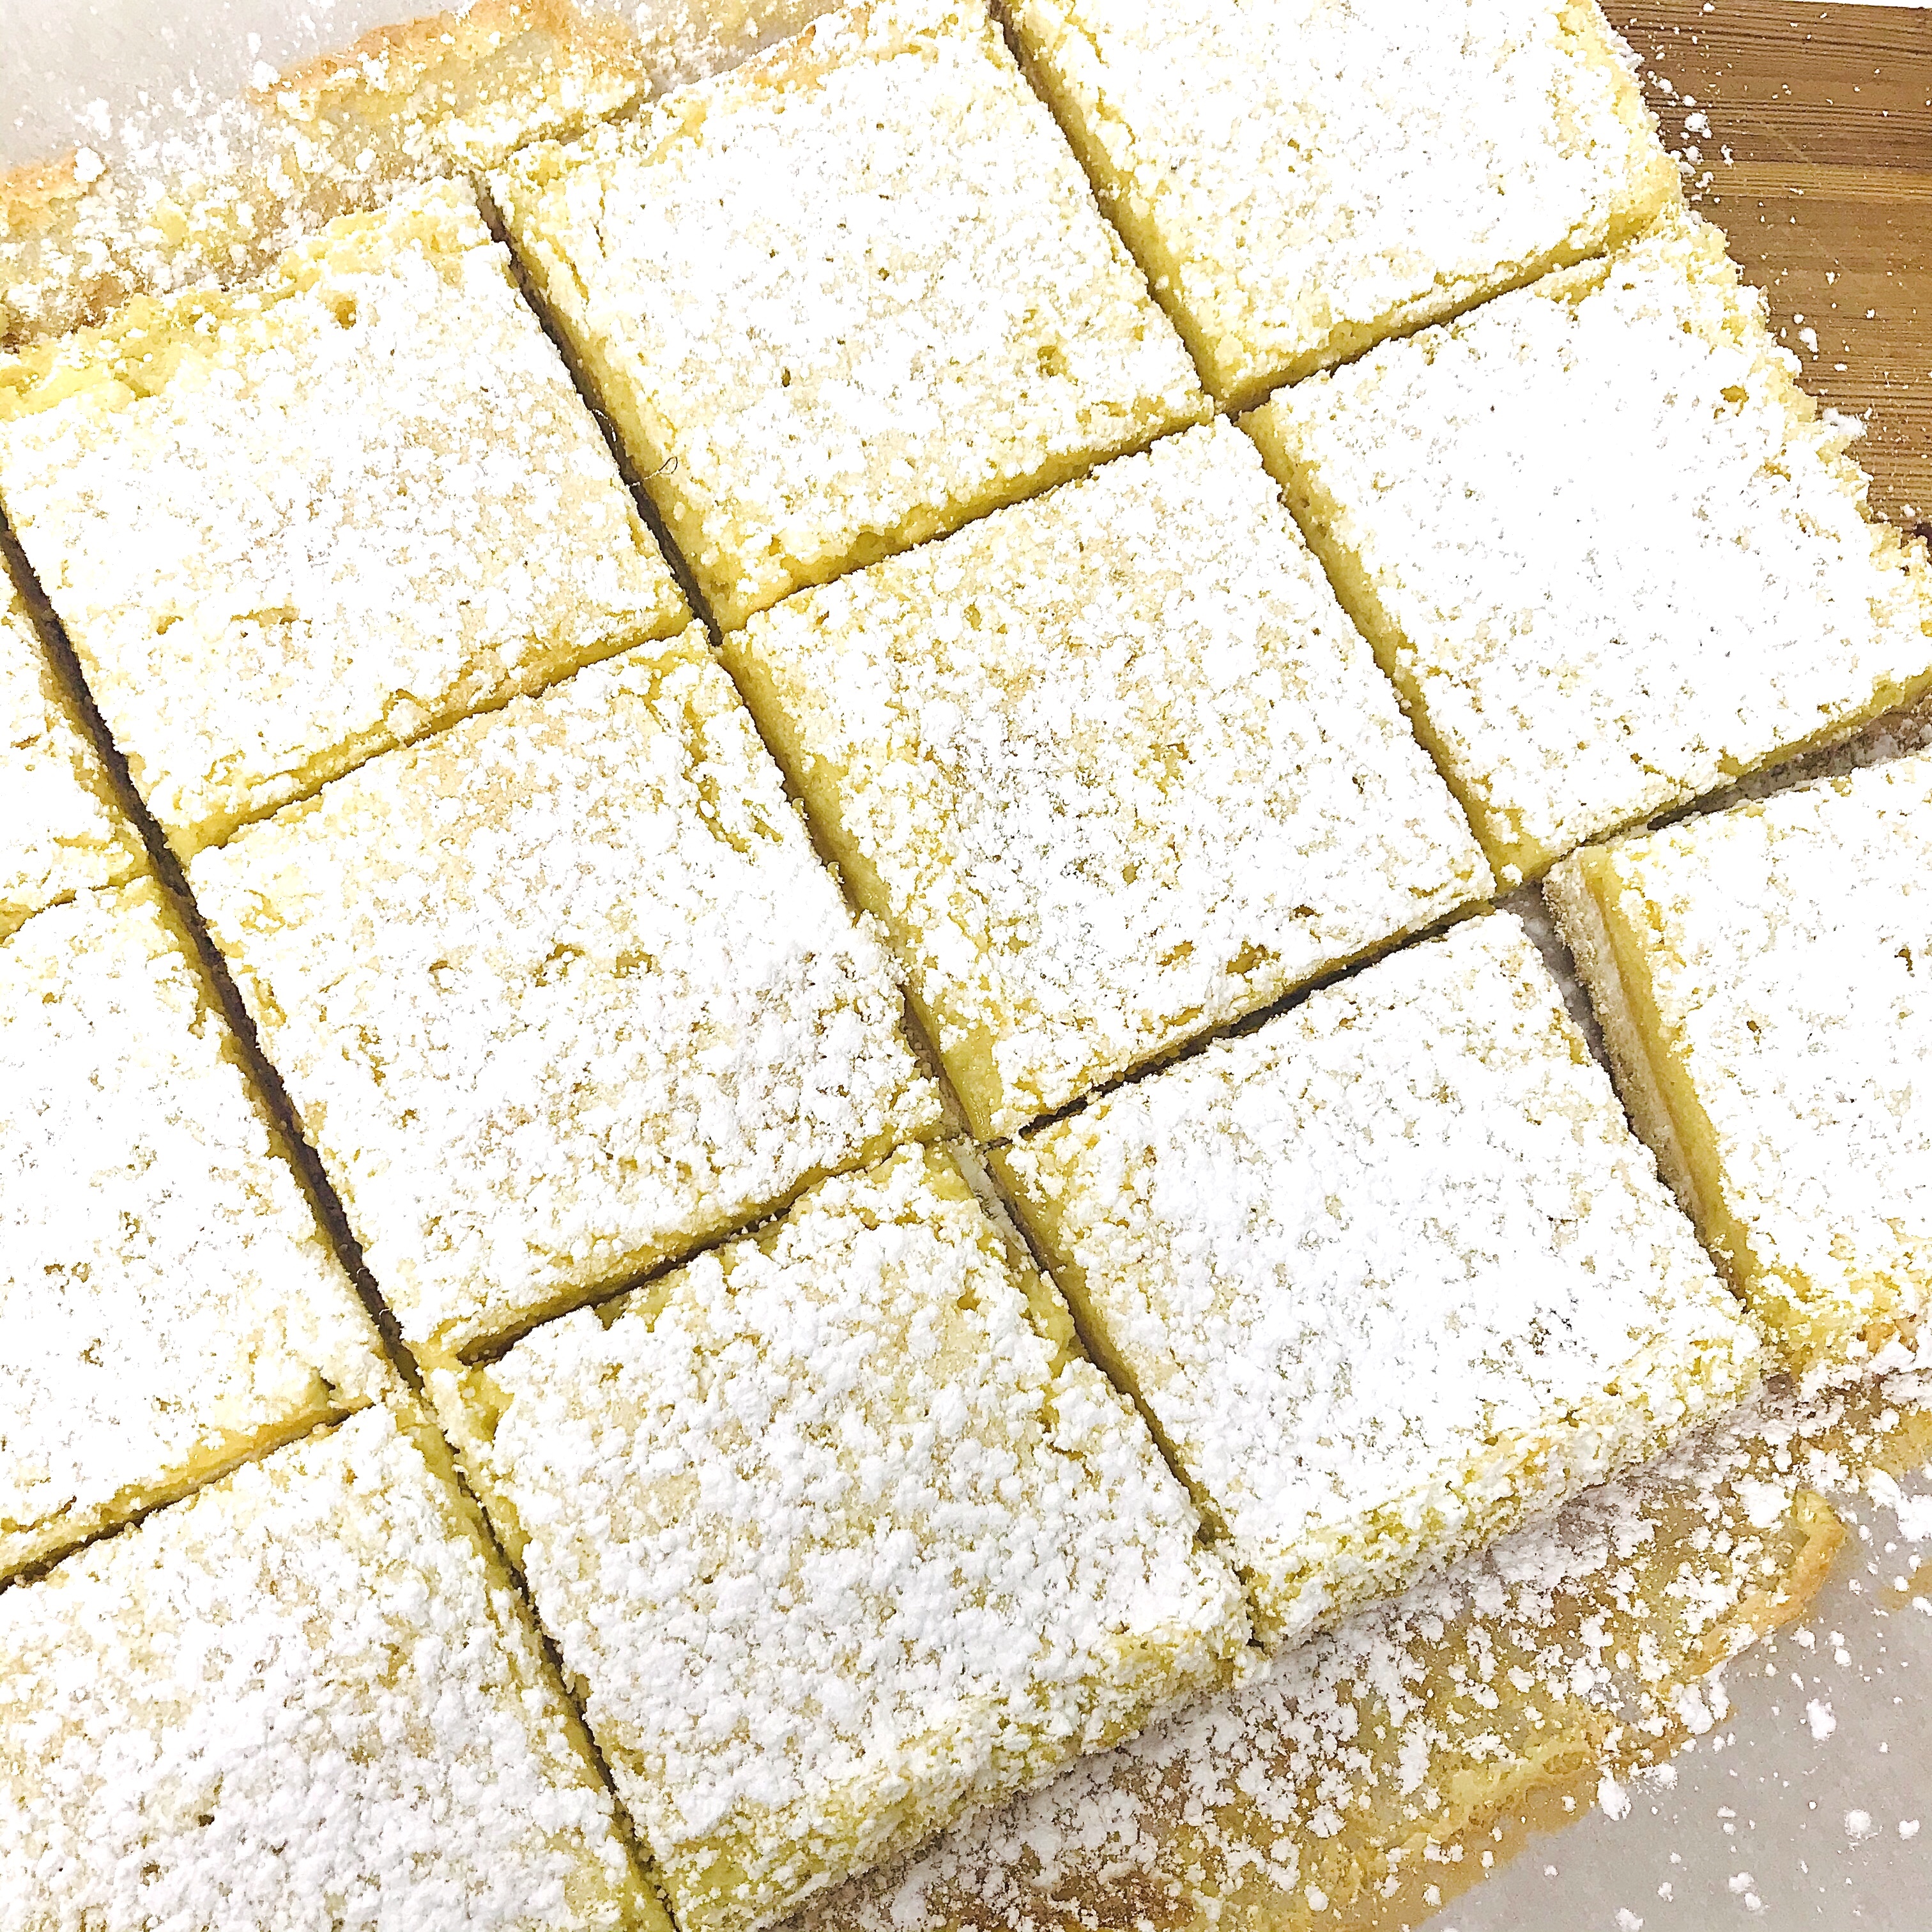
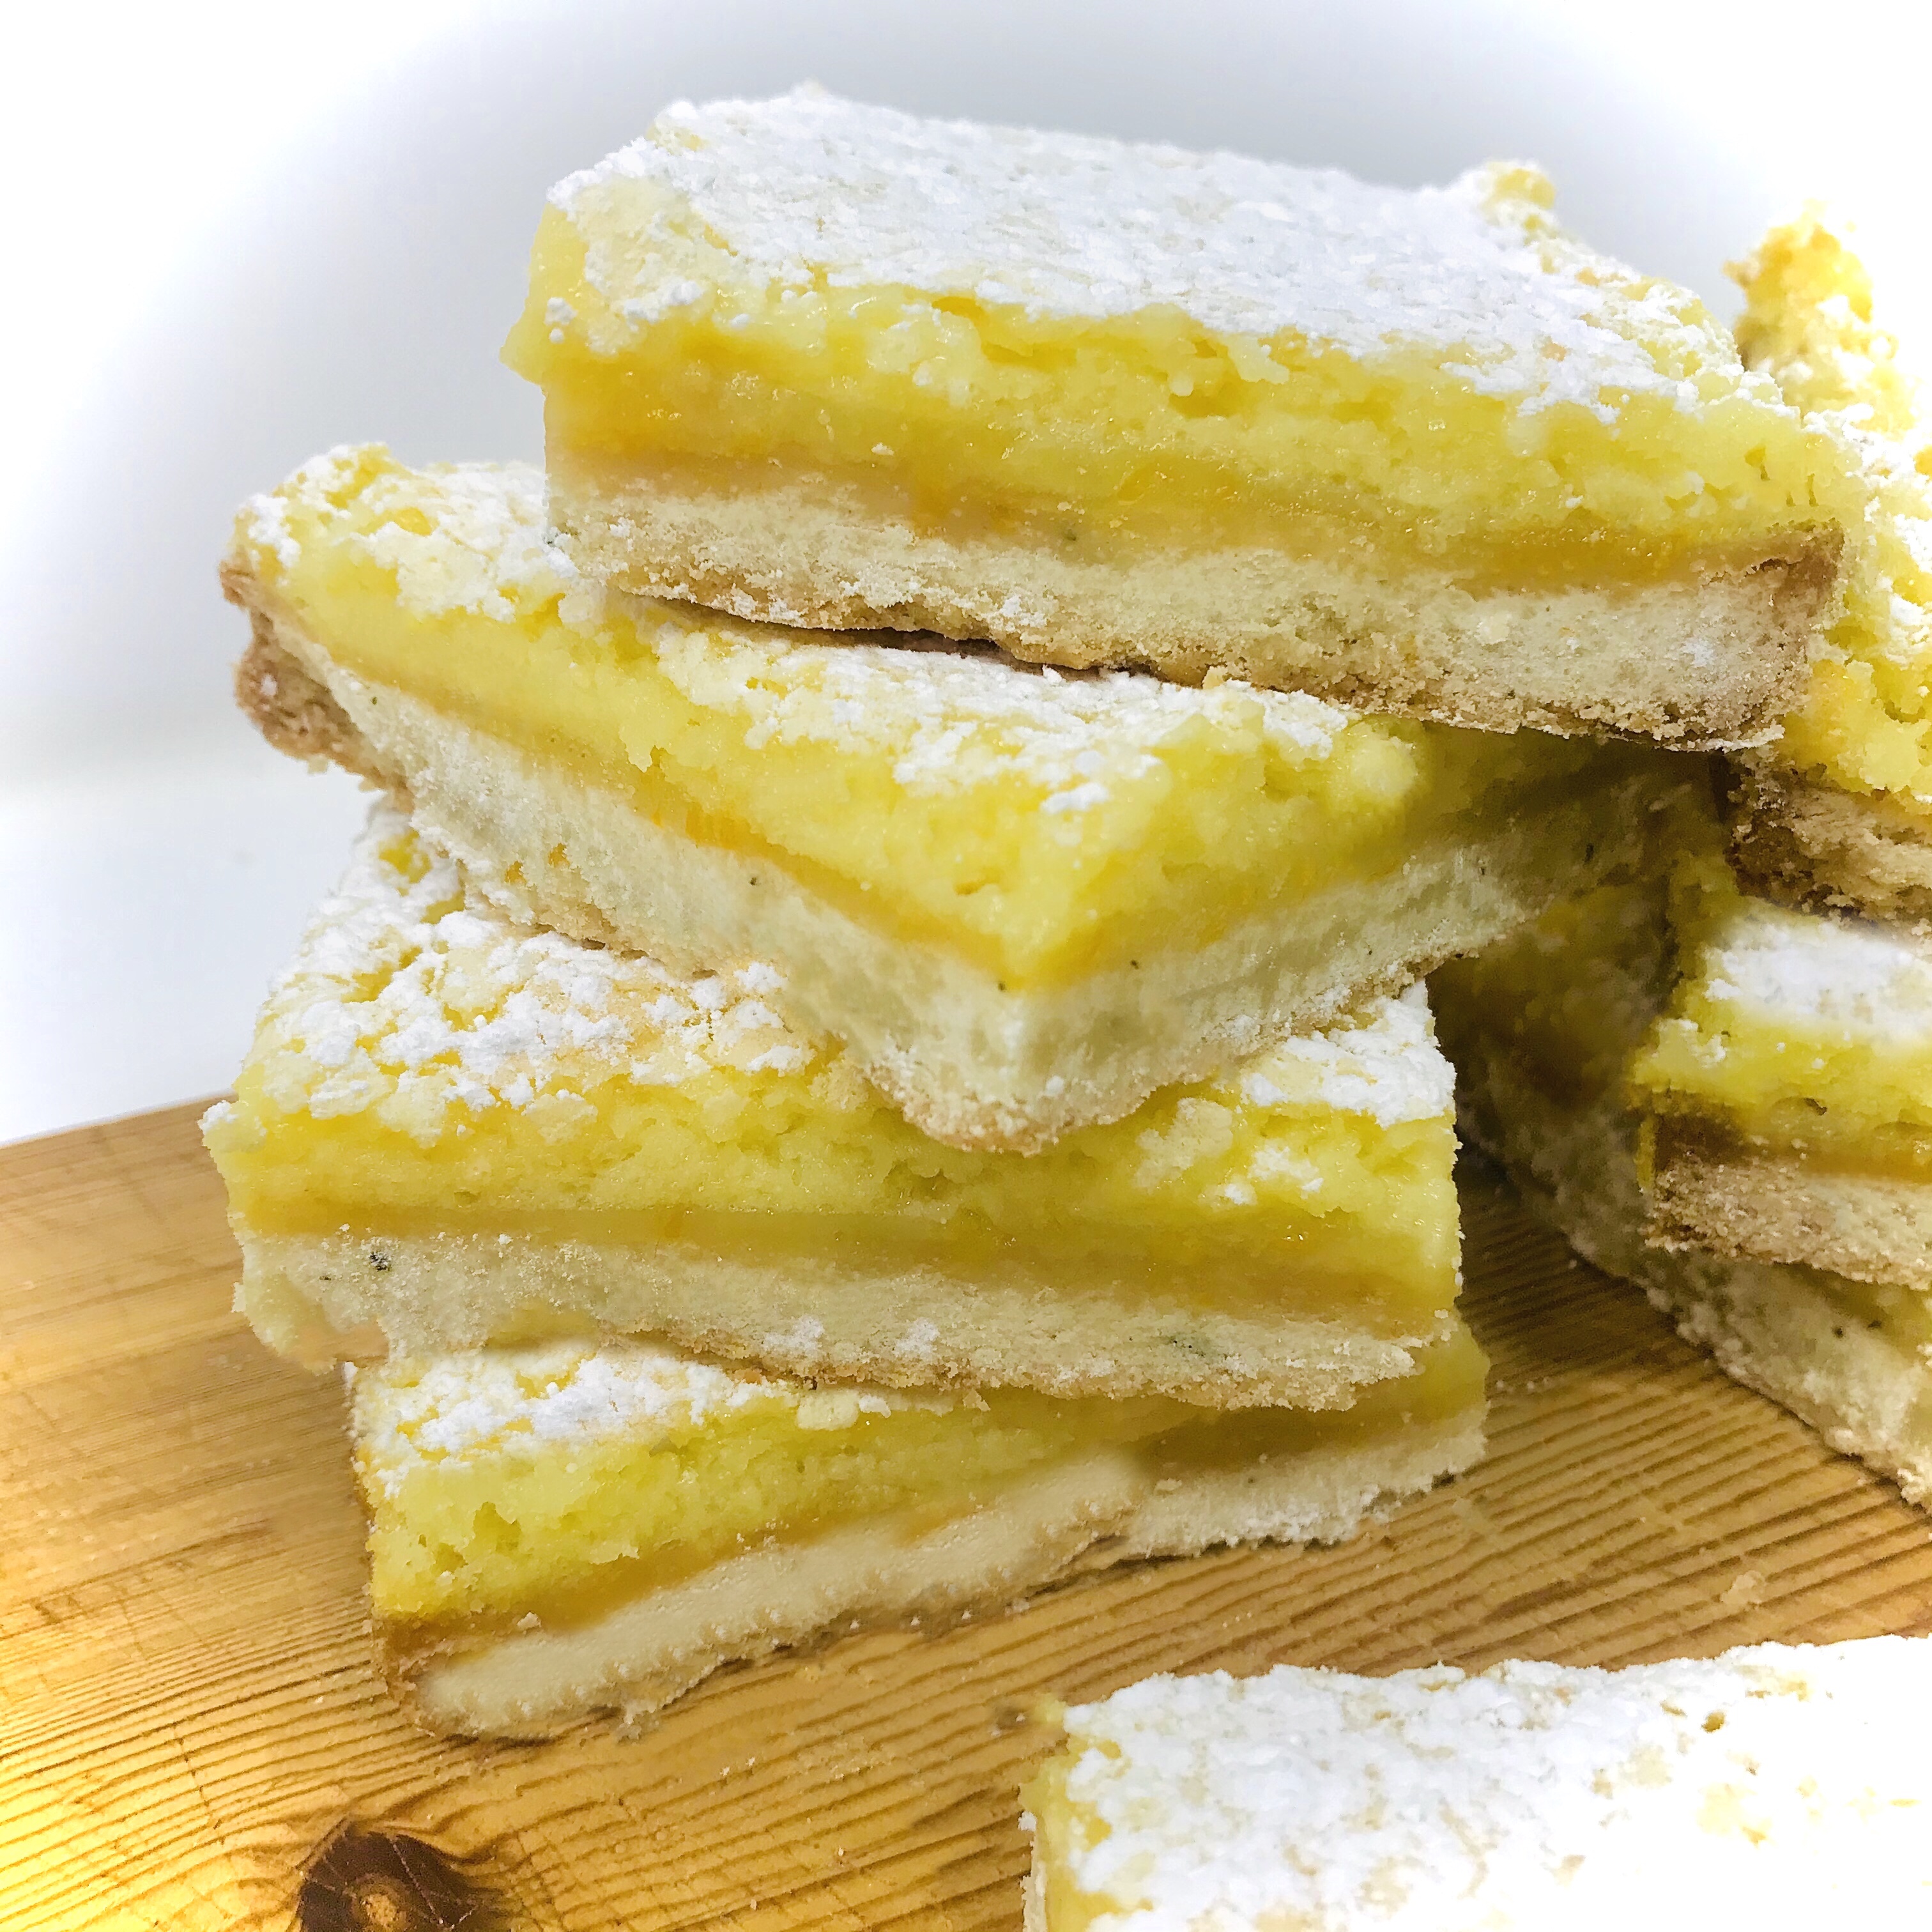
  5. Bake in your preheated oven for 1 hr, after which remove and let to cool completely in the tin. The finished bake should have firmed up considerably but still have a slight wobble. Dust with sugar if using.
  6. Once fully cooled, cut into squares (using this tin I usually divide into 4 x 4)
  • The finished Chester bread can be dusted with sugar or left plain if preferred
  • Baked Chester bread can be stored in an airtight container at room temperature for up to 4 days

img_7746


“Hey Dolly” (Oat Shortbread) Bars


img_7611
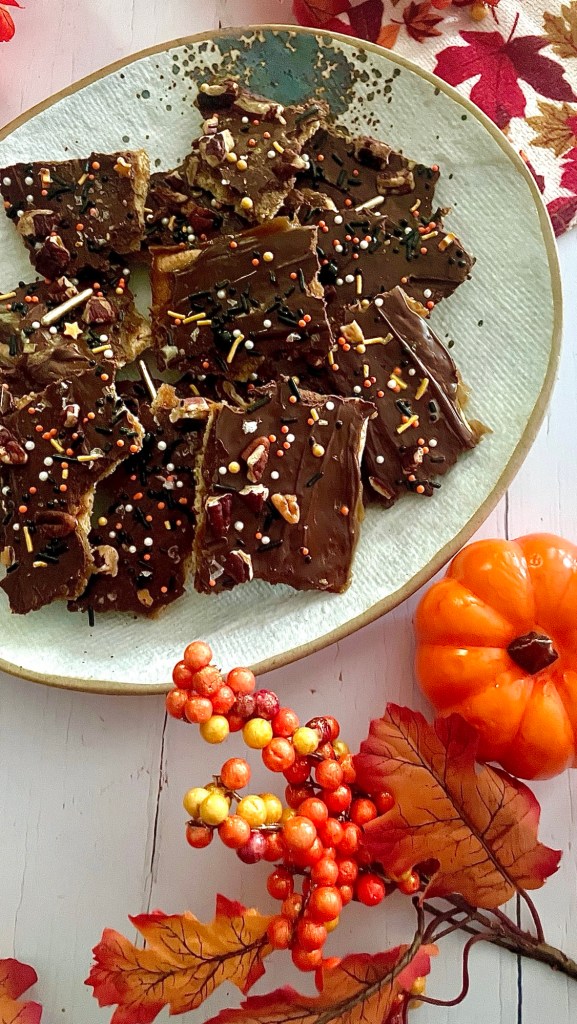
So I wanted a bar. But it had to be the right kind. I had previously made Hello Dolly Bars, or as they’re also known as Magic Cookies Bars, but I had found them too sweet and gloopy. Maybe I added too much condensed milk caramel or not enough dry ingredients? Either way I was far from happy with them and the resulting bars were deliciously mutated into ice cream topping instead. “Waste not, want not” etc etc.

However like a dog with a bone I couldn’t (okay I WOULDN’T) acknowledge failure. There were also a few tweaks I wanted to try. The crumb base layer of the original cookie bar was far too flimsy IMO. I wanted something with more stability and which would carry itself and the topping. Well what better way to go than with shortbread? Simplifying my Golden Coconut Shortbread with a wholewheat flour was the ideal solution. The nuttiness of the wholewheat grains perfectly complementing the oats I would add.

Another tweak was based on a pet peeve of mine – wet cookie bars. I don’t mean a bake that’s underbaked and soggy. It’s the excess of wet topping ingredients that spoils it for me. And so in with the aforementioned oats! Insider tip here- I’ve found that if a recipe calls for using jumbo rolled oats, using a mix of jumbo oats and quick oats gives a much better result. The smaller quick oats fill in the gaps and voids made between the larger oat flakes and you end up with more oaty bang for your buck. It’s a win!

The quick “caramel” of butter and sugar works as a good binder here but if it’s one thing I’m a sucker for it’s chewy bite (Samoas are my WEAKNESS!) and with that I added in some caramel pieces. These would bake to perfectly chewy morsels adding some extra interest to bars. A little fiddly work is involved here in cutting the caramels into smaller pieces but it’s absolutely worth it.

So they’re you have it- “Hey Dolly Bars”. Not quite traditional “Hello Dolly Bars” but baked bars with a lil extra something and sass.

Ingredients

Shortbread Base

  • 1 2/3 cup Wholewheat Flour
  • 1/3 cup Semolina
  • 2 Tablespoons Rice Flour
  • 1 1/2 Tablespoons Cornstarch
  • 1/2 cup and 2 tablespoons fine sugar, divided
  • 1/2 Teaspoon Kosher salt
  • 1 cup/ 2 sticks salted butter, cold and cubed

Oat Topping

  •  1/2 cup salted butter
  •  1/2 cup  granulated sugar
  •  3/4 cup  dark brown sugar
  •  1/4 teaspoon Kosher salt
  •  3 large eggs, beaten together
  •  1 teaspoon vanilla extract
  •  2 cups jumbo rolled oats
  • 1 cup quick oats
  •  1/2 cup shredded coconut, sweetened or unsweetened
  •  1/2 cup toffee bits apx (I use 12 Kraft caramels, chopped in half, then each half chopped in to 4)
  •  1 1/2 cups semisweet chocolate chips

a8fe5156-43a0-4ff1-b3cc-0882cb31eadb

Method

Shortbread base

  1. Lightly grease and line a 9″ x 12″ traybake tin
  2. In a large bowl combine the flour, semolina, rice flour, cornstarch, sugar and salt. Whisk together to further combine
  3. Add in the cubed butter and rub together with your fingertips until the mixture is just beginning to bind together. Every so often do a  quarter turn of the bowl to make sure you’re using all the dry mixture. You’ll want a texture somewhere between breadcrumbs and damp sand before you stop. Be wary of overworking the butter into the mixture – you want to avoid a dough that is feels slimey from the butter melting too much into the dry ingredients
  4. Tip the crumb mixture into your prepared tin and press the dough so that it forms a solid layer. Level the surface with the back of a spoon or measuring cup, making sure the mixture is evenly spread and uniform. Prick all over with a fork
  5. Refrigerate for 30 mins minimum
  6. Preheat your oven to 325°F
  7. Remove the shortbread from the fridge and bake for about 30 minutes
  8. Remove from the oven and allow to set side to cool in the tin while you make the topping

Oat topping

  1. Increase oven temperature to 350°F
  2. Prepare the topping by melting the butter in a medium saucepan over medium heat. Cook the butter, stirring often, until it melts completely. Continue to heat. The butter will start to foam up a bit, reduce the temperature if needed. Watch carefully as lightly browned specks begin to form at the bottom of the pan, and the foam starts to turn brown in spots. Smell the butter; it should have a nutty aroma
  3. Remove the pan and off the heat, stir in the granulated sugar, brown sugar and salt. The mixture will be thick. Let it cool for a few minutes
  4. Whisk in the eggs and vanilla until the mixture is well-combined. Transfer to a large bowl
  5. Stir in the oats, quick oats, shredded coconut, toffee bits and chocolate chips. Mix all the ingredients to combine well. Spread the mixture evenly over the shortbread crust.
  6. Bake for 20-25 minutes until the bars are set around the edges and the middle is a little jiggly. They’ll firm up as they cool.
  7. Once fully cooled remove from the tin and slice in to 18 pieces (3 x 6 bars)
  8. These bars will keep in an airtight container at room temperature for up to 5 days

fef4ec31-1fb7-49fa-9899-f71697f2c6b5


Meyer Lemon Bars

So these were part of the “Citrus Binge” I went on recently (see my other post on Minneolas Tangelo & Cardamom Cheesecake). Meyer Lemons have an almost mystical place in my  mind. Living in the UK they were harder to get hold of than here in Canada, AND when they were available they certainly didn’t last long! Needless to say when I saw them whilst shopping of course I was itching to make something from them!

I was pleasantly surprised when I got my hands on them. Scent-wise yes they evoked sun-kissed, floral dense getaway images but there was also a heady herbaceousness to their smell. It instantly brought to mind citrus-scented herbs like lemon verbena and lemon thyme- bright, sunny grass-like. Taste-wise it’s easy to see why Meyer lemons capture the imagination and have such acclaim. Think of the best homemade lemonade- just the right side of tart with enough refreshing astringency to keep you coming back for more. Yup, I was hooked.

Bars/tray-bakes have never been top of my list for “GO TO” eats. Aside from two I always pass on them- the wonderful Canuck treat that is the nanaimo bar (of which I have a few posts on this site – check them out in “Categories”) and the quintessential classic that is the Lemon Bar. The contrast between the buttery, crumbly shortbread layer and the refreshingly pucker-inducing citrus custard thickness evokes images of languid, sun-drenched picnics for me. I don’t know about you but given that I’m writing this on Day 27 of self-isolation in the Time of Covid I could definitely do with images of unbridled expanse and carefree torpor. The confinement will pass in time I know but I’m of the opinion that no matter how frivolous or trivial a distraction if it helps with our current state of sanctioned ennui then all the better.

And so here we are…


Ingredients

  • 2 1/4 cups unbleached all-purpose flour
  • 3/4 cup icing sugar
  • 1 1/2 teaspoon kosher salt 
  • 1 cup (2 sticks) very cold unsalted butter, cut into small pieces
  • 1 to 2 teaspoons ice water
  • 5 large eggs, at room temperature
  • 1 1/2 cups granulated sugar
  • 1 tablespoon Meyer lemon zest
  • 3/4 cup fresh Meyer lemon juice

Method

  1. Preheat oven to 350°. Grease a 9″ x 13″ baking pan and line it with parchment paper, leaving 1″ of overhang on the two long sides.
  2. In a food processor, pulse 2 cups flour, 3/4 cup powdered sugar, and salt. Add butter and pulse until mixture resembles a coarse meal. Add ice water 1 tsp at a time if mixture is too dry. Press dough into bottom of prepared pan, pressing snugly against the inside edges.
  3. Bake crust for 20-25 minutes, or until golden. Set pan on a wire rack to cool slightly. Reduce oven temperature to 300°.
  4. Whisk together eggs and granulated sugar until well combined and pale in color. Stir in lemon zest, lemon juice, remaining 1/4 cup flour, and a pinch of salt. Pour topping over warm crust. Bake for 15-20 minutes, or until set.
  5. Set pan on a rack to cool. Remove squares by lifting parchment. Cut into bars. Dust liberally with icing sugar
  6. Bars are kept refrigerated and eaten within 24 hours

*If Meyer lemons are available this recipe works just as well with standard lemons. But admittedly Meyer lemons DO elevate them.