If you follow my social media feeds (Twitter; Facebook and Instagram) you’ve probably noticed I’ve been posting a lot of recipes lately featuring the little known ingredient that is Black Garlic. Whilst it might conjure up not so pleasing images (and not to mention smells!) believe me it’s completely unfounded.
Courtesy of the team at Balsajo Original Black Garlic I’ve been experimenting on both the sweet and savoury fronts with some very tasty results indeed.
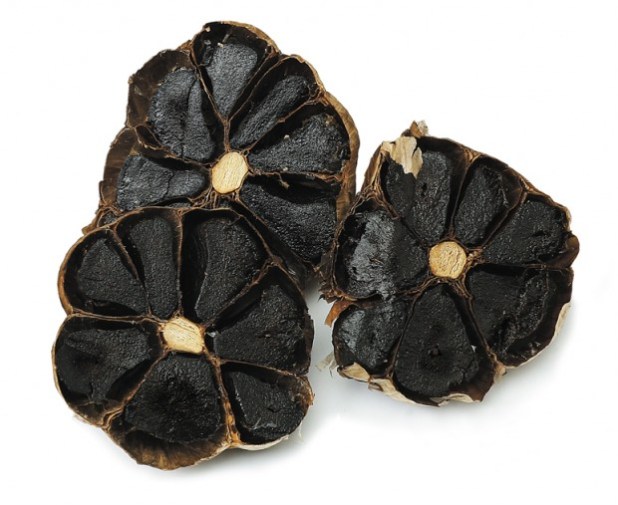
If you haven’t heard of Black Garlic yet please, please don’ tbe put off by the name. Yes- it is garlic “…but not as we know it Jim“. Forget the hard, pungent, opalescent nuggets that give us one of the cornerstones of cooking. Black Garlic is instead a case of Kitchen Alchemy made true. By process of heat and humidity (and probably some trade secret) familar white garlic bulbs are transformed into dark, fragrant, nuggets of molasses-like jelly. Again I say stick with me here! Whilst some people might be quick lable it shrivelled and black (well I guess it is black- there’s no fighting nature there!) what you can do with this is practically limitless. I’ve tried using it as an ingredient in sweet and savory dishes (and some in between). Thus far it’s prooved to be a very versatile ingredient indeed. Soft and jelly-like in texture with a flavour which brings to mind treacle, molasses, truffle, and balsamic I definitely recommend getting some of this into your kitchen. Its available in some selected supermarkets and artisan food stores. The guys over at Balsajo Black Garlic have included a handy stockist locator on their website.

I’ve been wanting to experiment with Black Garlic for a while in order to test the full breadth of it’s uses and here’s what I came up with:
Fennel Seed & Black Garlic Toffee
Originally this came about as some Twitter banter between myself and the wonderful Miss Kitty Hope (yes indeed, she of Hope and Greenwood – purveyors of all things fantastical and sweet!)- but more about that later. We nattered about bacon in sweets/ bakes and somehow ended up challenging each other to creating something with a none-too-common ingredient and so black garlic was suggested. The resulting Black Garlic & Fennel Seed Toffee is a sweet, creamy toffee with a subtle hint of anise from the Fennel Seed and the treacley flavour of the black garlic adding to the creaminess. Surprisingly moreish- even if I do say so myself!

Blueberry, Balck Garlic & Corriander Traybake
I needed to try the dark beauty of black garlic in a bake. Well- I wouldn’t be Mr. Mom’s without baking something now would I? Blueberry and corriander is a little known combo that works really well. The citrus notes of corriander seed boosting the flavour of the fruity blueberries. Topping the traybake with a limoncello buttercream frosting added an indulgent alcoholic kick (okay I’ll admit it I thought they were sounding just a little too healthy!). The addition of some chopped black garlic baked into the sponge mellows what otherwise might have been citrus overload and layers in nicley with the graduation from mellow to citrus kick.

The adapted recipe in cupcake form was featured in my stint on the Mel & Sue show and you can find the recipe here.

Black Garlic & Chilli Oatcakes
So enough with the sweet things I thought. How about a savoury bake? My husband and I are chalk and cheese; oil and water; Yin and Yang when it comes to tastes. Whilst I am a complete an utter sweet-tooth advocate, he’s marches firmly to be beat of the Umami drum. I’ll have pudding and he’ll have cheese. Ah hah! And so I had my next experimental idea for black garlic. The treacley earthiness of the black garlic combines well with the mellow oatiness of these biscuits, before a subtle kick of heat comes in from the chilli. I tried them with a fabulous Epoisses cheese, while my other half couldn’t get enough of them with a mature cheddar. They’ve definitely been added to my “Must Bake Again” list!

Black Garlic & Matcha Green Tea Cupcakes
As I mentioned earlier on, this trip through the looking glass into the Land of Black Garlic happened because of some rather impromptu Twitter banter between myself and my new BFF Miss Kitty Hope. We challenged each other (I rather foolhardily) to create a bake, or sweet….or something (?) with an unusual ingredient. I threw black garlic into the ring and Miss Hope picked up the gauntlet. The “competition” was facilitated by the team at Taste PR and kindly judged by the incredible Lily Jones (of Lily Vanilli). My black garlic & Matcha green tea cupcakes draw inspiration from the Asian background of black garlic and combine a number of Oriental flavours. The complete offering was a Matcha green tea & black garlic sponge, with Plum Wine spiked frosting, topped with a Matcha green tea, black garlic & black sesame seed marshmallow, and a candied black garlic clove “dart”. Rather incredibly (and very much to my surprise!) Lily decided on my cupcakes as a winner. I do however have to give kudos to Miss Kitty for providing some rather excellent and challenging competition (not to mention some hilarious Twitter “reading”!)

So enough preaching the wonders of black garlic. As they say, “The proof is in the pudding”…or rather in this case- the toffee. I in no way intend to compete with the skilful mastery of confection that Hope & Greenwood have but I will freely admit to Miss Kitty Hope being the inspiration behind my Black Garlic & Fennel Seed Toffee. After all without her initial challenge in my Twit-stream I’d never have ventured into the realm of boiled sugar at all. So if you’re feeling up for it and fancy a little black garlic experimentation why not try you’re hand at making…
Black Garlic & Fennel Seed Toffee (aka Miss Kitty’s Challenge)
Ingredients:
500g caster sugar
125g salted butter
1 tbsp treacle
3 tbsp golden syrup
1 tsp vanilla extract
397g tin condensed milk 90ml water
1 tbsp fennel seeds
5 cloves black garlic, chopped
You’ll need:
A deep sided pan
A sugar thermometer
A silicone tray, or a baking parchment lined & greased tray
Method:
– In a deep pan, place the butter, sugar, treacle, golden syrup and water into a pan and heat, stirring constantly.
– Once all the ingredients are well mixed and melted, add the condensed milk slowly, stirring occasionally until it boils.
– Continue at a steady boil until the mixture reaches the “Hard crack” stage on a sugar thermometer, again stirring occasionally. Test that the toffee is ready by dropping a spoonful into cold water – if it turns solid, it is ready.
– Remove from the heat and carefully stir in the fennel seeds and black garlic. (Note: The black garlic may clump together as it’s quite sticky. Separate into smaller pieces as you as you add to the toffee mixture.)
– Pour into the prepared tray. Allow to cool for about 6-7 minutes then score into regular sized pieces with a sharp knife.
– Once fully cooled break along the score lines into pieces.
– The toffee can be wrapped in baking parchment or greaseproof paper and stored in an air-tight container.
If you try my toffee recipe I do hope you enjoy and meantime,
“Remember Mom’s the word- that’s Mr. Mom’s!”