#Recipe Homemade Butter

Okay so I feel like a bit of a cheat posting this but a lot of people have asked me about it so here it is. The thought of making your own butter may instantly cause confusion and images of manic activity and sweaty exertion but believe me when I say- it really is UNBELIEVABLY easy! Well…I say “easy“…that’s if you’re in possession of a stand mixer such as KitchenAid or KMix. If not? then que the manic activity and sweaty exertion.

Getting back on track, once you’ve had a go at this there’s no looking back. A word to the wise though – I have yet to use this recipe in baking (mental note for some #KitchenExperiments) so I can’t vouch for how stable it is bake-wise. I’ll put it on my “To Do/ To Bake” list and let you know the outcome.

Ingredients (to make /3 cups (150g) of butter)

  • 300ml heavy cream
  • Salt to taste
  • Herbs (optional)

Yes that’s it- told you it was easy!

  • Fill a large bowl with ice-cold water and set aside for later.
  • Pour the cream into the bowl of your stand mixer. MAKE SURE TO FIT YOUR MIXER’S SPLASH GUARD!

2016-03-17 10.34.14

  • With the whisk attachment, whisk on a medium speed until the cream, starts to thicken (as if you were whipping cream as normal).

2016-03-17 10.35.10

  • Increase the speed to high and continue whipping. You will see the cream start to whip, then curdle. Keep whisking! You want to “push” the cream through this stage.  You may need to stop and scape down the sides.

2016-03-17 10.36.57

  • Continue to whisk and you’ll see the cream start to separate (and liquid start to splash!). The liquid is buttermilk and the solids, that should be starting to catch and gather in the whisk, are the butter solids. Carry on whisky for a few more minutes during which the buttermilk and solids will further separate. You should now have what resembles pale butter in your whisk bulb.

2016-03-17 10.38.22

  • Remove the whisk and gather the solids together in your hands and squeeze out any excess buttermilk. Immerse the butter in the water filled bowl- this washes it clean of any remaining buttermilk.

2016-03-17 10.41.18

  • Remove from the water, shake of any water and place on a clean surface. This is where you can add your flavourings. I normally just add some salt to taste, but you can also add herbs to make herb butter. Pat and fold the butter so that the flavourings are evenly distributed throughout. (You can get some butter paddles online which make this job a lot easier. They’re inexpensive and also look make an attractive kitchen decoration).
  • Wrap the finished and shaped butter in baking parchment to complete. I’ve kept mine at room temperature under a butter dish for up to 3 days and it’s still tasted great. You can also store in the fridge but it’ll need to be removed to allow to soften before use.
2014-09-02 08.50.59

Homemade buttermilk scones with Peach & Tonka bean jam and homemade butter


#Recipe Peanut Butter Cream Pie

If you’ve read my previous post on Toronto you may remember me mentioning a favourite restaurant there – The Gabardine. (If you haven’t you can read it here). One of the desserts I had the pleasure of trying was a Peanut Butter Cream Pie. I had never had it before and had no idea what it was but it sure sounded good. And boy, I was not disappointed! I can only describe it as a lighter version of a cheesecake with moreish peanut buttery goodness abound. Ever since then I haven’t been able to get it out of my mind and so set about trying to receate it. Not to detract from chef Graham Pratt’s original of course- the best form of flattery is, afterall, imitation.

For me this is one of those dishes that is truly evocative of a time in my life. One bite and I’m instantly back in the bright buttermilk interior of The Gabrdine, smelling herby puff pastry and smoked ham, cheeks gently puckering from a chilled Sauvignon, all the while watching the Torontonian business clique milling back to their desks. Typing this oddly stirs subtle pangs almost of homesickness. I hope to get back there some day- and hopfully try another slice of pie!

So with it being Peanut Butter Lovers Day today (seriously who decides these things?) it’s the perfect time for posting the recipe for my version of it.

Peanutbutter Cream Pie- Recipe Image

For the Pie

250g Digestive biscuits
5 tablespoons Melted butter
50g Demerara sugar
75g Salted peanuts
160g Icing suga
280g Cream cheese
230g Smooth peanut butter
230ml Double cream, lighlty whipped

To finish

150ml Double cream, whipped

You’ll also need a 9″ x 1″ or 1.5″ deep circular pie dish

  • In a food processor blend the digestive biscuits, Demerara sugar and salted peanuts.
  • Whilst blitzing drizzle in the melted butter. Blitz to rough breadcrumbs stage.
  • Pour into a pie dish and press into the base and sides using a metal spoon.
  • Place the crumb lined pie dish into the refrigerator to set at least 3 hours, preferably overnight.
  • In a stand mixer blend the icing sugar and cream cream until smooth.
  • Add in the smooth peanut butter and mix again to combine.
  • Gently fold in the whipped cream. Don’t stir too much as this will whip the cream even more and make the filling “heavy”.
  • When the whipped cream is fully folded in, pour/ spoon the filling into the set crumb base, and smooth the top.Refrigerate for 2-3 hours.
  • When ready to serve remove from the fridge and top with the remaining whipped cream.
  • Slice, and serve (with additional whipped cream if you really want to treat yoursefl!)

#BakeMumsDay with Dr. Oetker

IMG_3421

As a child I remember Mother’s Day was pretty much like every other day apart from two things. One – my father bought my mother flowers. This never normally happened. Two- I would rather unsuccessfully try to bake my mother something whilst keeping her completely in the dark. “Baking Incognito” if you will. This in itself was no mean feat given that my mother was (and still is despite her ailments) one of those archetypal Gaelic matriarchs who perpetually inhabit the kitchen, who know the correct oven temperature despite the dial markings having been eroded from years of use, and who insist that portion sizes are too small if you can still see the plate you’re being served on. Think Mary Berry meets Mrs. Brown. Yeah- there you have it.

Before I go any further I feel it only right I should clarify that by saying, “ …bake my mother something…” what I in fact mean is raiding the kitchen cupboard for what usually turned out to be a Green’s cheesecake packet mix and adding my own “special touch” to it. Yes, even as a nipper I was gustatorily experimental! A box mix enfant terrible! Said special touches ranged from grated chocolate topping to a hidden banana filling to that time where I added so much Baileys (I told you it was Baking Incognito!) that the final cheesecake was not as much sliceable as it was pourable.

Fast forward 30 years and now I’m the Gaelic “matriarchal” figure in my household, even down to intuitive temperature skills, but with added facial hair. People often ask me where I came up with the name “Mr. Mom’s”. It was actually whilst scrolling through my social media feed a couple of years ago on Mother’s Day that I noticed a post. It was from a woman wishing, “A Happy Mother’s day to all the Moms, Grandmas, and let’s not forget the Mr. Moms (in reference to gay male parents). I liked it, it resonated with me as a gay dad and it stuck. The rest, as they say, is history.
History that has led to my children being the first wave of my “tasting panel”. Even when their critique is not required it is doled out in precocious abundance. Baking with them is like looking at the world from an angle askew. Ingredients are suddenly wondrous and methods appear mystical- yet it all happens with a déjà vu tinged familiarity.

Mother’s Day for us is about the female influences and role models that our children have in our family. A chance for Granny and Auntie to step into the spotlight, and for me to step into the kitchen with the kids. Food gifts are something I completely endorse. To me a food gift is more than just the gift itself. It’s about the time taken to think how suitable it may be, the time taken to create it, and make sure it’s worthy of its recipient. Knowing that every step of the way the creator had the recipient in mind. And in the case of Mother’s Day in their heart as well.

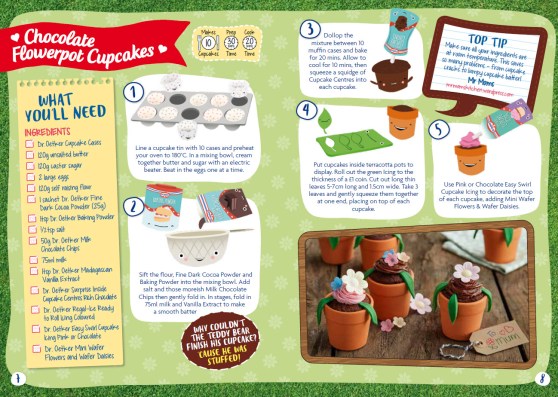
To celebrate this Mother’s Day, Dr. Oetker has teamed up with GBBO finalist Ian Cumming to create a recipe book that encourages kids to get in the kitchen to create some tasty treats for Mum. Brimming with fun recipes and tips, it’s a great way to introduce your little ones to the wonders of the kitchen. All with adult supervision of course!
Dr. Oetker wants to encourage children to bake with their dad, grandma or auntie and create a special surprise gift for mum. To do this, they have created a fun and engaging Mother’s Day-themed recipe book especially for children, featuring illustrations of four simple recipes from Ian Cumming, GBBO finalist and dad of two.

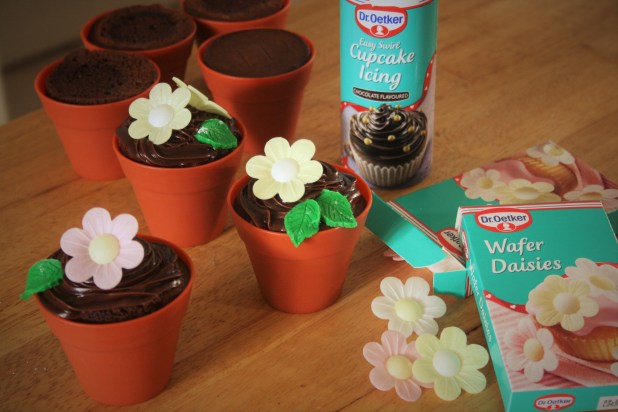
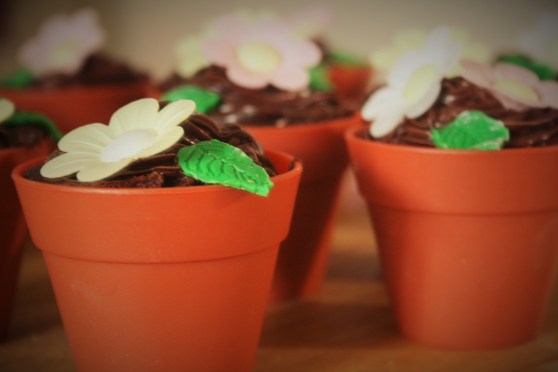
One of the recipes are these adorable chocolate flowerpot cupcakes-

Chocolate Flowerpot Cupcakes

Developed by Ian Cumming, the man who showed a flair for innovative interpretation of bakes, gives a suitably endearing twist on the traditional chocolate cupcake. Whether they’re for mums or grandmas, these adorable “flowerpot” cupcakes are certain to charm on Mothering Sunday. Using some delightful touches from the Dr. Oetker range lends that extra special touch for that extra special mothering influence in your life. Because the Dr. Oetker decorating range is so easy to use they’re ideal for little hands in helping out. If your children are anything like mine you may find it a struggle to actually have a full batch of completed cupcakes without some “disappearing”!

The Bake Mum’s Day recipe book can be downloaded here www.oetker.co.uk/mothersday The team at Dr. Oetker asked me to lend a hand in providing some tips for you whilst making the recipe. After all there’s always room for a little Mr. Mom’s twist on things!

– Make sure all your ingredients are at room temperature. This saves so many problems- from lumpy cupcake batter to possible splitting.

– If you’re using silicone flowerpot moulds (available from quality bake shops) I find it best if you “grease the mounds” beforehand with butter. For ease I just pop on a disposable glove, grab a finger-full of butter and apply. Using your finger makes it a lot easier than trying to use a brush or any other method to get into those fiddly crevices.

– When you remove the cupcakes from the oven, leave to partially cool (about 5 mins) remove from the flowerpot molds and leave to cool completely. While the cakes are cooling clean, rinse, and dry the molds. Then before you serve pop the cakes back into the molds. This means it’s so much easier for guests to get the cakes out nice and neatly upon serving.

– For some added texture I trim any domed top from the cakes, spread with a layer of Dr. Oetker chocolate cupcake icing, sprinkle on some crushed Bourbon biscuits (soil) and top with a swirl of Dr. Oetker cupcake icing as per the recipe.

– When you do have your children helping out, I find it saves so much mess and cleaning up if you have everything weighed out and in plastic bowls; plates; beakers. That way the little ones can actively enjoy getting the ingredients together and you don’t have to worry about them spilling heavy bags of flour, or breaking shells into the mixture.

Dr. Oetker Twitter Competition
For more family friendly recipes, head over to www.oetker.co.uk

They are also running a competition on Twitter to win a copy of the book as well as some baking goodies. To enter, just RT their competition tweet and follow @DrOetkerBakes

IMG_3417

IMG_3404

This post is in collaboration and sponspored by Dr. Oetker.

#Recipe Chewy Krispy Easter Bars

I ended up making these not for Easter but slightly ahead of time as part of my daughter’s half-term homework! I wanted to avoid lengthy cake recipes and also favored something which wouldn’t have her tinkering with my temperamental oven. If you do a quick online search for rice krispie treats you’ll be awash with various recipes and this is my take on it. It’s also a great recipe to get the kids involved- well and truly getting stuck in. The addition of the popping candy gives an extra little surprise when eating the bars much to the delight of the little ones!

2016-02-19 14.59.27

Makes 24

Ingredients
50g butter
300g mini marshmallows
170g Rice Krispies
75g Chocolate covered popping candy
90g bag Mini Chocolate eggs

Method

  • Grease a 34.5 x 24 x 4cm H. (13½” x 9½” x 1½”) tray-bake or brownie pan with butter or cake release.
  • Place the Rice Krispies in a large bowl, and sprinkle over the chocolate covered popping candy. Set aside until needed.
  • Melt the butter in a large saucepan over a low heat.
  • Add the marshmallows and cook gently until they are completely melted, stirring constantly.
  • Remove the pan with the melted marshmallows the heat and immediately pour over the cereal, mixing with a spatula until coated. If your making these with your kids this is this ideal stage to get them involved. Wearing vinyl gloves let them get stuck in with their hands mixing the cereal and marshmallow “goo” together until well combined and well coated. Be careful not to squash the cereal too much though!
  • Press the mixture into your prepared pan; press it down into the corners. It will be sticky and stringy but lots of tasty messy fun!
  • Flatten the top and push the chocolate eggs into the surface so they stuck in.
  • Let the marshmallow crispy squares cool completely in the tin and then cut them into 12 squares, then cut each square into ½ giving you 24 bars.
  • Serve and enjoy!2016-02-19 15.00.10

Wired for Sound! #recipe #brownies

So this morning saw me chatting to the imitable food presence that is William Sitwell on his “Biting Talk” show on Soho Radio. Some of you may recognise him from such things as the Mastechef food critics table, or from Waitrose Kitchen magazine. By the by, conversation ranged from cupcakes (of course!) to beards (well why not) to cartoon franchising (you’ll just have to listen for that one!) If you missed out here’s the link below for you aural delectation…

As only expected for #thebeardedbaker I brought along some baked goods for sampling. Yes, I know it was only 9am in the morning but (a bit like gin!) it’s always cake o’clock somehwere in there world. So the team at Soho Radio had the pleasure (I hope!) of trying out two new recipes for brownies and cupcakes-

cupcakes

My “Hot n Smoky” caramel cupcakes of caramel sponge filled with a smoked caramel centre, topped with caramel buttercream frosting and sriracha cinder toffee shards.


Brownies

Chocolate  Cherry & Cheesecake Brownies- Chocolate, Cherry and double-chocolate brownies topped with White Chocolate & Pink Peppercorn Cheescake

In the event that these have piqued your intrest and tingled your tastebuds here’s the recipe for the Chocolate Cherry brownies. Do bear in mind that these are exceptionally rich- a chocolate motherload not for the faint-hearted! As such I recommend cutting them down into half the traditional brownie size.

Chocolate Cherry & Pink Peppercorn Cheesecake Brownies
Makes 18 (deep pan) or 40 (shallow pan)

Ingredients
185g unsalted butter 185g, cubed
185g 70% cocoa dark chocolate, broken into pieces
3 eggs
275g caster sugar
85g plain flour
50g cocoa powder
1 tbsp Espresso powder
50g 70% cocoa dark chocolate chunks
50g white chocolate chunks
100g glace cherries, halved
1 egg
280g cream cheese
60g caster sugar
3 tbsp pink peppercorns, lightly crushed
50g white chocolate chunks

Method

  • Set your oven to 180C/gas mark 4 and line a deep 12″x9″ baking tray with baking parchment. * See note for brownie numbers
  • Melt the butter and chocolate in a bowl over a saucepan of simmering water (or bain-marie), stirring occasionally. Once melted, remove from the heat and allow to cool.
  • Beat the eggs and sugar until the mixture is thickened and fluffy.
  • In a separate bowl, combine the flour, cocoa powder, and espresso powder.
  • Fold the cooled chocolate mixture into the egg mixture.
  • Sieve in the dry ingredients, and fold together.
  • Fold in the chocolate chunks and cherries until well combined.
  • Pour your mixture into the lined tray and gently spread to level the surface.
  • For the cheesecake, beat the cream cheese, caster sugar, and egg in a separate bowl until smooth.
  • Melt the white chocolate (either over hot water or in a microwave in short bursts).
  • Add the pink peppercorns and melted chocolate into the cheesecake mixture and mix well.
  • Pour/ place blobs of the cheesecake mixture on top of the chocolate brownie mixture.
  • Swirl with a knife or a skewer to create a marbled effect throughout the batter
  • Place in the oven for 35-40 minutes, then leave to cool completely in the tin before removing from the tin or cutting into squares.
  • Leave to cool, then serve.

*If you use a 12” x 9” tin you will get 20 brownies (cutting 4 x 5) and then divide further down in half to give you 40 brownie “bars”. If you use a 9” x 9” silicone brownie pan (available from Lakleand) you’ll get 9 deeper brownies which you can cut down in half to give you 18 brownie “bars”.