Chewy Maple & Bee Pollen Oat Cookies

Not really much of a tale behind these other than I just REALLY wanted an oatmeal cookie one day. But I can be particular about my oat cookies! Not for me are the crisp, brittle types. I prefer the soft, chewy variety that meltingly give when you bite. Maple syrup ALWAYS makes things better so why not include it? To be honest it’s not too prevalent in the taste of this cookie- just enough boost the “cookie comfort factor” (I may trademark that as a baking calibration tool!) The bee pollen was a “why the heck not?” addition from a pantry rummage, albeit with added health benefits. If you don’t have any feel fee to omit. Which of course means these become “Chewy Maple Oatmeal Cookies”. One less ingredient but just as tasty.

Makes 30 apx

Ingredients

• 1 1/2 cups All Purpose flour

• 1 teaspoon ground cinnamon

• 1 teaspoon baking soda

• 1 teaspoon salt

• 1 cup (2 sticks) salted butter, softened

• 1 cup light brown sugar, packed

• 1/2 cup granulated sugar

• 2 large eggs

• 1 tablespoon fancy molasses

• 3 cups whole rolled oats

• 1/2 cup bee pollen

• 1/4 cup maple syrup

Method

  1. Whisk the flour, cinnamon, baking soda, and salt together in a medium bowl. Set aside
  2. In the bowl of a stand mixer, fitted with a paddle attachment, beat the butter and sugars on medium-high speed until blended, about 5 minute, then increase to high speed and whip for another 5-6mins
  3. In a jug combine the eggs, molasses, maple syrup and vanilla. Add to the butter mixture and beat for 3 minutes until combined. Scrape down the sides and beat again as needed to combine
  4. Add the dry ingredient mixture to the wet ingredients (I usually do it in 1/4 cup increments) and mix on low until combined. Remove the bowl from the mixer and fold in the oats and bee pollen. The final dough will be thick and sticky.
  5. Cover and chill the dough for at least 45 minutes in the refrigerator
  6. Preheat oven to 350°F (177°C). Line baking sheets with parchment paper or silicone baking mats
  7. Use a medium cookie scoop (about 2 tablespoon size) to scoop the cookie dough on to the prepared baking sheets, placing 2 inches apart. Bake for 15minutes or until lightly browned on the sides. The centers will look soft.
  8. Remove from the oven and allow cookies to cool on the baking sheet for 5 minutes before transferring to a wire rack to cool completely
  9. Cookies can be kept at room temperature in a sealed container for up to 1 week

Classic Angel Food Cake

img_6078

I recently tired making one of these to pass (yet another) day in self-isolation. I knew of it’s reputation for being a difficult and finicky cake to master. I’ve got to be honest- as long as you have the correct Angel Food/ Tube cake pan it’s a breeze. The recipe is a classic standard and sure it can be found with ease on Google. I’m posting it here for convenience as I’ve had a number of people inquiring about it.

A final parting word. Despite it’s fabled complication in the kitchen the cake itself is quite easy and well worth the effort. In my opinion it hands down beats any Japanese Souffle Cheesecake.

Angel Food Cake Checklist

  • Always use Cake Flour (see note below)
  • Always use room temperature egg whites
  • Always whisk/ sift the flour to aerate it
  • Always leave the cake pan ungreased
  • Always FOLD the mixtures together, do not beat
  • Always invert the baked cake straight out of the oven
  • Always allow to fully cool before removing from tin
  • Always use a serrated knife to cut cake slices to avoid squashing the crust

147fcae0-a4de-4e05-946e-8c4024911042

Ingredients

  • 1 1/2 cups Cake flour*
  • 2 cups sugar, divided
  • 14 large egg whites, room temperature
  • 1 teaspoon cream of tartar
  • 1/2 teaspoon kosher salt
  • 2 teaspoons vanilla extract

Special Equipment

  • 10″ Angel Food/ Tube cake pan

Method

  1. Preheat oven to 350°F
  2. In a medium bowl, whisk together flour and 1 cup sugar. Set aside until later
  3. In the bowl of a stand mixer fitted with the whisk attachment, beat egg whites at medium speed until foamy
  4. Add remaining 1 cup sugar. Increase mixer speed to high and immediately add cream of tartar and salt. Add vanilla extract, and beat until peaks form
  5. Transfer egg white mixture to a clean and dry large bowl. Gently fold in flour mixture in 4 additions just until combined. Transfer the batter to an ungreased 10-inch removable-bottom tube pan. Run a sharp knife through batter to remove any hidden air pockets, and smooth the top level
  6. Bake until cake is firm to the touch and an instant-read thermometer inserted near center registers 205°F (96°C) to 210°F (99°C), about 40 minutes.
  7. Remove from the oven and immediately invert pan** and let cool completely.
  8. When cool turn cake-side up and using an offset spatula, loosen cake from sides and remove bottom/ cake insert from pan surround. Loosen cake from bottom and tube by same method. Invert onto a cake plate and serve, cut using a serrated knife

    21fae060-1714-463a-be0f-15fc8d88f67a

    Served with blueberry & gin compote and peaches

    *When I was making this I discovered I didn’t have cake flour to hand. A frustration-saving substitution for cake flour is as follows

    For 1 cup of cake flour- 1 cup of All Purpose flour but remove 2 tablespoons of it. Add in 2 tablespoons of cornstarch and sift the mixture twice. Remeasure 1 cup of the resulting mix as 1 cup of cake flour. DO NOT use All purpose flour on it’s on in this recipe – your cake will have a texture verging on bread!

**Some Angel Food/ Tube cake pans come with pronged feet attached which allow for inverted cooling. If yours doesn’t have them (like mine) then invert the baked cake tin tube onto a narrow wine bottle neck or spirits miniature bottle (some balancing or leaning against something may be required)

PB & J Coffee Cake

img_5815

PB & J – Never have three letters caused such divisive reactions. To be honest the quintessential North American stable of childhood has often has left me baffled in the past. I guess the secret of it’s appeal lies in that age old combination of sweet and salty. Whilst I struggle with grasping it’s appeal in it’s original sandwich form I’ll confess to being partial to it in bake form with contradictory fervor. Just as long as it’s not with grape flavoring! That attraction still eludes me.

So imagine my interest when I stumbled upon this recipe. Although I wish I could lay claim to this recipe the credit all lies with the publication Bake From Scratch and their recent issue on “One Layer Cakes”, If you haven’t heard of BFS I’d definitely recommend checking them out. If not directly for their recipes then certainly as a source of inspiration as I have done in the past.

Whist the original recipe calls for making two 6″ single layer cakes I couldn’t help but think who on earth wants a cake that small! So I instead baked mine in a single 9″ with the only variance being a longer cooking time with the necessity for aluminium tenting the top of the cake towards the end of baking. 

Prepare to surrender to the peanut buttery goodness! I love the crumbly peanut streusel topping- it’s a unique twist on the signature coffee cake feature. I’m sure jam/ jelly to suit your taste could be subbed in, there just happened to be strawberry lurking in my pantry. All in all this cake didn’t last long as it proved a quick hit with the kids. I kept mine on the counter top, in an airtight cake box, and after 4 days it was still tasty ever.

img_5809

Ingredients

Streusel topping

  • 1/3 cup All Purpose flour
  • 1/4 cup firmly packed light brown sugar
  • 1/4 cup smooth peanut butter
  • 1 tablespoon salted butter, softened
  • 1/3 cup salted peanuts, chopped

Cake

  • 1/2 cup unsalted butter, softened
  • 1 cup granulated sugar
  • 2 large eggs
  • 1 teaspoon vanilla extract
  • 1 1/2 cups All Purpose flour
  • 1 teaspoon baking powder
  • 1/2 teaspoon kosher salt
  • 1/2 cup buttermilk
  • 3/4 cup strawberry jam

Garnish

Warmed peanut butter

Method

  1. Preheat oven to 350°F. Spray a 9” round deep cake pan with baking spray and line with baking parchment
  2. To make the streusel topping: In a medium bowl, whisk together flour and brown sugar. Stir in peanut butter and butter until mixture is crumbly. Crumble with your fingertips until desired consistency is reached. Stir in peanuts. Chill in the refrigerator until needed later
  3. For cake: In the bowl of a stand mixer fitted with the paddle attachment, beat butter and sugar at medium-high speed until fluffy and pale, stopping to scrape sides of bowl. Reduce mixer speed to low. Add eggs, one at a time, beating well after each addition. Mix in the vanilla extract
  4. In a separate medium bowl, whisk together flour, baking powder, and salt. Gradually add flour mixture to butter mixture in 3 stages alternately with buttermilk, beating just until combined after each addition. Pour 1/3 of the cake batter into your prepared tin. Spread on strawberry jam, and top with remaining batter, smoothing the top for a level surfaced. Sprinkle with the peanut streusel you prepared earlier
  5. Bake until a wooden pick inserted in center comes out clean, 60-65 minutes, if needed loosely covering with foil to prevent excess browning. Let cool in pan for 15 minutes. Run a sharp knife around edges of cake to loosen sides. Invert onto a plate, and then invert again onto a wire rack. Let cool completely. Garnish with warmed peanut butter, if desired.

img_5821

Millionaire’s Shortbread

img_5688

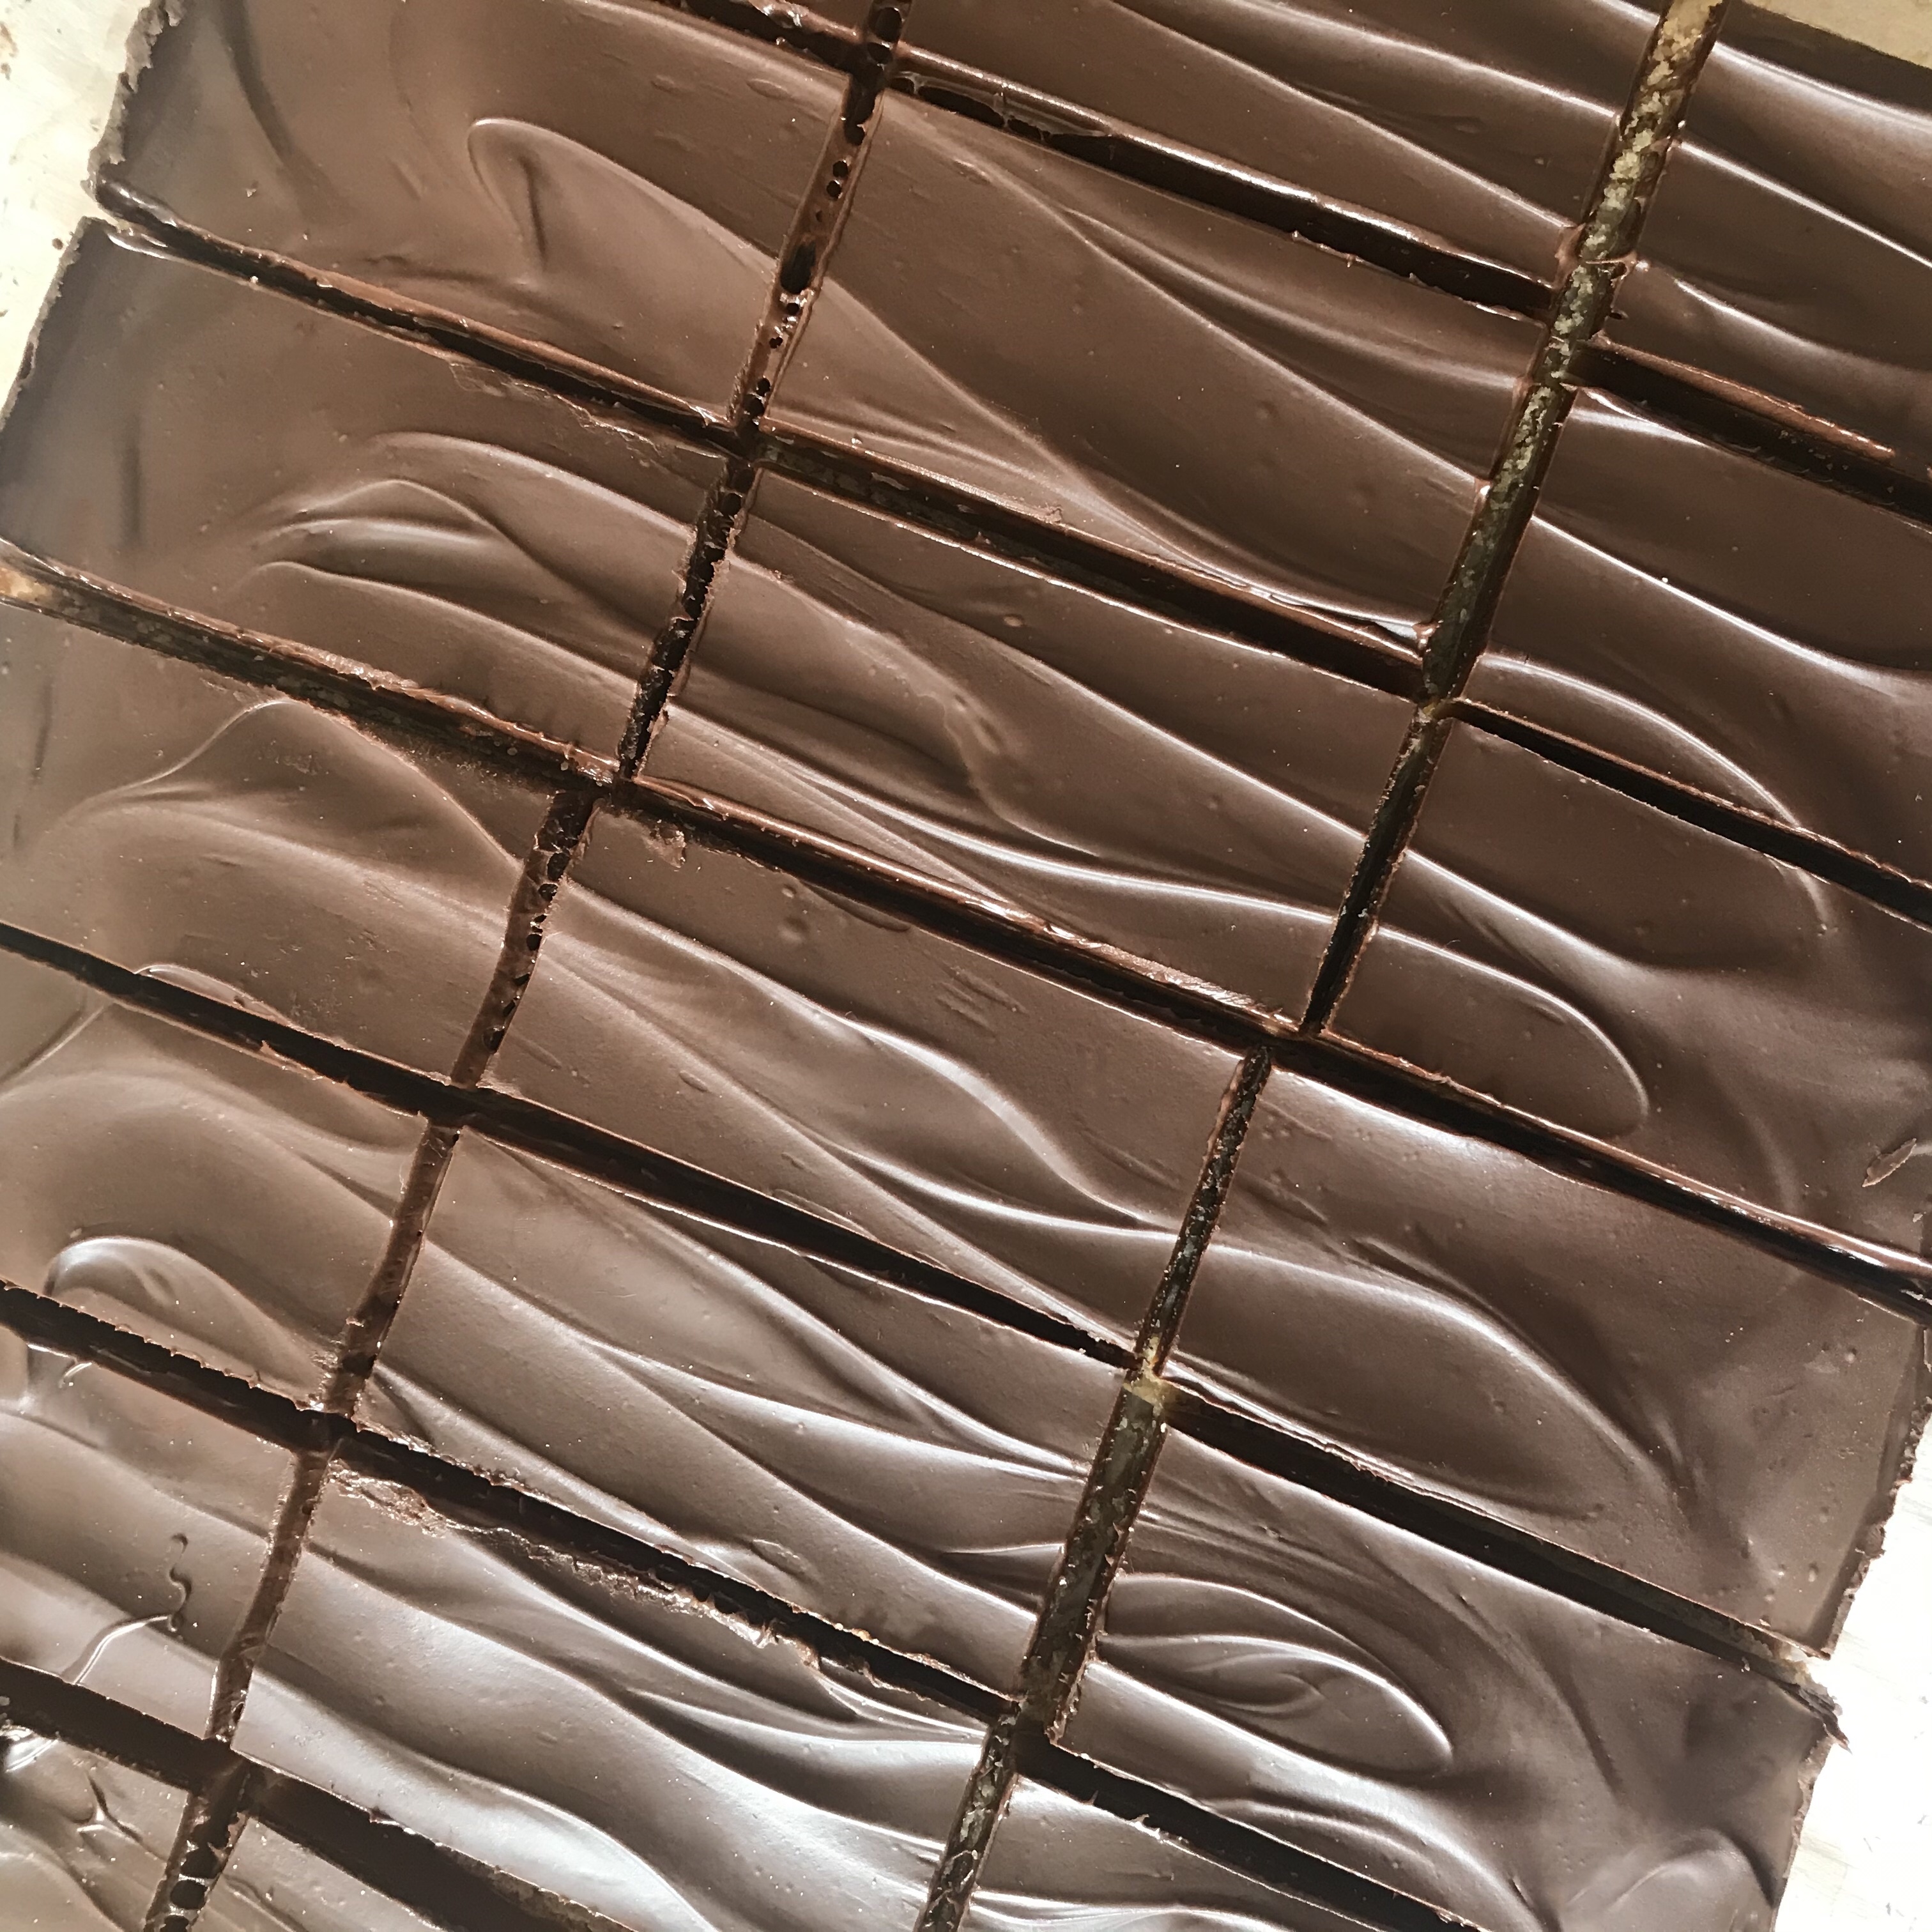
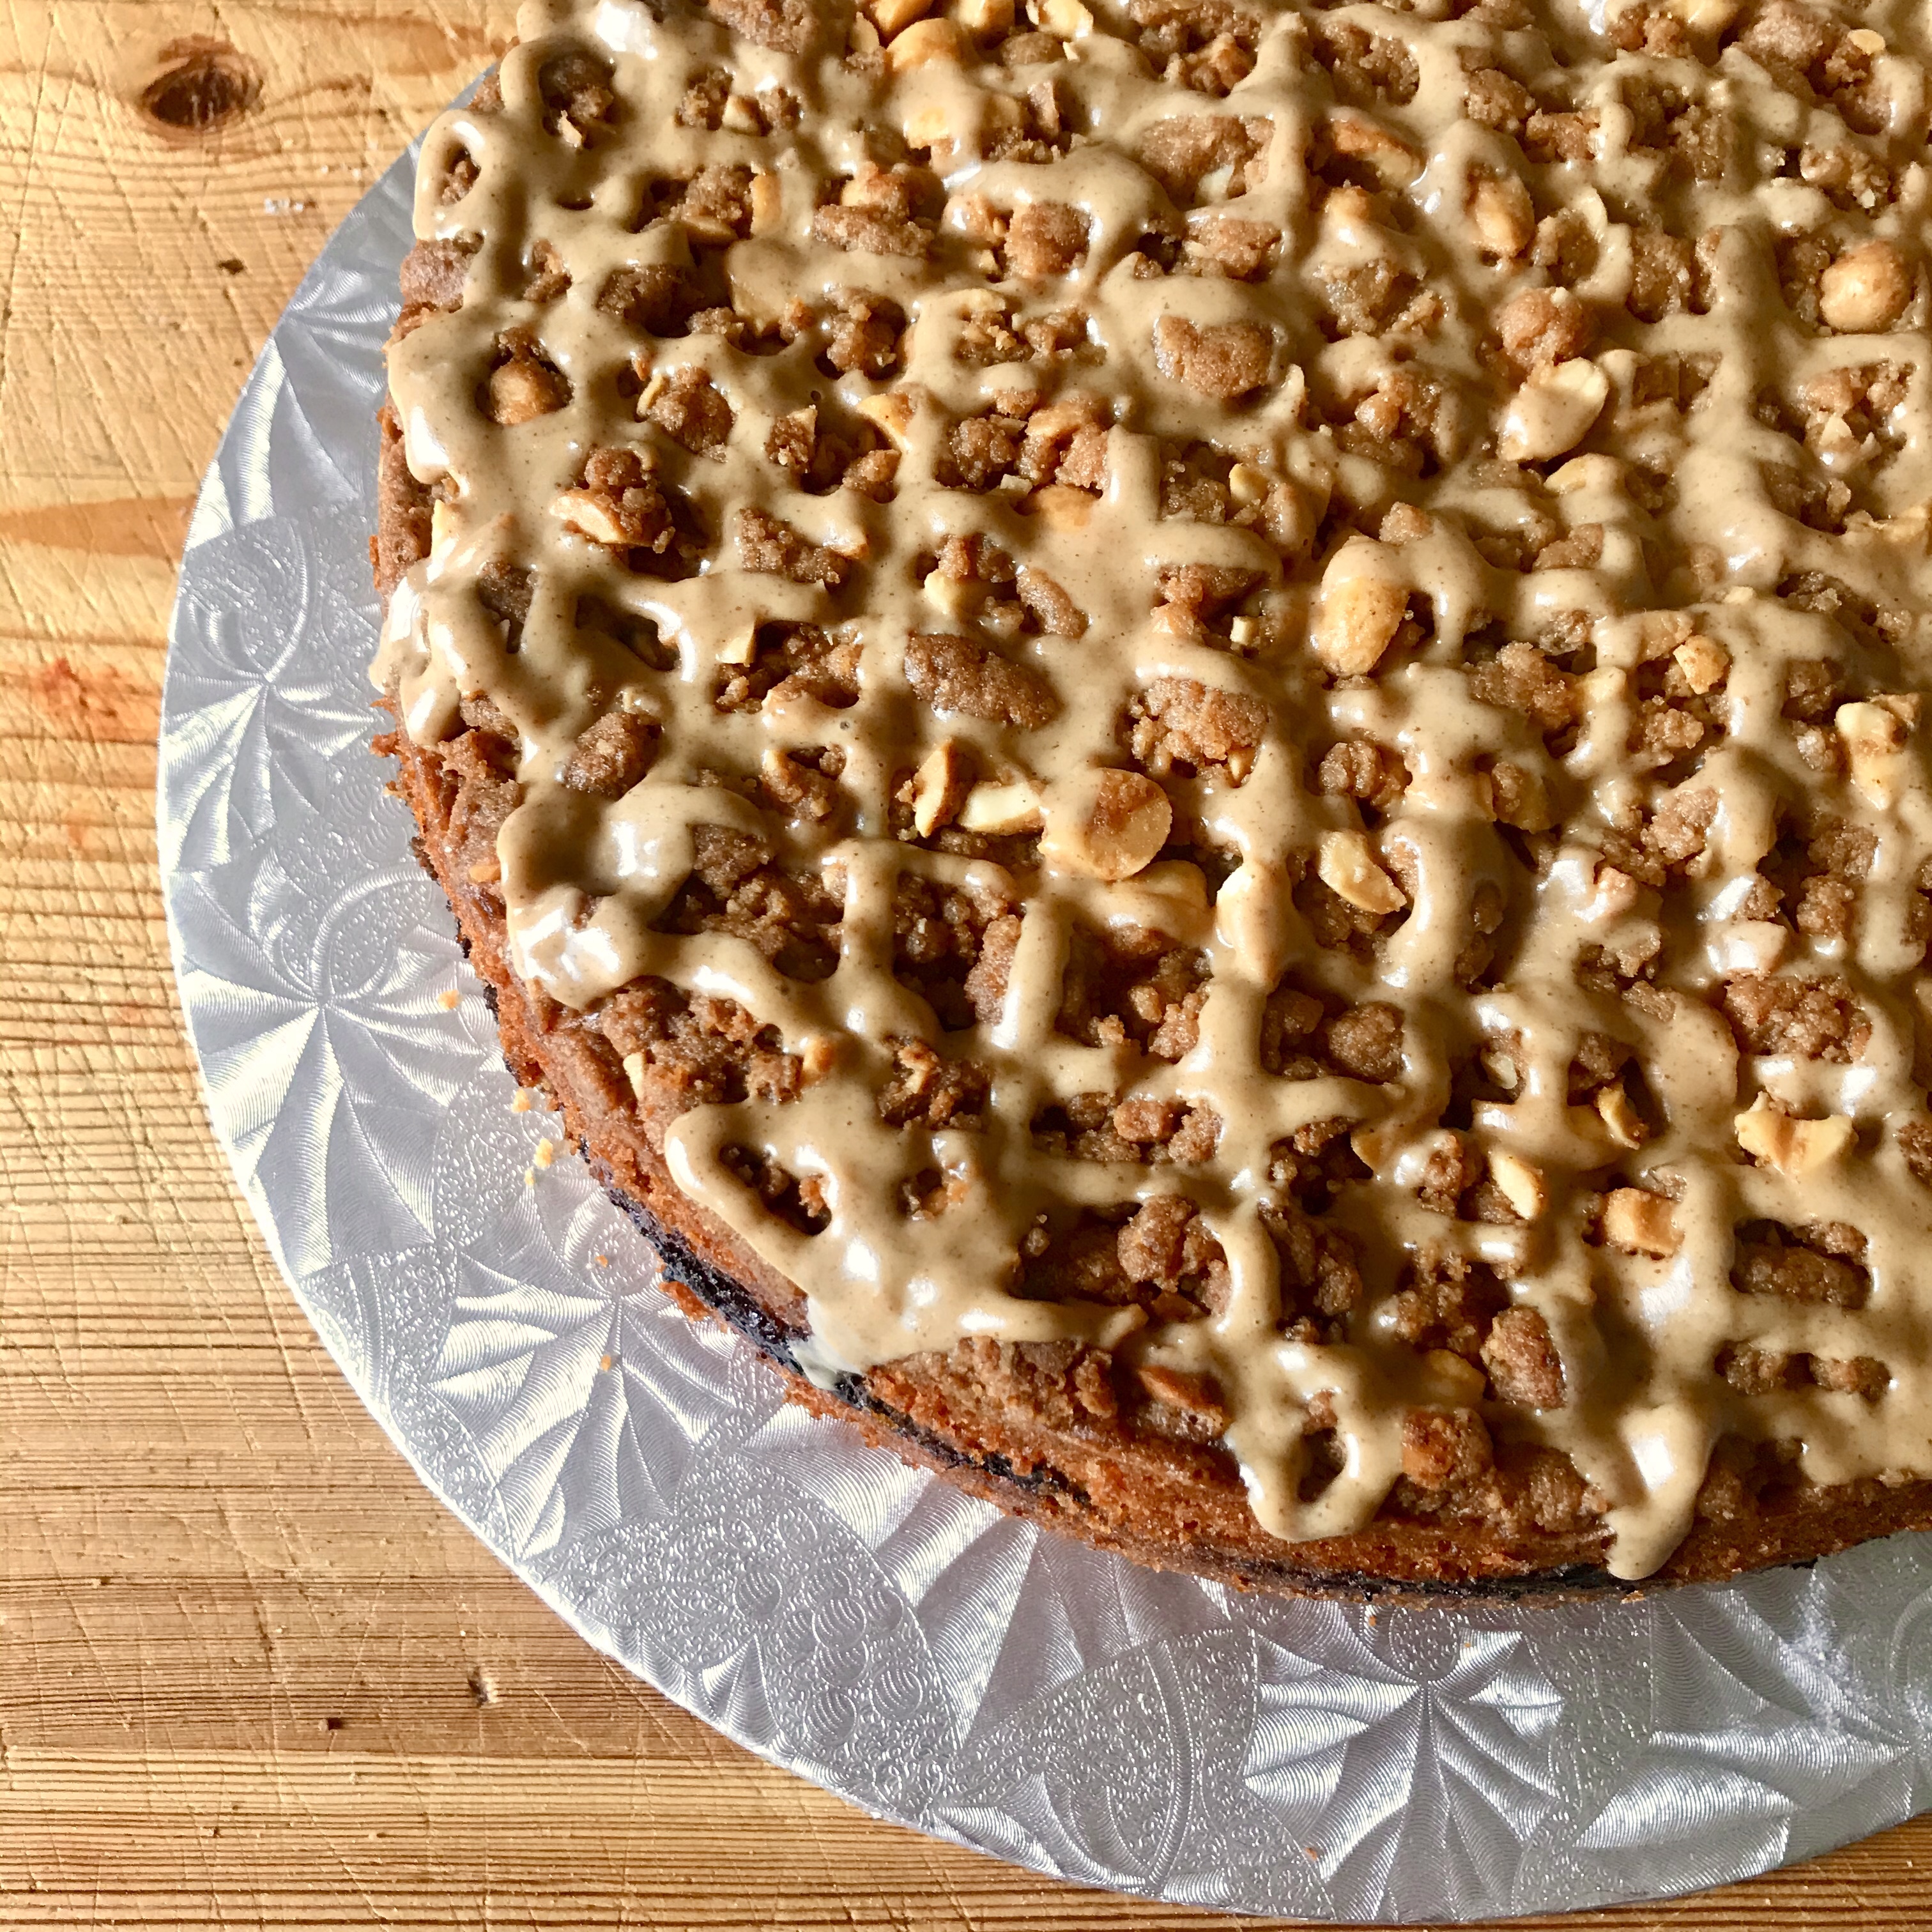
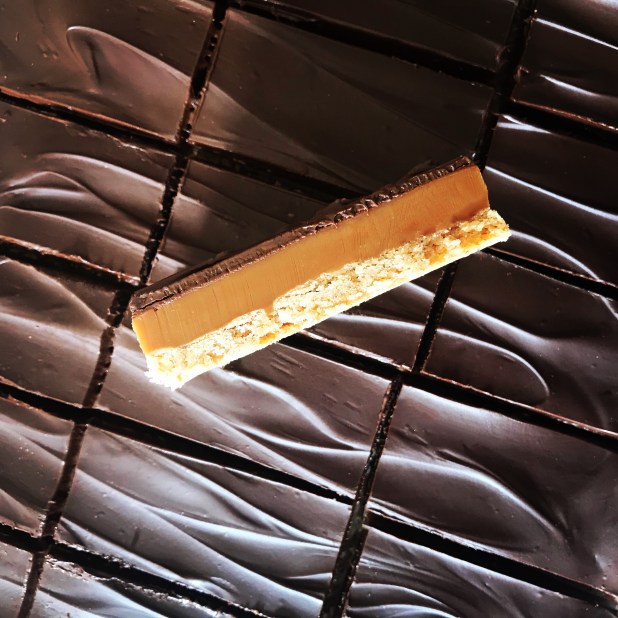
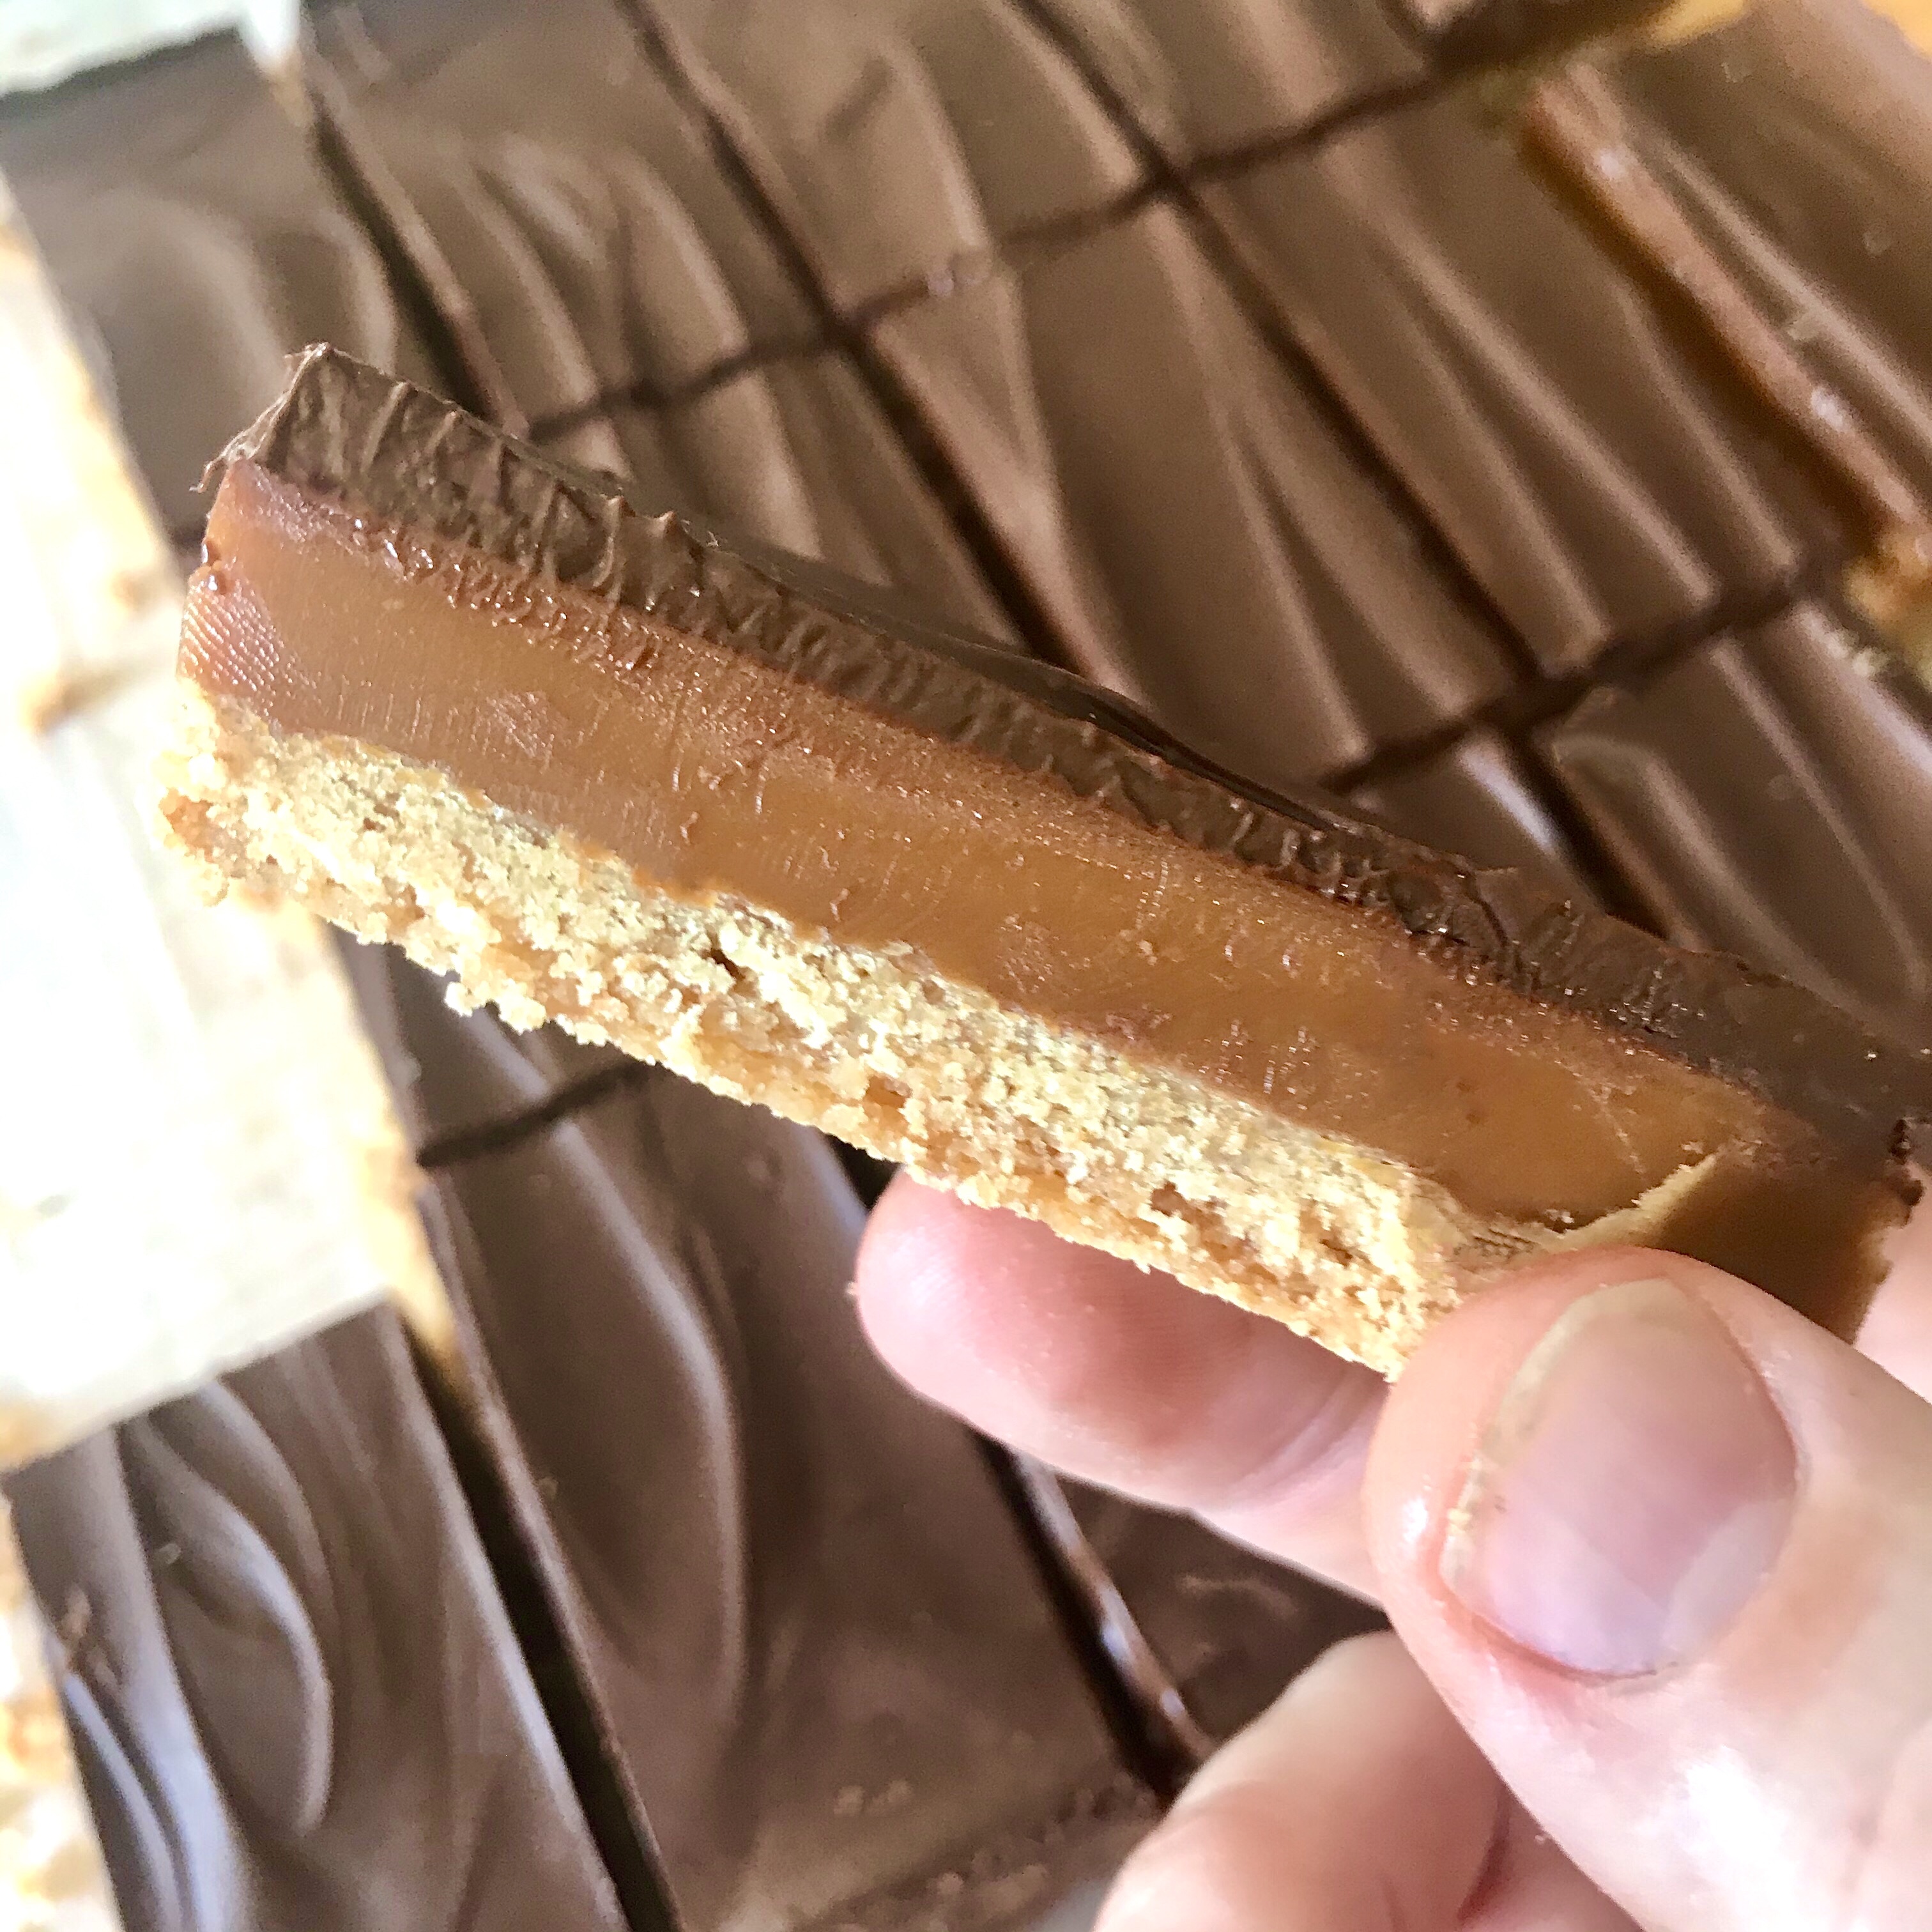
“Millionaire’s Shortbread”, “Caramel Slice”, “Millionaire’s Slice”…call them what you will these caramel laden shortbread bites remain hugely popular from many a childhood memory. Investigation would point to it’s origin’s thanks to our Antipodean friends in the ’70s and as such the initial recipe remains unchanged- buttery shortbread, sweet caramel and luxurious chocolate.

Yes it may seem like such a chore laboring to make each of those individual layers but the end result is surely worth it? None of the intrinsic layers require any great skill in the kitchen, but with some attention and patience a batch of delicious Millionaire’s Shortbread is pretty much a cinch. 

The shortbread layer is first out of the starting block. The pale, crumbly dough that you’ll press into you pan will be baked to a golden, buttery slab of goodness. I mention in the recipe below a handy trick that I’ve used over time and in addition have seen cited in a few other recipes. Using a measuring cup or spoon to compact the freshly baked biscuit layer helps avoid surplus crumbling when slicing the baked shortbread. Simply press the back of the measuring cup (I find 1/3 cup a good size) or spoon gently but firmly on to the shortbread surface in it’s entirety, taking can not to drag it lest you pull some of still-setting crumbs with you. Once this is done you can leave to cool (or pop it in the fridge as I do) and carry on. See- that wasn’t so hard was it? 

And now for the infamous caramel layer! Yes, boiling sugar in a pan and the resulting caramel can sound daunting but with some care and a good candy thermometer on hand those fears will soon be waylaid. I have two pointers here a) constant gentle stirring is a lifesaver in order to avoid the molten mixture catching at the bottom of the pan and charring b) adding in heavy cream to the caramel mixture not only adds a luxurious touch but also keeps the mixture emulsified and avoiding separation which can occur due to heating the condensed milk. The last thing you want ruining your hard work is a gluey, grainy approximation of caramel. 

As for the final finishing chocolate layer, the one that always gets me salivating, there is one common pitfall. One that I can admit to making more than a few times. Don’t forget to add butter to your chocolate for the finishing coating. Practice has taught me that just melting the chocolate and slathering it on in it’s virgin state leads to a brittle layer that frustratingly cracks at every cut and bite. Including the butter incorporates enough yield into the final set surface that you can achieve those insta-worthy cut pieces and decedent mouthfuls without covering yourself in chocolate splinters.

If you do venture to make these you’ll see (and taste) just why they have proven so popular again and again, and indeed traveled the world over. Just remember to share!

c79e439e-b05d-4385-b31a-9a5eb4a4658e

Ingredients

Shortbread Base

  • 2 1/2 cups all-purpose flour
  • 1/2 cup granulated sugar
  • 3/4 teaspoon kosher salt
  • 2 sticks salted butter, melted

Caramel Filling

  • 1 (14-ounce) can sweetened condensed milk
  • 1 cup brown sugar, packed
  • 1/2 cup heavy cream
  • 1/2 cup golden corn syrup
  • 1 stick salted butter
  • 1/2 teaspoon salt

Chocolate Topping

  • 8 ounces semi-sweet chocolate
  • 1 tablespoon salted butter

Method

Shortbread Base

  1. Pre-heat your oven to 325°F. Grease and line a 13×9″ baking pan with parchment paper leaving some hanging over edges of pan to lift out after baking
  2. In a large bowl combine the flour, sugar, and kosher salt. Add melted butter and stir until flour is mixed and dough is crumbly
  3. Transfer to your prepared baking pan and press evenly over bottom of prepared pan. Using fork, pierce dough at regular intervals all over. Bake for 30 minutes, or until light golden brown and firm to touch
  4. Remove from oven. While still warm, use a the back of a measuring cup and press surface of shortbread slightly to compress. Although this part is optional it helps when cutting later. Set aside until needed later

Caramel Filling

  1. Combine the caramel ingredients together in large saucepan. Cook over medium to low heat, stirring frequently to avoid any scorching on bottom for 20 minutes, or until mixture reaches 240°F (Soft Ball stage on candy thermometer)
  2. Carefully pour over shortbread while hot and spread to even thickness. Let cool completely for 1 1/2 hours, or until caramel is firm to the touch

Chocolate Topping

  1. In a small microwave safe bowl melt the chocolate and butter in microwave for 30 second intervals on high, stirring in between until melted. Stir to incorporate the butter until smooth. I find that 2 blasts in the microwave is usually enough
  2. Pour the chocolate over the cooled caramel layer and tilt pan to cover to edges and look smooth or use a spatula or knife and spread back and forth across the surface. Refrigerate the finished shortbread for a couple of hours or until the chocolate topping is set
  3. Lift out of pan using parchment overhang onto a cutting board. Slice into bars*. For the size of tin I use here, I cut so I have 3 by 8 rectangular “bars” (2 cuts x 7)

*I’ve found the best way to slice the shortbread so that you get neat, clean bars is as so- Remove the fully cooled shortbread traybake from the refrigerator about 15 minutes before you want to slice. Fill a tall heat-proof jug full of boiling water so that it covers the blade of a sharp knife. Let the knife stand in the jug for 2 minutes. CAREFULLY wipe the knife off of any water and make your cut into your shortbread. Slice once- quickly and smoothly, then stand the knife back in the jug of boiling again. You don’t need to leave it for long this time, a simple full plunge of the blade will do. Again CAREFULLY wipe the blade clean of any water or chocolate residue. Carry on cutting, plunging and wiping until all the traybake is cut to your required size. Leave for a few minutes so the cur bar edges firm up then serve.

img_5683

The Magic of Yeast Water

img_5498
First they came for the hand sanitizer, then they came for the TP. Finally they came for…the flour & yeast? Yeah- The Time of Covid has been a stressful, testing and, let’s face it, downright weird one. Panic induced mob-mentality has led to mass line-ups outside grocery stores and bulk buying of household items in order to weather self-isolation orders and solitude. 

Whether it’s genuine creativity or social media induced compulsion it’s also led to an exponential increase in people home-baking. Despite the majority of grocery market shelves being repopulated with once scare items, a social distance complying stroll through any baking aisle will reveal barren, flour dusted shelves that once accommodated flour of all varieties and it’s habitual partner-in-crime…yeast.

Yeast shortage bedamned! Whilst I realized that I did NOT have the space to accommodate a domestic flour mill, what I could set about investigating was yeast and it’s production. I mean- I’d had already gotten a pretty solid hold on the process of Kombucha brewing -whatever else there is NO shortage of scobies at my house! That process involved yeast and it’s cultivation so how different could growing yeast for baking be? Turns out not so much. Use of a base fruit to cause a fermentation reaction (I use raisins here) and a few more steps. Said reaction then causes the production of yeast with which you can make use of in bread-making. Seems easy right? Well technically it is. BUT don’t expect it to be a speedy process. It takes almost a week to brew the initial yeast water- and that’s BEFORE you actually start on the bread production- which is slow. It seems that making bread by using naturally grown yeast, weather via a dough starter or yeast water, is a slower process than using your packet or jarred variety. 

Please don’t think that I’m nay-saying the process. Quite the opposite in fact. Is the slow lengthy process of brewing and proofing so bad after all? In world now fraught with anxiety and frustration, is spending time on things so bad? Basking in the mindfulness of a task or hobby is hardly disadvantageous. I mean- time isn’t one of those things in shortage right now? Although a lengthy effort to make and bake with yeast water I can definitely say it’s one heck of a rush of elation and satisfaction when cutting in to the final baked loaf.  And I will say it’s a delay well worth waiting for once you taste the final protracted fruits of your labour. Using natural yeast adds so much more character and dimension to your loaf that you’ll never get with the speedy but banal convenience of quick yeast again.

Another positive aspect (if more practical) is that once the initial yeast water is brewed there is minimal, if none at all, upkeep of it in comparison to it’s celebratory sourdough starter cousin. “Apparently” it’s just a process of just drain off the fruit, storing the yeast-rich water in the fridge, using it when needed. You only need to add more components when the source water runs low and you need to make more. (I say “apparently” as I’m in the middle of this process myself – so expect updates!)

I’m still testing out varying methods of dough proofing and crafting, and in doing so am trying a various hodge-podge of principles and methods “a little of this, a little of that”. Initially I used a sourdough method of using a starter and levain. As this method resulted in success (see the final video) it’s the one I detailed here.

*Later in the recipe I use a bench scraper to help with the procedure. Whilst not essential, you can use your hands, it does make the job easier.
I also make reference to something called  “50/50 mix”. This is a half and half mixture of bread flour and rice flour. The smaller, coarser grains of the rice flour helping to overcome dough sticking


Yeast water base
  • 4 Tablespoons raisins
  • 2 Tablespoons sugar
  • 1 cup tepid water
  1. Add all ingredients to a 1 litre bottle (in the photogrpahs below I started off in a Kilner jar but later transferred to a bottle). I’ve used a spare SodaStream bottle but the main thing you want is something that can be sealed and airtight. Mix to shake and leave to ferment in a warm (room temperature) place. I leave it in my pantry. Over the next 4 days shake the bottle at least once a day to ensure than the contents remain mixed and to avoid mould growth on the fruit. Over this time you will gradually see the fruit starting to float and a layer of bubbles form on the surface of the liquid
  2. After the forth day release the cap carefully as the contents will be choc-full of carbonation and fizzing. You should also notice an odour reminiscent of beer/ over-ripe fruit. You’ll know it- it’s pretty distinctive. Once the contents have settled add an additional 4 cups of water and shake to mix the contents. leave overnight in your selected warm location
  3. The following day, again carefully release the cap and wait for the carbonation to subside. Add in a further 1 tablespoon of raisins and 1/2 cup of water. Shake again and set aside for at least 4 hours before initial use

Starter dough

  • 30g Bread Flour
  • 30g Yeast Water (drained of any fruit)
  1. Mix these two ingredients together in a jar and set aside overnight in the same location as your yeast water. If you water is successful (ie alive!) the mixture should have increased in volume and be quite bubbly. If not I’m afraid it’s pack to the drawing board for you. Perhaps try fresh fruit instead of dried? I’ve read of some recipes where figs, dates, and even apples have been used. Also see my note below*

Levain

  • Rested Starter dough, as above
  • 60g Bread Flour
  • 30g yeast water 
  1. Transfer you starter mix from the jar to a large bowl. Add in the bread flour and additional yeast water. Stir to combine well (the mixture should be like a thick slurry paste). Leave this to rest for minimum 6 hours in the same location as your yeast water. The next step is were you’re actually going to make the bread dough! (A word to the wise here – select a bowl large enough to contain you’re final amount of dough after proofing)

img_5348

Bread dough

  • Rested levain, as above
  • 400g bread flour
  • 10g salt
  • 350g tepid water
  1. Combine all the ingredients in a large mixing bowl. Using your hand in a “claw” shape mix them until they are well combined. Cover with oiled cling wrap or a plastic bag and set aside for 30 minutes (this is called the autolyse)
  2. After 30 mins remove the covering and again with your hand in a “claw” shape mix the dough. Continue for another few minutes until it gets to the stage where the dough is a roughly a single ball/ lump in the centre of the bowl and is “cleaning” the sides of the bowl of any residual mixture. It should still be quite sticky
  3. Transfer the dough from the bowl onto a counter top. I find there is no need to flour or oil it as this way helps it stick- enabling stretching and gluten strand formation. This are is where you’ll develop your own technique for kneading the dough. As a heads up while you knead the dough it will become firmer and dryer, sticking less to the surface. My method of kneading is to grab the dough by either side and pull it up, away from the counter surface, causing the centre to stick to the surface. If the complete doughball comes away slap it to the counter surface whilst still holding either end. Then fold either end back on top of the main body of dough and repeat. I think this part of kneading is quite specific to the person doing it- almost like a signature. I continue this for 15 minutes by which time the dough has become firmer, dryer and holds it’s shape a lot better. At this point transfer back to the large bowl for First Proof. Cover loosely with oiled cling wrap and leave in a warm location (you guessed it- same as your yeast water!) The proofing of this will be rather slow so I’ve left mine overnight until it has more than doubled in size. 

The following day

  1. Your next step in dough production! Tip the risen dough out on to a clean counter top lightly dusted wit a 50/50 mix of bread flour and rice flour. You don’t actually want to knock it back too much here unlike when you ‘re making a standard bread loaf. Using a bench scraper gently scoop up and fold the dough in on itself. You’ll want to do this all around the dough ball. I usually end up doing it at between 6 to 8 times. What you’ll end up with is a dough ball with a very smooth, tight bottom (!) and it’s seams gathered at the top. Gently scoop the dough ball up and transfer it to a prepared banneton (heavily dusted with 50/50 mix) or bowl lined with a heavy-dusted cloth. Cover the banneton/ bowl with oiled cling-wrap, return it to your “yeast water” place and leave to proof/ rise for a second time. I’ve had to wait up to 6 hours for this to happen. When it has risen and doubled in size it’s now time for the next step

img_5373

  1. Preheat your oven to 425 degrees F at least 15 mins before wanting to bake. Line a baking tray with baking parchment. Dust the top of your dough (in the banneton) with 50/50 mix. Place your lined baking tray over the top of the banneton/ bowl and quickly invert. The dough should fall out onto the prepared tray. If not it may take some gentle coaxing with flour dusted fingers. Once your dough has turned out onto the tray, slash/ score the top of it (as fancy or as plain as you like) and you good to go!
  2. Place the dough in your preheated oven and bake for 20 mins. After this time reduce the temperature to 390 degrees F and continue to bake for another 15-20 minutes. Your loaf should develop a hard, crisp out crust and sound hallow when tapped from below. Remove from the oven and leave to full cool before cutting