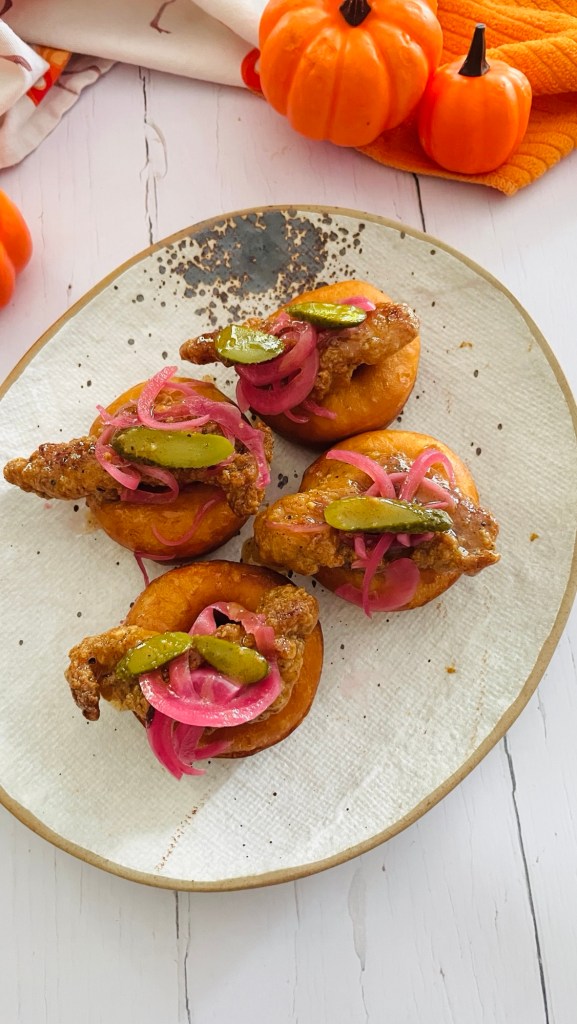
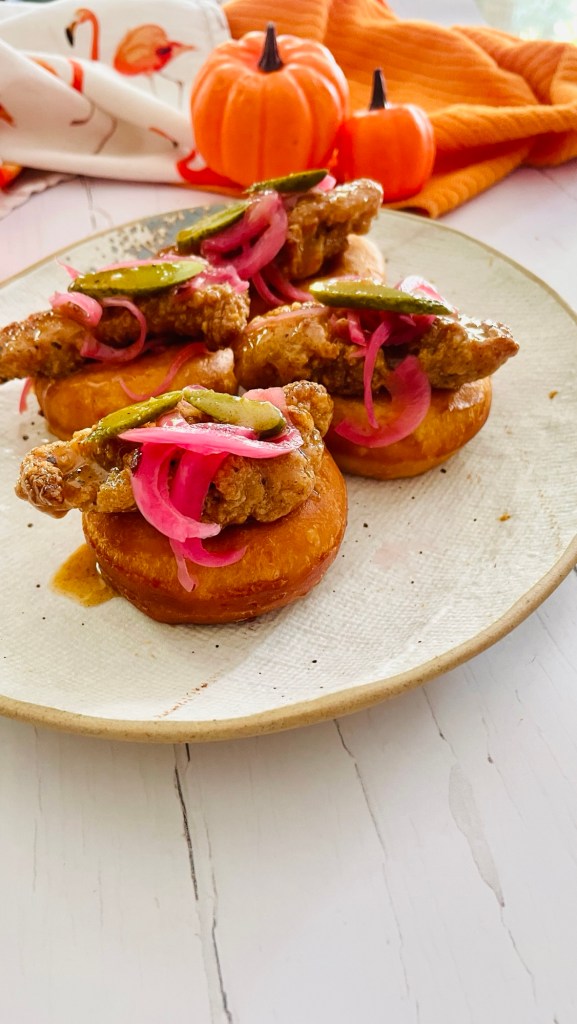
Ultimate Chocolate Cookies

Makes 16

Ingredients

  • 1/2 cup unsalted butter
  • 1/2 cup granulated sugar
  • 1/2 cup  packed light or dark brown sugar
  • 1 large egg, at room temperature
  • 1 tsp pure vanilla extract
  • 1 cup all-purpose flour
  • 2/3 cup  natural unsweetened cocoa powder
  • 1 tsp baking soda
  • 1 tsp espresso powder
  • 2 Tbsp milk powder
  • 1/8 tsp salt
  • 1 1/2 Tbsp milk
  • 2/3 cup semi-sweet chocolater chips, or chunks
  • 1/3 cup milk chocolate chips, or chunks
  • 1/3 cup white chocolate chips, or chunks 

Method

  1. In stand mixer bowl fitted with a paddle attachment, beat the butter, granulated sugar, and brown sugar together on medium high speed until light and fluffy. Add the egg and vanilla extract, and then beat on high speed until combined
  2. In a separate bowl, whisk together the flour, cocoa powder, baking soda, espresso powder, milk powder and salt together until combined. With the mixer running on low speed, slowly add to the creamed butter mixture. Beat on low until combined
  3. Add in the milk, beating to combine on high speed
  4. Remove the bowl from the mixer and fold in the chocolate chips. Cover dough tightly and chill in the refrigerator for at least 1 hour
  5. Remove cookie dough from the refrigerator and allow to sit at room temperature for 10 minutes. If the cookie dough chilled longer than 3 hours, let it sit at room temperature for about 20 minutes. This will make it easier to scoop
  6. Preheat oven to 350°F. Line large baking sheets with parchment paper or silicone baking mats. Set aside.
  7. Scoop the dough into balls, I use a 2 tablespoon cookie dough scoop. Arrange on a thew preared cookie sheets allowing 2-3 inches between
  8. Bake the cookies for 11-12 minutes or until the edges appear set and the centers still look soft. Remove them from the oven and lightly bang the baking sheet on the counter 2-3 times
  9. Cool cookies for 5 minutes on the baking sheet. Transfer to cooling rack to cool completely 
  10. Cover leftover cookies tightly and store at room temperature in an air-tight container for up to 1 week
Advertisement

Strawberry Alfajores

Makes 24 -30 cookies (dependent on cookie cutter used)

Ingredients

Dulce de leche filling

  • 1 can sweetened condensed milk, 300ml
  • 2 tsp freeze dried strawberry powder

Alfajores

  • 11 tablespoons of unsalted butter, at room temperature
  • 1 cup granulated white sugar
  • 2 egg yolks, at room temperature
  • 1 egg, at room temperature
  • 1 Tbsp brandy
  • 1 cup  all-purpose flour
  • 2 cups cornstarch
  • ½ tsp baking powder
  • Pinch of salt
  • 1 tsp vanilla extract
  • Zest of ⅓ lemon

To finish

  • 1/4 cup powdered sugar
  • 1 Tbsp freeze dried strawberry powder

Method

To make dulce de leche

  1. Remove the label from the can of sweetened condensed milk
  2. Place in a large pan with water, ensuring the can is covered by at least 2 inches of water. *form a ring from crumpled aluminum foil to sit the can on to stop direct heat from the bottom of the pan
  3. Bring the water filled pan to a boil, and reduce to simmer for about 2 1/2 hours. Top up with addtional water as need to maintain the 2 inch water coverage to the can
  4. Once the time has passed, carefully remove the can of sweetened condensed milk from the pan using tongs. Set aside and leave to cool
  5. Open the can and transfer the dulce de leche to two bowls, dividing 2/3 and 1/3
  6. To the bowl with 1/3 dulce de leche add in the strawberry powder and stir until fully combined. Set both bowls aside until needed
  7. *The recipe makes additional so any surplus can be kept in an air tight storage container for later use

To make the alfajores

  1. In a bowl combine the flour, cornstarch, baking powder and salt. Whisk well to combine. Set aside until needed
  2. In the bowl of a stand mixer, cream together the butter and sugar until pale and fluffy
  3. Add egg yolks, whole egg and mix well to incorporate
  4. Add brandy, vanilla extract, and lemon zest. Mix well to combine
  5. Add the flour/ cornstarch mixture, mixing very well until no streaks of dry ingredients remain. The final dough will be very soft
  6. Divide the dough into two and pat each into a disc, wrap the dough in plastic wrap and chill in the refrigerator for 60 minutes
  7. Preheat oven to 325ºF, and line two cookie sheets with baking parchment, or silicone mat
  8. On a floured surface, roll dough to about ¼ inch thickness
  9. Using cookie cutter, cut and place cookies on prepared cookie sheets, spacing about 1/2 inch apart
  10. Gather the scraps, roll them again and cut more alfajores cookies until you use up all the dough
  11. Bake for 10-12 minutes or until barely starting to color. Let cool on the cookie sheets for about 5 minutes then transfer to a wire rack to cool completely

To fill and finish

  1. Fill two piping bags with each of the dulce de leche fillings. Pipe a border of unflavoured filling to the flat side of one cookie, leaving a space in the middle. Fill this space with the strawberry dulce de leche. Press lightly with another cookie, flat side down forming the alfajores. Continue until all the cookies have been paired up
  2. In a small bowl combine the powdered sugar and strawberry powder, mixing to combine well
  3. Using a sieve, or shaker, dust the alfajores with the strawberry sugar mix to coat.
  4. Alfrjores are best eaten a few hours, or even the day after, being prepared. This allows the filling to soak into and “mature” the cookies to the desired texture

Dead Man’s Fingers

What’s Halloween without a little treat from the Other World, huh? These delightfully dreadful cookies are a wonderful treat to have lying around at any festively freakish gathering. A spin on traditional sugar cookies, they really do look more than the sum of their parts. They’re also easy enough that you can rope in some ghoulish little helpers for the fun.

A point to note that like all sugar cookies, you want to avoid baking them to the usual cookie state of “golden brown”- this will result in them being a tad too hard for enjoyment. Bake them for the time required below, or until hte edges are just starting to turn a light golden brown. The cookies may look under-baked but trust me here- they will taste so much better!

Makes apx 24 (depending on size)

Ingredients

Graveyard Dirt

  • ¼ cup butter; melted
  • 1 Cup granulated sugar
  • 1 Cup cocoa powder
  • ½ pinch salt
  • slivered almonds; chopped walnut; shaved dark chocolate; shaved milk chocolate (Optional)

Fingers Cookies

  • 2 cups All Purpose Flour
  • ½ teaspoon baking powder
  • ¼ teaspoon fine salt
  • ½ cup (1 stick) unsalted butter, at room temperature
  • 1 cup sugar
  • 1 large egg, at room temperature
  • 1 teaspoon pure vanilla extract
  • 28 large, flaked almonds
  • ½ cup smooth, raspberry jam
  • 1 Tablespoon light corn syrup

Method

Graveyard Dirt

  1. Melt butter in the microwave in a small glass or ceramic bowl (microwave safe) and allow to cool to room temperature
  2. In a large mixing bowl, blend the sugar, salt, and cocoa powder until thoroughly mixed
  3. While whisking, slowly add the melted butter and continue mixing gently until blended, but dry
  4. Using a fork, continue mixing until it looks like dark soil
  5. At this stage mix in the chopped nuts to give the soil texture
  6. Spoon the “dirt” on to your serving plate or tray, ready for your finger cookies

Fingers Cookies

  1. Preheat the oven to 325 degrees F. Prepare a cookie sheet with baking spray or line with a silicone mat, or baking parchment. Set aside until needed
  2. In a medium bowl, whisk together the flour, baking powder and salt. Set aside until needed
  3. In the bowl of a stand mixer fitted with the paddle attachment, beat the butter and sugar together until light and fluffy, scraping down the sides of the bowl with a spatula as needed, about 10 minutes
  4. Add in the egg, vanilla and mix until well combined and smooth.
  5. Gradually beat in the dry flour mixture, ¼ cup at a time until a dough forms
  6. Remove the bowl and using about 1 1/2 tablespoons of dough at a time, roll the dough between your palms into 5-inch-long fingers about 1/2-inch thick. Firmly press a sliced almond into the end of each finger to make fingernails
  7. Make several horizontal cuts, about 1/4 inch deep, in the center of each finger to make mimic skin folds at the knuckles. Gently press the dough on either side of the cuts to shape the knuckles
  8. Arrange the fingers on the prepared baking sheet and bake until light golden, 16 to 18 minutes
  9. Transfer the fingers to a wire rack and cool completely
  10. While the cookies cool, in a small saucepan, combine the jam, corn syrup and heat over low heat until warm, about 2 minutes, stirring gently
  11. Dip the blunt ends of the fingers in the warm jam and arrange on a plate of the graveyard dirt for serving

Sweet Biscuits w/ Vanilla Cream & Maple Macerated Pineberries

Makes 12 Biscuits

Ingredients

Biscuits

  • 3 cups flour
  • 1 cup sugar
  • 4 teaspoon baking powder
  • ½ teaspoon salt
  • ¾ cup butter
  • 2 Tablespoon lemon juice
  • 1 teaspoon vanilla extract
  • 3/4 cup milk
  • 1 large egg
  • egg wash (1 egg + 2 Tablespoon water, whisked together)
  • Turbinado sugar

Vanilla Cream

  • ½ cup whipping cream
  • 1 tablespoon granulated sugar
  • 1 ½ teaspoon pure vanilla extract

Maple Macerated Pineberries

  • 2 ½ cups fresh pineberries, topped and quartered
  • 1 Tablespoon Maple Sugar

Method

Maple Macerated Pineberries

  1. In a bowl combine the pineberries and maple sugar, mixing well. Set aside to macerate on the countertop for at least 30 minutes before serving

Vanilla Cream

  1. Using a handheld mixer or stand mixer with the whisk attachment, beat the cream, sugar and vanilla extract on medium-high until stiff peaks, about 3-4 minutes.
  2. Chill in the refrigerator until needed

Biscuits

  1. Preheat your oven to 375 degrees F
  2.  In a large bowl whisk together the flour, sugar, baking powder and salt, mixing well
  3. Using a large hole cheese grater, grate in the butter, then cut using a pastry cutter, or knife, until mixture resembles a coarse meal. You will still be able to see the butter in pieces pea-size or slightly smaller
  4. Make a well in the centre of the dry mix
  5. Mix together the lemon juice, vanilla, milk and the egg
  6. Pour into the well and mix until just combined to a dough ball
  7. Lightly flour a countertop, transfer the dough from the bowl and roll (using a floured rolling pin) to 1 inch thickness
  8.  Cut out biscuits with 3inch biscuit cutter and place on parchment lined baking sheet
  9. Lightly brush the tops of the biscuits with the gee wash
  10. Sprinkle turbinado sugar on top of the biscuits
  11. Bake at 375 degrees F for 20 minutes or until golden brown. Remove from the oven and leave to cool on a rack before serving

To Serve

  1. Slice each biscuit crossways in half
  2. Spoon some of the vanilla cream on the bottom half
  3. Top with a generous amount of the maple macerated pineberries
  4. Top with the other half of the biscuit
  5. Repeat with additional dollops of vanilla cream and macerated pineberries
  6. Serve and enjoy!

Quick Individual Cherry Cobbler

So I’m a sucker for cravings. Once I get something in my mind that’s it- I won’t rest until I’ve tasted it. That was that was the case with this cherry cobbler. Sure it’s a cheat’s version- using canned pin filling. But I craved it and the quicker I got it the better. Also lets face it- using canned filling cuts down on the stove-time involved in the making off this. If you feel so inclined, go right ahead with your favorite mix of cherries that you might use for your fillings. I’m definitely not one to dictate how you should run your kitchen.

The topping here is an adaption of a regular biscuit dough that I use to biscuit top stews and casseroles. Here I’ve slightly upped the sugar for a sweeter finish, adding in some cinnamon and oats for a more rustic dessert finish.

I love the flavor combination of cherries and almonds, thinking that it’s one of the best out there. Food trivia moment- both are linked by the compound Benzaldehyde, which is the second most popular flavor and fragrance after vanillin. Baking- educational too! (Darn! now I’m thinking I need to make a Cherry Bakewell…curse you infernal cravings!

With the use of pie filling these are so quick and easy that even making them in the current warmer weather can be justified. Plus adding a scoop of your favorite ice cream on top even more so!

Makes 4

Ingredients

  • 1 can 540ml (20 oz) cherry pie filling
  • 1/4 teaspoon almond extract
  • 1/4 cup toasted, flaked almonds
  • 1 cup all-purpose flour
  • 1/2 cup Jumbo rolled oats
  • 3 teaspoons granulated sugar
  • 1 1/2 teaspoons baking powder
  • 1/4 teaspoon cream of tartar
  • 1/2 teaspoon ground cinnamon
  • Pinch teaspoon salt
  • 4 tablespoons melted butter
  • 1/2 cup milk
  • 4 Tablespoon Turbinado sugar

Method

  1. Butter four 0.25L ramekins
  2. In a bowl mix the pie filling and the almond extract. Divide the pie filling equally among the ramekins
  3. Sprinkle the tops of the pie filling with the toasted almond flakes. Set them aside on a foil-lined baking sheet until later
  4. Preheat oven to 375 F
  5. In a medium bowl, combine flour, oats, sugar, baking powder, cream of tartar, ground cinnamon and salt. Whisk to combine
  6. Add the melted butter and milk, stirring just until moistened. The biscuit batter will be quite thick and lumpy. Drop batter by heaping scoopfuls onto the filling
  7. Sprinkle the turbinado sugar over the biscuit dough
  8. Bake for about 20 minutes, or until biscuits are browned and filling is hot and bubbly
  9. Leave to cool for about 5 minutes. Serve and enjoy!