Turtle Brownies

Yields 24

Ingredients

Brownies

  • ¾ cup unsalted butter, cubed
  • 6oz semi-sweet chocolate, broken into pieces
  • 3 eggs + 1 yolk
  • 1 cup sugar
  • ¾ cup plain flour
  • ½ cup cocoa powder
  • ½ teaspoon espresso powder
  • 1 Tablespoon milk powder
  • 1 cup pecan pieces, toasted
  • 1 cup semi-sweet chocolate chips
  • ½ cup caramel sauce (homemade or store bought)

To Finish

  • ¾ cup sugar
  • ¼ cup milk
  • ¼ cup butter
  • 4oz semi-sweet chocolate
  • ½ teaspoon expresso powder
  • ½ teaspoon salt
  • ½ cup pecan pieces, toasted
  • ½ cup semi-sweet chocolate chips
  • ¼ cup caramel sauce (homemade or store bought)
  • 1 teaspoon sea-salt flakes

Method

  1. Set your oven to 350°F and prepare a 9” x 9” baking tray with oil/baking parchment leaving an overhang each side
  2. Melt the butter and chocolate in a bowl over a saucepan of simmering water (or bain-marie), stirring occasionally. Once melted, remove from the heat, and allow to cool
  3. In the bowl of a stand mixer, beat the eggs, egg yolk and sugar until the mixture is thickened and fluffy, then, in a separate bowl, combine the flour, cocoa powder, espresso powder, milk powder and whisk to combine
  4. Add the cooled chocolate mixture into the egg/sugar mixture. Fold together until uniform in color
  5. Fold in the pecan pieces and chocolate chips
  6. Pour your mixture into the prepared tray and gently spread to level the surface. Place in the oven for 25-30 minutes, then remove from the oven when baked
  7. Leave to cool on a wire rack for 10 mins, then after this time use a chopstick, or cake dowel, to poke holes over the surface of the brownie, taking care NOT to poke the full way through the brownie layer
  8. Once the surface of the brownie has been poked with holes, pour the caramel sauce over the surface of the brownies and spread with a spatula to ensure the caramel gets to all of the holes
  9. Place in your refrigerator for between 1 hour to allow the caramel to soak the brownie layer and firm up
  10. After this time prepare the frosting. Remove the brownie pan form the fridge and set on a counter ready to be frosted – you’ll need to move quickly
  11. In a wide pan combine the sugar, butter and milk. Heat over a medium heat until melted, stirring to combine, then increase heat to bring to a boil. Continue to boil for 1 minute, stirring constantly
  12. After the minute, remove the pan from the heat, then quickly but carefully add the chocolate pieces and stir constantly. When then chocolate appears to be nearly fully combined, add in the salt and espresso powder and stir for a few seconds more until fully combined and uniform in color.
  13. Pour the frosting over the caramel surface of the brownie layer.
  14. AA If needed tilt to brownies to ensure full surface coverage
  15. Whilst the frosting is still setting, sprinkle the surface with the pecan pieces and chocolate chips, gently pressing if needed to ensure they stick. Return the brownies to the fridge for at least another hour to allow the frosting to set
  16. After this time, remove from the fridge and give one last drizzle of caramel over the surface and sprinkle with some sea salt flakes to finish
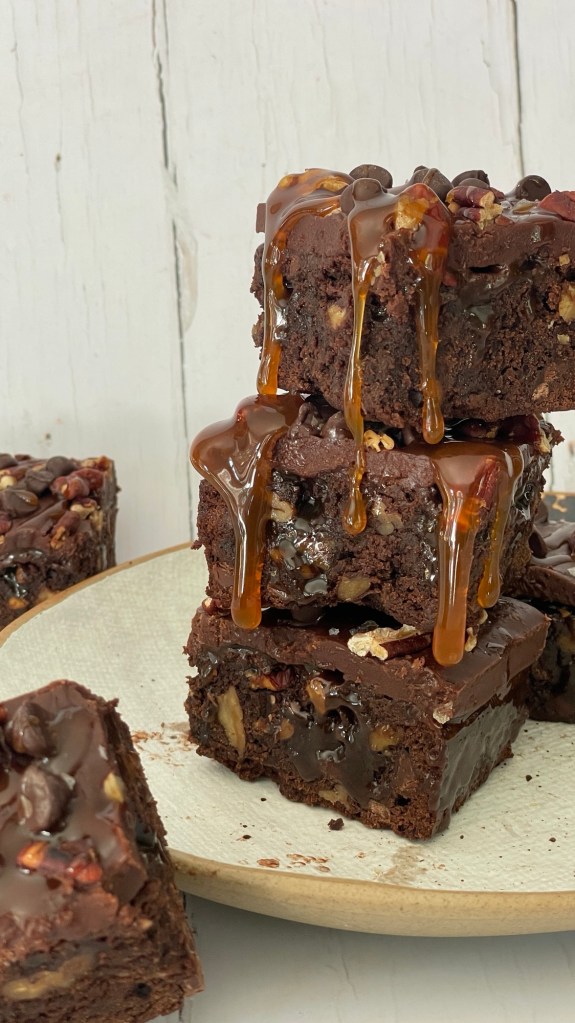
  17. These brownies are exceptionally rich and decadent so keep than in mind when slicing. I usually divide into 12, and then cut in half again to give 24 brownie “bars” in total
  18. Serve and enjoy!

Salted Caramel Chocolate Pots

Yields 6 glass jars or pots (1/2 cup capacity each)

Ingredients

  • 1 ¼ cups whipping, or heavy, cream
  • 7oz semi-sweet chocolate, chopped into small chunks
  • 12 Tablespoons caramel sauce (store bought or homemade)
  • 1-2 teaspoons sea-salt flakes
  • 6 teaspoons chopped peanuts, optional

Method

  1. Add the cream to a medium pan and heat over a medium heat
  2. While the cream heats add the chocolate chunks to a medium bowl
  3. Once the cream has gently heated- you’ll noticed small bubbles at the edge of the surface, remove it from the heat and pour over the chocolate chunks. Leave to sit for 5 minutes while you prepare the caramel pots
  4. Spoon or pipe 2 Tablespoons of caramel sauce into the bottom of each glass jar or pot
  5. Sprinkle each with sea-salt flakes to taste
  6. After the 5 minutes have past, gently stir the chocolate/ cream mixture until it is fully emulsified, smooth and uniform in color
  7. Gently pour over the prepared caramel layer, dividing equally between the pots. I find this a lot easier using a small ladle
  8. Once all the pots have been filled, sprinkle each with the chopped peanuts and refrigerate for at least 2 hours until set
  9. Keep refrigerated until serving, and enjoy

Tia Maria Budino w/ Black Garlic crème

feat. Tia Maria Cold Brew Coffee liqueur

Makes 4-6 (dependent on size of serving glass)

Ingredients

Vanilla Cream Topping

  • 1 cup heavy, or whipping, cream
  • 1 clove black garlic
  • 2 Tablespoon powdered sugar

Tia Maria Budino

  • 6oz semi-sweet chocolate
  • 2oz milk chocolate
  • 1 Tablespoon butter
  • 6 egg yolks, room temperature
  • ¼  cup granulated sugar
  • 2 Tablespoons cocoa
  • Pinch of salt
  • 1 cup heavy, or whipping, cream
  • 1 cup milk
  • 5 Tablespoon Tia Maria cold brew coffee liquor
  • 1 Tablespoon extra virgin olive oil
  • 1 teaspoon vanilla extract

To decorate (optional)

Graham crumb, or cocoa, to dust

Method

Black Garlic Crème (ahead of time)

  1. Roughly smash the black garlic to a paste and combine in a small pan with the cream
  2. Heat over a medium heat until just starting to bubble at the edges
  3. Remove from heat and set aside to infuse for minimum 20 minutes
  4. After this time strain through a sieve into a small bowl, discard the debris, and cover with cling wrap
  5. Transfer the bowl with the cream to your refrigerator and chill the cream for minimum 2 hours, preferably overnight if you have the time

Tia Maria Budino

  1. In a large bowl combine the semi-sweet chocolate, milk chocolate and butter. Set aside until needed
  2. In a pan combine the egg yolks, sugar, cocoa powder and salt, whisking to combine. Over a low heat add the cream and milk, whisking to combine and cook for 8-9 minutes, until thickened and smooth. Take care not to overheat the mixture
  3. Remove the egg yolk mixture from the heat and pour over the chocolates/ butter, passing it through a strainer, or sieve, as you do. Let the combined mixture sit for 5 minutes
  4. Once the chocolate has fully melted add the Tia Maria liquor, olive oil and vanilla extract, stirring to combine until smooth and glossy. Set aside
  5. Portion ramekins, or rocks tumbler, with some of the chocolate budino mixture (in the region of 1/2 cup each). Place in the refrigerator to set for at least 90 minutes, preferably a few hours

To finish

  1. Towards the end of budino chilling time remove the infused cream from your refrigerator, combine in a medium bowl with the powdered sugar. Whip to medium peaks. Pipe, or spoon, the whipped cream over the tops of your set budino and dust with graham crumbs, or cocoa, if using
  2. Serve and enjoy!

Chocolate Orange Shortbread

Makes 24

Ingredients

  • ½ cup and 2 tablespoons fine sugar, divided
  • 2 Tablespoons Orange zest
  • 2 cups All Purpose Flour
  • 1/3 cup Semolina
  • 2 Tablespoons Rice Flour
  • ½ teaspoon Kosher salt
  • 1 cup salted butter, cold and cubed
  • 1 cup semi-sweet chocolate chips

Method

  1. Lightly grease the sides of and line a 9″ x 12″ traybake tin with parchment paper allowing a 2-3” overhang
  2. In a large bowl, combine ½ cup sugar, the orange zest and rub together with your fingers to release the orange oils into the sugar. Add in the flour, semolina, rice flour, and salt. Whisk together to further combine
  3. Add in the cubed butter and rub together with your fingertips, or a pastry cutter, until the mixture is just beginning to bind together. Every so often do a quarter turn of the bowl to make sure you’re using all the dry mixture. You’ll want a texture somewhere between breadcrumbs and damp sand before you stop. Be wary of overworking the butter into the mixture – you want to avoid a dough that is feels slimey from the butter melting too much into the dry ingredients
  4. Add the chocolate chips and gently fold through the butter crumb mixture
  5. Tip the crumb mixture into your prepared tin and press the dough so that it forms a solid, even layer. Level the surface with the back of a spoon or measuring cup, making sure the mixture is evenly spread and level
  6. Refrigerate for 30 mins minimum
  7. Preheat your oven to 325°F
  8. Remove the chilled dough from your fridge and using a knife, or pizza cutter, score the shortbread into 24 rectangular pieces (2 cuts by 7 cuts) taking care not to actually cut the full way through the dough layer
  9. Bake the dough for 30- 35 minutes or until a very pale golden brown, and deeper golden brown at the edges
  10. Leave rest for 5 minutes, then cut with a knife, or pizza cutter, at the score lines you previously made, cut to the bottom of the pan to complete the cut the full way through
  11. Dust with the remaining fine sugar and leave the full slab of shortbread to cool in the tin for 15 minutes. Carefully lift the fingers out of the tin with a palette knife or the parchment paper overhang and finish cooling on a wire rack
  12. Keep in an airtight container for up to 1 week

Pumpkin Chocolate Babka

Makes 1 large 10” Babka loaf ring

Ingredients

Dough

  • 2 Tablespoons sugar
  • 2 ¼ teaspoons active yeast
  • ¾ cup whole milk
  • 1 egg
  • 1 cup pumpkin puree
  • 2 teaspoons pumpkin spice
  • 1 teaspoon salt
  • 1 stick butter, softened and cubed
  • 5 cups All-purpose flour

Filling

  • 6 Tablespoons butter
  • ⅔ cups sugar
  • 3 oz bittersweet chocolate, coarsely chopped
  • 5 Tablespoons unsweetened cocoa powder

Glaze

  • ¼ cup water
  • ¼ cup sugar

Method

Dough

  1. In the bowl of a stand mixer, with a dough hook, combine the warm milk, yeast, the sugar, mix and allow it to sit until foamy, about 10 mins
  2. Add in the pumpkin, butter, egg, salt, and spices and mix to combine. Add in the flour, bit by bit, until completely incorporated, then knead for 6 minutes at medium-high speed using the dough hook of a stand mixer, until the dough is smooth
  3. Cover the bowl with oiled plastic wrap and set it in a warm place to rise for about an hour, or until doubled in size

Filling

  1. About 10 minutes before your pumpkin dough has done rising, prepare the chocolate filling by melting the butter in a small saucepan over medium heat, then stirring in the sugar until almost completely dissolved.
  2. Remove from heat and add in the chopped chocolate. Stir until melted and smooth, then add the cocoa powder and stir to combine and form a thick filling. Set aside until needed

To Finish

  1. Prepare your baking pan. I use a 10” fluted pan to make this, prepared with brushed baking spray
  2. Take your risen dough and knock it back by punching then turn it onto a lightly floured surface. Roll it into a large rectangle (apx 14x 18 inches) and then spread the chocolate filling evenly across the dough, spreading it all the way to the edges
  3. Roll the long edge of the dough into a tight log, just like when making cinnamon rolls.  Use a sharp knife pr bench scraper to slice the dough in half lengthwise, leaving one end intact. Then with the cut sides facing up, cross one end over the other and repeat all the way down the length of the dough, keeping the cut sides facing up while wrapping the two lengths of dough around each other to form a rope or twist
  4. Gently lift the twisted loaf and squish it into your prepared pan. Cover loosely with oiled cling wrap and allow to rise for about 35-40 minutes
  5. While dough is rising, prepare the syrup by combining the water, sugar and bringing it to a boil in a small saucepan. Let the syrup boil for 4 minutes, then remove from heat and allow to cool to room temperature
  6. Preheat oven to 375 degrees F. When oven is hot, bake the babka for 35-40 minutes.
  7. Remove the cooked babka from the oven and drizzle/ brush it with the room temperature syrup
  8. Allow to cool in pan for 15 minutes, before removing and allow to cool fully on rack
  9. Slice and enjoy!