4oz semi-sweet chocolate, chopped into chunks, or chocolate chips
12 caramel candies
Method
Line a cookie sheet with baking parchment and set aside until needed
In the bowl of a stand mixer beat the butter, brown sugar and white sugar until creamy
Mix in the egg, followed by the cookie butter spread and continue mixing until fully combined. Add in the vanilla paste (or extract) and again mix to combine fully
In a separate bowl, combine the flour, baking soda, baking powder, milk powder, salt and whisk to combine
Gradually add the combined dry ingredients into the sugar/butter mixture. Mix on medium/low speed until fully incorporated
Fold in the chocolate chunks, or chips. Mix until well mixed through the dough (I find here it easier to fold by hand rather than using a spatula or spoon. It just depends on what you’re more comfortable with)
Cover the dough with cling wrap and refrigerate the dough for at least 1 hour
Near the end of the cookie chilling time, preheat your oven to 325°F
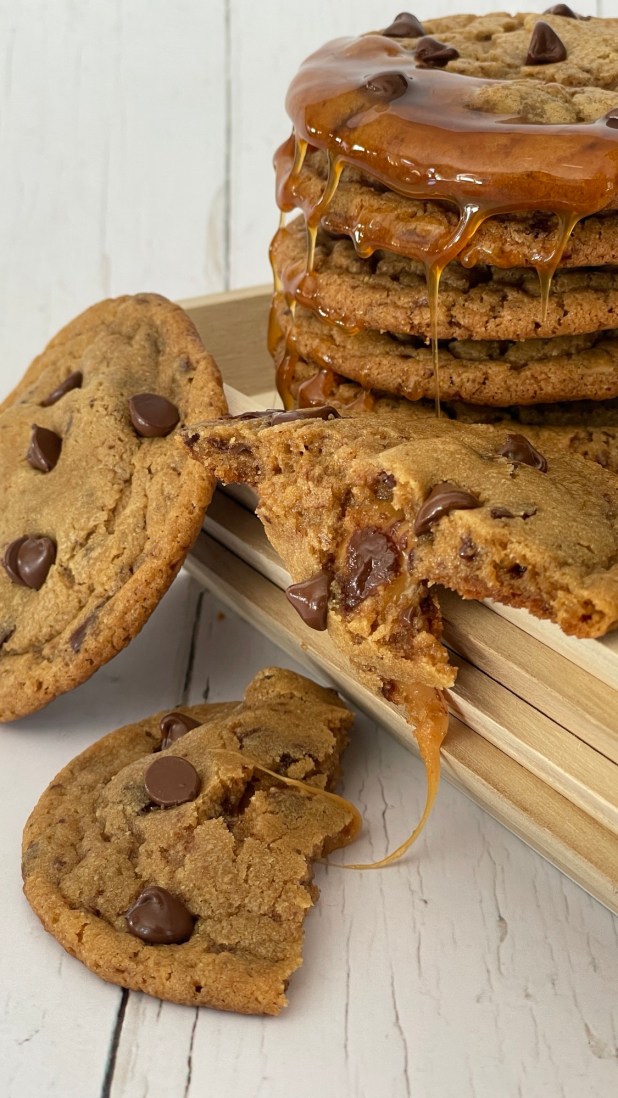
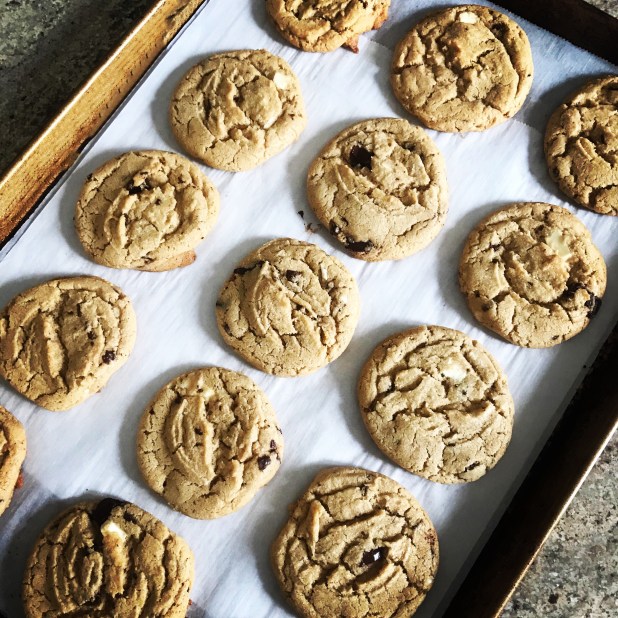
Using a medium cookie scoop (2 tbspn apx) shape the dough into 1 inch balls- you should have at least 24 in total
Place a caramel candy between two cookie dough balls and squash the dough together to reshape into a larger cookie dough ball. Place the balls of dough about 3 inches apart on the pre-lined cookie sheet
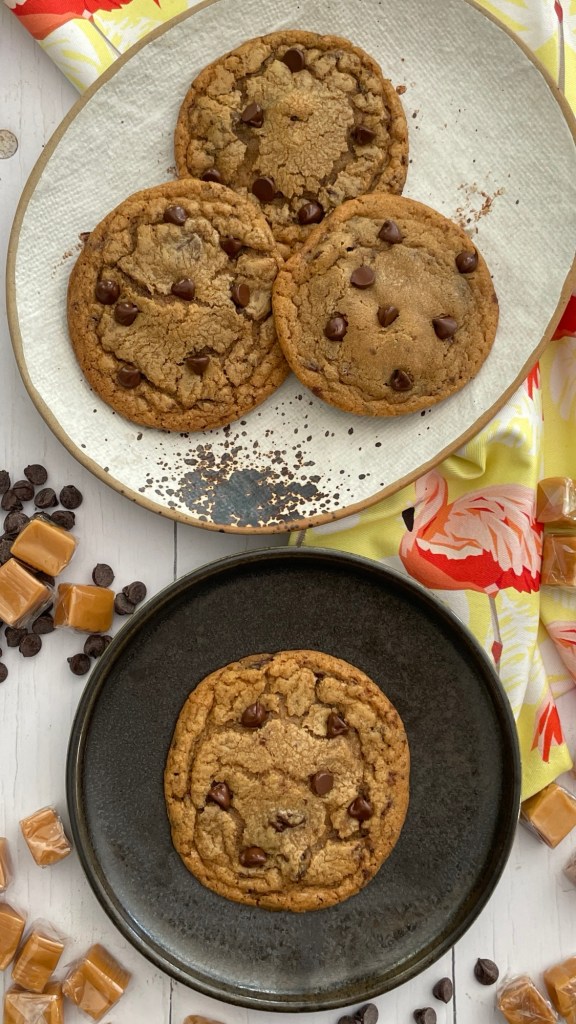
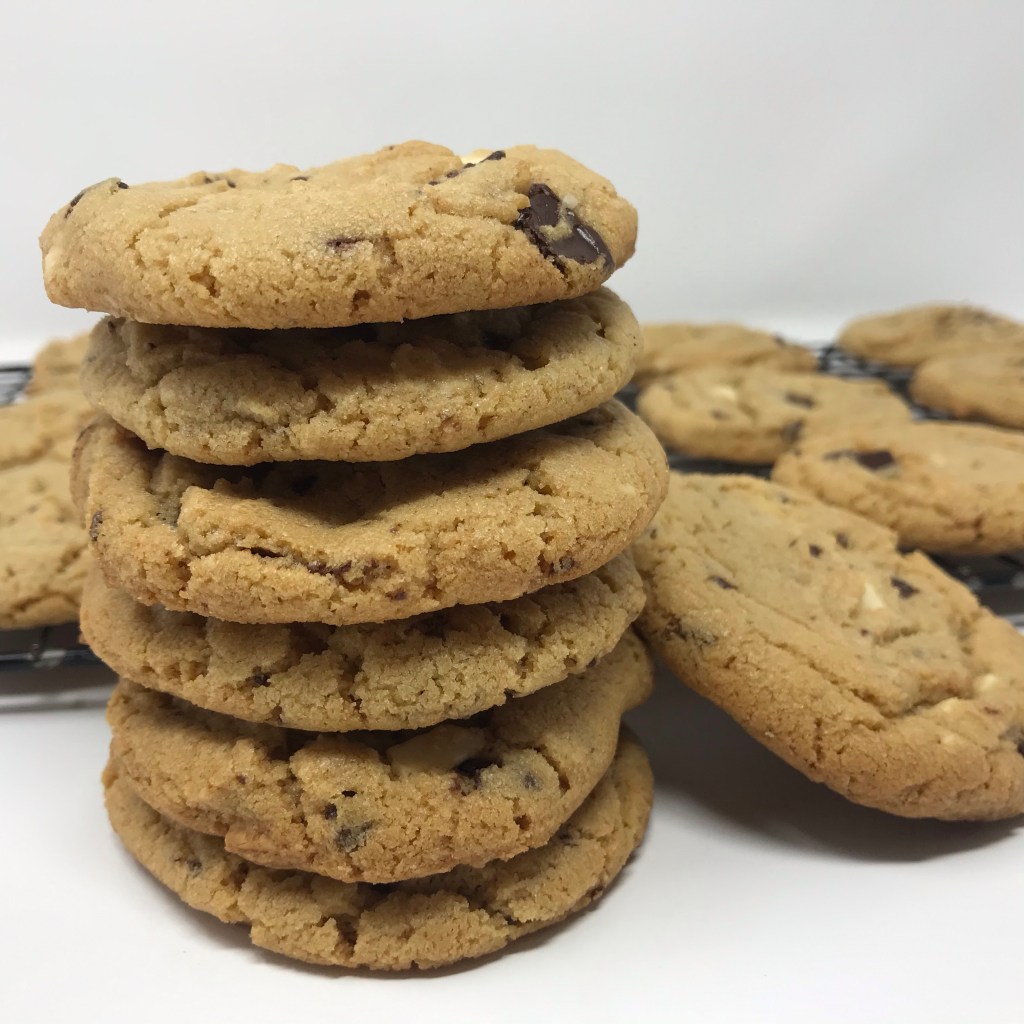
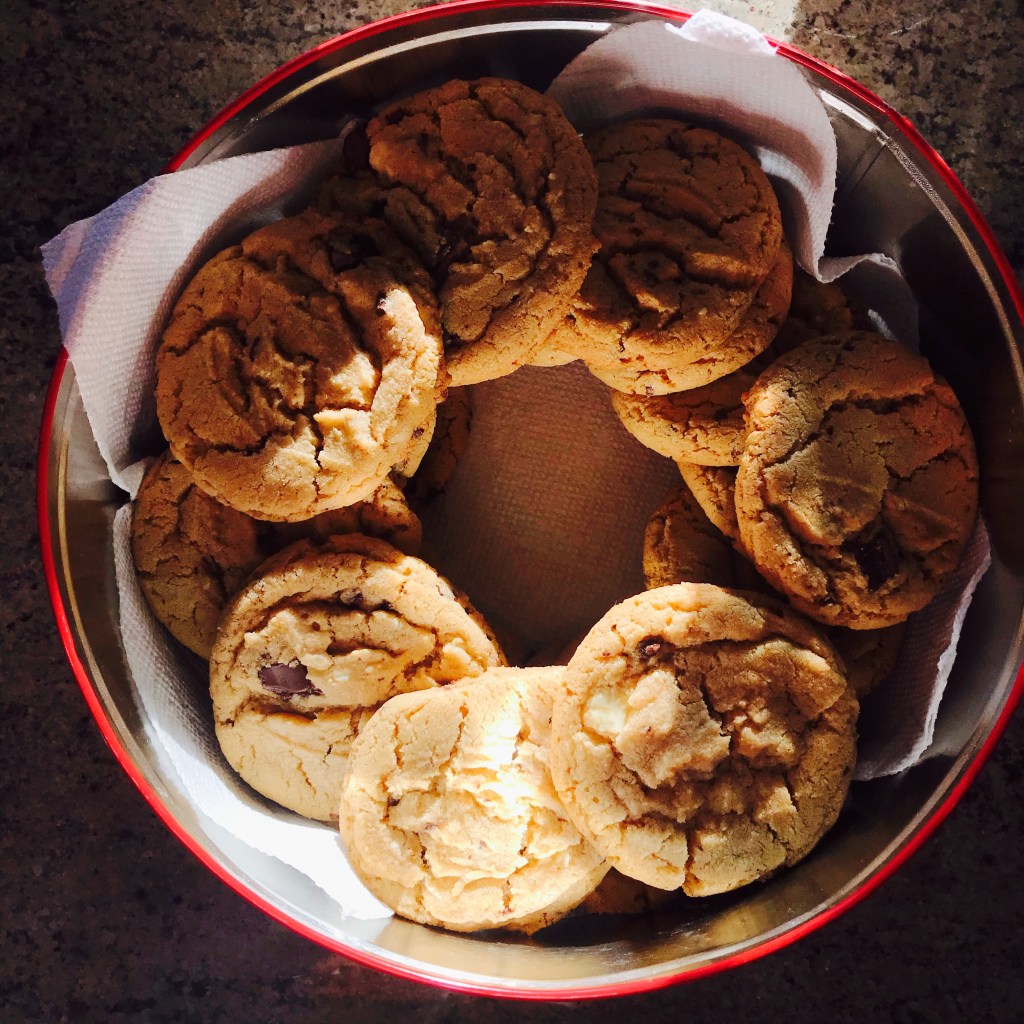
Bake at 325°F for 18-20minutes. The cookies will spread slightly spread and be domed where the caramel candy is. Remove the cookies from the oven and let cool on their baking sheets for 5 minutes. Stud with additional chocolate chips if wanted. After that, transfer the cookies to a rack to cool completely*
Serve and enjoy! Cookies will keep in an air-tight container for up to one week
*The caramel centres will become firmer as they cool. If you want a softer, gooier centre, microwave the cookie for about 15 seconds,
Lightly grease the sides of and line a 9″ x 12″ traybake tin with parchment paper allowing a 2-3” overhang
In a large bowl, combine ½ cup sugar, the orange zest and rub together with your fingers to release the orange oils into the sugar. Add in the flour, semolina, rice flour, and salt. Whisk together to further combine
Add in the cubed butter and rub together with your fingertips, or a pastry cutter, until the mixture is just beginning to bind together. Every so often do a quarter turn of the bowl to make sure you’re using all the dry mixture. You’ll want a texture somewhere between breadcrumbs and damp sand before you stop. Be wary of overworking the butter into the mixture – you want to avoid a dough that is feels slimey from the butter melting too much into the dry ingredients
Add the chocolate chips and gently fold through the butter crumb mixture
Tip the crumb mixture into your prepared tin and press the dough so that it forms a solid, even layer. Level the surface with the back of a spoon or measuring cup, making sure the mixture is evenly spread and level
Refrigerate for 30 mins minimum
Preheat your oven to 325°F
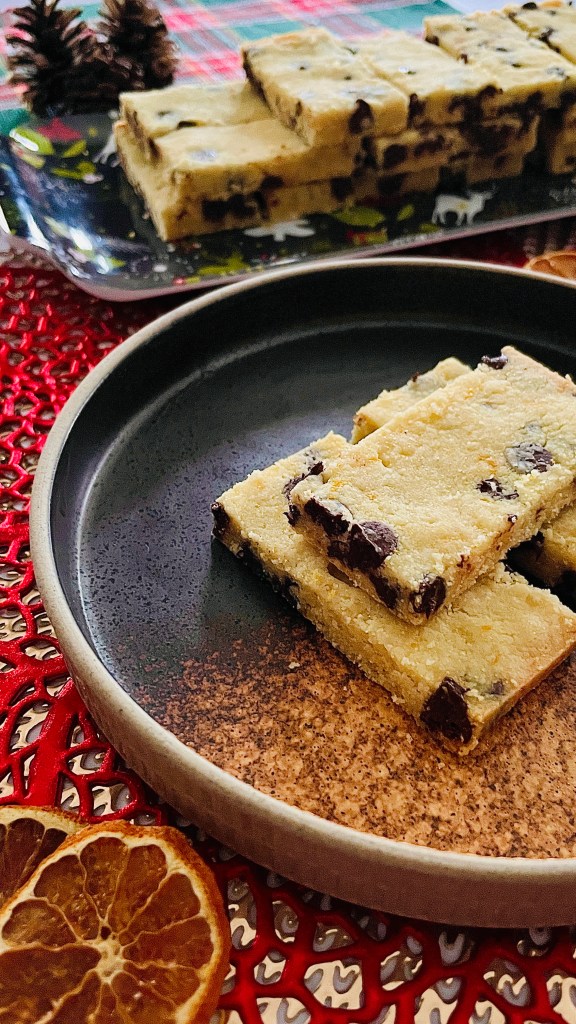
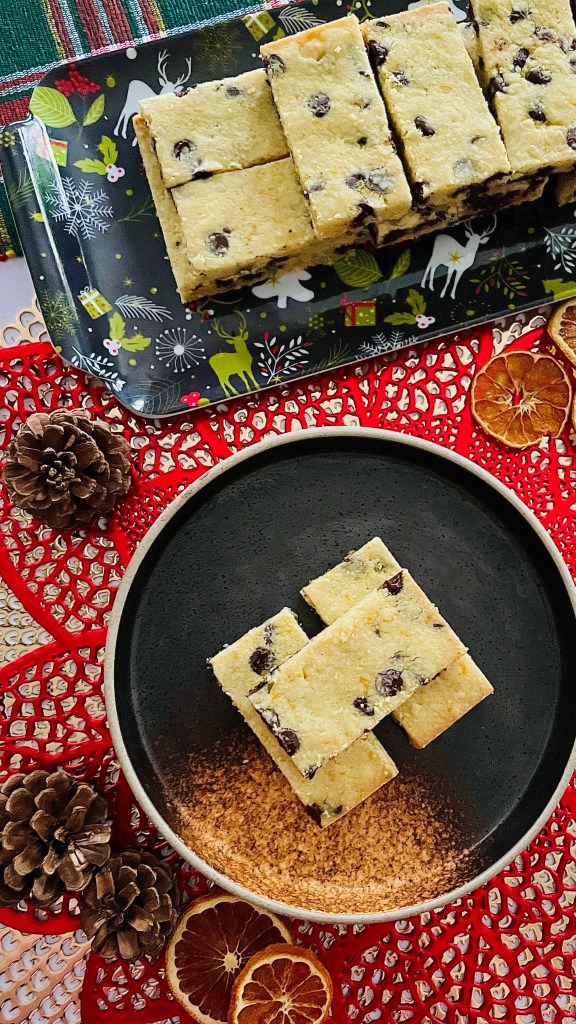
Remove the chilled dough from your fridge and using a knife, or pizza cutter, score the shortbread into 24 rectangular pieces (2 cuts by 7 cuts) taking care not to actually cut the full way through the dough layer
Bake the dough for 30- 35 minutes or until a very pale golden brown, and deeper golden brown at the edges
Leave rest for 5 minutes, then cut with a knife, or pizza cutter, at the score lines you previously made, cut to the bottom of the pan to complete the cut the full way through
Dust with the remaining fine sugar and leave the full slab of shortbread to cool in the tin for 15 minutes. Carefully lift the fingers out of the tin with a palette knife or the parchment paper overhang and finish cooling on a wire rack
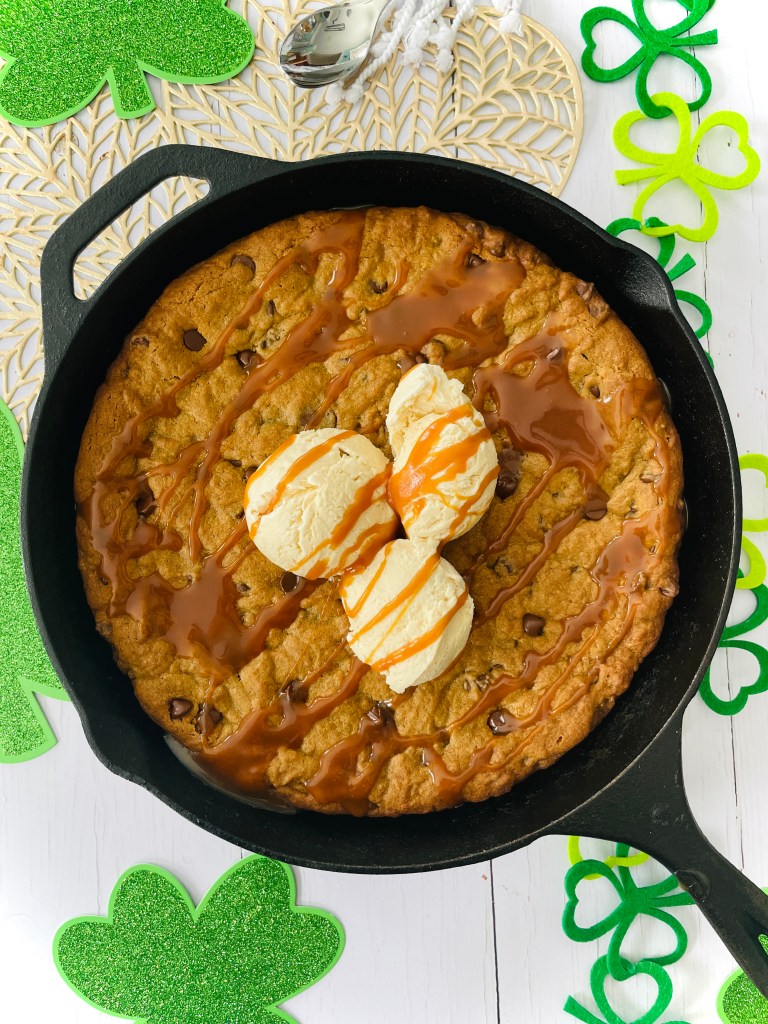
The quantities in this recipe make more than enough ice cream and caramel sauce for this recipe. Any surplus can be stored as noted at the end of the recipe. Enjoy!
Ingredients
Irish Cream ice cream
2 1/2 cups whipping cream
1 can (300ml) sweetened condensed milk
3/4 cup Irish cream liquer
pinch salt
*before starting the ice cream ensure that your bowl, beaters and cream are chilled in the fridge for a couple of hours
Caramel sauce
½ cup water
2 Tablespoon light corn syrup
1 ½ cups granulated sugar
¼ teaspoon cream of tartar
¼ cup unsalted butter, cubed, room temperature
1 cup heavy cream, room temperature
2 Tablespoons Irish whiskey
Skillet cookie
375ml Irish porter stout
1 cup brown sugar, divided into 1/4 and 3/4 quantities
1/2 cup white sugar
3/4 cup butter, room temperature
2 Tablespoon rendered bacon fat
2 large eggs
2 teaspoon vanilla extract
1 teaspoon baking soda
2 teaspoon hot water
1/2 teaspoon salt
2 1/2 cups flour
2 Tablespoons milk powder
2 cups semi-sweet chocolate chips
1 Tablespoon butter
Method
Irish Cream ice cream
In a medium bowl add the sweetened condensed milk, Irish cream and salt, whisking to combine. Set aside until needed
In a large bowl whisk the whipping cream until soft peak stage
Add in the Irish cream mixture, folding gently so as not to deflate the whipped cream
Pour into a freezer-proof container and freeze for at least 5 hours, or overnight, until the ice cream has set. Keep in the freezer until ready to serve
Caramel sauce
Combine the sugar, corn syrup, cream of tartar and water in a large saucepan set over a medium–low heat, swirling the pan until the sugar melts. Bring to the boil and cook for 10–12minutes until it becomes a deep gold colour, but not dark brown. DO NOT STIR at any point. If you need to you can gently swirl the pan to make sure the mixture is melting evenly. When the caramel begins to colour, it will darken quickly so keep a close eye on it
Once it reaches the correct color, quickly, but carefully, remove the pan from the heat. Add the butter cubes and using a wooden spoon gently stir until the butter has melted and is well combined. It will bubble a little and release steam so take care not to burn yourself
Next, add the cream and again slowly stir, again taking care not to burn yourself from the rising steam
Once well combined, add the whiskey, and whisk to combine. Return to a medium heat and cook for a further minute, stirring constantly. Remove from the heat and transfer to a heat-proof bowl. Allow to cool completely
Skillet cookie
In a pan combine the porter stout and 1/4 cup brown sugar. Heat over a medium heat and reduce until 1/3 cup remains. Remove from heat and set aside to cool fully
Preheat your oven to 375 degree F. Heat a 10″ cast iron skillet in the oven while making the cookie batter
In the bowl of a stand mixer, combine the butter, white sugar, remaining brown sugar and bacon fat, beating until well creamed, pale and fluffy
Add in the eggs one at a time, beating to combine thoroughly before proceeding. add in the vanilla extract and cooled porter stout syrup, beating until uniform in color and well combined
Dissolve the baking soda in the hot water and add to the batter along with the salt, stirring to combine
Add in the flour and milk powder, stirring to combine well. Finally fold in the chocolate chips
Carefully remove the hot skillet from your oven, and melt the butter in it, swirling it to coat the bottom and sides of the skillet. Add the cookie batter and carefully spread it out using a spatula or spoon to fill the skillet
Return the filled skillet to the oven and bake for 20-22 minutes until cookie is deep golden brown color
Remove from oven and allow to cool to serving temperature
To serve
To serve, finish the warm cookie with scoops of Irish cream liqueur and drizzle generously with the whiskey caramel sauce
To keep
The baked cookie can be kept in an airtight container at room temperature for up to 3 days
The ice cream should be kept in an airtight, freezer-proof container for up to 3 months.
The caramel sauce can be stored in an airtight, sterilised container for up to 2 weeks in the fridge. If it sets too much in the fridge, remove and allow to come to room temperature
Yet another bake that came about from my time on Food Network Canada’s show Great Chocolate Showdown. The elimination challenge in Episode 4 was to bake a brunch dish inspired by a favorite childhood dessert, using QuakerTM oat flour. The items for selection were coffee cake, tart, pancakes, crepes and biscuits. While I’m definitely partial to a good breakfast biscuit, pancakes are much closer to my heart. Waffles give me a savory brunch option, whilst pancakes are the perfect vehicle for a sweet option.
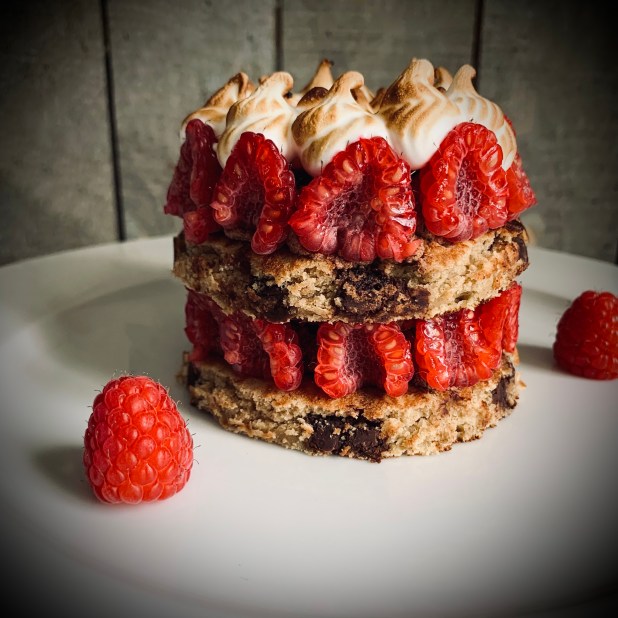
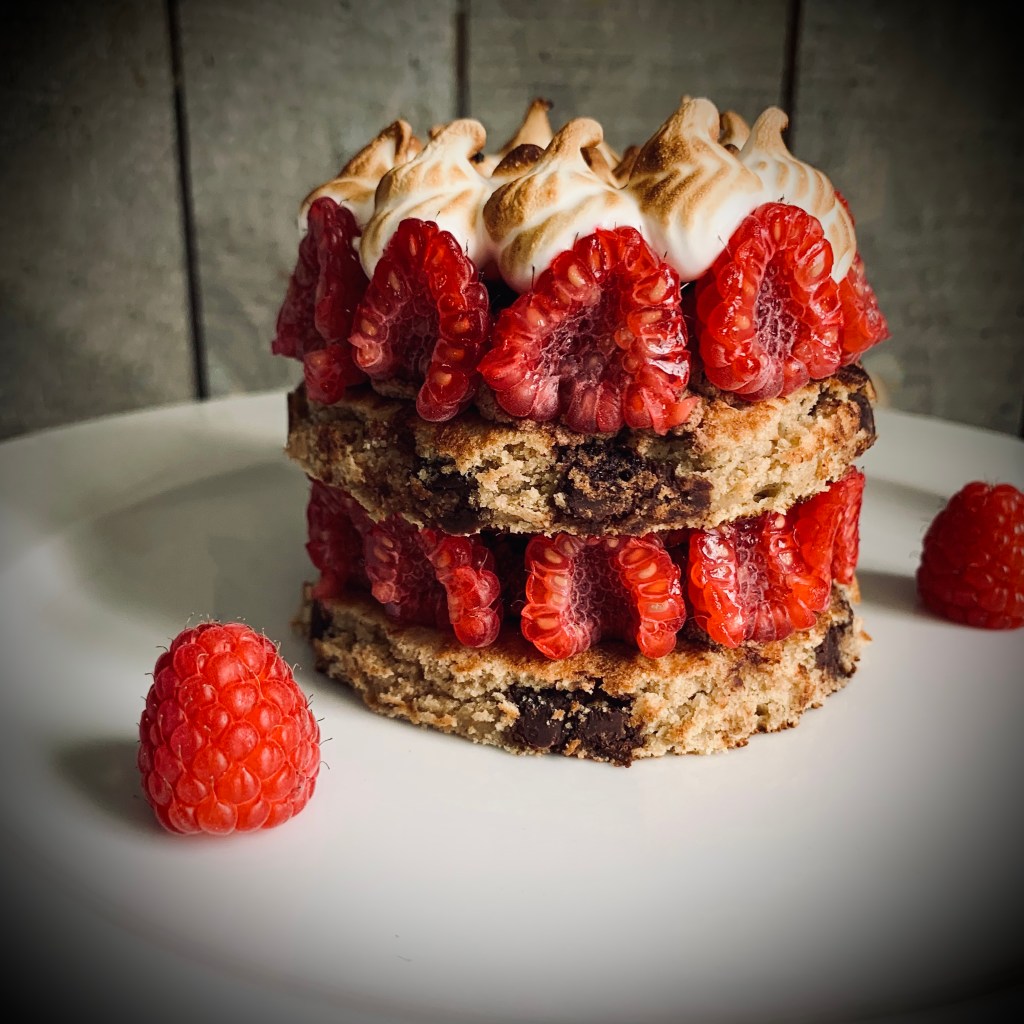
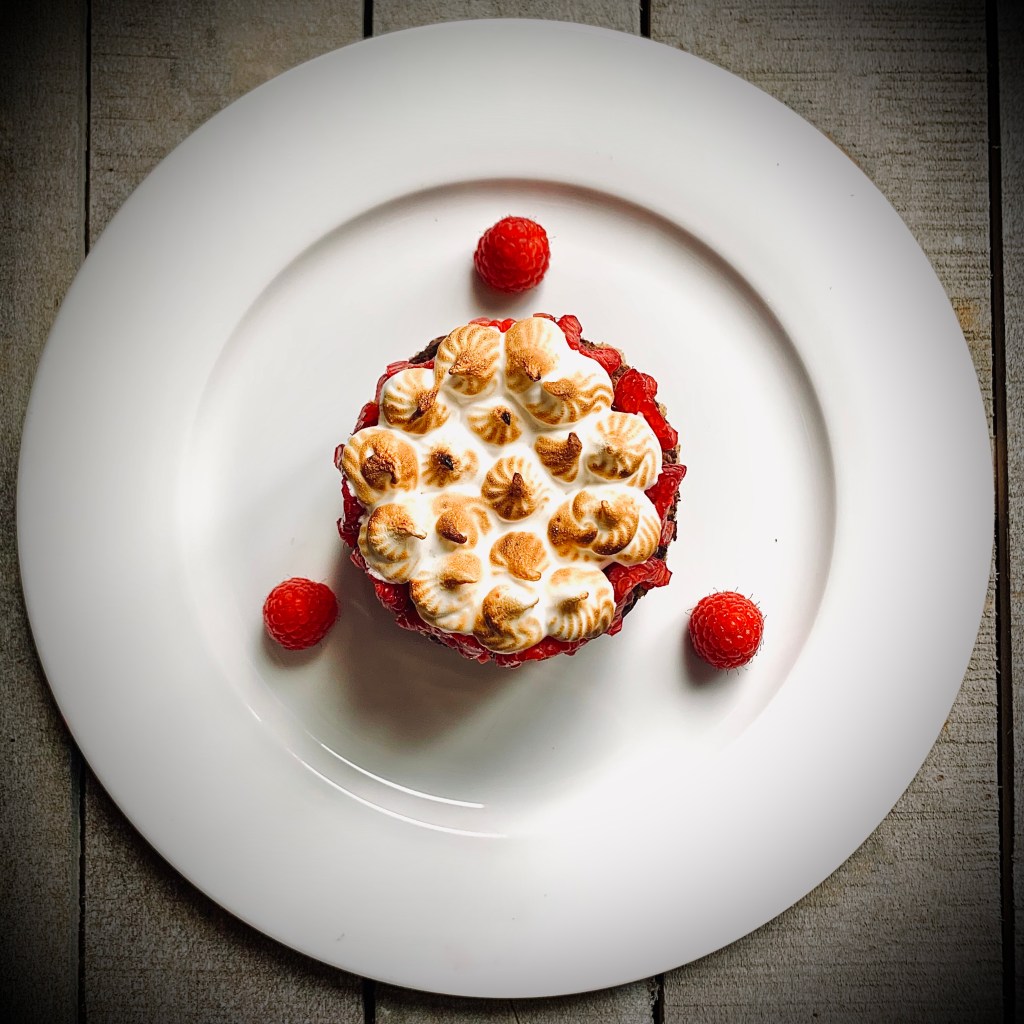
My childhood memory would have been firmly anchored in my mom and her synonymous dessert that is Queen of Puddings. My mother was solely responsible for my ability, passion and sometimes foolhardy ambition when I bake. In my childhood memories, she’s permanently enrobed in a gingham tabard, and there was nothing this woman couldn’t make, bake or generally concoct in the kitchen. If I were to sum up a childhood of kitchen memories in one delicious dessert, Queen Of Puddings, instantly springs to mind. With layers of breadcrumb enriched vanilla custard layered with sweet, tangy raspberry jam and topped with billowy clouds of fluffy, golden toasted meringue it was my mom’s go-to dessert when ingredients were scarce. For me it’s a classic case of my mom being a kitchen alchemist and turning a few mundane ingredients into something fantastic- a fine example of the whole being more than the sum of it’s parts. The original recipe is easy and comforting, and it’s warmth, familiarity and soothing nature will always remind me a a childhood at my mother’s hip.
Of course trying to marry such a quintessentially classic comfort pudding with the concept of brunch was always going to be a fun challenge at best! In my head the signature layers of the original recipe lend themselves perfectly to create a layered, stacked brunch dessert. Here I’ve created a pancake stack bordering on an entremet- layers of pancake with ganache, custard, and jelly regally crowned with peaks of soft, fluffy meringue. Anyone for a boujee brunch?
Yes I’ve taken shortcuts here with the use of Jello-O and custard powder. For me, when making brunch, shortcuts are ALWAYS welcome. Anything that helps me get to the table fast and get the bubbles flowing even faster is always acceptable in my books! I’m not one to stand on ceremony.
Bottoms up!
Queen of Puddings Brunch Pancakes #recipe #greatchocolateshowdown
1 1/2 cups fresh raspberries, sliced lengthwise in half
Method
Prosecco Raspberry Gelee
In a jug combine Jell-O powder and boiling water. Stir until dissolved
Slowly add in prosecco and stir gently to incorporate
Pour into 3″ dia silicone tartlet mold to 1/4″ depth
Place in refrigerator to set
Chocolate custard
Mix the custard powder and sugar together in a small pan
Add the milk, and stir to combine
Continue heating, stirring constantly, until the custard is smooth and well thickened
Remove pan from heat and stir in chocolate chunks until melted and fully incorporated
Leave to cool for 5 mins before placing into a piping bag fitted with a plain round tip
Pipe discs of the custard into a silicone tartlet mold to match your Jell-O tartlet mold
Cover the surface of the custard with cling wrap to prevent skin forming on the surface
Place in refrigerator to set
Whipped Chocolate Ganache
Gently heat the cream in a pan until just below boiling. (look for small bubble starting to appear at the edge of the cream)
Remove from heat, add the raspberry liqueur, salt and chocolate chunks and leave for 2-3 minutes
After this time gently stir to emulsify the mixture until it is smooth and uniform in color
Leave to cool to room temperature
Using a whisk or hand held mixer whip the mixture until light and fluffy. Be careful not to overwhisk in case of separation
Cover and set aside until needed
Oat Pancakes
In a medium bowl, whisk together the oat flour, baking powder, cinnamon, and salt
In a separate larger bowl, mix together the eggs, milk, melted butter, orange zest, and vanilla extract
Add the dry ingredients and stir to combine. Once nearly combined stir in the chocolate chips
Heat a griddle pan over a medium high heat. Lower heat to medium low, and using 1/3 cup measurement pour circles of pancake batter to give you 8 pancakes. Your pancakes should spread to approximately 4-4 1/2″ diameter
Cook on each side for 3-2 minutes until golden brown, flipping when done.
Remove from heat and set aside until serving
Meringue
In a stand mixer fitted with the whisk, beat the egg whites until soft peaks form
With the mixer on, gradually beat in the sugar until stiff peaks form. meringue should be glossy and smooth
Transfer to a piping bag fitted with a desired piping nozzle
Assembly/ To Serve
Remove whipped ganache from refrigerator and transfer to a piping bag fitted with a round plain nozzle
Pipe a round of ganache onto a pancake placed on a plate, leaving 1/4-1/2″ border
Set raspberries halves around on the border, standing up against the ganache
Place a second pancake on top
Carefully remove a round of chocolate custard* from the mold and place on top of second pancake
Carefully remove a round of raspberry gelee* from the mold and place on top of the chocolate custard round
Set raspberries halves around on the border, standing up against the custard & gelee rounds
Top with peaks of meringue piped in desired arrangement and torch to finish until toasted and browned
Serve with any remaining raspberries
*Chocolate custard and gelee rounds can be placed in the freezer, after setting, for 10-15mins to firm up to aid removal
Chop the chocolate in chunks. You don’t want too fine a piece- irregular and varied sizes look a lot better in the finished cookie. Set aside until needed
Line a cookie sheet with baking parchment and set aside until needed
In the bowl of a stand mixer beat the butter, brown sugar and white sugar until creamy (about 10 mins at medium speed)
Mix in the egg, followed by the tahini butter and continue mixing until fully combined. Add in the egg and vanilla paste (or extract) and again mix to combine fully
In a separate bowl, combine the flour, baking soda, baking powder, salt and whisk to combine.
Gradually add the combined dry ingredients into the sugar/butter mixture. Mix on medium/low speed until fully incorporated
Fold in the chocolate chunks. Mix until well mixed through the dough (I find here it easier to fold by hand rather than using a spatula or spoon. It just depends on what you’re more comfortable with)
Cover the dough with cling wrap and refrigerate the dough for between 20- 30mins
Preheat your oven to 325°F
Using a medium cookie scoop (2 tbspn apx) shape the dough into 1 inch balls. Place the balls of dough about 2-3 inches apart on the pre-limed cookie sheet
Bake at 325°F until light brown, about 15 to 17 minutes. Remove the cookies from the oven and let cool on their baking sheets for 5 minutes. After that, transfer the cookies to a rack to cool completely
*The baked cookies will keep for up to a week in an airtight container