Mint Viennese Whirls

Episode 5 of Food Network Canada’s Great Chocolate Showdown rolls around and it’s pushing the boundaries on flavor combinations. This one’s all about the TEA! Using tea leaves we have to incorporate the selected flavor into a selection of bakes/ desserts fit for a high tea party. Out of the tea flavors to be selected from (Rooibos; Mint; Sencha Green; Milk Oolong; Chai Masala and Earl Grey) I ended up with Mint. Although this is the most well known, and probably most popular, it could be seen as more of a curse than as blessing due to it’s popularity. Is it a flavor that has been done to death?

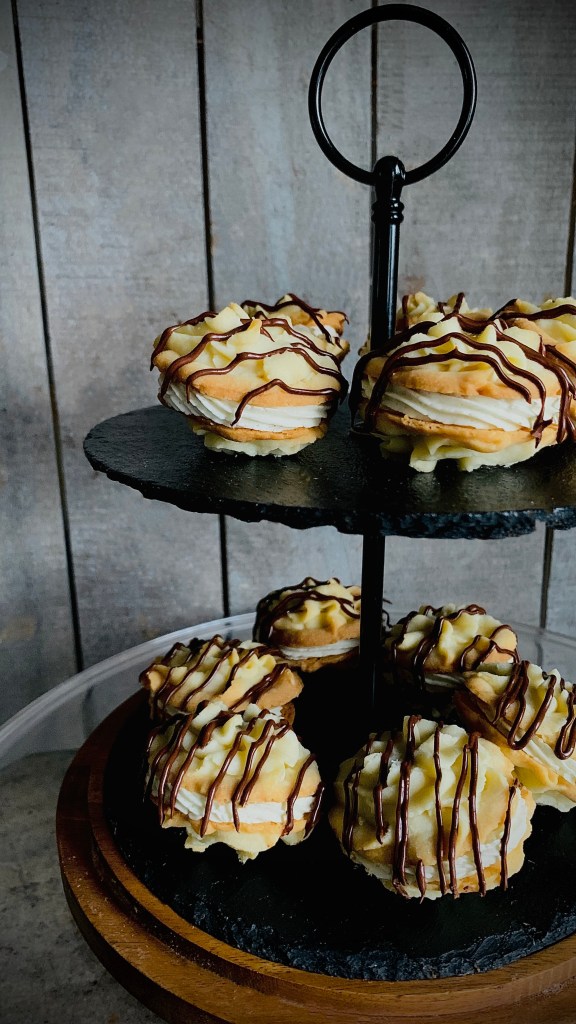
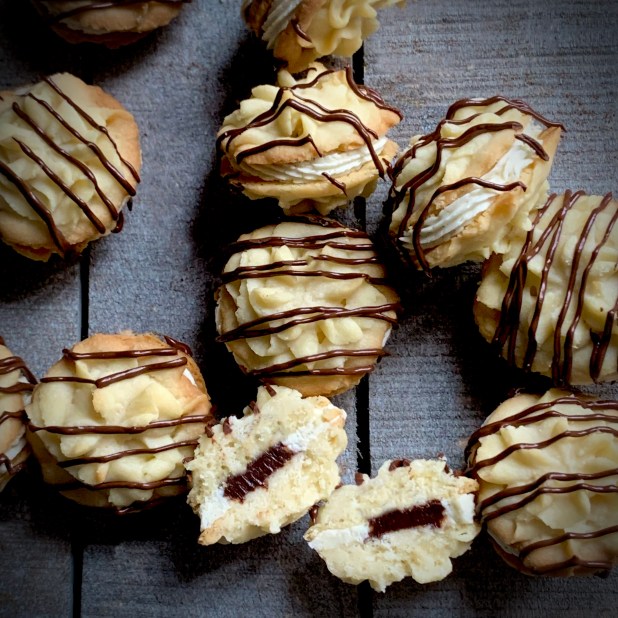
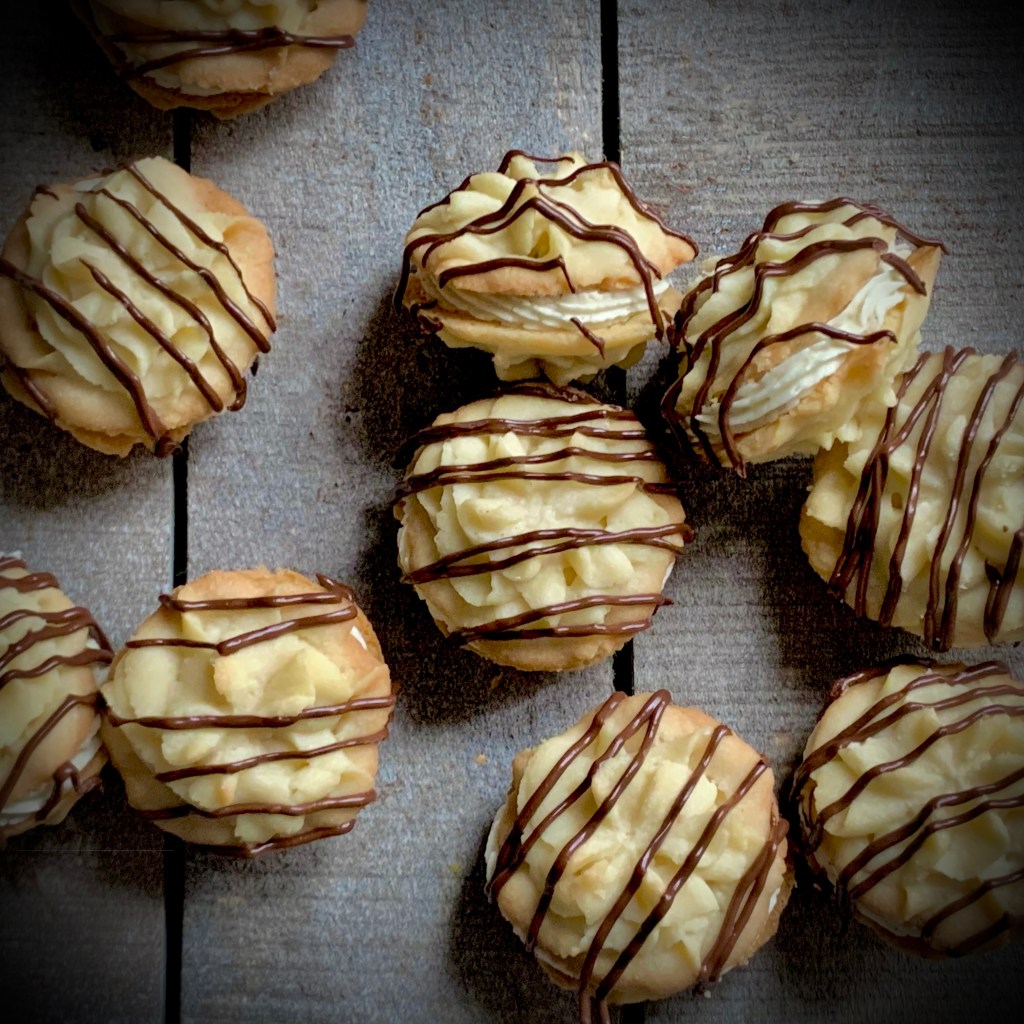
Of the two desserts that I chose to present, these Viennese Whirls are my personal favorite. Buttery crumbly shortbread like cookies that are usually sandwiched together with a duo of buttercream and jam, I chose here to use the fillings to incorporate the mint flavor. Infusing a heavy cream base allowed it to be added both the buttercream filling and the feature chocolate ganache. What results is a mint flavor that avoids falling into the cliched “mouthwash mint” territory but remains palatable and interesting in these 2-bite sandwich cookies.

Mint Viennese Whirls #recipe #greatchocolateshowdown

Makes apx 16 sandwich cookies

Ingredients

Infused cream base

  • 1/2 cup heavy cream
  • 2 Tbsp mint tea leaves

Cookies

  • 250g very soft butter
  • 50g icing sugar
  • 225g plain flour
  • 25g cornflour

Buttercream filling

  • 125g unsalted butter, softened
  • 200g icing sugar, plus extra for dusting
  • 4 tsp tea infused cream
  • ¼ tsp mint tea leaves (ground to a powder)

Chocolate Ganache filling

  • 2oz Dark Chocolate
  • ¼ tsp mint tea leaves (ground to a powder)
  • ¼ cup Infused cream, warmed to just below boiling
  • 1 Tbsp icing sugar

To Decorate (optional)

  • 3oz Dark chocolate, melted

Method

Infused cream base

  1. In a small pan combine the heavy cream and mint tea. Stir well
  2. Heat and continue to stir until the cream reaches just below boiling
  3. Remove from heat and leave to infuse for 15 minutes, stirring occasionally
  4. After this time, pour through a sieve to strain the tea leaves, pressing to remove traces of cream and set aside until needed

Cookies

  1. Preheat the oven to 350F. Line 2 baking sheets with non-stick baking parchment or pre-marked silpat sheets
  2. Measure the butter and icing sugar into a bowl, beating until pale & fluffy
  3. Sift in the flour with cornflour and beat on a medium high speed, until thoroughly mixed
  4. Spoon the mixture into a piping bag fitted with a medium star nozzle (Wilton 2D). Pipe swirled rounds (size 1 1/2″ dia) on to prepared baking sheets
  5. Bake in the center of the oven for 12—13 minutes, until a pale golden-brown at the edges. Cool cookies on the baking sheets for 5 minutes then carefully transfer, with a spatula or palette knife, to a wire rack to cool completely. Once cool divide cookies into 2 equal portions (I find it best here to sort through the batch and match up cookies of the same size)

Buttercream Filling

  1. Measure the butter into a bowl, sift the icing sugar and tea powder on top
  2. Add the infused cream, beat on medium speed until well combined. Increase to high speed and whip until very light and smooth
  3. Spoon into a piping bag fitted with an open star nozzle (Wilton 32)
  4. Taking one portion of the cookies, pipe a border onto the flat side of the cookies, leaving a void in the middle

Chocolate Ganache filling

  1. Warm the infused cream to just below boiling. In a separate bowl combine the chocolate and icing sugar. Pour over the warmed cream
  2. Leave for 5 minutes
  3. Stir and whisk until smooth and fully emulsified
  4. Leave to cool until semi-firm (transfer to fridge to firm up but not solid)
  5. When firm pipe into center of the cookie with buttercream filling, and seal with it’s matching cookie from the second portion batch, twisting slightly to seal

To Decorate (optional)

  • Using a piping back with the end snipped off, drizzle some chocolate lightly over the assembled cookies. Leave for the chocolate to set- if you can wait that long!
Advertisement

Queen of Puddings Brunch Pancakes

Yet another bake that came about from my time on Food Network Canada’s show Great Chocolate Showdown. The elimination challenge in Episode 4 was to bake a brunch dish inspired by a favorite childhood dessert, using QuakerTM oat flour. The items for selection were coffee cake, tart, pancakes, crepes and biscuits. While I’m definitely partial to a good breakfast biscuit, pancakes are much closer to my heart. Waffles give me a savory brunch option, whilst pancakes are the perfect vehicle for a sweet option.

My childhood memory would have been firmly anchored in my mom and her synonymous dessert that is Queen of Puddings. My mother was solely responsible for my ability, passion and sometimes foolhardy ambition when I bake. In my childhood memories, she’s permanently enrobed in a gingham tabard, and there was nothing this woman couldn’t make, bake or generally concoct in the kitchen. If I were to sum up a childhood of kitchen memories in one delicious dessert, Queen Of Puddings, instantly springs to mind. With layers of breadcrumb enriched vanilla custard layered with sweet, tangy raspberry jam and topped with billowy clouds of fluffy, golden toasted meringue it was my mom’s go-to dessert when ingredients were scarce. For me it’s a classic case of my mom being a kitchen alchemist and turning a few mundane ingredients into something fantastic- a fine example of the whole being more than the sum of it’s parts. The original recipe is easy and comforting, and it’s warmth, familiarity and soothing nature will always remind me a a childhood at my mother’s hip.

Of course trying to marry such a quintessentially classic comfort pudding with the concept of brunch was always going to be a fun challenge at best! In my head the signature layers of the original recipe lend themselves perfectly to create a layered, stacked brunch dessert. Here I’ve created a pancake stack bordering on an entremet- layers of pancake with ganache, custard, and jelly regally crowned with peaks of soft, fluffy meringue. Anyone for a boujee brunch?

Yes I’ve taken shortcuts here with the use of Jello-O and custard powder. For me, when making brunch, shortcuts are ALWAYS welcome. Anything that helps me get to the table fast and get the bubbles flowing even faster is always acceptable in my books! I’m not one to stand on ceremony.

Bottoms up!

Queen of Puddings Brunch Pancakes #recipe #greatchocolateshowdown

Makes 4

Ingredients

Oat Pancakes

  • 2 cups oat flour
  • 1 1/2 tsp baking powder
  • 1/2 cinnamon
  • 1/8 tsp Kosher salt
  • 2 eggs
  • Zest 1 large orange
  • 1 cup whole milk
  • 1/4 cup butter, melted
  • 1 Tbsp agave syrup
  • 1/2 tsp vanilla extract
  • 1 cup chocolate chips

Whipped Chocolate Ganache

  • 1/2 cup whipping cream
  • 2oz dark chocolate, cut in to chunks
  • 1 Tbsp Raspberry liqueur
  • 1/8 tsp Kosher salt

Prosecco Raspberry Gelee

  • 1 pack Raspberry Jell-O
  • 1 cup boiling water
  • 1 cup Prosecco

Chocolate Custard

  • 2 Tbsp custard powder
  • 2 tsp sugar
  • 1 cup whole milk
  • 2 oz dark chocolate, cut in to chunks

Meringue

  • 2 egg whites
  • 1/2 cup fine sugar

To Serve

  • 1 1/2 cups fresh raspberries, sliced lengthwise in half

Method

Prosecco Raspberry Gelee

  1. In a jug combine Jell-O powder and boiling water. Stir until dissolved
  2. Slowly add in prosecco and stir gently to incorporate
  3. Pour into 3″ dia silicone tartlet mold to 1/4″ depth
  4. Place in refrigerator to set

Chocolate custard

  1. Mix the custard powder and sugar together in a small pan
  2. Add the milk, and stir to combine
  3. Continue heating, stirring constantly, until the custard is smooth and well thickened
  4. Remove pan from heat and stir in chocolate chunks until melted and fully incorporated
  5. Leave to cool for 5 mins before placing into a piping bag fitted with a plain round tip
  6. Pipe discs of the custard into a silicone tartlet mold to match your Jell-O tartlet mold
  7. Cover the surface of the custard with cling wrap to prevent skin forming on the surface
  8. Place in refrigerator to set

Whipped Chocolate Ganache

  1. Gently heat the cream in a pan until just below boiling. (look for small bubble starting to appear at the edge of the cream)
  2. Remove from heat, add the raspberry liqueur, salt and chocolate chunks and leave for 2-3 minutes
  3. After this time gently stir to emulsify the mixture until it is smooth and uniform in color
  4. Leave to cool to room temperature
  5. Using a whisk or hand held mixer whip the mixture until light and fluffy. Be careful not to overwhisk in case of separation
  6. Cover and set aside until needed

Oat Pancakes

  1. In a medium bowl, whisk together the oat flour, baking powder, cinnamon, and salt
  2. In a separate larger bowl, mix together the eggs, milk, melted butter, orange zest, and vanilla extract
  3. Add the dry ingredients and stir to combine. Once nearly combined stir in the chocolate chips
  4. Heat a griddle pan over a medium high heat. Lower heat to medium low, and using 1/3 cup measurement pour circles of pancake batter to give you 8 pancakes. Your pancakes should spread to approximately 4-4 1/2″ diameter
  5. Cook on each side for 3-2 minutes until golden brown, flipping when done.
  6. Remove from heat and set aside until serving

Meringue

  1. In a stand mixer fitted with the whisk, beat the egg whites until soft peaks form
  2. With the mixer on, gradually beat in the sugar until stiff peaks form. meringue should be glossy and smooth
  3. Transfer to a piping bag fitted with a desired piping nozzle

Assembly/ To Serve

  1. Remove whipped ganache from refrigerator and transfer to a piping bag fitted with a round plain nozzle
  2. Pipe a round of ganache onto a pancake placed on a plate, leaving 1/4-1/2″ border
  3. Set raspberries halves around on the border, standing up against the ganache
  4. Place a second pancake on top
  5. Carefully remove a round of chocolate custard* from the mold and place on top of second pancake
  6. Carefully remove a round of raspberry gelee* from the mold and place on top of the chocolate custard round
  7. Set raspberries halves around on the border, standing up against the custard & gelee rounds
  8. Top with peaks of meringue piped in desired arrangement and torch to finish until toasted and browned
  9. Serve with any remaining raspberries

*Chocolate custard and gelee rounds can be placed in the freezer, after setting, for 10-15mins to firm up to aid removal

Corn Husk Meringue w/ White Chocolate Sweetcorn Mousse

So this is a dish that in a sense “never was”. Episode 3 of Food Network Canada’s Great Chocolate Showdown had an elimination challenge of selecting from a preset range of vegetables and using said vegetable as the feature item in a dish of your creation. Along with chocolate of course! I got to sit this out thanks to winning “Sweet Safety” that week but nonetheless I couldn’t help but think that I’d have loved to have done this challenge as it’s right in my wheelhouse of using unexpected ingredients in unexpected places.

I’d have been hoping for Sweetcorn from the Parsnip; Pumpkin; Beets; Fennel and Sweetcorn). This would have given me the ideal opportunity to pay homage one of my food idols Enrique Olvera. Taking one of his feature desserts from the menu at his Pujol restaurant and tweaking it somewhat (hopefully not too irreverently!) to facilitate the over-riding brief of the show and yes- include chocolate.

Corn Husk Meringue w/ White Chocolate Sweetcorn Mousse #recipe #greatchocolateshowdown

Preview in new tab

Ingredients

Makes 4

Meringue

  • 4 dried cornhusks
  • 2 large egg whites
  • 1/2 cup sugar

Mousse

  • 1 1/2 cups fresh corn kernels (from 3 ears)
  • 1 tablespoon sugar
  • 1/8 teaspoon kosher salt
  • 1 cup heavy cream
  • 1/4 cup mascarpone

Salted Bitter Caramel Popped Corn

  • 1/3 cup popping corn kernels
  • 2 Tablespoons Canola, or other flavorless, oil
  • 1/2 cup dark brown sugar
  • 3 Tablespoons water
  • 1/2 teaspoon Kosher salt
  • Additional sea salt to taste

Method

Meringue

  1. Preheat the oven to 450° F. Spread the husks on a large baking sheet; bake for 8 to 10 minutes, until browned. Remove the browned husks from the oven and reduce the oven temperature to 200° F
  2. Cut any unbrowned ends from the husks, discard and break the remaining browned husks into small pieces Transfer to a spice grinder in batches and grind to a powder. Sift the husk powder through a fine sieve and discard the larger remnants
  3. In a stand mixer fitted with the whisk, beat the egg whites until soft peaks form. With the mixer on, gradually beat in the sugar until medium peaks form. Add 2 1/2 tablespoons of the husk powder; beat at medium-high speed until stiff. Reserve any remaining husk powder for serving
  4. Transfer the meringue to a pastry bag fitted with a round tip. Pipe four 3-inch rounds of meringue onto a parchment paper–lined baking sheet. Bake for about 1 hour and 10 minutes, until the meringues are set and sound hollow when lightly tapped on the bottom. Set aside and set cool completely while you make the mousse

Mousse

  1. In a skillet, combine the corn, sugar, salt and 3/4 cup of the cream and bring just to a boil. Simmer over moderate heat, stirring, until the corn is tender, 8-10 minutes. Transfer to a blen­der and puree until smooth.
  2. Strain the puree through a fine sieve, pressing on the solids. Let cool completely, then whisk in the mascarpone
  3. In a bowl, beat the remaining 1/4 cup of cream until stiff. Fold into the corn mixture until no streaks remain. Chill until ready to serve

Salted Bitter Caramel Popped Corn

  1. Measure corn kernels and oil into a large pan
  2. Cover pan leaving lid slightly ajar and place over a medium heat
  3. Kernels will start to pop, shake occasionally. When popping slows and stops remove pan from heat and carefully remove the lid
  4. Leave to cool for 5 minutes, then transfer to a bowl to cool fully while you prep the caramel coating*
  5. Line and oil spray a baking sheet
  6. In a pan combine the brown sugar and water. Heat over a medium heat until sugar has melted, swirling the pan often
  7. Increase heat to high and boil for 6-8 minutes until sugar syrup has thickened
  8. Remove pan from heat, stir in the Kosher salt and leave to cool for 5 minutes. Carefully toss in 1 1/2 cups popped corn and gently stir to fully coat the popped corn pieces. Transfer to your prepared baking sheet, spreading the pieces out before leaving to cool and set.
  9. Once cooled toss the pieces in additional seas salt to taste

Assembly/ To Serve

  1. Transfer the meringues to plates and gently crack open with a table knife. Spoon the corn mousse between the meringues
  2. Arrange a sprinkling of the salted bitter caramel popped corn around the plate and sprinkle the remaining corn husk powder over. Serve right away

*This recipe makes more popped corn than needed. Any surplus can be stored in an air-tight bag or container for scoffing later!

**In the photos here I have also garnished with some tempered white chocolate “corn husks”.

Black Garlic Ice Cream Sandwich, with Fennel & Orange Donuts

I can just bet your reaction upon reading the title of this recipe post. Furrowed brow, wrinkled nose…who knows…maybe even a snort of disbelief? “Garlic in a dessert? Well surely that CAN’T be right. He’s pushed fooling around with flavors too far this time!” Well for those of you who have been on this weirdly, wonderful flavor train of mine for while you might remember I have long been a advocate of black garlic and it’s uses in the sweeter side of things in the kitchen- check out my Living in the Black from a few years ago. Yes THAT long!

To give any newcomers a quick rundown-

Black garlic is fresh raw garlic that changes with time through the use of low heat and humidity of about 70% in a process called the Maillard reaction. During this process, the cloves turn a distinct black color. The garlic’s texture and flavor change as well. The flavor of black garlic has the slight tang of tamarind or balsamic vinegar and a mild sweetness that resembles rich molasses with the complexity and umami notes of soy sauce. Its cloves are much softer than fresh garlic, and stickier.

Thank you for coming to my TED talk.

Here I’ve initially paired the black garlic itself with some dark chocolate in an ice cream. The ice cream itself is left wholly unflavored save for a touch of sweetness from a little honey. This allows the flavor of the black garlic to shine through, and work really well with the bitter sharpness of the dark chocolate. for me it’s a wonderfully decadent, almost avant-garde treatment of the humble stalwart dessert. I should point out that for me this recipe is all the more appealing as it’s a “no churn” recipe, you just need to tale a bit more time in the planning of it.

As for the donuts (which are baked, not fried) the whole idea for this came from a quest to create an ice cream sandwich that was just “a little bit” different. Black Garlic was my “gimmick” in the ice cream and well off course something left of center was needed as the sandwich vessel itself. That’s where the donuts come in. The flavors of orange and fennel aren’t just a random selection for intrigue value. The fennel anise, citrus of orange and that molasses-like tang of black garlic work together in a combination that takes on a herbaceous-like quality that does indeed elevate this beyond your usual ice cream sandwich.

Be warned though- unique elevated flavors or not, this is still an ice cream sandwich- so be prepared to get messy!

Black Garlic Ice Cream Sandwich Recipe #recipe #greatchocolateshowdown

Ingredients

Makes 12 donuts and 1.25 litres ice cream

Black Garlic Ice Cream

  • 2 cups and 1/2 cup heavy whipping cream, separated
  • 2 cloves black garlic, squashed to a paste
  • 1 1/2 teaspoons honey
  • 1 can (14oz) sweetened condensed milk
  • 4oz dark chocolate, cut in to chunks

Orange & Fennel Donuts

  • ½ cup (1 stick) butter, softened at room temp
  • ½ cup sugar
  • ¼ cup light brown sugar
  • Zest of 2 large oranges
  • 2 ½ cups AP flour
  • 1 ½ teaspoon baking powder
  • ¼ teaspoon bicarb of soda
  • ¾ teaspoon salt
  • 2 teaspoons ground fennel
  • 2 eggs, room temperature
  • 1 Tablespoon orange juice
  • 1 teaspoon vanilla extract
  • 1 cup whole milk, room temperature

To Decorate

  • 6oz Dark chocolate, melted
  • Gold leaf, optional
  • Dragees, optional
  • Feuilletine, optional

Method

Black Garlic Ice Cream

  1. In a large saucepan combine 2 cups of heavy whipping cream and the black garlic paste
  2. Heat over a medium heat, stirring occasionally until small bubbles start to form at the edge of the milk
  3. Reduce heat to low for 5 mins
  4. After 5 mins remove from heat and leave to infuse for 15 mins. After this time strain the cream/ garlic mixture in to a small bowl to remove the garlic pieces
  5. Cover surface with plastic wrap to prevent skin and place in refrigerator to cool fully
  6. Once the cream mixture has cooled fully, transfer to a large bowl, add in the 1/2 cup of whipping cream and whisk to soft peak stage
  7. Fold in honey and condensed sweetened milk until fully incorporated
  8. Pour the mixture into a freezer-proof container, cover the surface with plastic wrap and freeze for 2 hours
  9. After 2 hours, remove ice cream from freezer and fold in chocolate chunks
  10. Return to freezer and leave until fully frozen, minimum 6 hours
  11. To serve ice-cream remove from freezer and leave at room temperature for 5 mins before scooping to serve

Orange & Fennel Donuts

  1. Preheat oven to 425 degrees C. Prepare donut pans with butter, or baking spray
  2. In stand mixer bowl with paddle attachment, cream the butter, sugars and orange zest until light and fluffy (apx 3 mins)
  3. In a separate medium bowl combine the flour, baking powder, baking soda, salt, ground fennel and whisk together
  4. Reduce mixer speed to medium, add eggs and vanilla extract and beat until combined, scraping the sides occasionally
  5. Reduce speed to low and add in flour mixture in 2 batches, alternating with milk. Mix until just combined
  6. Transfer batter to piping bag with an open nozzle (or just snip the end off) and pipe in donut pan. Bang to remove bubbles
  7. Bake for 10- 12 minutes until springy, skewer test until clear
  8. Leave to cool in pan for 5 minutes then remove to rack to cool fully
  9. To finish the donuts dip in the melted chocolate and decorate to you liking

*Serve the ice cream and donuts however you like. Single scoop on a single donut and dusted with some feuilletine, adding some tasty textural crunch (I highly recommend this!); single scoop in an epic double donut sandwich or double scoop in a double donut extravaganza. The choice is yours- go WILD!

Coming to a small screen soon

If you follow any of my social media channels you will know by now that I’ll be a competitor on an upcoming baking reality TV show. If you don’t follow them and just happened to stumble upon this page, well the show in question is Food Network Canada’s “Great Chocolate Showdown“. Premiering on Tuesday, March 1st at 9pm ET/PT the show features 10 highly skilled home bakers from all walks of life.

Great Chocolate Showdown is an ooey-gooey, decadent chocolate dessert competition series where 10 home bakers go head-to-head in the indulgent world of chocolate, vying for the grand prize in a range of creative and exciting chocolate-based challenges. In order to survive the competition from week-to-week and avoid elimination, the chocoholic dessert-makers must dazzle our panel of world-renowned chocolatiers and food expert judges with their delicious, inventive creations. In the end, three bakers take on the biggest chocolate challenge of their lives, but only one is crowned ‘Great Chocolate Showdown Champion’ and wins the $50,000 grand prize

During the course of the competition I’m hoping to deliver some amazing bakes, cakes and sweets while staying through to my flair for flavors, all the while competing for the grand prize of $50k. Hopefully you’ll get to tune in, watch along and route for me.

Great Chocolate Showdown, Season 3 premieres March 1 at 9 p.m. ET/PT on Food Network Canada and is available to stream live and on-demand with STACKTV and the Global TV App.

New episodes air Tuesdays at 9 p.m. ET/PT on Food Network Canada and are available to stream live and on-demand with STACKTV and the Global TV App.

You can follow ME, if you don’t already, at my accounts below

Instagram: https://www.instagram.com/crumbsinmybeardyyz/

Twitter: https://twitter.com/MrMomsYYZ

TikTok: https://www.tiktok.com/@crumbsinmybeardyyz?lang=en

You can follow Food Network Canada, Great Chocolate Showdown and all it’s happenings at the accounts below

Facebook: https://www.facebook.com/foodnetworkcanada

Twitter: https://twitter.com/foodnetworkca

Instagram: https://www.instagram.com/foodnetworkca

TikTok: https://www.tiktok.com/@foodnetworkca?lang=en

#GreatChocolate Showdown

Online: See exclusive content at www.foodnetwork.ca

For the official press release see here

That’s all for now. Stay tuned!

Toronto’s only contender for Great Chocolate Showdown Season 3 #greatchocolateshowdown