Recipe Alert…Peanut Butter Oattie cookies

2015-04-22 13.13.58

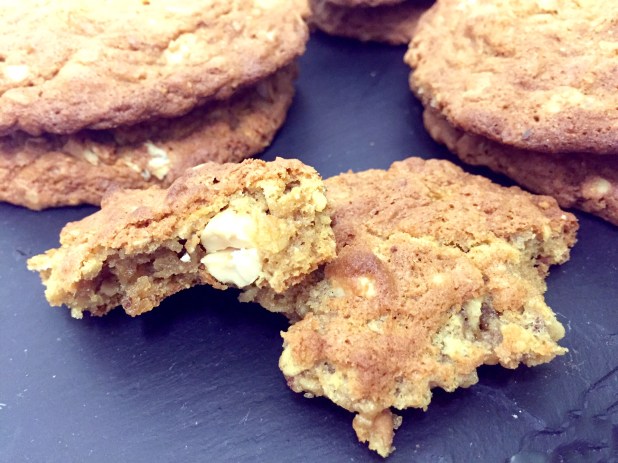
My Peanut Butter Oattie cookies are packed full of oats giving them a soft, chewy texture with whole peanuts adding pleasing crunchiness. Make sure you use salted peanuts as they add wonderful pockets of tangy saltiness contrasting the sweet oats.

Sweet, salty, chewy and incredibly moresish- you need to try these beauties! They’re proving incredibly  popular in my household at the moment- I’ve already lost count of the times I’ve been asked to make them. A fantastic treat to have in stock when the kids bundle home from school- a hard days “Rock; Paper; Scissors” having depleted their energy levels! Partnered with a glass of cold milk it’s indeed a marriage made in heaven. But it’s not just my children who can be found pilfering the cookie jar when these are about. My husband’s preference for the savory means he’s oftened to be found checking emails with cookie in hand!

I call them cookies as opposed to biscuits as a personal preference. For me biscuits represent something more uniform and structured- exact bites of crumbly sweetness. The cookie on the other hand is something more rustic. A ballsier rebel of the Baking World conforming less to the rules of appearence and plunging headfirst into the realm of flavours. Cookies don’t care how you think they look- they prefer to let their flavours make an impression. These cookies are not your small, danity bite size treats. They are large handfuls of tastiness- not meant to be nibbled on but greedily chomped at. Partnered with a glass of cold milk your satifaction is sure to be sealed with dripping, grinning milky moustache.

2015-04-22 12.41.18

Peanut Butter Oattie Cookies

Makes between 24-30 (depending on size)

175g Unsalted butter

225g Crunchy peanut butter

4 tablespoons Maple syrup

150g Caster sugar

150g Light brown sugar

2 large Eggs

1 tablespoon Vanilla extract

225g Plain flour

2 teaspoons Bicarb of soda

1/2 teaspoon Salt

250g Jumbo porridge oats

100g Salted peanuts


Method

  • In the bowl of a stand mixer combine the butter, peanut butter, maple syrup, vanilla extract and both of the sugars. Set to beat on medium speed. Beat for about 10 mins.
  • Whilst the butter mixing is beating you can get on the the other parts of the recipe. Preheat your oven to 170 degrees C and line two baking sheets with baking parchment.
  • In a separate large bowl combine the flour, bicarb of soda, and salt.
  • Add the porridge oats and peanuts and mix throughly.
  • To the butter mixture add 1 egg and beat to evenly incorporate. Add the remaining egg and once again beat to evenly incorporate.
  • Remove the bowl from the mixer and slowly add half of the dry ingredients, mixing only until just incorporated. Add in the remainder of the dry ingredients and once again mix until just combined. The batter will be quite stiff and lumpy. Don’t worry- this is exactly what you want.
  • Using two dessert spoons or an icecream scoop, place plarge balls (slightly larger than golf-ball shapes) onto the lined baking trays. Leave apx 2 inches between each cookie ball as they will spread whilst cooking they will spread. (I’m never too fussed about having them an even size as I think having them varying shapes and textures adds to their charm and  tastiness).
  • Place the cookie trays into the preheated oven and bake for 10-12 minutes, until they spread and are golden brown.
  • Remove from the oven and allow the baked cookies to rest on the trays for about 8-10mins. They will still be a bit soft at this point so remove from the trays with a fish-slice or flat spatula and leave to cool fully on wire racks. During cooling they will frim up some more giving a soft cookie texture.
  • Once fully cooled, remove from the rack and enjoy.


In the meantime,

“Remember Mom’s the word- that’s Mr. Mom’s!”

Recipe Alert…I am The Muffin Man

Whilst you may think that there is always cake available in my house (and to be quite honest you wouldn’t be wrong) there is also always a hearty supply  of fruit- perhaps to ease my conscience for numerous bakes? An influx of bananas of late has lead to a near constant presence of the over-ripening fruit. So much so that my husband commented the other evening, “Why is this place turning into the house of black bananas?!?!” Fair enough- he has a point. I however think it’s not necessarily a bad thing to have some fragrant, burnished fruit lying about. They make for much more interesting and tasty bakes once the process of almost “self-caramelisation” is under way. An earlier post of mine gave the recipe for Banana Bread– a firm memory of mine from the kitchen of my childhood. Having only just finished off out latest batch of this I needed something different to make use of the over-ripe bananas now taking up residence on my butchers trolley. So what better way than muffins- that versatile, anytime treat (but not a treat) bake.

Going slightly off track, I recently made some cookies, Maple Butter Cookies with prosciutto dust, using Moose Maple Butter. I am in fact chomping on some as I type- their gloriously maple sweet crumbs littering the keyboard here- oh dear! However- I digress. As a result of this still have some of the said maple butter left and wanted to try other bakes to use it in. So my muffins to be were to provide the perfect excuse for this as well. Kill two birds with one stone – or bake two pans in one oven (to sound a little less brutal about it all).

2015-03-25 13.51.23

Banana Bran Muffins (feat. Moose Maple Butter)

Makes 9

Ingredients

250g self-raising flour

1 tsp baking powder

1/2 tsp bicarbonate of soda

1/4 tsp pinch of salt

1/2 tsp mixed spice

115g caster sugar

100g oatbran

75g melted Moose Maple butter (if can also use regular unsalted butter)

125ml milk

1 tsp vanilla extract

3 medium, over-ripe bananas

2 medium eggs


Method

  • Heat the oven to 190C electric/ 170C fan.
  • Melt the (maple) butter and allow to cool.
  • Mash the bananas well.
  • Sift the flour, baking powder, bicarbonate of soda, salt, and mixed spice together in a large bowl, add caster sugar and oatbran, stir through to combine.
  • In a separate bowl, beat together the eggs, vanilla extract, melted (maple) butter and milk. Add the mashed banana and mix well.
  • Make a well in the centre of the dry ingredients and add the egg mixture, stirring roughly with a fork. Be careful NOT to overmix at this point. You just want it mixed enough so that no pockets of dry ingredients remain. It should look lumpy and pastey – like how a cake batter ISN’T supposed to look!
  • Line a 12 (or 2 x6 ) muffin tray with 9 muffin cases. Fill the cases to the top .
  • Bake for between 2o- 25 minutes, until muffins are springy to touch. Rest the muffin tray on a wire rack for five minutes then remove the muffins and leave to cool.

Hope you enjoy!

2015-03-25 13.54.06

In the meantime,

“Remember Mom’s the word- that’s Mr. Mom’s!”


Sweet dreams are made of these…

Hello again! Now you may think that in my absence I have been swanning around rubbing shoulders with all sorts of celebrities- I wish! In actual fact I have been locked away in my hot and steamy kitchen baking up a storm on some rather new and exciting (well I think so!) flavours. The wonderful folk over at Hope and Greenwood have been terribly generous in sending me some wonderful gifts of their sweet goodies and I thought it only right try out some of them out in baking.

We all know cupcakes are my love so it’s only fitting that I should start there. Not one but two of varieties of cupcake would be inspired by Hope and Greenwood and feature one of their delightful sugary treats.

First out of the starting blocks is my “Salty Dog” cupcake: vanilla sponge studded with chocolate chips and fudge pieces, hiding a salted caramel centre, topped with vanilla buttercream frosting and finished with a H&G Salt Caramel Fudge piece and caramel drizzle. The oozing caramel centre mixing with the salty/ sweet tang of the fudge piece is a marriage made in confection heaven.

2015-03-05 17.43.59

Salty Dog cupcakes feat. Hope and Greenwood Salt Caramel Fudge


My next cupcake again features the sublime flavour of salted caramel- well, you can never have too much of a good thing can you? The “Caramel Crunch” a decidedly moreish cupcake of vanilla and honeycomb sponge with a duo of chocolate and caramel buttercream frosting, all topped with a golden nugget of Miss Kitty and Mr. G’s best Salt Caramel Honeycomb.

"Caramel Crunch" cupcakes feat. Hope & Greenwood Salt Caramel Honeycomb.

“Caramel Crunch” cupcakes feat.
Hope & Greenwood Salt Caramel Honeycomb.my

Not wanting to be completely biased towards cupcakes I also added brownies into the mix. The inspiration for my “Raspberry Ruffle” brownies came from the sweet of the same name- an indulgent mix of chocolate, coconut and raspberry. A fruity Bounty bar for all intents. So I combined a rich chocolate and coconut brownie with a luscious raspberry cheesecake swirl topping and studded it with Raspberry Jam Coconut Ice from H&G’s kitchen. Never has a brownie tasted so naughty!

"Raspberry Ruffle" brownie feat. Hope & Greenwood's Raspberry Jam Coconut Ice

“Raspberry Ruffle” brownie feat.
Hope & Greenwood’s Raspberry Jam Coconut Ice

For the piece de résistance I chose to work with a new product recently launched from the confectioners extraordinaire. Hope and Greenwood’s new Almond Brittle with Himalayan Sea salt definitely raises the confectionery bar to a new high. Sweet almonds encased in sugary amber have a delectable crunch and a sprinkling of hand-harvested pink Himalayan rock salt and chilli give an unexpected Wonka-esque tongue tingling sensation. A sweet like this definitely deserved some A-grade treatment. With this in mind I set about and created my Caramelised White Chocolate and Tonka Bean tart, with Almond Brittle fringe. What’s more (and as promised!) I’ve included the recipe. It’s a fabulous dessert whose sophisticated and rich taste belies it’s simplicity. This is sure to become a favourite in my house!

2015-03-14 18.54.02

Caramelised White Chocolate & Tonka Bean tart, with Hope & Greenwood Almond Brittle Fringe

Caramelised White Chocolate & Tonka Bean Tart, with Almond Brittle Fringe

For the base:

200g Ratifia biscuits

100g unsalted butter, cubed

For the filling:

200g White chocolate (min. 30% cocoa butter)

25g unsalted butter

300ml double cream

2 Tonka beans, finely grated

For the decoration:

300ml double cream, whipped

75g Hope & Greenwood Almond Brittle with Himalayan Sea-salt


  • Preheat oven to 120C/100C fan.
  • Blitz the biscuits in a food processor until beginning to turn to crumbs, then add the butter and whiz again to make the mixture clump.
  • Press this mixture into a 23cm / 9 inch loose-bottomed tart tin; press a little up the sides to form a slight ridge.
  • Place in the fridge to set for at least 2 hours.
  • Break up the chocolate into pieces and put it on baking tray.
  • Place the baking tray in the preheated oven and bake, giving it a good stir every 10 mins, until it’s a light golden brown. Take the chocolate out when it is the color of peanut butter. If chocolate should start to look chalky or grainy, give it a good, brisk stir and it should return to normal.  Scrape the chocolate into a bowl and set aside.
  • In a saucepan add the grated tonka beam to the double cream and heat until just under boiling.
  • Remove from the heat and add in the caramelised white chocolate and stir until it is fully melted and incorporated.
  • Leave to cool for about 10 mins by which time it should start to thicken.
  • After the cooling time pour the caramelised white chocolate cream into the crumb base.
  • Place in a fridge to set for at least 3 hours, or overnight.
  • When set, remove the tart from the fridge and pipe a “fringe” of whipped cream around the edge.
  • Break the almond brittle into bite-sized pieces and stud the whipped cream fringe all around.
  • Serve and enjoy!

2015-03-14 18.54.34

I do hope you’ve enjoyed this little trip to the “Sweet Shop” and feel intrigued enough to try out not only my recipe but also some of the goodies from Hope & Greenwood.

In the meantime,

“Remember Mom’s the word- that’s Mr. Mom’s!”

“It’s comin’ on Christmas…”

Well that time of year has rolled around again. From the kitchen stream the dulcet tones of Joni pining to skate away from her uncomfortable familiarity with the festivities. But also coming from there is the heady, luxurious smell of maturing fruit cakes- rich, enrobing and comfortably nostalgic. This year has seen me churn out the grand total of 8 christmas cakes. Not bad going for someone who’s not exactly their no. 1 fan!
Making these it struck me again how much I had unwittingly absorbed in the kitchen as a child. From my mother’s hip I watched as she wove Yuletide magic steeping and stirring; trimming and tying. I loved being in the kitchen at Christmas time whilst growing up. It was one of best places to forget whatever trials and tribulations had occurred. Christmas was always peak season for arguments in our house (I dare say as probably in most). That mix of self-imposed stress and duty mixed with excitement was a delicate scales in which the looming frenzy of the Christmas day often tipped the balance.
It was in these time I could loose myself in my mother preparing and baking the festive season’s fare. From cakes to puddings; mince pies to brandy butter- they were all homemade weeks in advance. It’s somewhat sheepishly that I admit to having a bizarre fascination with the latter. I don’t just mean over-indulgence. I mean smearing it in everything from toast to biscuits- even eating it like yogurt from the reclaimed tubs. There was nothing quite like a spoonful of that sugary paste melting sublimely on my tongue. The things we do as children! In a rather paradoxical turn of events post-puberty I cannot stand the stuff. Eating it with pudding or cake is bad enough but to have it “raw” (as I used to think of it when younger) absolutely beggars belief for me! To quote my Scottish family it “gie’ me the boak”.
So parking the idea of brandy butter and the associated puddings this year I decided to have a go at making mince pies and mincemeat. Basing my only knowledge of these so far solely on childhood memories, I always thought of them as being too complicated and time consuming. All those ingredients together and THEN you have to bake them. Who on earth had the time to do that normally – let alone at this time of year? I also have to confess to not being a particular fan of mince pies (come to think of it dried-fruit bakes in general- horror I know!) However there’s usually one that will find it’s way on to my plate in flurry of “devil may care” festive abandonment. I prefer it unadorned- no cream; no custard; no brandy butter (!) In contrast to my husband, who will throw every diary-based condiment at a mince pie thus turning it into a festively Frankenstein Iles Flottantes, I prefer to let the sweet waftings the of cinnamon sugar dusting speak for itself.
And since it be the Season of Giving ….

2014-11-14 18.36.43
This is my first venture at making my own mincemeat and having passed the test with husband & children I’m mighty please with the results (even if info say so myself!) Wonderfully festive and lip-smackingly fruity it beats the shop-bought jars any day.
In this recipe the pastry is the one thing I will succumb to shop buying. It’s Christmas and who has all that time to stretch out yard upon yard of micro thin pastry! I use filo pastry as it allows the full, juicy flavour of the mincemeat comes through. There’s also something about the contrast between the crispy, flaky casing with the sweet, fragrant filling that just adds an extra “oomph!” to the pies.

2014-11-14 18.27.05

FILO MINCE POINSETTIAS

For the mincemeat
200g Sultanas
200g Currants
175g Dried Figs, chopped
100g mixed peel
75g stem ginger, chopped into small pieces
150g suet
1 large Branley Apple, chopped into small pieces
Zest and Juice of 2 Clementines
Juice of 1 Lemon
35g chopped almonds
35g pecans, toasted and chopped
4 tablespoons Dark Rum
5 tablespoons of Port
4 tablespoons Brandy
1 tablespoon Vanilla Extract
225g Dark Muscavado
1 teaspoon mixed spice
1 teaspoon cinnamon

For the poinsettias

12 sheets of Filo pastry
25g unsalted butter, melted
Cinnamon Icing sugar (for dusting)

  • Mix all the ingredients, except the alcohol, in a large saucepan until well combined. You want to make sure everything is covered in both sugar and spice. Heat over a gentle heat until suet has melted.
  • Remove from the heat, add in the alcohol and stir well.
  • Cover and leave to cool and infuse overnight (longer if possible) stirring occasionally.
  • Place into sterilised jars and store in a cool place. Once in jars the mincemeat will last for up to 6 months.
  • That’s it! This recipe will be good for 36 of the mince pies mentioned below.

For the mince poinsettia pies carry on to the next steps.

  • Preheat your oven to 180c/ 160fan. Spray a 12-hole muffin tin with cake release spray or oil.
  • Lay the sheets of filo pastry out on top of each other and cut them in half across the width. Then cut each half in half again to give four stacks, roughly square in shape. Using a pizza wheel-cutter makes this job a lot easier!
  • Line each hole of the muffin tin with a mini-sheet of filo. Brush with a little melted butter.
  • Repeat the above step until you have 3 sheets of filo in each hole. Rotate the sheets slightly so that the overlay each other staggered. Gently push the filo down into the hole so it takes the full shape of the tray. The edges of the sheets will drape over the holes giving the “poinsettia” effect. After repeating 3 times there will be 12 mini-sheets left, keep these under some damp kitchen paper for now.
  • Please the filo-lined trays in the over for about 5 mins, until pale golden.
  • Place 2 tablespoons of mincemeat into each pie case.
  • Using the remaining filo mini-sheets, scrunch one over each pie filling making a “cap” for the pie. You don’t need to be neat as the “scrunched up” / folded look adds to the effect.
  • Brush the new filo tip with the remaining melted butter.
  • Bake in the oven for 10mins until golden and crispy.
  • When ready remove the pies from the oven and place in a wire rack. If using, dust the hot pies with the cinnamon icing sugar and bask in the unmistakably festive fragrance!

2014-11-14 18.37.52