Pizza Waffle Fries

Serves 2-3

Ingredients

1 bag (540g) waffle fries

Marinara pizza sauce

  • 1 can (14oz) diced tomatoes
  • ¼ cup olive oil
  • 1 teaspoon garlic powder
  • ½ teaspoon onion powder
  • 1 Tablespoon balsamic vinegar
  • 1 ½ Tablespoons sugar
  • 1 Tablespoon Italian seasoning
  • ½ Tablespoon dried basil
  • Salt and black pepper, to taste

To finish

  • 1 cup shredded mozzarella cheese
  • ½ cup shredded sharp cheddar cheese
  • 1 cup pepperoni slices

Method

  1. Cook the waffle fries in accordance with manufacturer’s instructions

Whilst the waffle fries are cooking prepare the pizza sauce

  1. In a pan combine the marinara pizza sauce ingredients. Stir over a medium heat until well combined. Bring toa boil and cook for 3 minutes, stirring continuously
  2. Reduce heat and simmer for 10 minutes, stirring occasionally
  3. After this time remove from the heat and bland using an emulsion blend to an even sauce
  4. Set aside until needed

To finish

  1. In a bowl mix together the cheeses. Set aside until needed
  2. Once the waffle fries have been cooked remove from the oven and set temperature to 400°F
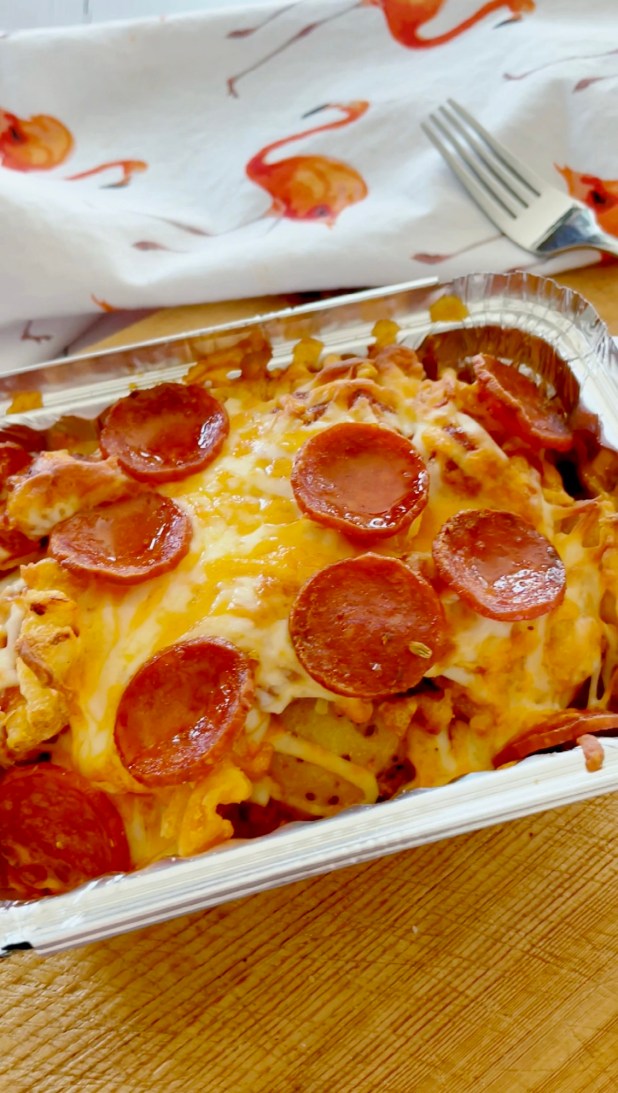
  3. Portion the waffle fries by layering with the fires with marinara pizza sauce and cheese. Finish with a layer of cheese and top with pepperoni slices
  4. Return the pizza waffles fries to the oven to cook for 7-10 minutes until the cheese has melted and the pepperoni has “cupped”. *You can also give them some additional time under the broiler for extra finishing

Sugar Cookie Cheese(cake) Ball

Ingredients

  • 16 oz. cream cheese, at room temperature
  • ½ cup (1 stick) unsalted butter, at room temperature
  • 1 ½ cups sugar cookie mix (dry and heat treated*)
  • 1 teaspoon vanilla extract
  • 1 cup powdered sugar
  • 1 cup sugar cookies, crushed
  • Festive sprinkles for decorating

Method

  1. Beat together the softened cream cheese and the softened butter until fully incorporated
  2. Add the cookie mix, powdered sugar, and vanilla extract and beat until well combined
  3. Fold in the sugar cookie pieces, and mix until combined
  4. Lay out a piece of cling wrap and scoop the cream cheese mixture onto it
  5. Form a ball, then wrap up the ball in the cling wrap. Use an extra layer of cling wrap to help it keep its shape. (I find a small soup ball helps to act as a mould here)
  6. Freeze for about 2 hours minimum, but preferably overnight
  7. Place the sprinkles in a low shallow baking dish
  8. Take the ball out of the freezer and unwrap. At this point you can use the heat from your hands to smooth out and geta more regular “ball” shape if needed
  9. Roll the ball in the sprinkles making sure you cover as much of it as you can
  10. Place the cheesecake ball on your serving plate and place in the fridge for between 30 minutes to an hour
  11. Serve with additional cookies or graham crackers for scooping
  12. If not serving that day, wrap in new cling wrap and place back in the freezer and then take out an hour before serving to come up to room temperature

*Heat treating the cookie mix

To heat treat the cookie mix, place it in a microwavable bowl and heat in 20 second bursts, stirring well between, until an internal temperature of 165F. Make sure that you stir between bursts to distribute the heat and avoid the mix catching to burn. Allow to cool before using

Andes Mint Cookies

Makes 24

Ingredients

  • ½ cup unsalted butter
  • ½ cup granulated sugar
  • ½ cup packed light or dark brown sugar
  • 1 large egg, at room temperature
  • 1 teaspoon pure vanilla extract
  • ½ teaspoon peppermint extract
  • 1 cup all-purpose flour
  • 2/3 cup natural unsweetened cocoa powder
  • 1 teaspoon baking soda
  • 1 teaspoon espresso powder
  • 2 Tablespoon milk powder
  • 1/8 teaspoon salt
  • 1 1/2 Tablespoon milk
  • 1 cup mini semi-sweet chocolate chips
  • 24 Andes mint chocolate candies

Method

  1. In stand mixer bowl fitted with a paddle attachment, or with an electric whisk, beat the butter, granulated sugar, and brown sugar together on medium high speed for about 3 minutes, until light and combined. Add the egg and vanilla extract, and then beat until combined
  2. In a separate bowl, whisk together the flour, cocoa powder, baking soda, espresso powder, milk powder and salt together until combined. With the mixer running on low speed, slowly add to the creamed butter mixture. Beat on low until combined
  3. Add in the milk, beating to combine on high speed
  4. Remove the bowl from the mixer and fold in the chocolate chips. Cover dough tightly and chill in the refrigerator for 30 minutes to 1 hour
  5. Remove cookie dough from the refrigerator and allow to sit at room temperature for 10 minutes. If the cookie dough chilled longer than 3 hours, let it sit at room temperature for about 20 minutes. This will make it easier to scoop
  6. Preheat oven to 350°F. Line large baking sheets with parchment paper or silicone baking mats. Set aside.
  7. Scoop the dough into balls, I use a 1 to 1 ½ tablespoon cookie dough scoop. Arrange on a the preared cookie sheets allowing 2-3 inches between
  8. Bake the cookies for 11-12 minutes or until the edges appear set and the centers still look soft. Remove them from the oven and lightly bang the baking sheet on the counter 2-3 times
  9. Cool cookies for a minute or two minutes on the baking sheet, then carefully press an Andes mint into the top pf each cookie, securing in the still setting dough. Allow to cool for a further 5 minutes, in which time the chocolate mint will soften, allowing you to spread/ swirl them with a small spatula or spoon creating your mint topping
  10. Transfer to cooling rack to cool completely
  11. Cover leftover cookies tightly and store at room temperature in an air-tight container for up to 1 week

Rudolph Linzer Cookies

Makes 24

Ingredients

  • 12 tablespoons unsalted butter, softened
  • 1/2 cup granulated sugar
  • 1 teaspoon cinnamon
  • ½ medium tonka bean, finely grated
  • 1 large egg yolk
  • 1 teaspoon Vanilla Extract
  • 1 1/3 cups All-Purpose Flour
  • 3/4 cup Almond Flour
  • 1/4 teaspoon fine sea salt

Filling

  • Raspberry, or strawberry, jam

To Finish

  • Candy eyes
  • Melted chocolate
  • Powdered sugar, for dusting

Method

  1. Line two large cookie trays with baking parchment and set aside until needed
  2. Beat the butter, sugar, cinnamon and tonka bean until light and fluffy, scraping the bowl as needed, about 3 minutes. Add the egg yolk, vanilla and beat until combined
  3. In a separate bowl, whisk together the flour, almond flour, and salt. Add the flour mixture to the egg mixture and mix until just combined, taking care not to overmix
  4. Divide the dough in half, and pat each half into a disc. Wrap in plastic wrap, and refrigerate until firm, about 1 hour
  5. Remove the dough from the refrigerator, and let it soften for 5 to 10 minutes, until it feels soft enough to roll.
  6. On a floured surface, roll one disc of dough out about 1/8″-thick. Using a 2 1/2″ round cookie cutter, cut out cookies. Transfer rounds to a parchment-lined baking sheet. Gather the scrap dough, roll, and repeat. If at any time during this process the dough becomes sticky and hard to work with, simply refrigerate it for about 20 minutes, until firm
  7. Place the cut cookies (you should have 24 cookies) in the refrigerator for 30 minutes and preheat your oven to 350°F
  8. While the first half of cookies is chilling, cut 24 rounds from the second dough circle. Once you’ve transferred these cookies to a baking sheet, use your smallest cookie cutter, or the end of a round piping tip, to make a cutout hole off-center of each and remove it. Place cookies in the refrigerator for 30 minutes to chill
  9. Bake the cookies for 12 to 15 minutes, or until the edges are just beginning to turn brown. Let them cool for 5 minutes on the sheets, then transfer to a rack to cool completely
  10. Turn the whole cookies flat side up and spoon 1/2 teaspoon of jam into the center, spreading it slightly. Top with the sugar-dusted cookies. With your melted chocolate in a small piping bag, with the end slightly snipped off, pipe on “antlers” and fix candy eyes at the ends, above the hole
  11. Though you can eat these cookies straight away, they taste better after letting them sit for a day or two so the jam can soak into the cookie making it deliciously soft

Candy Cane Eggnog Soft Cookies

Makes 30

Ingredients

  • ¾ cup unsalted butter, room temperature
  • ½ cup granulated sugar
  • ½ cup brown sugar
  • 2 large eggs
  • 1 teaspoon pure vanilla extract
  • ½ cup eggnog
  • 2 teaspoon baking powder
  • 1 teaspoon mixed spice
  • ½ teaspoon salt
  • 2 cups all-purpose flour
  • 30 Peppermint Candy Cane Kisses

Method

  1. Preheat the oven to 350 degrees F
  2. In a large bowl with an electric mixer beat the butter, granulated sugar, and brown sugar until well combined, about 1 minute
  3. Add the eggs, one at a time, beating until combined and scraping down the edges as needed
  4. Add the vanilla and eggnog and beat to combine
  5. Add the baking powder, salt, mixed spice, and beat until combined
  6. Add the flour and beat until just combined
  7. Scoop into 1-1 ½ tablespoon sized cookie dough balls and place on parchment paper lined baking sheets. They batter will appear wetter than usual cookie dough
  8. Bake in the preheated oven for 8-10 minutes. They will be puffed up and slightly golden
  9. Let them cool for 2 minutes and then press a peppermint candy cane Kiss into the center of each cookie. Leave to cool completely until the kiss is set firm
  10. Enjoy!