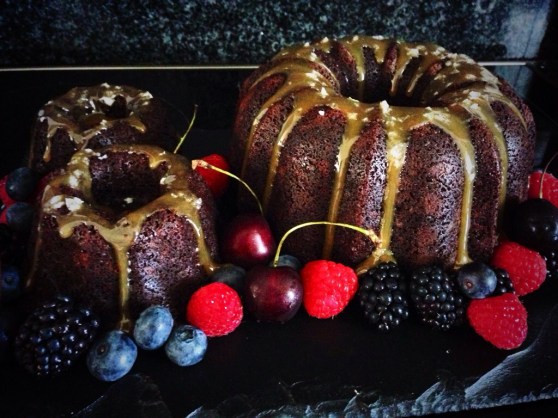
#Recipe Nanaimo Bars

Nanaimo Bars (2)
Nanaimo Bars

Last year my husband and I went to Canada for the first time. We spent a week in Toronto and I absolutely fell in love with the place. The food…the people….the food…you get the picture I’m sure? I won’t wax lyrical about it (if you want that you can read all about my Canuck adventures here). The food is something I definitely never run out of things to say about. You haven’t lived until you’ve tried poutine, and then there’s Nova Scotia Lobster! But the point of this post is to share my love of yet another Canadian foodstuff (albeit not a native of the East Coast) – the Nanaimo Bar. Yes, I’ll admit it does sound like a character from a Disney movie but believe me it’s worth getting used to the name.

It’s basically a layered fridge cake made up of a crumb base layer, a buttercream-style middle layer (traditionally custard flavoured), then topped with a chocolate layer. Yes- they are a rich as they sound. Trust me, no matter how much your eyes tell you, one will be enough (okay- maybe two!) Originating in the district of Nanaimo, British Columbia it’s so popular that it’s been declared a national treasure. And like all good national treasures there are many recipes and many takes on how to  make the bars- and they’re all the “proper” way. This is however is my way and how I like them best.

(As a note I prefer them kept in the fridge once they’re made as keeping them at room temperature causes the buttercream and chocolate layers to soften too much)

Ingredients

Base layer:

½ cup unsalted butter 

¼ cup sugar

5 tbsp. cocoa

1 egg beaten

1 ¼ cups graham wafer crumbs

½ cup chopped walnuts

1 cup coconut

For the filling:

½ cup unsalted butter

2 Tbsp. and 2 Tsp. cream

2 Tbsp. vanilla custard powder

2 cups icing sugar

For the topping:

4 oz. semi-sweet chocolate 

2 Tbsp. unsalted butter

– Lined 9″ x 9″ tray (1 ½ inch high) or silicone baking tray

Nanaimo Bars (5)

Method

To make the base:

  • Melt the butter, sugar and cocoa in a small pan over a low heat and stir until the sugar dissolves. Take off the heat.
  • In a separate bowl combine the crumbs, coconut and walnut pieces.
  • Add the beaten egg to chocolate mixture and mix well to combine and thicken. The mixture may appear to separate but continue whisking vigorously and it’ll come back together to a shiny, thick consistency. Pour chocolate mixture over the crumb mixture and mix well to combine.
  • Press mixture into the lined tin and level the surface. Chill for 30mins to 1 hour.

To make the filling:

  • Add the butter, cream, custard powder, and icing sugar together in a stand mixer.
  • Cream well at a high-speed until fluffy and smooth
  • Spread this over the biscuit base and chill for at least 3 hours until set firm.

To make the topping:

  • Melt the chocolate and butter in a bowl over a pan of simmering water.
  • Allow to cool for a few mins then spread it over the filling.
  • Return to the fridge and leave until set (at least 1 hour).
  • Cut in to bars and serve.

Nanaimo Bars (3)

Cranberry, Pear & Dark Chocolate Hot Cross Buns

IMG_3404

Okay- I’ll come clean. I don’t actually like hot cross buns. Well- hot cross buns in the “traditional” sense. Dried fruits of sultanas, currants and raisins do absolutely nothing for me and hot cross buns I place firmly in the same category as Christmas Cake. I’ll accept them to be civil, I’ll bake them to experiment and I’ll eat them under duress. So it only seems fitting that this Easter season I come up with something  a lot more palatable, even to the those of us prone to outbursts of “inyaphobia” (yes, it’s a thing I jest you not…Google it).

I can’t quite put a finger on where my malaise with dried fruit comes from. It probably has its roots, like all else culinary for me, in my childhood and my mother’s kitchen. Each festive season, whether it be Easter, Christmas or Halloween was heralded with a routine palette of sensory ticks…the flat clanging of baking trays on kitchen surfaces, the heady scent of dried fruit steeping in brandy, cold tea or whatever liquid was to hand, and the frequent blistering blasts of heat from oven. It’s the smell of the dried fruit steeping that sticks with me, permeating memory as much as clothing. Like anything in life familiarity breeds contempt, and boy did my mother like a fruit cake!

Hence my deviation from hot cross buns with their traditional sultana/mixed peel combination. Instead I give you an almost “regal” combination of cranberries and pear (yes, I’m aware they’re dried too but far more tolerable in my view) laced with dark chocolate chunks. Chocolate makes everything better. Except fish- that’s just wrong! So best you stick to making these hot cross buns instead.

*This recipe has been revised in April 2020 to include measurements/ quantities and ingredient names as suitable for Canada and the US. Throughout the recipe I still refer to the ingredients as they were originally drafted.

IMG_3420

Ingredients
500g/ 4 cups All Purpose/ Plain flour
85g/ 1/3 cup (caster) sugar
2 teaspoons mixed spice powder (if you don’t have this you can use pumpkin spice mix)
2 teaspoons ground cinnamon
¼ teaspoon nutmeg
10g/2 teaspoons Kosher salt
14g/ 2 1/4 teaspoons fast-action dried yeast
1 tablespoon vanilla extract
40g/ 2 tablespoons butter
300ml/ 1 1/4 cups whole fat milk
1 egg, beaten
65g/ 1/3 cup dried cranberries, soaked in

2 tablespoons orange juice
65g/ 1/3 cup dried pear, chopped into small pieces
65g/ 40z dark chocolate/ semi-sweet chocolate, chopped in small/ medium chunks

Cross marking
50g/ 1/2 cup All Purpose/ Plain flour
80ml/ 1/3 cup cold water

Glaze
2 tbspn golden syrup/ light corn syrup

Method

  1. Line a baking sheet/ tray with baking parchment and set aside for later
  2. Combine the flour, sugar, spices, salt and yeast into a large bowl. Make sure the salt and yeast are on opposite sides of the bowl
  3. In a pan combine the milk, vanilla extract and butter. Heat over a medium/low heat until the butter has melted. Allow the mixture to cool until tepid
  4. Add 1/3 the tepid milk mixture to the dry ingredients, along with the beaten egg. and use your hands to bring the mixture together. Add in the second 1/3 of the milk mixture and continue forming a dough, taking any stray flour from the sides of the bowl
  5. Finally, slowly add the remaining milk until you form a soft pliable dough. Take note here as you may not need all of the milk
  6. Tip the dough out on to a lightly oiled work surface. Knead by hand for about 7-8 minutes. After this time add the fruit and chocolate chunks into the dough and continue to lightly knead for 3-4 minutes until you have a smooth, elastic dough and the fruit & chocolate has been incorporated (*If you are using a stand mixer please see the note below)
  7. Lightly oil a bowl and place the dough in it, covering with oiled cling film and leave to rest in a warm place until doubled in size (apx 1 hour)
  8. Tip the dough on to a lightly oiled surface and divide into 12 balls. (I usually do this by rolling it into a thick sausage shape, apx 40cms long. Divide into 2, then divide each half into 6 equal pieces and roll them into balls)
  9. Place the balls on the tray, placing them fairly close together and flattening them slightly
  10. Cover the baking tray with oiled cling film and leave for an hour until the balls have doubled in size
  11. Preheat the oven to 350F/170C degrees
  12. For the cross marking, combine the flour and water in a bowl. Mix together to make a paste and spoon into an icing bag
  13. When the buns have risen remove the tray from the bag, snip the end of the piping bag (making a hole about 3mm) and pipe a cross on each bun. Bake for 15-20 minutes until pale golden-brown, turning the baking trays round halfway through

*If you are using a stand mixer for the dough, attach the dough hook and follow steps as follows

  • Combine the flour, sugar, spices, salt and yeast into a large bowl. Make sure the salt and yeast are on opposite sides of the mixer bowl
  • Follow Steps 4 & 5 above to combine the liquid
  • Continue to knead in the mixer for 5 minutes
  • After 5 minutes remove the dough from the mixer, add  the dried fruit & chocolate chunks and continue to lightly knead until you have a smooth, elastic dough and the fruit & chocolate has been incorporated (apx 3-4 minutes)
  • Proceed to Step 7 above and follow remainder of method as above

To finish

  1. Warm the golden syrup in a pan and while the buns are still warm, brush the buns with a little syrup to glaze. Return to the wire rack and allow to cool.
  2. Serve with fresh butter. They can be lightly warmed in an oven for tasty seasonal breakfast treat. Enjoy!

IMG_3422


Wired for Sound! #recipe #brownies

So this morning saw me chatting to the imitable food presence that is William Sitwell on his “Biting Talk” show on Soho Radio. Some of you may recognise him from such things as the Mastechef food critics table, or from Waitrose Kitchen magazine. By the by, conversation ranged from cupcakes (of course!) to beards (well why not) to cartoon franchising (you’ll just have to listen for that one!) If you missed out here’s the link below for you aural delectation…

As only expected for #thebeardedbaker I brought along some baked goods for sampling. Yes, I know it was only 9am in the morning but (a bit like gin!) it’s always cake o’clock somehwere in there world. So the team at Soho Radio had the pleasure (I hope!) of trying out two new recipes for brownies and cupcakes-

cupcakes

My “Hot n Smoky” caramel cupcakes of caramel sponge filled with a smoked caramel centre, topped with caramel buttercream frosting and sriracha cinder toffee shards.


Brownies

Chocolate  Cherry & Cheesecake Brownies- Chocolate, Cherry and double-chocolate brownies topped with White Chocolate & Pink Peppercorn Cheescake

In the event that these have piqued your intrest and tingled your tastebuds here’s the recipe for the Chocolate Cherry brownies. Do bear in mind that these are exceptionally rich- a chocolate motherload not for the faint-hearted! As such I recommend cutting them down into half the traditional brownie size.

Chocolate Cherry & Pink Peppercorn Cheesecake Brownies
Makes 18 (deep pan) or 40 (shallow pan)

Ingredients
185g unsalted butter 185g, cubed
185g 70% cocoa dark chocolate, broken into pieces
3 eggs
275g caster sugar
85g plain flour
50g cocoa powder
1 tbsp Espresso powder
50g 70% cocoa dark chocolate chunks
50g white chocolate chunks
100g glace cherries, halved
1 egg
280g cream cheese
60g caster sugar
3 tbsp pink peppercorns, lightly crushed
50g white chocolate chunks

Method

  • Set your oven to 180C/gas mark 4 and line a deep 12″x9″ baking tray with baking parchment. * See note for brownie numbers
  • Melt the butter and chocolate in a bowl over a saucepan of simmering water (or bain-marie), stirring occasionally. Once melted, remove from the heat and allow to cool.
  • Beat the eggs and sugar until the mixture is thickened and fluffy.
  • In a separate bowl, combine the flour, cocoa powder, and espresso powder.
  • Fold the cooled chocolate mixture into the egg mixture.
  • Sieve in the dry ingredients, and fold together.
  • Fold in the chocolate chunks and cherries until well combined.
  • Pour your mixture into the lined tray and gently spread to level the surface.
  • For the cheesecake, beat the cream cheese, caster sugar, and egg in a separate bowl until smooth.
  • Melt the white chocolate (either over hot water or in a microwave in short bursts).
  • Add the pink peppercorns and melted chocolate into the cheesecake mixture and mix well.
  • Pour/ place blobs of the cheesecake mixture on top of the chocolate brownie mixture.
  • Swirl with a knife or a skewer to create a marbled effect throughout the batter
  • Place in the oven for 35-40 minutes, then leave to cool completely in the tin before removing from the tin or cutting into squares.
  • Leave to cool, then serve.

*If you use a 12” x 9” tin you will get 20 brownies (cutting 4 x 5) and then divide further down in half to give you 40 brownie “bars”. If you use a 9” x 9” silicone brownie pan (available from Lakleand) you’ll get 9 deeper brownies which you can cut down in half to give you 18 brownie “bars”.


#Recipe Ricotta Pancakes- 3 ways

Pancake Tuesday to me is synonymous with one flavour conbination- Jif Lemon and sugar. Not caster sugar but granulated, and heaven forbid the juice be fresh. Nay! It had to come from a plastic lemon of the sqeezable variety.  This cheek-puckering combination of crunchy sugar and citrus instantly bringing back childhood memories of playground squabbles about the quantities of pancakes consumed before school. Who cared of it was only 11am!?! Somehow you had persuaded your parents to let you scoff gargantuan amounts of fried batter for breakfast. Times have changed and I now realise there is more to life than lemon juice and sugar- just about! So here’s my recipe for ricotta pancakes with a variety of serving suggestions. Try one…or try them all! Either way I hope you enjoy.

IMG_3359

Ricotta Pancakes

200g plain flour
1 tsp baking powder
1 large egg, beaten
200ml whole milk
250g tub ricotta cheese
1 tbsp rapeseed oil

  • Put the flour, baking powder and a pinch of salt in a large bowl.
  • Make a well in the middle, then pour in the egg and a splash of milk.
  • Gradually mix the flour into the liquid until starting to combine.
  • Mix in the rest of the milk in three stages until you have a smooth batter, then beat in the ricotta with a whisk.
  • Heat the rapeseed oil in a large non-stick frying pan until hot.
  • Spoon in a small laddle full of batter, spaced well apart, to make pancakes about 10cm across.
  • Cook on medium heat for 2-3 mins until bubbles appear on the surface. Flip over with a palette knife and cook for 2-3 more mins until golden. Set aside and keep warm; cook the rest of the batter.
  • Stack the pancakes, with baking parchment between, and keep warm in a low oven until ready to serve.

IMG_3363

1 ways- Spiced Orange

150ml orange juice

1 tablespoon caster sugar

1/2 teaspoon fenugreek

1/2 teaspoon caraway seed

4 cardamom pods, crushed

1 large orange, sliced

Caster sugar

  • Gently warm the spices in a pan until the frangrance is released.
  • Add in the orange juice and caster sugar.
  • Continue to gently heat until the sugar is disolved. Set aside to cool and infuse before use.
  • While the sauce is cooling, sprinkle the orange slices with caster sugar. Using a cook’s torch, carmalise the sugar on the slices until the sugar is bubbling, burnished and a deep amber in color. Alternatley you can heat under a high grill until the sugar reaches the same stage as with the torch.
  • Arrange a copule of slices of orange on top of your pancakes and drizzle with the spiced orange sauce. (I’ve drizzle some around the palte and used a pipette to allow the sauce to be “injected” into the stack)

IMG_3379

2 ways- Mango with Rosemary, Basil & Lime

75g fresh mango, chopped roughly

4 tablespoons waster

2 tablespoons caster sugar

1 tablesppon lime juice

1 small spirg fresh rosemary

3 large basil leaves

  • In a pan combine the liquids and caster sugar.
  • Add the rosemary spirg and chop in the basil leaves.
  • Heat until the sugar has disolved and the on point of boiling.
  • Remove from the heat and allow to cool fully and infuse for at least a couple of hours.
  • When fully cooled, strain into a bowl to remove the herbs. Toss in the mango pieces.
  • Top a stack of panckes with some of the mango, and serve with a dollop of creme fraiche.

IMG_3391

3 ways- Smoky Chocolate sauce with bourbon & pecan

50g dark chocolate, 70% cocoa content

25g butter

120ml double cream

1 tablespoon bourbon whiskey

1/4 teaspoon liquid smoke

25g chopped pecans, lightly toasted

  • Melt the chocolate in a bowl over a pan of simmering water (or in a microwave in short bursts) until smooth and fully melted. Remove from the heat.
  • Heat the butter, double cream, bourbon whiskey and liquid smoke in a small saucepan until evenly combined.
  • Remove from the heat and stir through the melted chocolate until fully combined. When fully mixed add in the pecan nuts.
  • Pour generously over your pancakes and sprinkle with some additional chopped pecans.

#Recipe: Chocolate, Guinness & Black Garlic Bundt cake with Smoked Chocolate glaze

So I’ve (eventually) gotten around to posting this recipe- massive apologies for the delay. This cake first started out as an experiment using black garlic and was finished with a salted caramel sauce and served with forest fruits. I wanted to create something that looked and tasted indulgent but had a slight edginess to it- nothing too frou-frou! For me it was a Gothic romance in cake form. Time moved on and so did the recipe development. I replaced the salted caramel with a chocolate glaze but wanted to still keep my (signature) twist. And so liquid smoke was added. Depending on how much you use, this wonderful ingredient adds a tasty smoky flavour and in this case married really well with the black garlic of the bundt. It’s availble online or from good food ingredient stores.

iness; Chocolate and Black Garlic Bundt

The original version of the Chocolate, Guinness & Black Garlic bundt cake

Bundt cake mixture

375g plain flour

1/2 teaspoon baking powder

1/2 teaspoon salt

70g unsweetened cocoa powder

225g butter, softened

110g unsalted butter, chopped and softened

600g caster sugar

1 teaspoon vanilla extract

5 eggs

125ml milk

125ml Guinness stout (from a bottle as opposed to a can)

6 cloves black garlic, chopped

100g dark chocolate chips or pieces

Chocolate glaze

12 Tablespoons icing sugar

4 teaspoons whole milk

1 tablespoon liquid smoke

*this mixtures makes enough for a very ample bundt cake (using a 25cm tin) or 2 standard sized ones (I used Nordicwares Fleur De Lis and Anniversary tins)

2015-11-18 16.52.49

To make the bundt cake

  • Preheat the oven to 170 C. Grease and flour  your Bundt cake tin(s)- or if your like me spray the inside with cake release spray.
  • Sift flour, baking powder, salt and cocoa together into a bowl and place to one side.
  • In a jug combine the milk and the Guinness. Set
  • In the bowl of your stand mixer, cream butter, margarine, sugar and vanilla until light and fluffy. (A tip here is to keep beating until you can no longer feel the sugar grains between you fingers).
  • Add eggs one at a time, beating well after each. Add flour mixture alternately with the milk/Guinness mixture. Mix to combine.
  • Add in the chopped black garlic cloves and chocolate chips. Mix well.
  • Pour into your prepared Bundt tin(s). Bake in the preheated oven for 70 minutes or until a skewer inserted into cake comes out clean. Let cool for 10 minutes in the tin, then turn out onto a wire rack and cool completely before glazing.

To make the glaze

  • Combine all the ingredients in a jug and mix well to combine until smooth. The mixture should fall easily from  your whisk and leave a slowly sinking trail in the bowl. If you find the mixture too stiff add some more milk in 1/2 teaspoon increments.

To finish

  • Place the cake on a cooling rack with some foil or baking parchment underneath to catch the drips.
  • Drizzle or paint the glaze onto the fully cooled cake until coated.
  • Spinkle with finishing decoration of you choice.
  • Slice, serve and enjoy!2015-11-18 16.55.00-1