In the bowl of stand mixer combine the butter, both sugars, salt, fancy molasses and whip together until pale and fluffy, about 10 minutes
Mix in the milk and the vanilla extract until combined
In a separate bowl, whisk together the flour, cinnamon, ginger, and cloves. Add in the flour mixture by ¼ cupful, beating between until combined, until all the flour mixture has been added
Fold in the chocolate chips. Add sprinkles, or nonpareils, to your liking
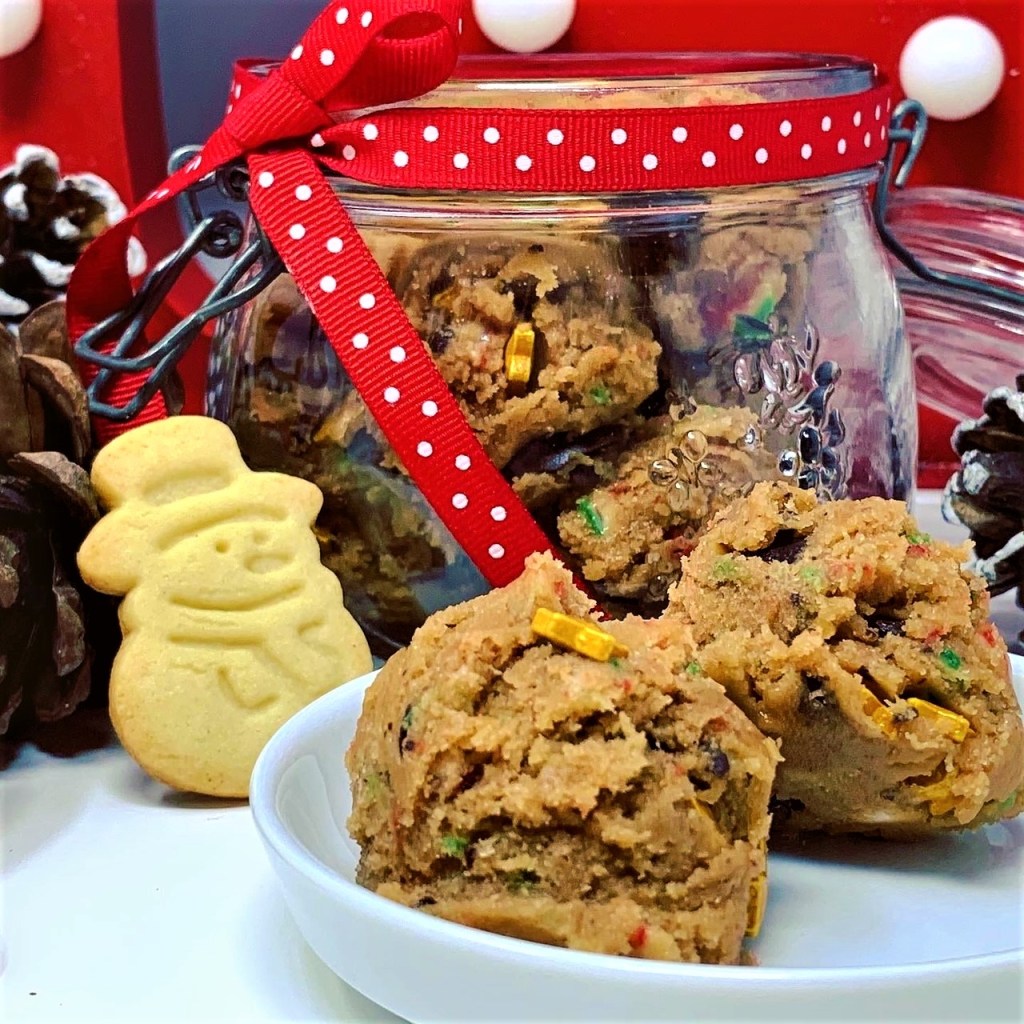
Scoop, or spoon, into sterilised mason, or kilner, jars and add some more sprinkles for that extra festive touch. Wrap as you like if you’re gifting to someone- I usually bow and tag the jars with festive ribbon
Cookie dough is best eaten at room temperature
How To Store: Keep this Edible Gingerbread Cookie Dough in the refrigerator in an airtight container. Eat it up within 2 weeks!
* To heat treat your flour for safety, place it in a bowl and microwave it in 30-second intervals until the flour temperature reaches 165 F (74 C). Mix with a spoon between intervals. Mine usually takes around 3 bursts. Allow to cool before using. Or you can bake it for 7-8 minutes in a preheated oven at 350°F
Edible Cookie Dough Christmas Trees
If you’re not gifting this edible cookie dough (how could you not? It’s the Season of Giving!) a fantastic way of using this delicious treat are these adorable Edible Cookie Dough Christmas Trees. Fun and easy to make, you can also get some little helping hands involved too!
Ingredients
Additional waffle/ sugar cones
White, or semi-sweet chocolate, melted
Festive sprinkles
Method
Line a baking tray with baking parchment or foil, and set aside until needed
If your edible cookie dough is still soft enough, fill a place in a piping bag and snip the end off.
Pipe the cookie dough into your cones. (If the edible cookie dough is a bit too stiff to pipe, you can use a butter knife, or small spoon, to fill the cone instead)
Coat the outside of your filled comes with the melted chocolate, either by dipping in a deep bowl, or coating using a spoon
Place on your prepared baking tray and let the chocolate set for a minute or two (this will help the sprinkle stick better). Add festive sprinkles to finish your Christmas trees off and allow for the chocolate to fully set
To serve/ eat, push a popsicle stick into the cookie dough, for ease of holding and enjoy!
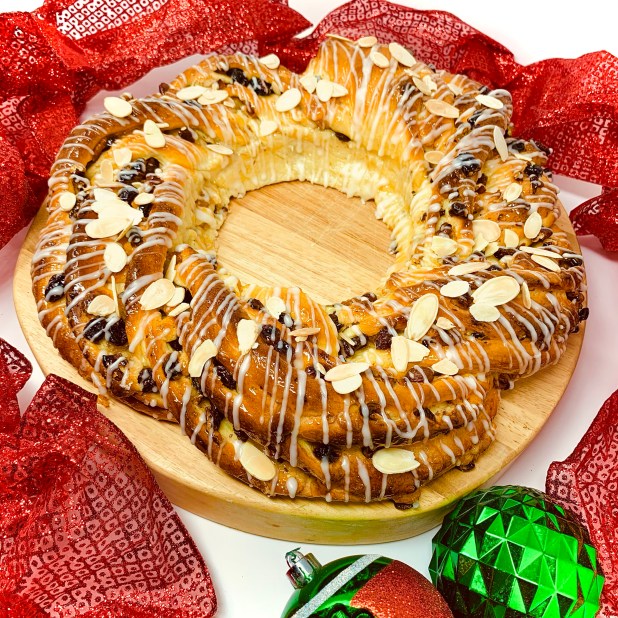
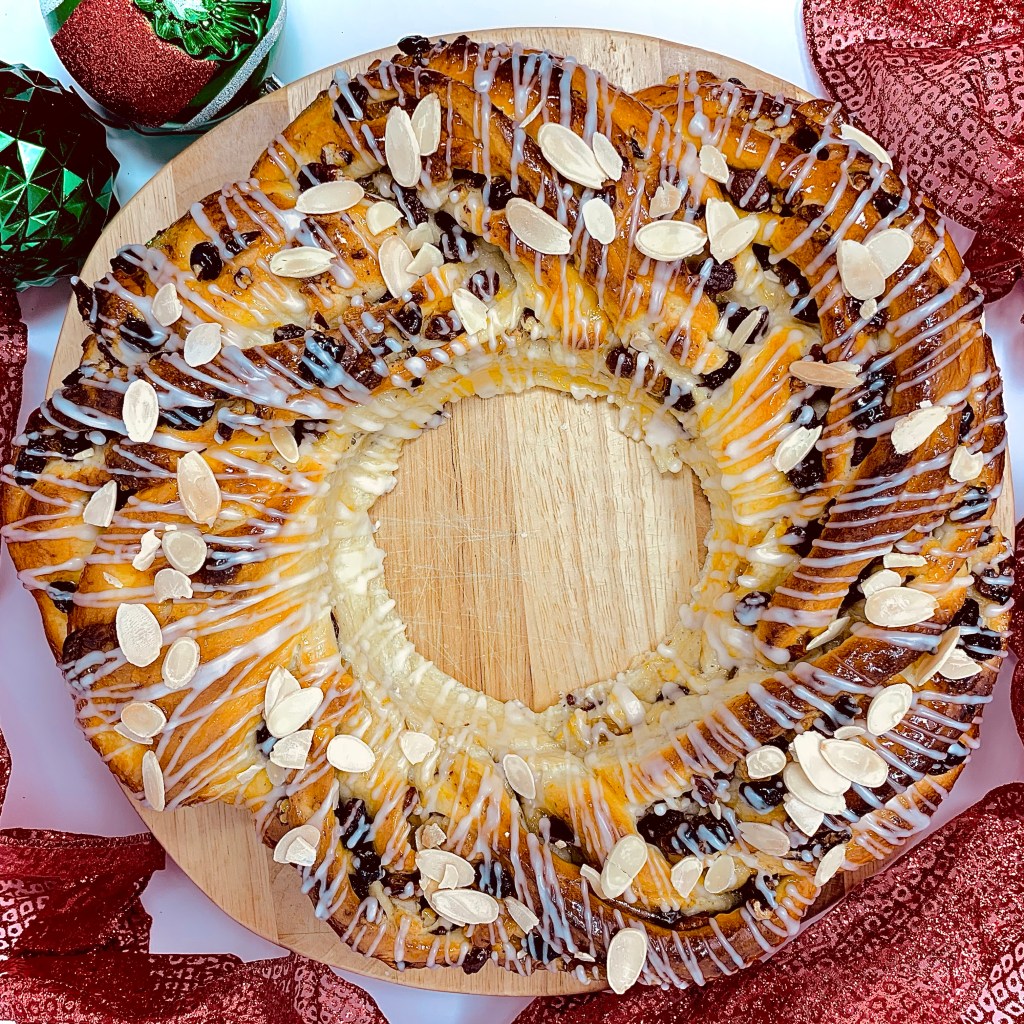
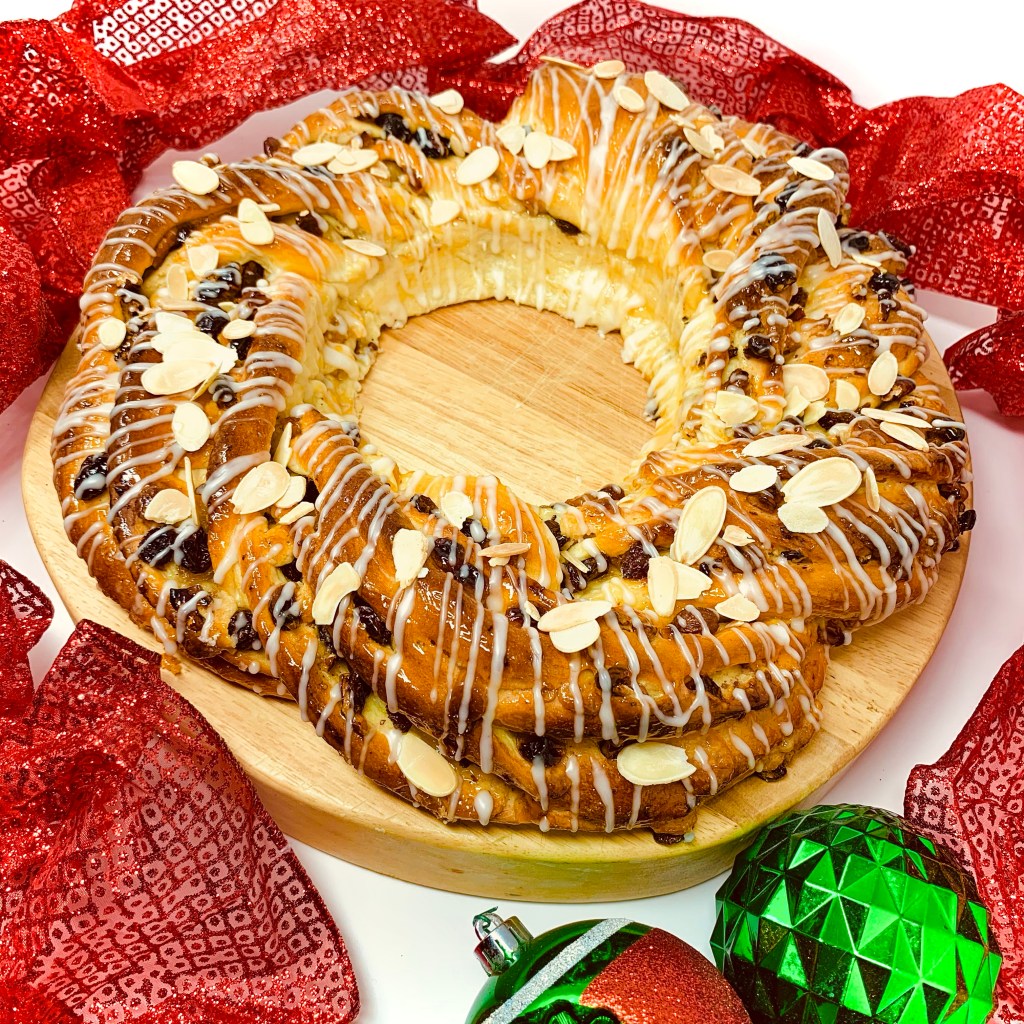
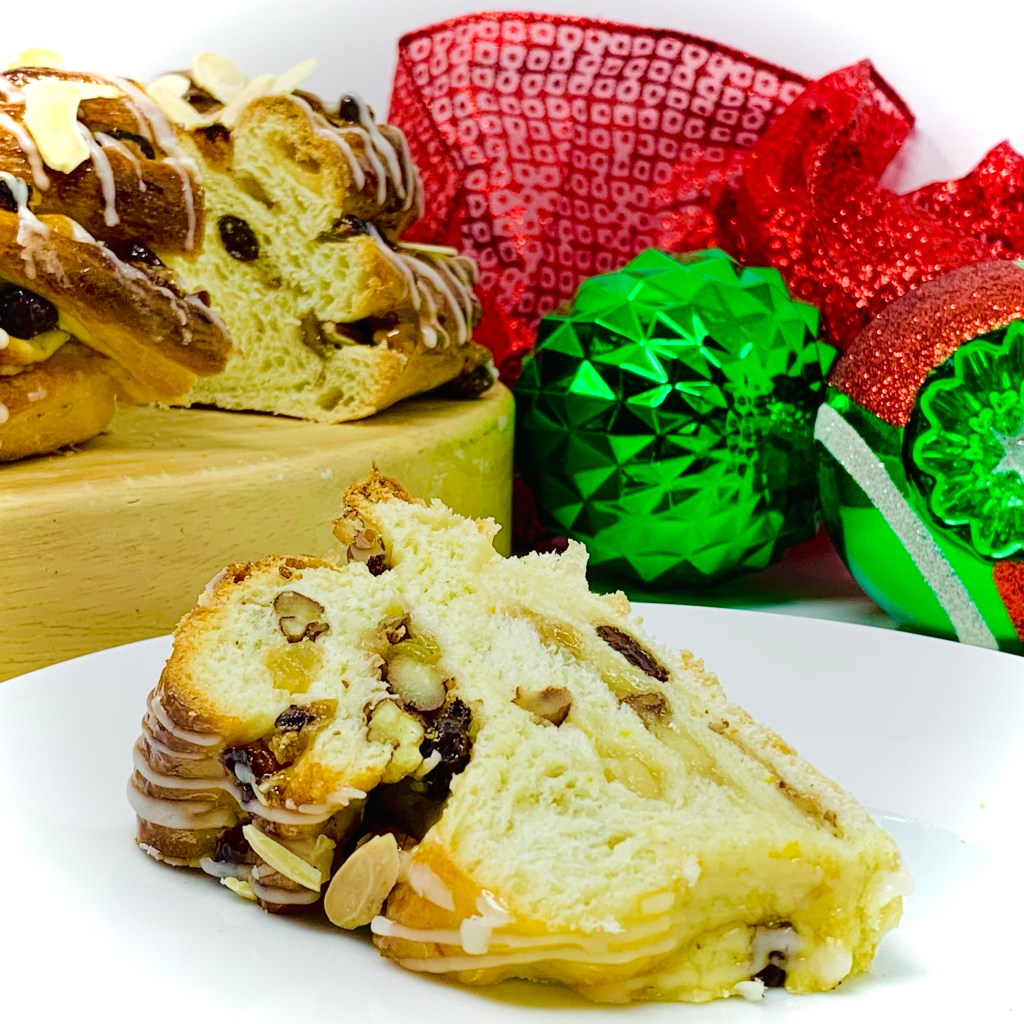
A Christmas Carol holds a play in my household as a cornerstone of Christmas. In fact the 1984 version starring George C Scott is held in such high esteem as THE quintessential version that it heralds the “official” start of yuletide festivities on December 1st for us. Each time there is a new version I look forward to seeing how each of the ghostly visitors will be portrayed. My favorite being the largest of the all- the bountiful and exhuberant Ghost of Christmas Present. Maybe it’s their jovial grasp of transient life and joie de vivre? Or maybe it’s that they are a harbinger of plentiful – cornucopia overflowing with festive bounty. This is what brings me to this recipe- the couronne.
So many things about it that instantly makes me think of the Ghost of Christmas Present. From it’s wreath shape, to the fluted edges blossoming with sweet, festive fillings, to the sweet, heady flavor of marzipan (always a signature festive flavor for me). Consider it in the same vein as that other Christmas classic- stollen, alebit not as heavy I find. The braiding can be a little bit tricky to master – I’m not kidding when I swore at one point it must be like wrestling an octopus. Filling will fall out- just accept it. It is not a testament as to your prowess, it’s just inevitable. Any loose stray filling can just be sprinkled back over the fully shaped dough and nobody, aside from you and the kitchen walls, will be any the wiser.
Although this couronne is good for a week in an airtight container, it really is at it’s best up to three days after baking.
Ingredients
Dough
3/4 cup milk
1/2 stick butter
1 cinnamon stick
4 cups Bread Flour
2 1/4 tspn yeast
1/4 cup warm water
1 Tbspn salt
3 Tbspn and 1 tspn sugar divided
Zest 1/2 orange
1/2 cup golden raisins
1/2 cup Thompson raisins
1/4 cup cherry wine (or orange juice for kid-friendly)
1 tspn vanilla extract
1 cup pecans, toasted and roughly copped
1 cup almond marzipan
To glaze and decorate
1/3 cup apricot jam
1 cup icing sugar
1 tspn water
1/4 tspn rum or rum extract
2 Tbspn Flaked almonds, toasted
Method
The night before you want to make the couronne, in an airtight container or jar combine the dried fruits, cherry wine and vanilla extract and mix well. Seal and set aside for the fruit to soak up the liquid, occasionally shaking/ stirring the mixture
The following day, in a small pan combine the milk, butter and cinnamon stick. Heat gently, stirring occasionally until the butter has melted fully. Remove from heat and set aside to cool until tepid
In a small bowl mix together the yeast, warm water and 1 Tbspn sugar until combined. Set aside for 10 minutes until frothy
In the bowl of a stand mixer, combine the flour, remaining sugar and salt
Add in the frothed yeast mixture and the butter/ milk (depending on the humidity of your kitchen you may not need all of the butter/ milk mixture. Start with 3/4 of it and add more slowly if needed)
Knead with the dough hook attachment for 6-7 minutes until it comes together as a dough. Continue mixing until the sides of the bowl are clean and the dough is soft. It should stop feeling sticky and have a smooth exterior
Transfer the dough to a large pre-oiled bowl, cover with cling film and set aside to prove in a warm place approximately an hour
When the dough has about doubled in size, turn it out onto a lightly floured surface. Without knocking it back, roll out the dough into a rectangle roughly 13x10in in size
Sprinkle the soaked plump fruits over the surface of the dough
Scatter the chopped pecans over the surface of the dough
Break/ tear the marzipan in to rough pieces 1/2″ to 1″ in size. Scatter these pieces over the surface as well
By the time you’ve finished the surface of your dough should be covered with soaked fruits, pecans, and marzipan
Roll the dough tightly like a Swiss roll along the long edge so you end up with a sausage shape approximately 13″ long and transfer the roll to a large lined/ prepared baking sheet.
Cut the roll in half lengthways, all the way along it’s length. Turn the roll lengths so that the cut layers are exposed on top. Keeping the cut layers to the top overlap the two lengths of dough together forming a simple braid.
Form the braided length into a circle shape and join/tuck the ends to form a ring shape. *I use a heatproof greased/ oiled can or circular bowl placed in the middle to wrap the dough around to help give the circular shape
Cover the couronne ring and set aside in a warm place for 30-40 minutes to rise, until the dough springs back quickly when lightly prodded
Preheat your oven to 425F
Bake the proved couronne for 25-30 minutes, or until risen and golden-brown. Remove from the oven and leave to cool on the sheet for 10 minutes. Transfer to a wire rack to cool
While the couronne is cooling, heat the apricot jam with a splash of water in a small pan over a medium heat until runny. Pass through a sieve to remove any pieces of fruit, then brush the sieved jam all over the warm couronne to glaze. Set aside to cool completely
For the icing glaze mix together the icing sugar, water and rum (extract) to form a runny glaze. Drizzle over the cooled couronne and scatter with the flaked almonds
The couronne will keep for up to one week at room temperature in an airtight container
“Have yourself a merry little Christmas Let your heart be light Next year all our troubles will be out of sight”
So I’ve finally ventured into the world of online baking, albeit to a select audience- my kids school. Living in the time of Covid-19 has us all at sea, missing connections and striving for some semblance of normality and familiarity in what has become a very isolated, displaced cyber age. Exchanging hugs and handshakes has become thing of the past replaced with online reactions of ‘thumbs up’ and real-time fleeting grabs at proximity with elbow bumps.
It was this want for maintaining connectivity that led me to the small cyber-screen. My kids’ school has a pretty close-knit community of parents and an active parents council. The sundering of this by the Corona virus and the resulting division between “in life” and virtual schooling presented a challenge- how to keep “everyone in the loop”? Both parents and kids missing school-yard friendships and school-gate gossips. Nearly 9 months of following covid-responsible protocols, vastly reduced personal interactions and hyper-vigilant hygiene routines have taken it’s toll on us all – I know they have on me and my family. Now there are feelings of covid-fatigue playing tug-of-war with impending excitement for festivities, all the while trying to hold some together some semblance of normality for ourselves and our children.
Yes, all of this might seem like an overly dramatic preamble to a few festive themed recipes. However, I think it’s in times like these that maybe were forced to look at things differently. Everyday habits and tasks becoming life-buoys helping to navigate the way. We look inward and discover dormant strengths. Especially when it come to our kids. Let’s face it as much as we might complain about them sometimes (oh, I’ll openly admit I do!) there is no judge, jury or executioner that will harm a hair on their heads will we draw breathe. So if distracting them for thirty minutes with cookie making and hot chocolate gives them a well needed little spark of festive joy; a diversion so they aren’t so down about missing playdates or such- then I’m in. I also know as a parent that in times like this when the children are otherwise occupied, you can breathe. Finally exhale and exchange a look with your significant other that says “You okay?… We got this.” Thirty minutes to centre and steady yourself.
A friend of mine said of our current times, “We are not all in the same boat. We are all in the same storm.” There is no cookie-cutter (forgive the pun) or one-size-fits-all way of dealing with this. But we’ll find ways to make it through. It’s what we do as humans and as parents. It’s what we’ll do this holiday season…look for and create some tinsel-tinged spark of festive joy to light the encompassing winter nights. If baking some cookies helps do that then you go ahead and break out those mixing bowls and fire up the oven. I know I will be.
The segment I “zoomed” (?) was just for making and decorating vanilla cookies, along with making peppermint candy cane hot chocolate. I’ve included a couple of other recipes that you can try out if you feel like it. All suitably festively themed and can be made by one or all. Whatever you make or do I hope you and your family have fun. Enjoy the time, the flavors…heck even enjoy the mess.
Wishing you all a happy, safe and healthy Christmas and holiday season. Enjoy the cookies!
“Someday soon we all will be together If the fates allow Until then, we’ll have to muddle through somehow So have yourself a merry little Christmas now”
Photograph: J Lee Frank
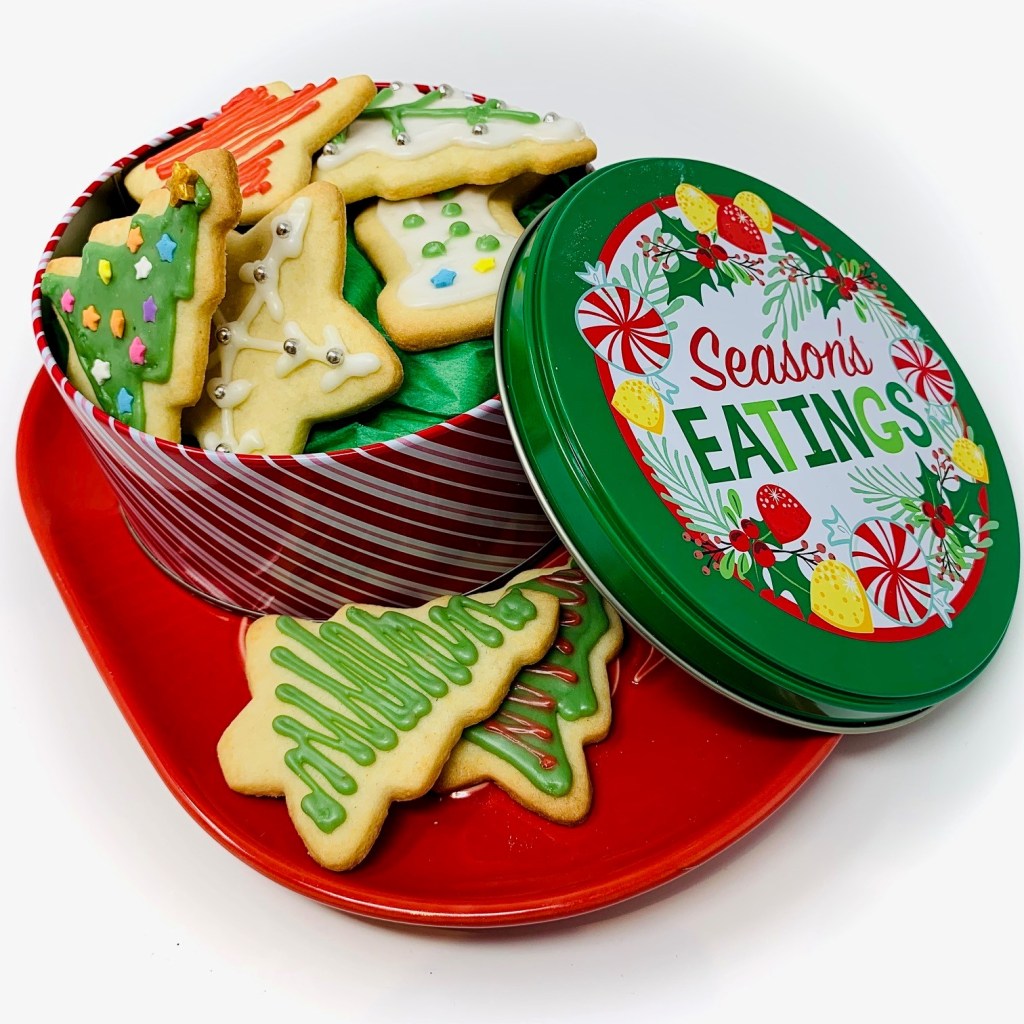
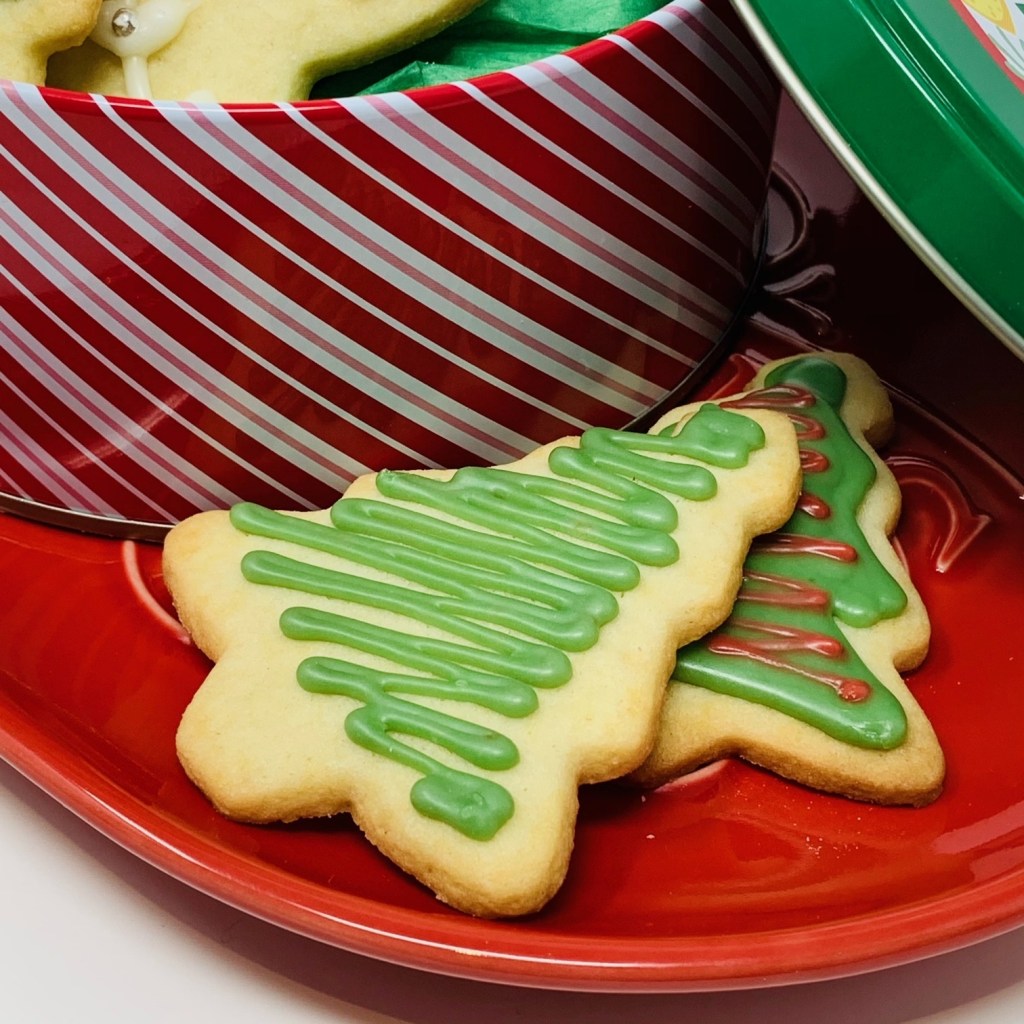
Vanilla Sugar Cookies
*Chilling the dough for at least 2 hours is required or else its too tricky and unworkable. I prefer to chill it overnight.
You can’t really go wrong with sugar cookies. Well you can actually. In my experience store bought sugar cookies err on the side of fudgy staleness enrobed in the tooth-aching sweetness of excess icing. This is definitely a case of “homemade is better”.
The only thing to bear in mind with these is the chilling time. I’ve seen various recipes suggesting 30 minutes, whilst others have up to overnight recommended. I’ve found that longer works better so I follow the overnight direction. If you find the dough becoming too soft, gummy and hard to work, wrap it back up in clingwrap and pop it back in the fridge for 30mins or so.
Makes approximately 48 cookies (this depends on your choice of cookie cutters)
Ingredients (all at room temperature)
Cookies
1 cup white sugar
1 cup butter, softened
1 tsp vanilla extract
2 eggs
3 cups all-purpose flour
2 tsp baking powder
½ tsp salt
Glaze/ Icing
1 ½ cups icing sugar
2 Tbsp milk
1 tsp light corn syrup
½ tsp almond extract
Food coloring (your favorite festive colors) *see note on coloring
Nonpareils; sprinkles; dragees (take your pick!)
Method
In the bowl of a stand mixer, or with an electric mixer, beat sugar, butter and vanilla until mixture is creamy, about 5-7 minutes. Scrape down sides of bowl. The mixture should become pale, fluffy and not feel grainy when you rub some between your fingers
Whilst your mixture is beating, in a separate bowl combine flour, baking powder and salt and stir to combine. Set aside until needed
To your sugar/ butter mixture, add eggs one at a time, beating after each addition, until fully incorporated. If you notice your mixture starting to split, add teaspoon of your flour mixture to bring it back together
Once the eggs have been added, beat in the dry ingredients into the creamed mixture, until well combined. Increase the speed until the mixture comes together in a soft dough
Remove the dough from the bowl and divide in to four even balls, flatten to discs and wrap in cling wrap
Chill in the refrigerator for a least 2 hrs, or overnight (I personally find overnight works better
When ready to bake, preheat your oven to 350°F
Remove your chilled dough from the fridge, one ball at a time, and leave to become pliable whilst your oven heats to temperature. When your oven reaches temperature, roll out the dough to 1/4″ (0.6 cm) onto a well floured surface. (Avoiding rolling the dough too thin as it may stick and tear). Flour is your friend here – make sure you amply dust everything- counter surface, rolling pin, your hands, cutter
Use cookie cutters of your choice for a variety of different shapes and sizes. Using a palette knife, or spatula, place cookies on your lined cookie sheets
Bake at 350°F for 10 minutes or until the edges are just turning golden brown
Remove from oven and leave to cool on their trays for 5 mins before using a spatula to transfer to cookies to racks to cool completely
Glaze
Combine icing sugar with milk; corn syrup and extract to reach desired spreading consistency. It should be quite thick. If it is much too thick, add 1/2 Tablespoon more milk. If it is much too thin, add 2 more Tablespoons of confectioners’ sugar. If you drizzle a little of the icing with the whisk, the ribbon of icing will hold for a few seconds before melting back into the icing.
Stir in food coloring or leave icing white. You can pour some icing into different bowls if using multiple colors
You can pipe the icing on to the cookies using a piping bag or squeezy bottle, or using a pastry brush, paint frosting over cooled cookies and decorate with your choice of sprinkles
Allow to set for at least 30mins before eating (note: the icing will still be a little soft at this point. If you want the icing to be fully hard for gifting, leave the decorated cookies to air-dry on a rack overnight
*A note on adding coloring: I prefer to use coloring gels when coloring the glaze. They are a concentrate which with very little will pack a real punch of color without affecting the consistency of your glaze. If you’re using the squeezy tube color dyes be aware that because they have a more form you are adding more liquid to your icing mix.
Enjoy!
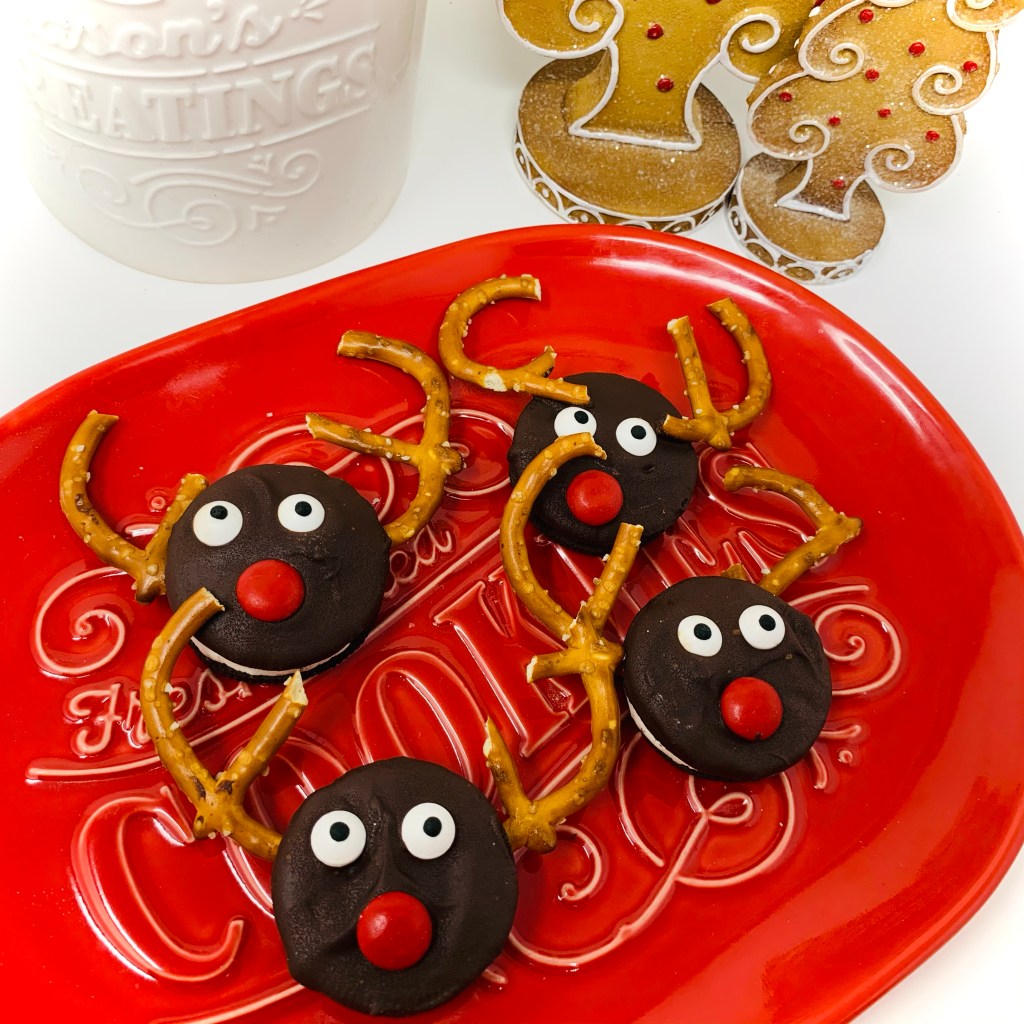
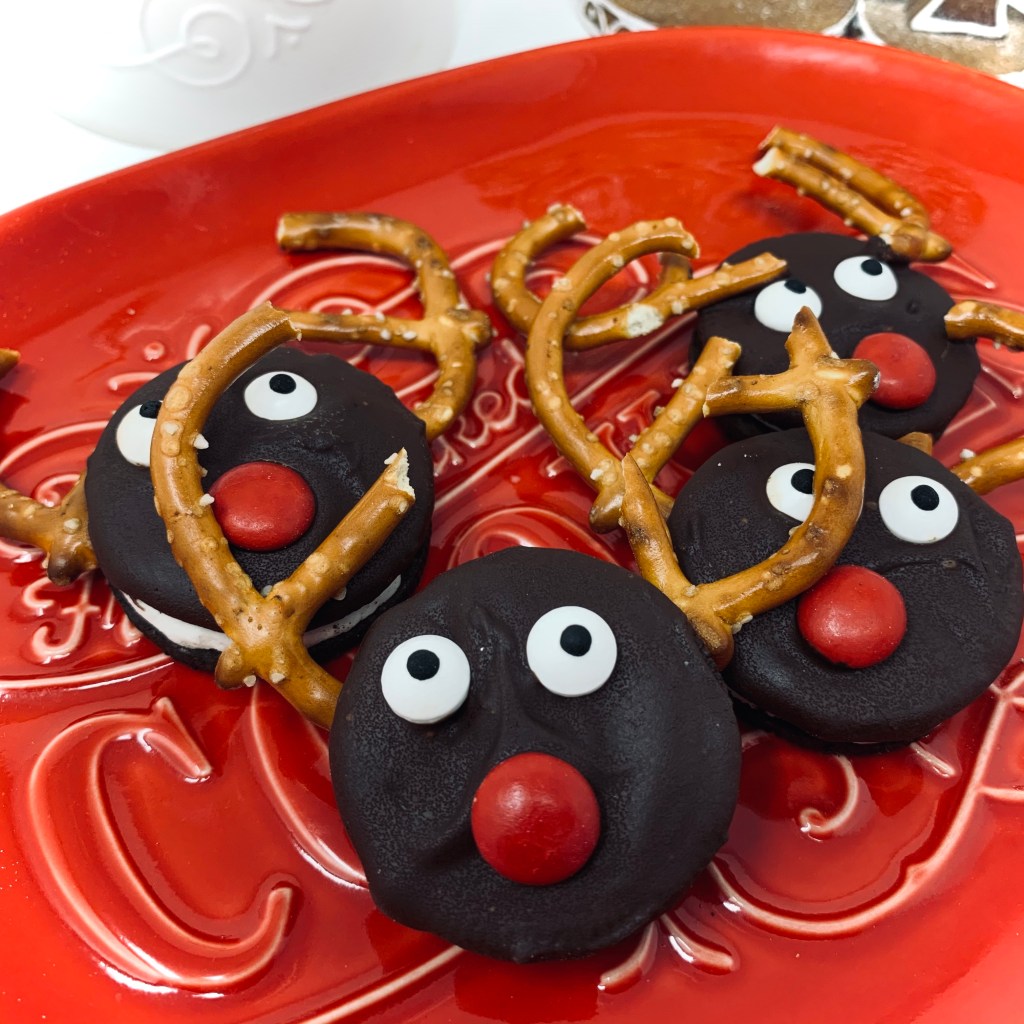
Rudolph Oreo Cookies
Now these look like SO much more work than they are. At worst they can be a little fiddly but that just means there’s more “mis-shapes” for the family to enjoy. This is a great recipe to get the little ones involved in. Once the chocolate is melted you can pretty much give them free reign! Step back and enjoy some chocolate covered chaos.
“And now,” cried Max, “let the wild rumpus start!”
Ingredients
24 Double-stuffed Oreo cookies (if you can find “Mega-stuffed” even better
Large twist pretzels
48 White chocolate chips (or candy eye decorations)
24 red candy shell chocolates (M&Ms are ideal)
160z chocolate (sweet or semi-sweet, to taste)
Method
Line a cookie sheet with baking parchment or silicone baking matt
Start by cutting up the pretzels. Use a sharp knife to cut them in half, then carefully cut away the center section where the pretzels were joined until to have a vaguely “antler” shape. This bit can be a bit fiddly as the pretzels can break easy but do remember they don’t have to be exact – all reindeers antlers are different after all! Repeat until you have 24 sets of pretzel antlers
Melt the chocolate in a medium bowl set over a pan of water OR in the microwave, stirring after every 30 seconds to prevent overheating. Once it’s melted and smooth, using two forks or a confectionary dipping scoop dip and coat an Oreo cookie until it is full coated. Remove using your chosen tools, then place the dipped cookie on the prepared baking sheet.
While the chocolate is still wet, press a red candy chocolate into the center of the cookie- there’s your nose!
Make your eyes using two white chocolate chips or candy eye decorations
Create two pretzel antlers by pressing them between the cookies and into the space where the cream filling is. You may need to use a fork to hole the top cookie layer pressed in place while you poke the “antlers” in. Once you’ve assembled one reindeer this way, repeat until all of the cookies are dipped and decorated
Lastly to give your reindeer more “eye appeal” dip a toothpick in the melted coating and give each reindeer two black dots in the center of the white chocolate chip eyes
Refrigerate the tray to set the chocolate completely, for about 20 minutes. Store Oreo Reindeer Cookies carefully in an airtight container at room temperature. They will keep for several weeks, but for the best taste and texture, enjoy them within a week
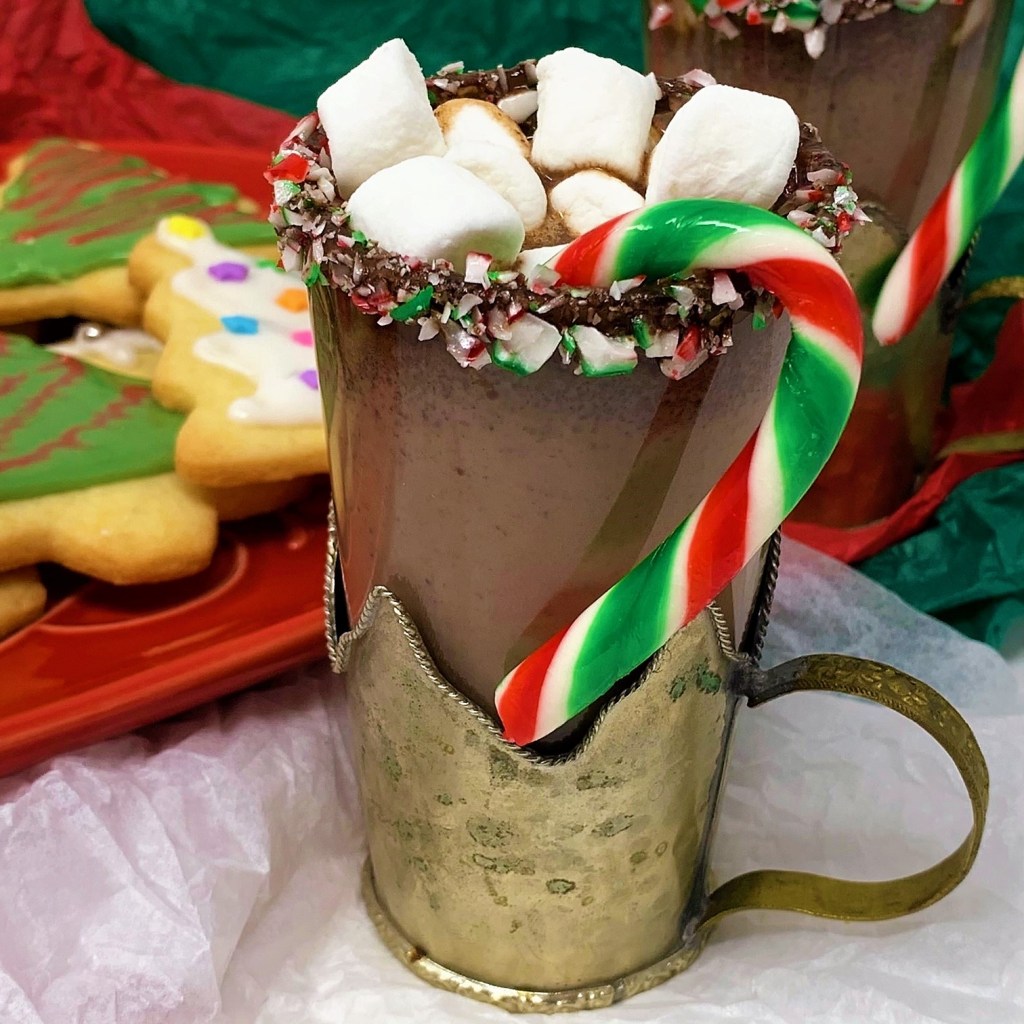
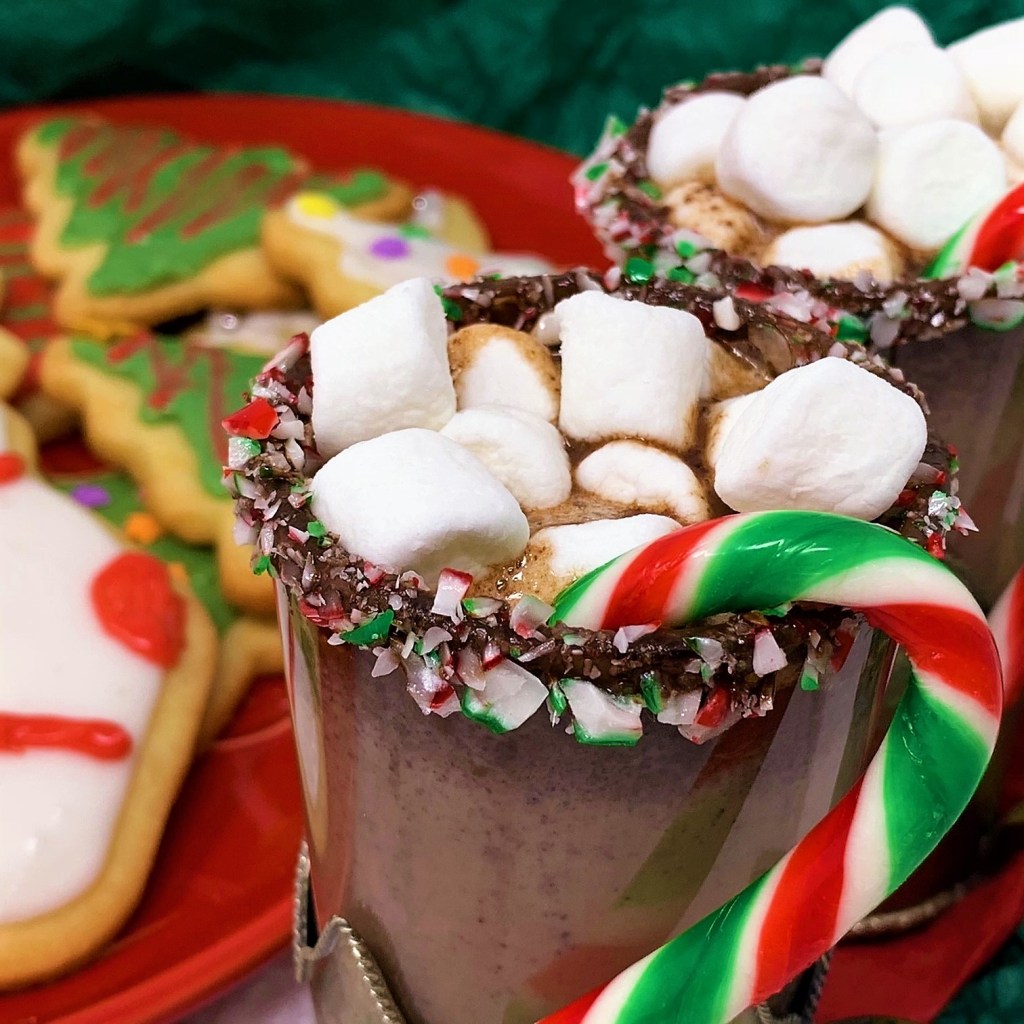
Candy Cane Hot Chocolate
Well…we need something to wash those cookies down with don’t we? If you want to REALLY treat yourself, dip the rim of your mugs into some melted chocolate and then some crushed peppermint candy canes for a stress-free, festive finishing touch.
Ingredients
3 cups milk
1 cup heavy cream
4oz semisweet chocolate, broken in to pieces
4 peppermint candy canes, crushed
Optional decorations
1 cup whipping cream, whipped to soft peaks
Mini marshmallows
Crushed peppermint candy canes
4 small peppermint candy canes, to stir
Method
In a saucepan, combine the milk and cream and heat over a medium heat until hot, but not boiling
Whisk in the chocolate and the crushed peppermint candies until melted and smooth
Pour hot chocolate into four mugs, and garnish as preferred. Serve each with a candy cane stirring stick
Enjoy!
Baileys Edible Cookie Dough
Because even the grown ups need a li’l something in the festive season. This can easily be made kiddie-friendly by omitting the Baileys liqueur. Looking for that gift that’s a bit different? Then look no further! Place in mason jars, decorate and tag accordingly et viola! Cookie dough can be stored (in jars or other air-tight containers) in the refrigerator for up to a week. To enjoy at it’s best remove from the fridge and allow to come to room temperature.
Ingredients
2 cups All Purpose Flour
1 cup light brown sugar
¼ cup white sugar
¼ tsp salt
¼ cup butter, softened
3 tsp vanilla extract
2 Tbsp milk
2 Tbsp Baileys liqueur
Extra Fixings
(added to taste but I usually keep it to including 2-3)
Festive Candy Sprinkles
Dark Chocolate Chips
M&M’s
Crushed Oreos
Crushed Peppermint Candy Cane
Method
Combine all ingredients in a large bowl of a stand mixer and stir to combine.
Add in extras and stir until well incorporated. Enjoy! (A note here – I usually keep the extra fixings to a maximum of 3, or else your cookie dough is in danger of becoming an over-sweet mess).
Store in the refrigerator for up to one week. Before eating, remove from refrigerator and let come to room temperature for a softer texture.
And here we are our second Holiday season in Toronto, Canada. Thankfully this one is a LOT less hectic than last years’ where it wasn’t so much Rudolph & Co. dashing around as it was me, trying to get unpacked and set up in our new home. As you could imagine not much time was left for baking the traditional festive wares, never mind experimenting and trying out new recipes!
This year however I’ve allowed myself the pleasure of being ahead of the game. A slew of expected visitors may have something to do with that. As crazy as it sounds having the tree trimmed and house decorated in November DOES free you up to do so much more. Or at least plan it!
The last Christmas spent in the UK, I created some food gift hampers to gift to friends and included some of my favourite festive foods. “Twinkling” caramel sauce (subtly spiked with rum); Crunchy spiced cookies; Christmas cake (with the emphasis more on chocolate than fruit) to name a few. This got me thinking as to what I would gift this year if given the opportunity. The first three recipes here would make ideal food gifts for those nearest and dearest to you.
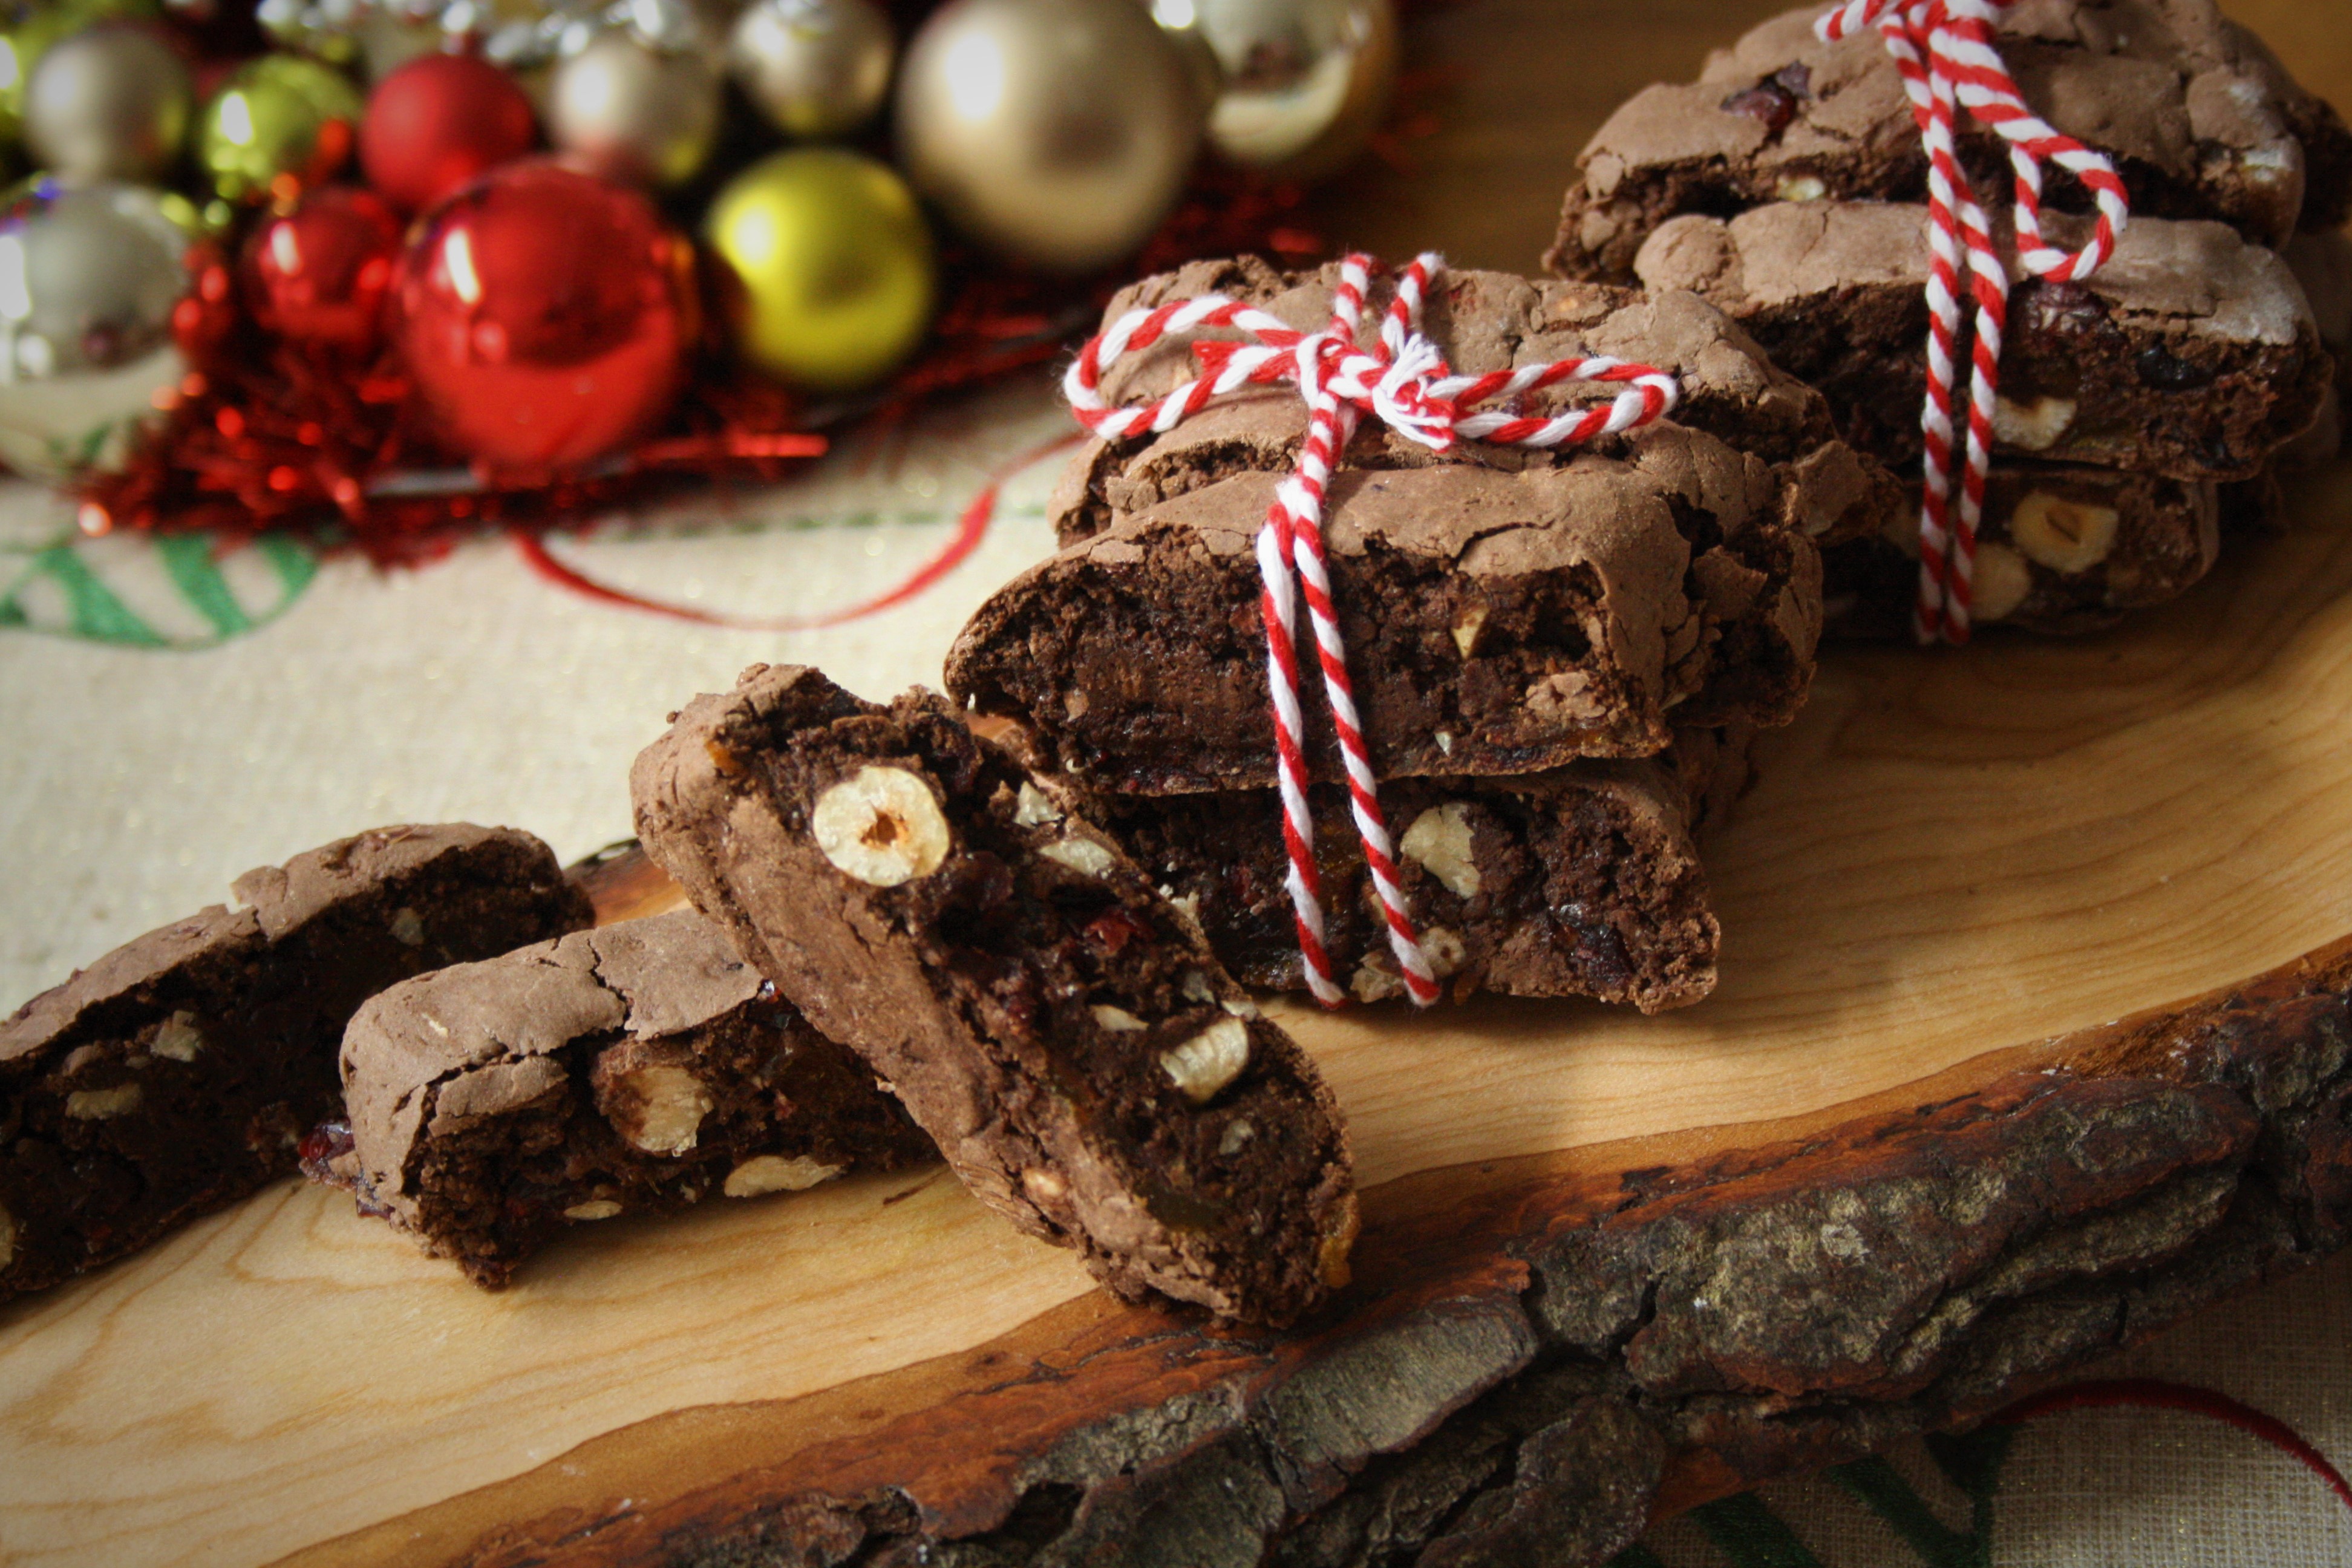
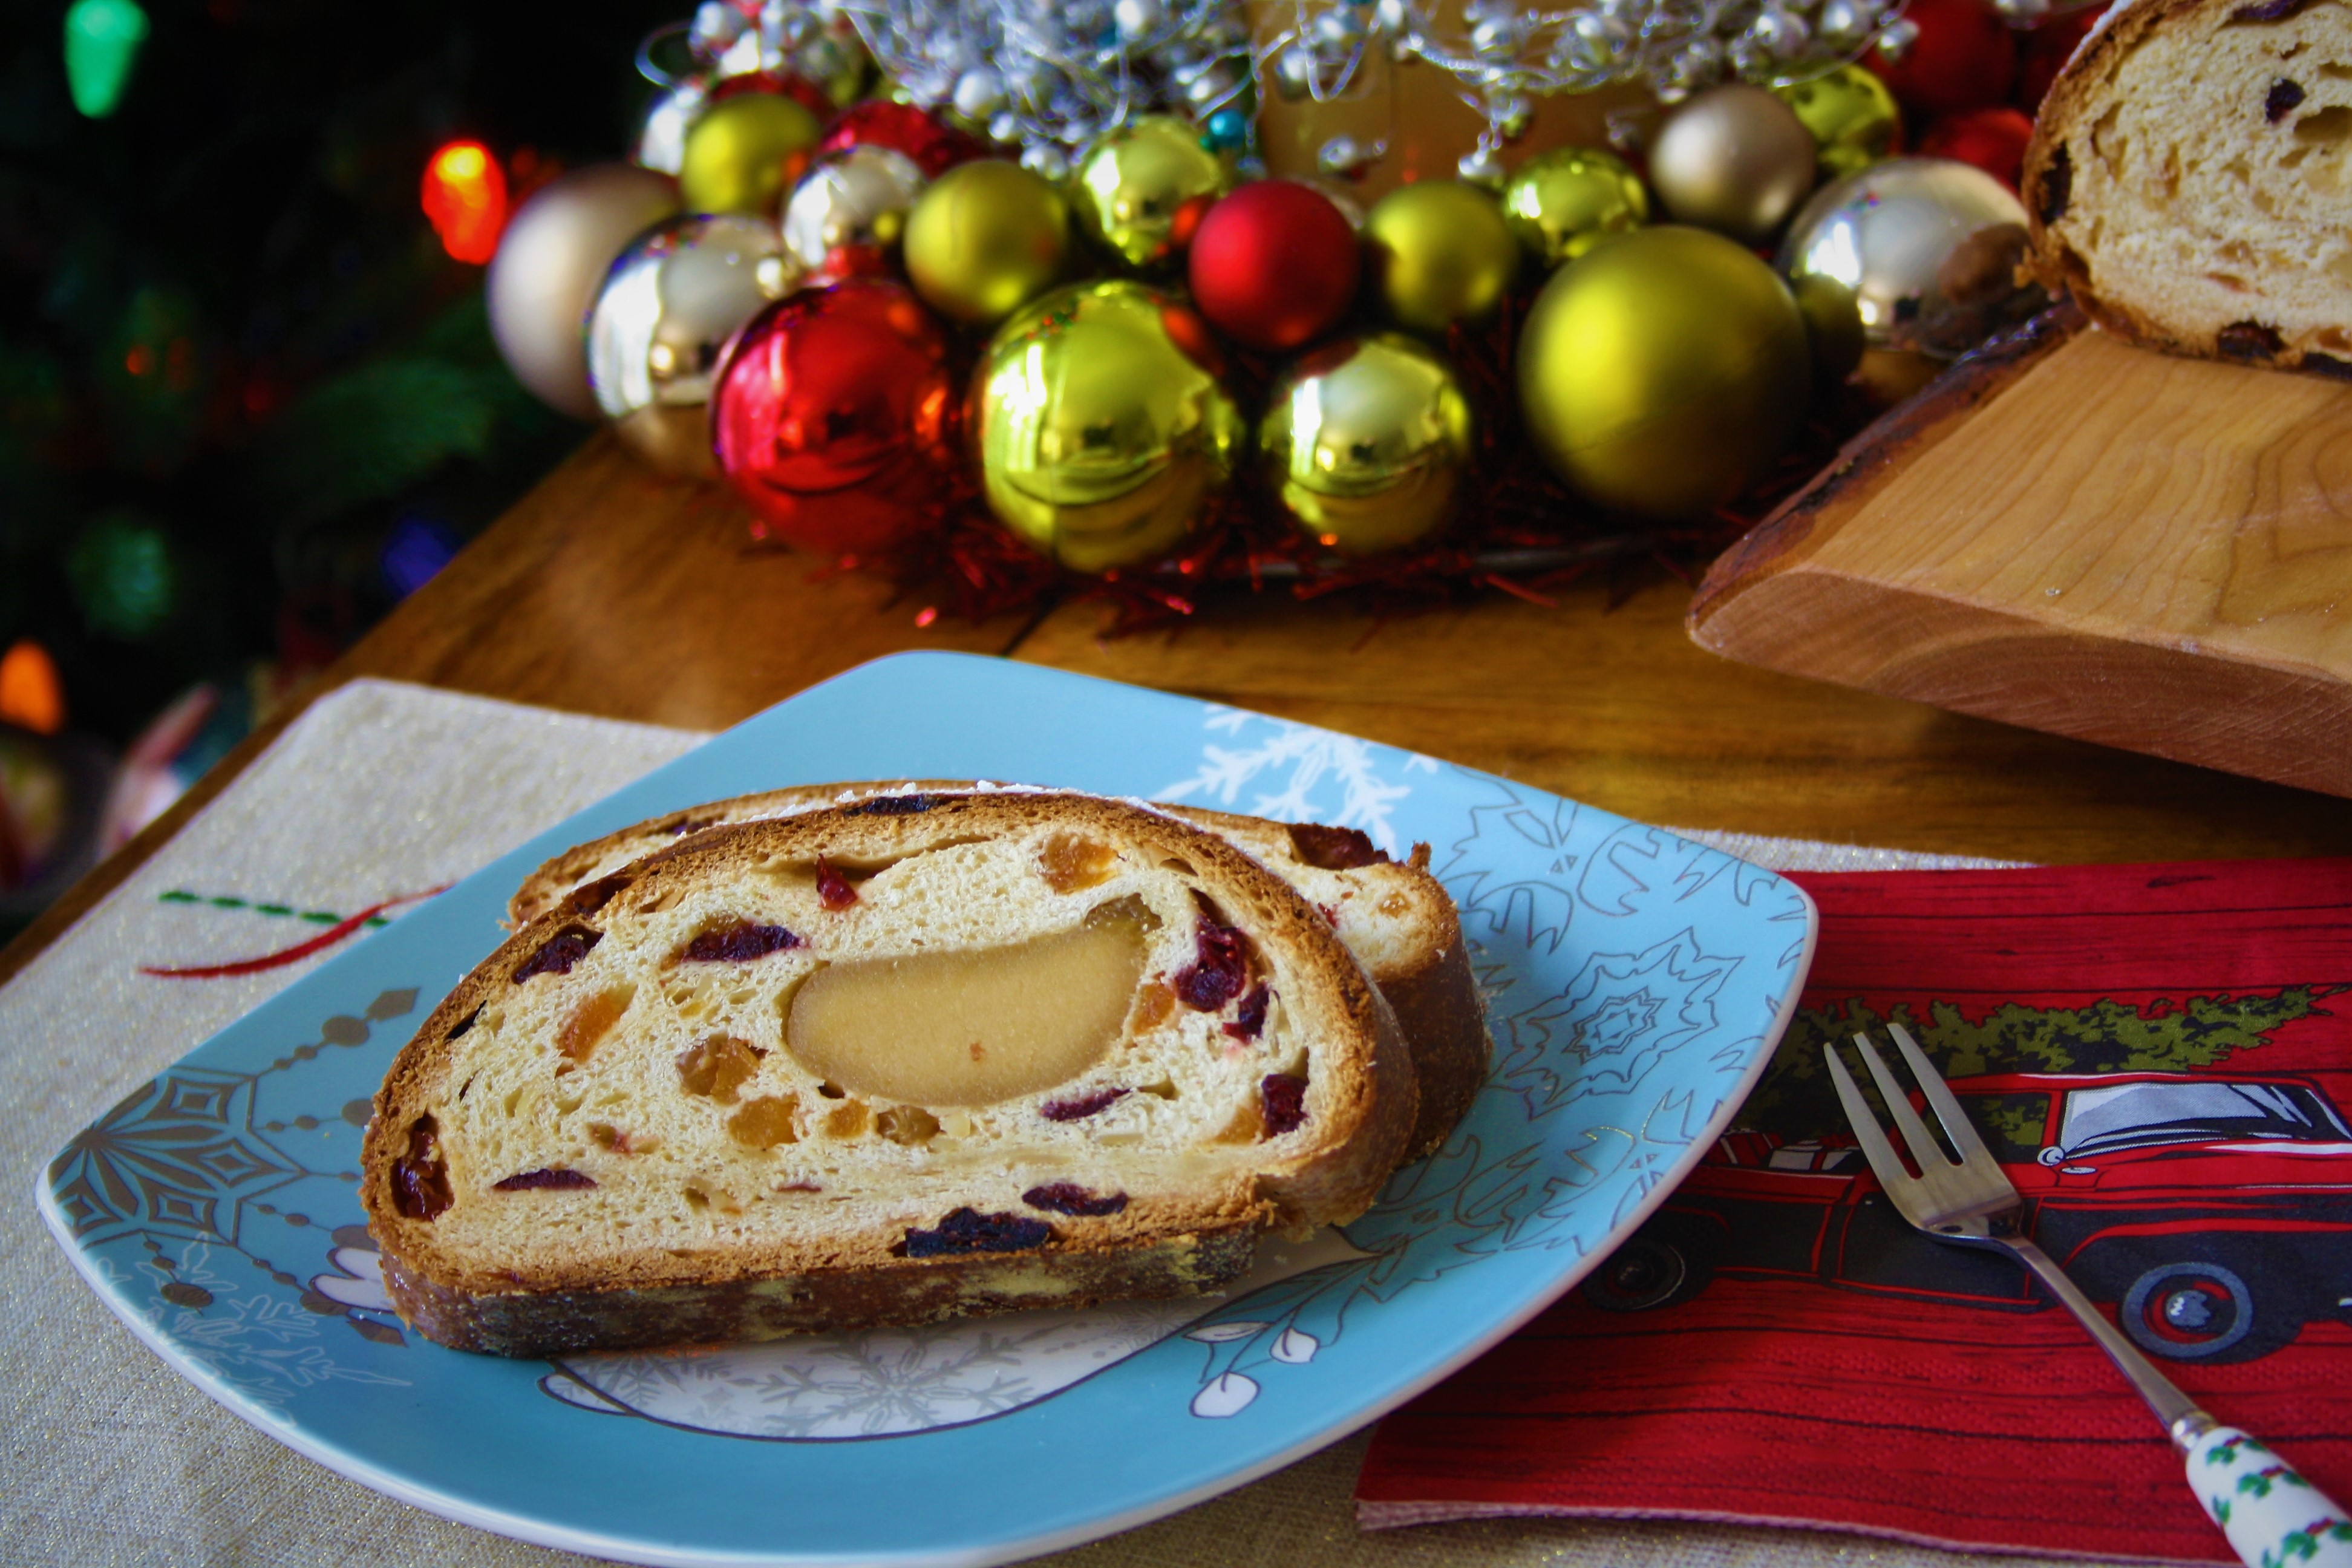
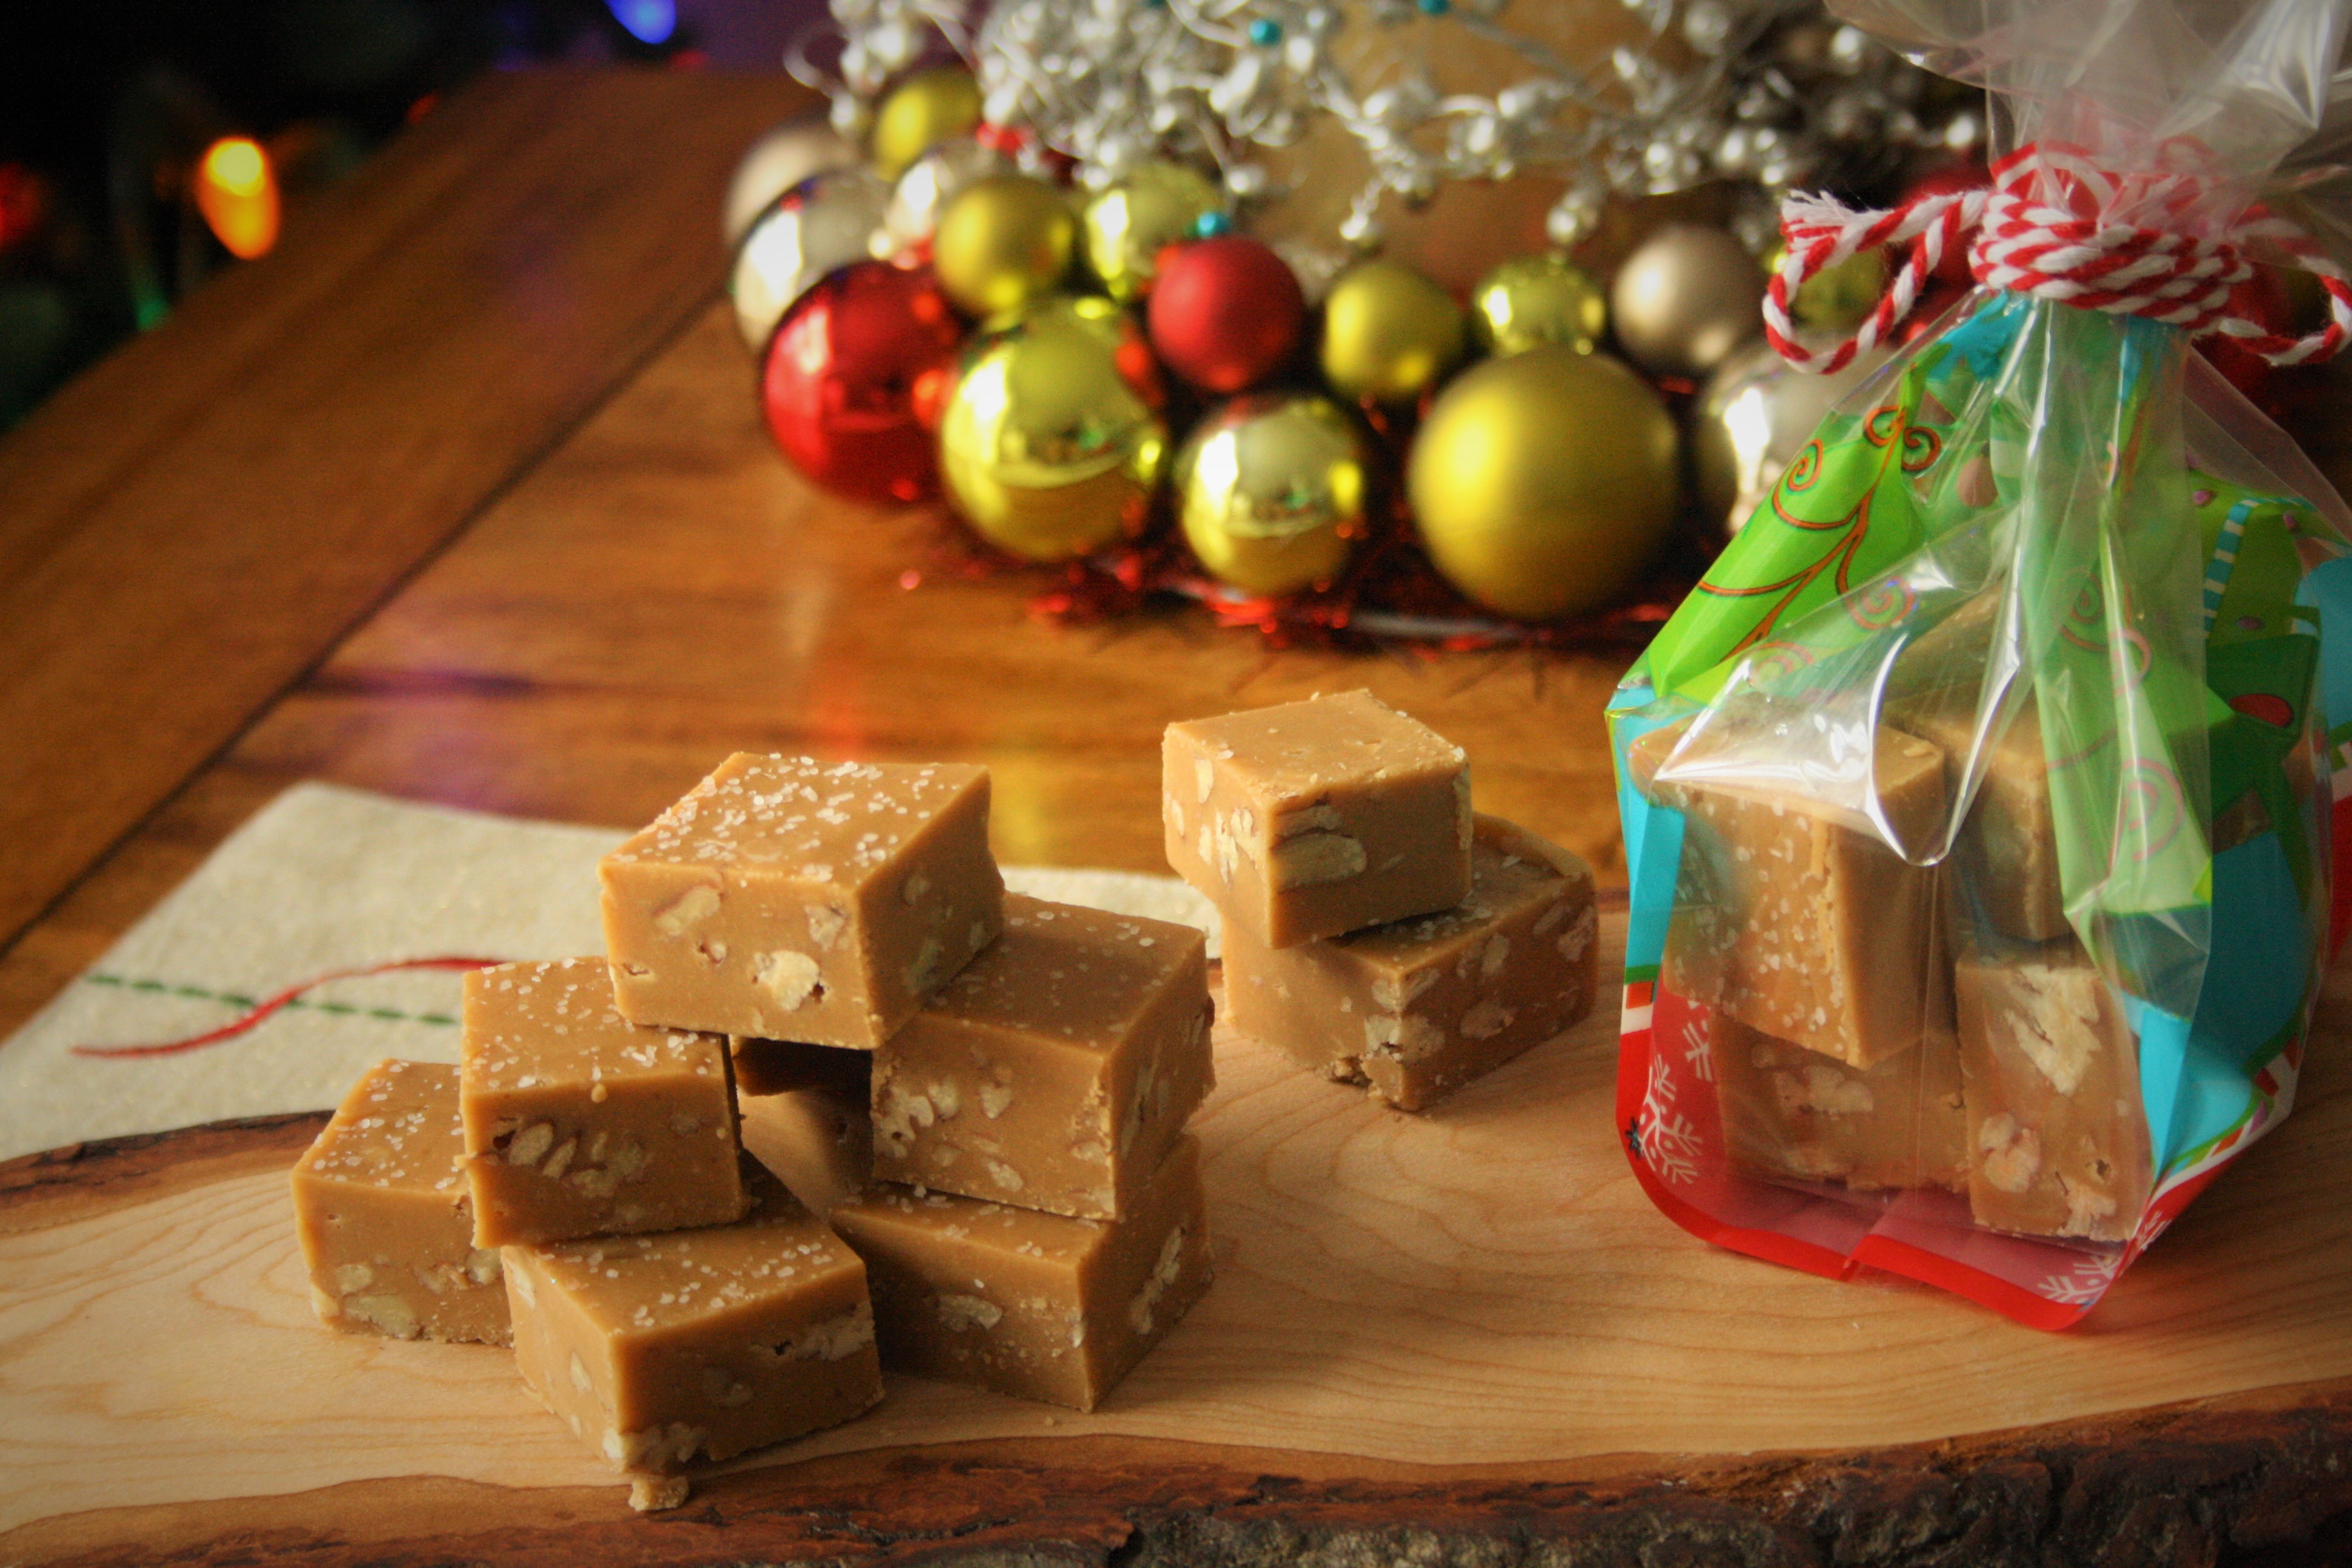
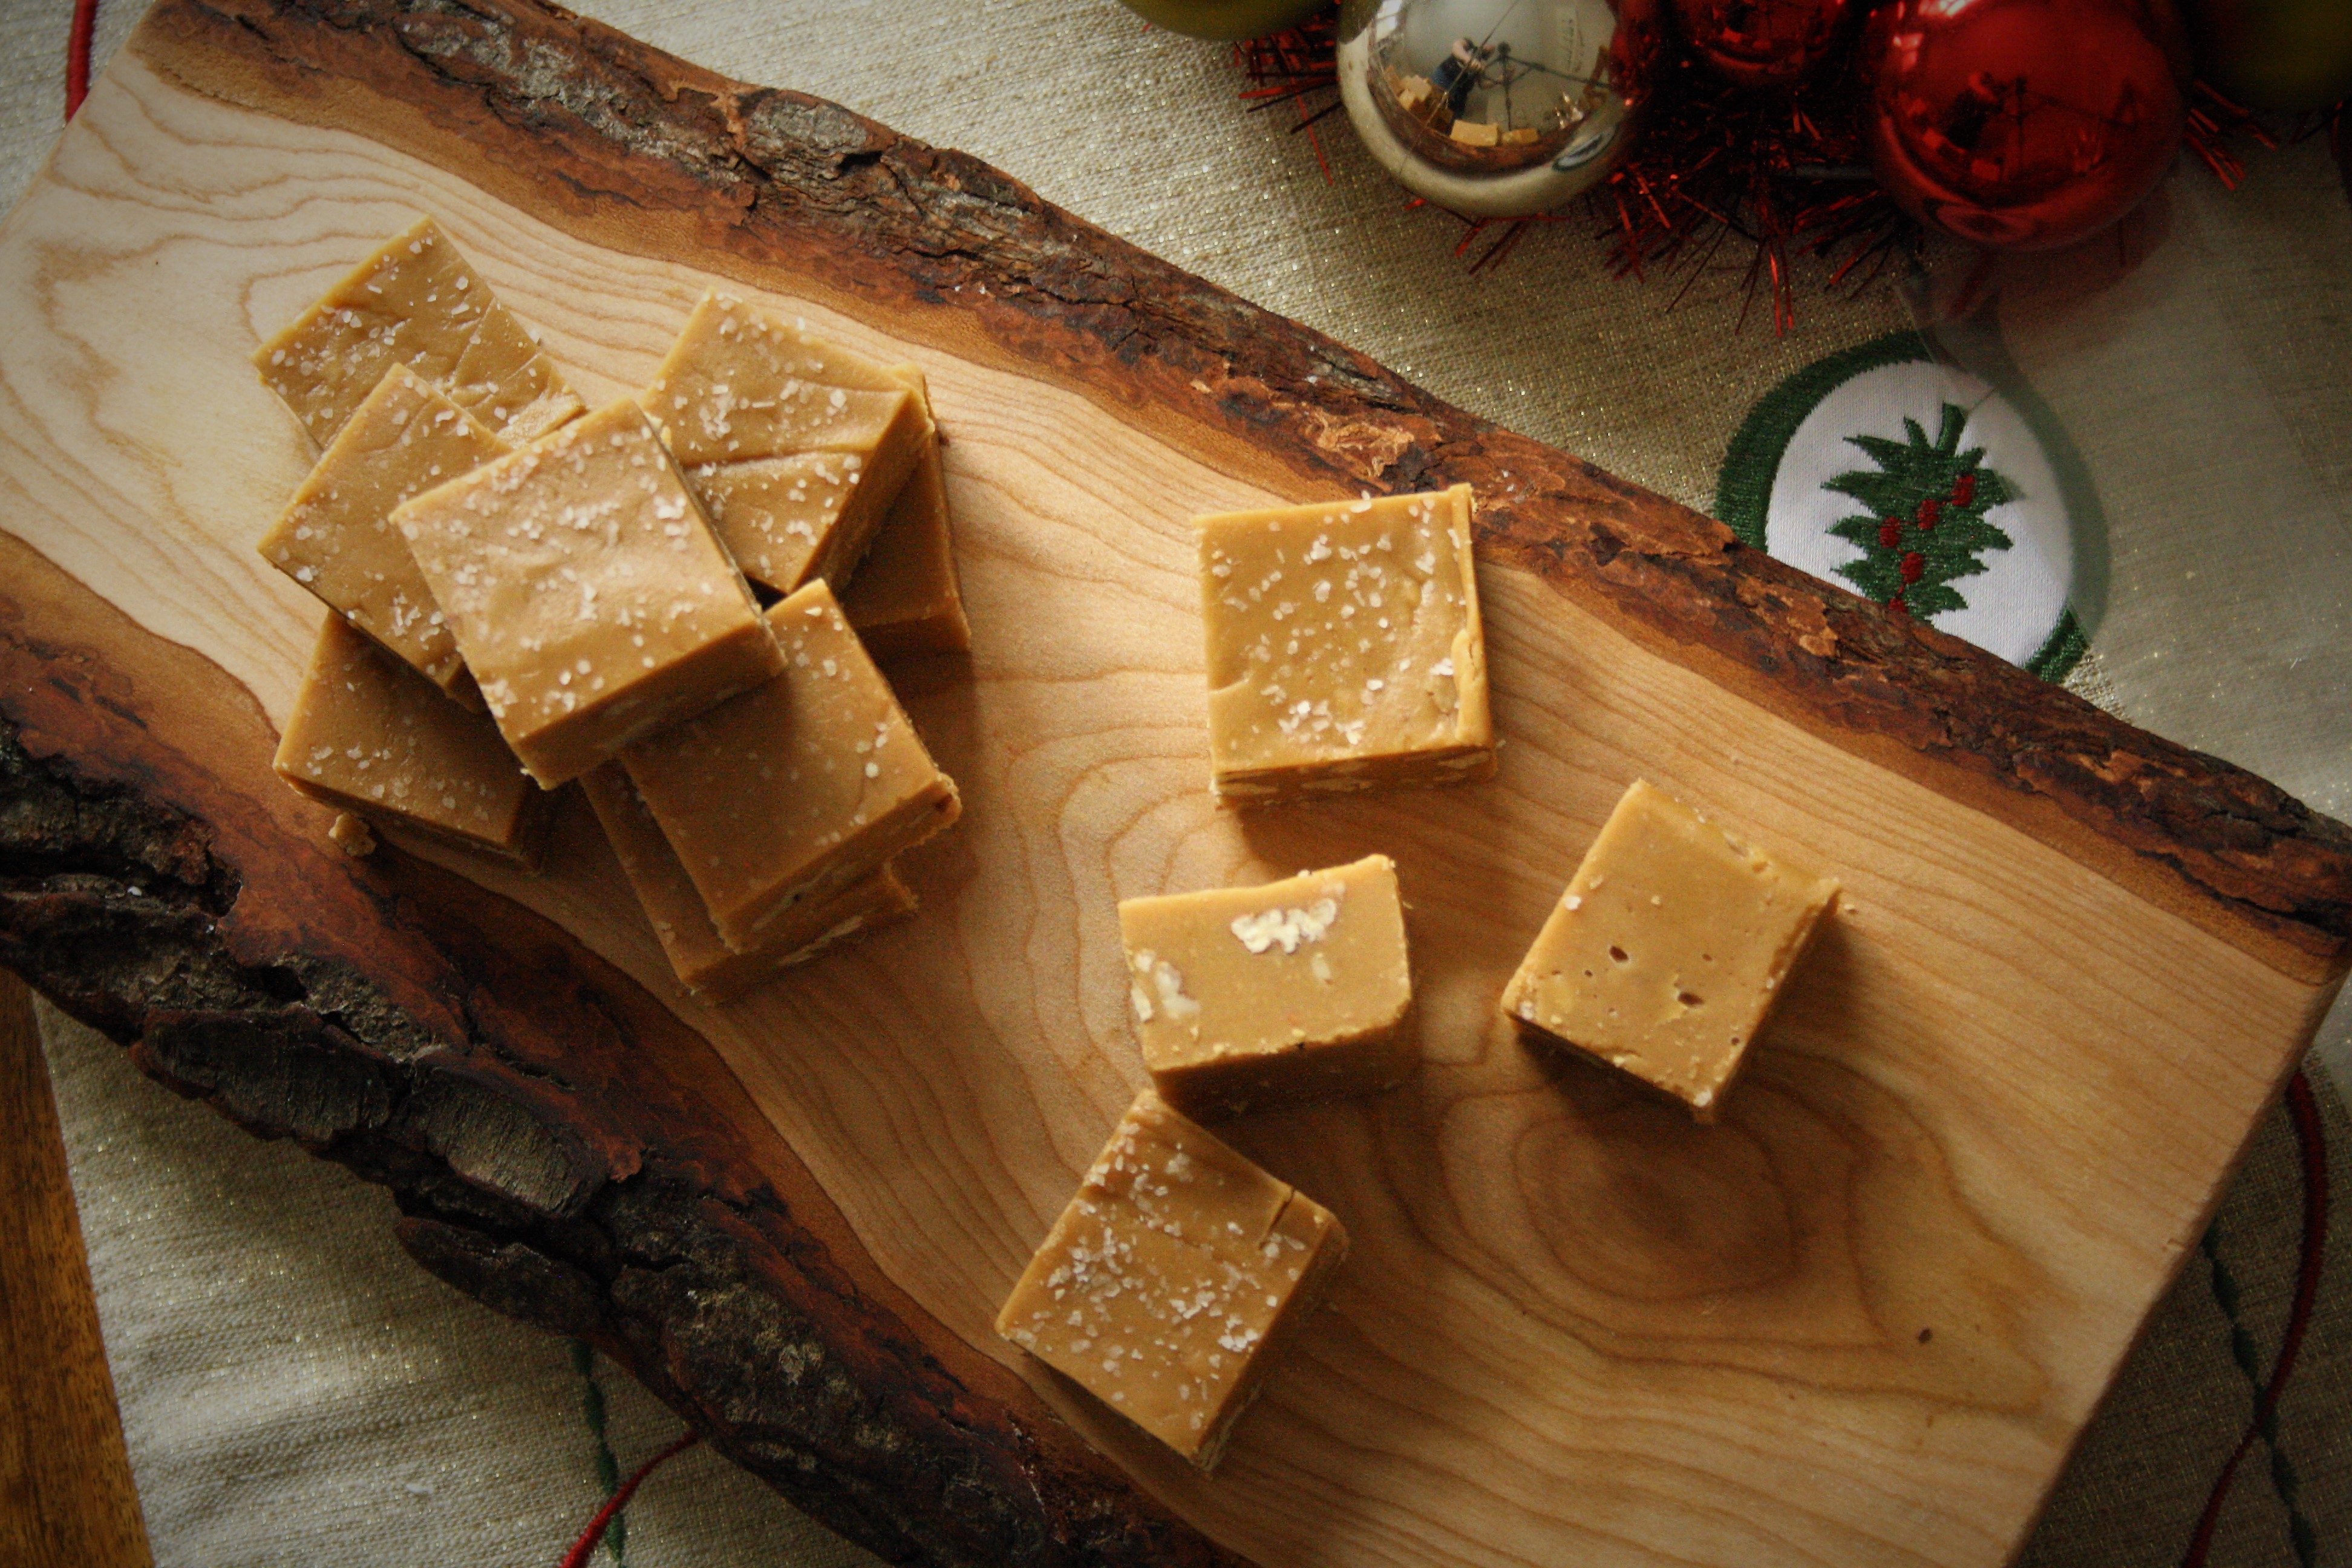
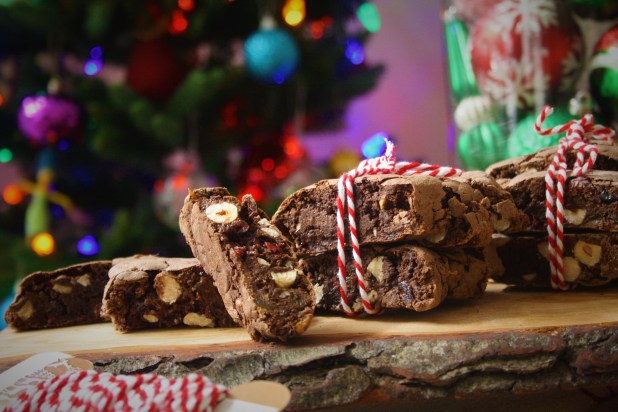
Biscotti make such a great alternative to the stalwart festive cookie. Enjoy their crunchy texture studded with roasted hazelnut and cranberries with a hot cup of coffee while you put your feet up, taking a break from the looming festive onslaught. Stollen has always been my preference to the traditional Christmas fruit cake- maybe the inclusion of sublime marizpan has something to do with it? Here I’ve omitted the usual mixed peel in favour of apricots and cranberries- for no reason other than I personally hate the stuff. I find it too bitty and chewy for my liking. Fudge has always been a favourite of mine. Smooth, creamy and sweet it never fails to warm me. Bringing my ever present twist to things I’ve added some liquid smoke to lend a subtle smokiness which works so well with the maple flavour of the fudge. Finishing it off with a gentle sprinkling of Kosher salt gives it a lip-licking quality that sings of pure indulgence. Not to mention making the finished treat visually reminiscent of the coats of baby deer in winter snow.
The fourth recipe I’ve included is not so much a food gift for other people but rather for yourself. I know too well how frenzied and manic Christmas morning can be so I wanted to make something that might help alleviate some of the culinary pressure of that time. Preparing them the evening before is a massive shortcut that helps no end on the big day. Packed full of filling and flavours of cinnamon, apples, cranberries and pecans they’re an extra special treat that’s sure to get the day off to a wonderful start.
I do hope you enjoy these recipes as much as I have, both creating and tasting them, and I’d like to wish you and yours a wonderful, peaceful holiday season and happy new year. (Wow! never thought I’d be writing that so soon!)
Hazelnut & Cranberry Chocolate Biscotti
Makes 20-24
2 eggs
3/4 cup caster sugar
1 2/3 cups All-purpose flour
1/3 cup cocoa, unsweetened
1 tsp baking powder
2/3 cups of hazelnuts (filbert) , toasted and roughly chopped
1/2 cup dried cranberries
1/2 cup orange juice
1 teaspoon vanilla extract
1/4 teaspoon almond extract
All-purpose flour for dusting
Method
Heat your oven to 150°C/300F
Place the cranberries in a bowl, cover with orange juice and allow to soak while you continue the recipe
Line a baking tray with baking parchment and dust lightly with flour
In the bowl of a stand mixer with balloon whisk attachment, beat the eggs with the sugar until pale and doubled in size.
Fold in the vanilla and almond extracts
Sift in the flour, cocoa and baking powder
Remove the cranberries from the orange juice
Add in the nuts and fruits and fold thoroughly until the mixture comes together a dough
Tip out onto a lightly floured work surface and lightly roll out into a log shape. Divide the log into two, halfway along it’s length
Place the logs on the lined baking sheet and with your hands lightly flatten logs to approximately 40mm wide x 20mm high
Bake in your pre-heated oven for 12-15 minutes or until firm
Remove the baking sheet from the oven and leave to cool for 10 minutes. After this time cut the logs into slices (10-15mm thick) and lay them flat on a baking sheet (with cut-side uppermost) and bake again for 10-15 minutes or until crisp
Remove from the oven and allow to cool on a wire rack
These can be kept for up to a week in an air-tight container
Alternative Stollen
Makes 1
4 cups white bread flour
1/2 cup caster sugar
1 tablespoon fast action yeast
1/2 tablespoon salt
1 1/2 sticks unsalted butter, softened
1 1/2 cups whole milk
1/4 teaspoon ground nutmeg
1/4 teaspoon ground cloves
1 tsp vanilla extract
1/4 almond extract
2/3 cups almonds nibs
1 cup golden raisins
1/2 cup dried apricots, chopped
1/2 cup dried cranberries
1/2 teaspoon dried orange zest
1/2 teaspoon dried lemon zest
8 oz marzipan
To finish
1/4 stick butter, melted
2 tbsp icing (confectioners’) sugar
Method
Line a baking sheet with baking parchment and lightly dust with bread flour. Set aside until needed
Put the flour and sugar in a stand mixer bowl and stir to combine. Add the yeast on one side of the bowl and the salt on the other
In a pan combine the milk, butter, lemon zest, orange zest and heat gently until the butter has melted. Remove from heat and set aside to cool and infuse. Stir occasionally to prevent the zests clumping
With the dough hook attached and on a medium speed, add the cooled milk/ butter liquid in a steady stream. Leave the machine to knead for 6 minutes until smooth and pliable
Whilst the dough is kneading, mix the nutmeg, cloves, vanilla and almond extracts, dried fruits and almond nibs together in a bowl
Remove the dough from the stand mixer bowl and place the dough on top of the fruit mixture and knead from the outside into the centre. When everything has been fully incorporated, return to the bowl, cover with oiled cling film and leave to rise for 1-1 ½ hours in a warm place, until doubled in size
Flatten the dough and roll out on a lightly floured surface to a rectangle about 45cm x 35cm. Shape the marzipan to about 25 x 15cm and place on top of the dough. Wrap the dough so it encloses the marzipan and place the full loaf on your prepared baking sheet, with the joining seam at the underside. Cover and leave to rise for 45mins – 1 hour until risen and doubled in size
Preheat the oven to 190C /375F and bake for 40mins. Remove from the oven and place on a cooling rack. Brush the baked loaf liberally with melted butter, and dust with icing sugar. Leave to cool completely before serving
This will keep for up to a week, wrapped and stored in an airtight container
Salted Smoky Maple Pecan Fudge
Makes 36 pieces
1 can (12 ounces) evaporated milk
3 cups light brown sugar, packed
1 1/4 cups (2 1/2 sticks) butter, chopped
1 cup icing (confectioners’) sugar
2 tablespoons pure Maple syrup
1 teaspoon vanilla extract
1/2 teaspoon liquid smoke
1 1/2 cups pecan halves, roasted and roughly chopped
Kosher Salt, to taste
Method
Line and butter an 8-inch square baking pan or silicone pan with baking parchment, allowing the parchment to extend over sides of pan
Mix the evaporated milk, brown sugar and butter in large saucepan. Bring to boil on medium-high heat, stirring constantly. Reduce heat to medium-low; simmer, stirring frequently, until mixture reaches 236°F on a candy thermometer (soft-ball stage). (Be patient- this will take about 30 minutes. Also DO NOT leave it unattended!)
Remove from heat and pour into the bowl of a stand mixer. (Careful! The sides of the bowl will become VERY hot)
Add the icing sugar, maple syrup, vanilla extract and liquid smoke and beat together with on low speed. Increase speed to medium; beat until thickened and smooth.
Remove the bowl from the stand mixer and fold in the chopped pecans. Spread evenly in prepared pan. Sprinkle the top of the fudge with kosher salt to your taste. (I usually use 2 good pinches, evenly sprinkled)
Refrigerate at least 1 hour or until firm. Use baking parchment to lift out of pan onto cutting board.
Cut into 36 squares and enjoy!
If stored at room temperature this will keep for up to a week in an air-tight container, if stored in the fridge it will last for up to two
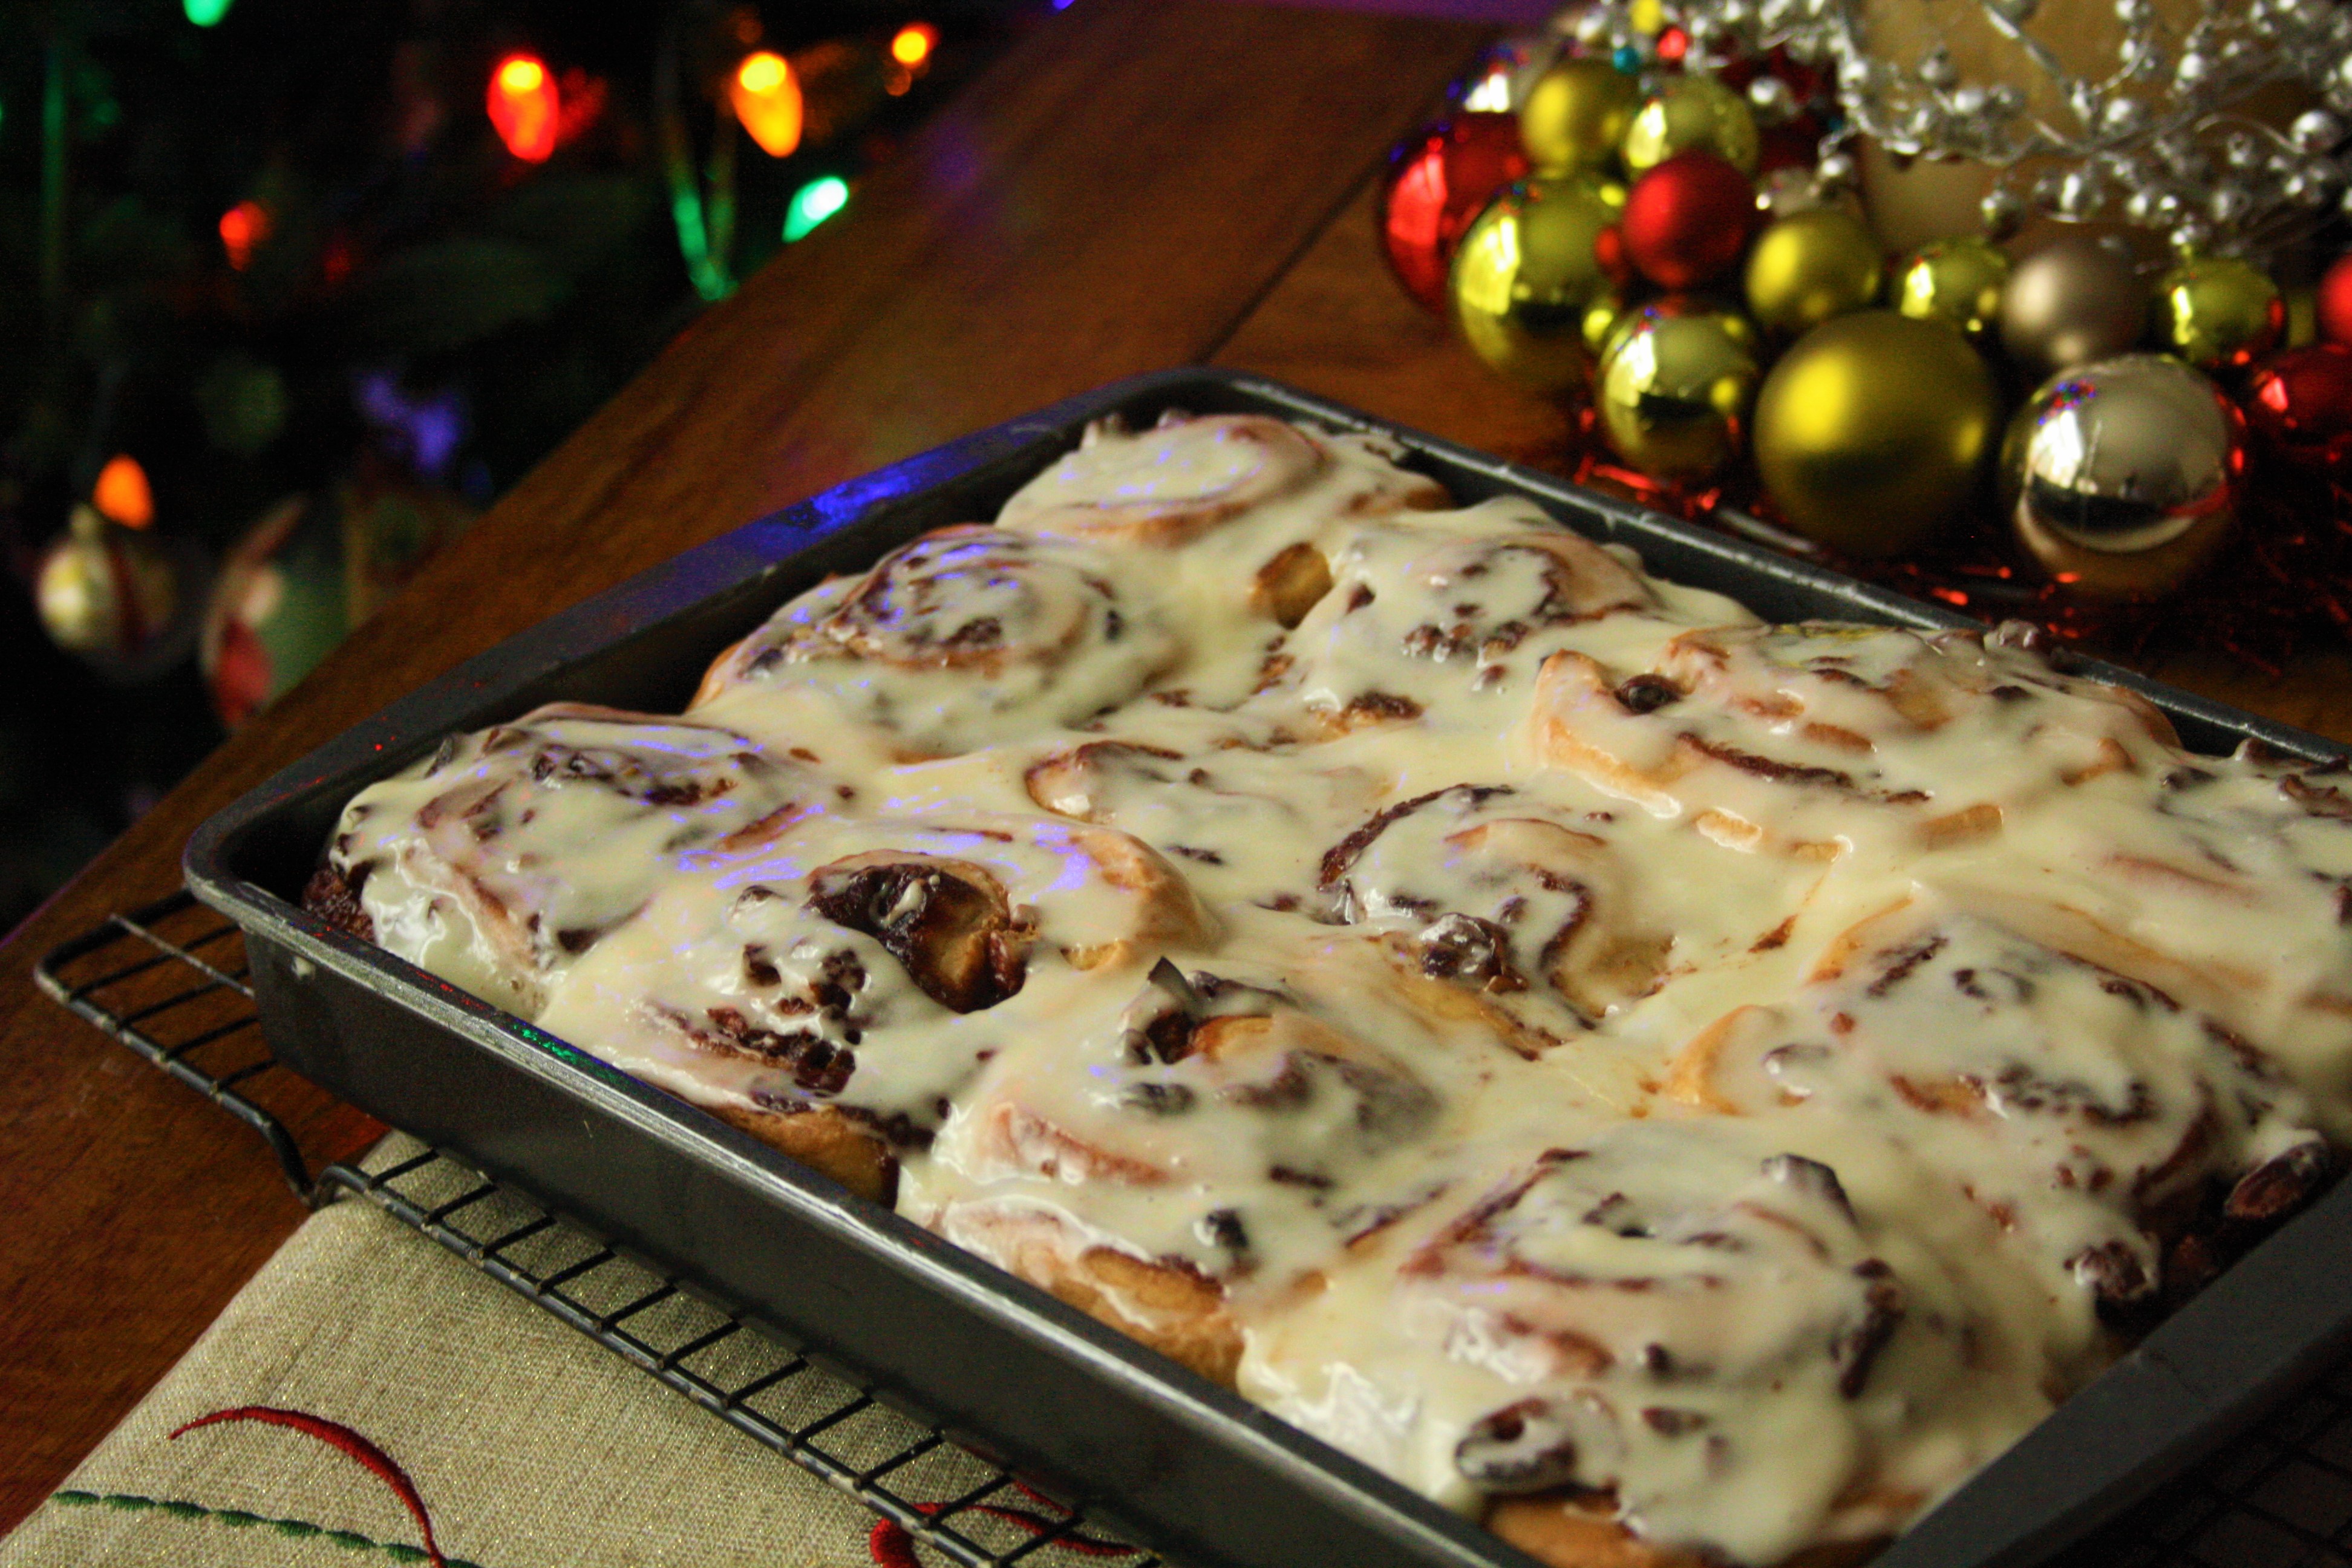
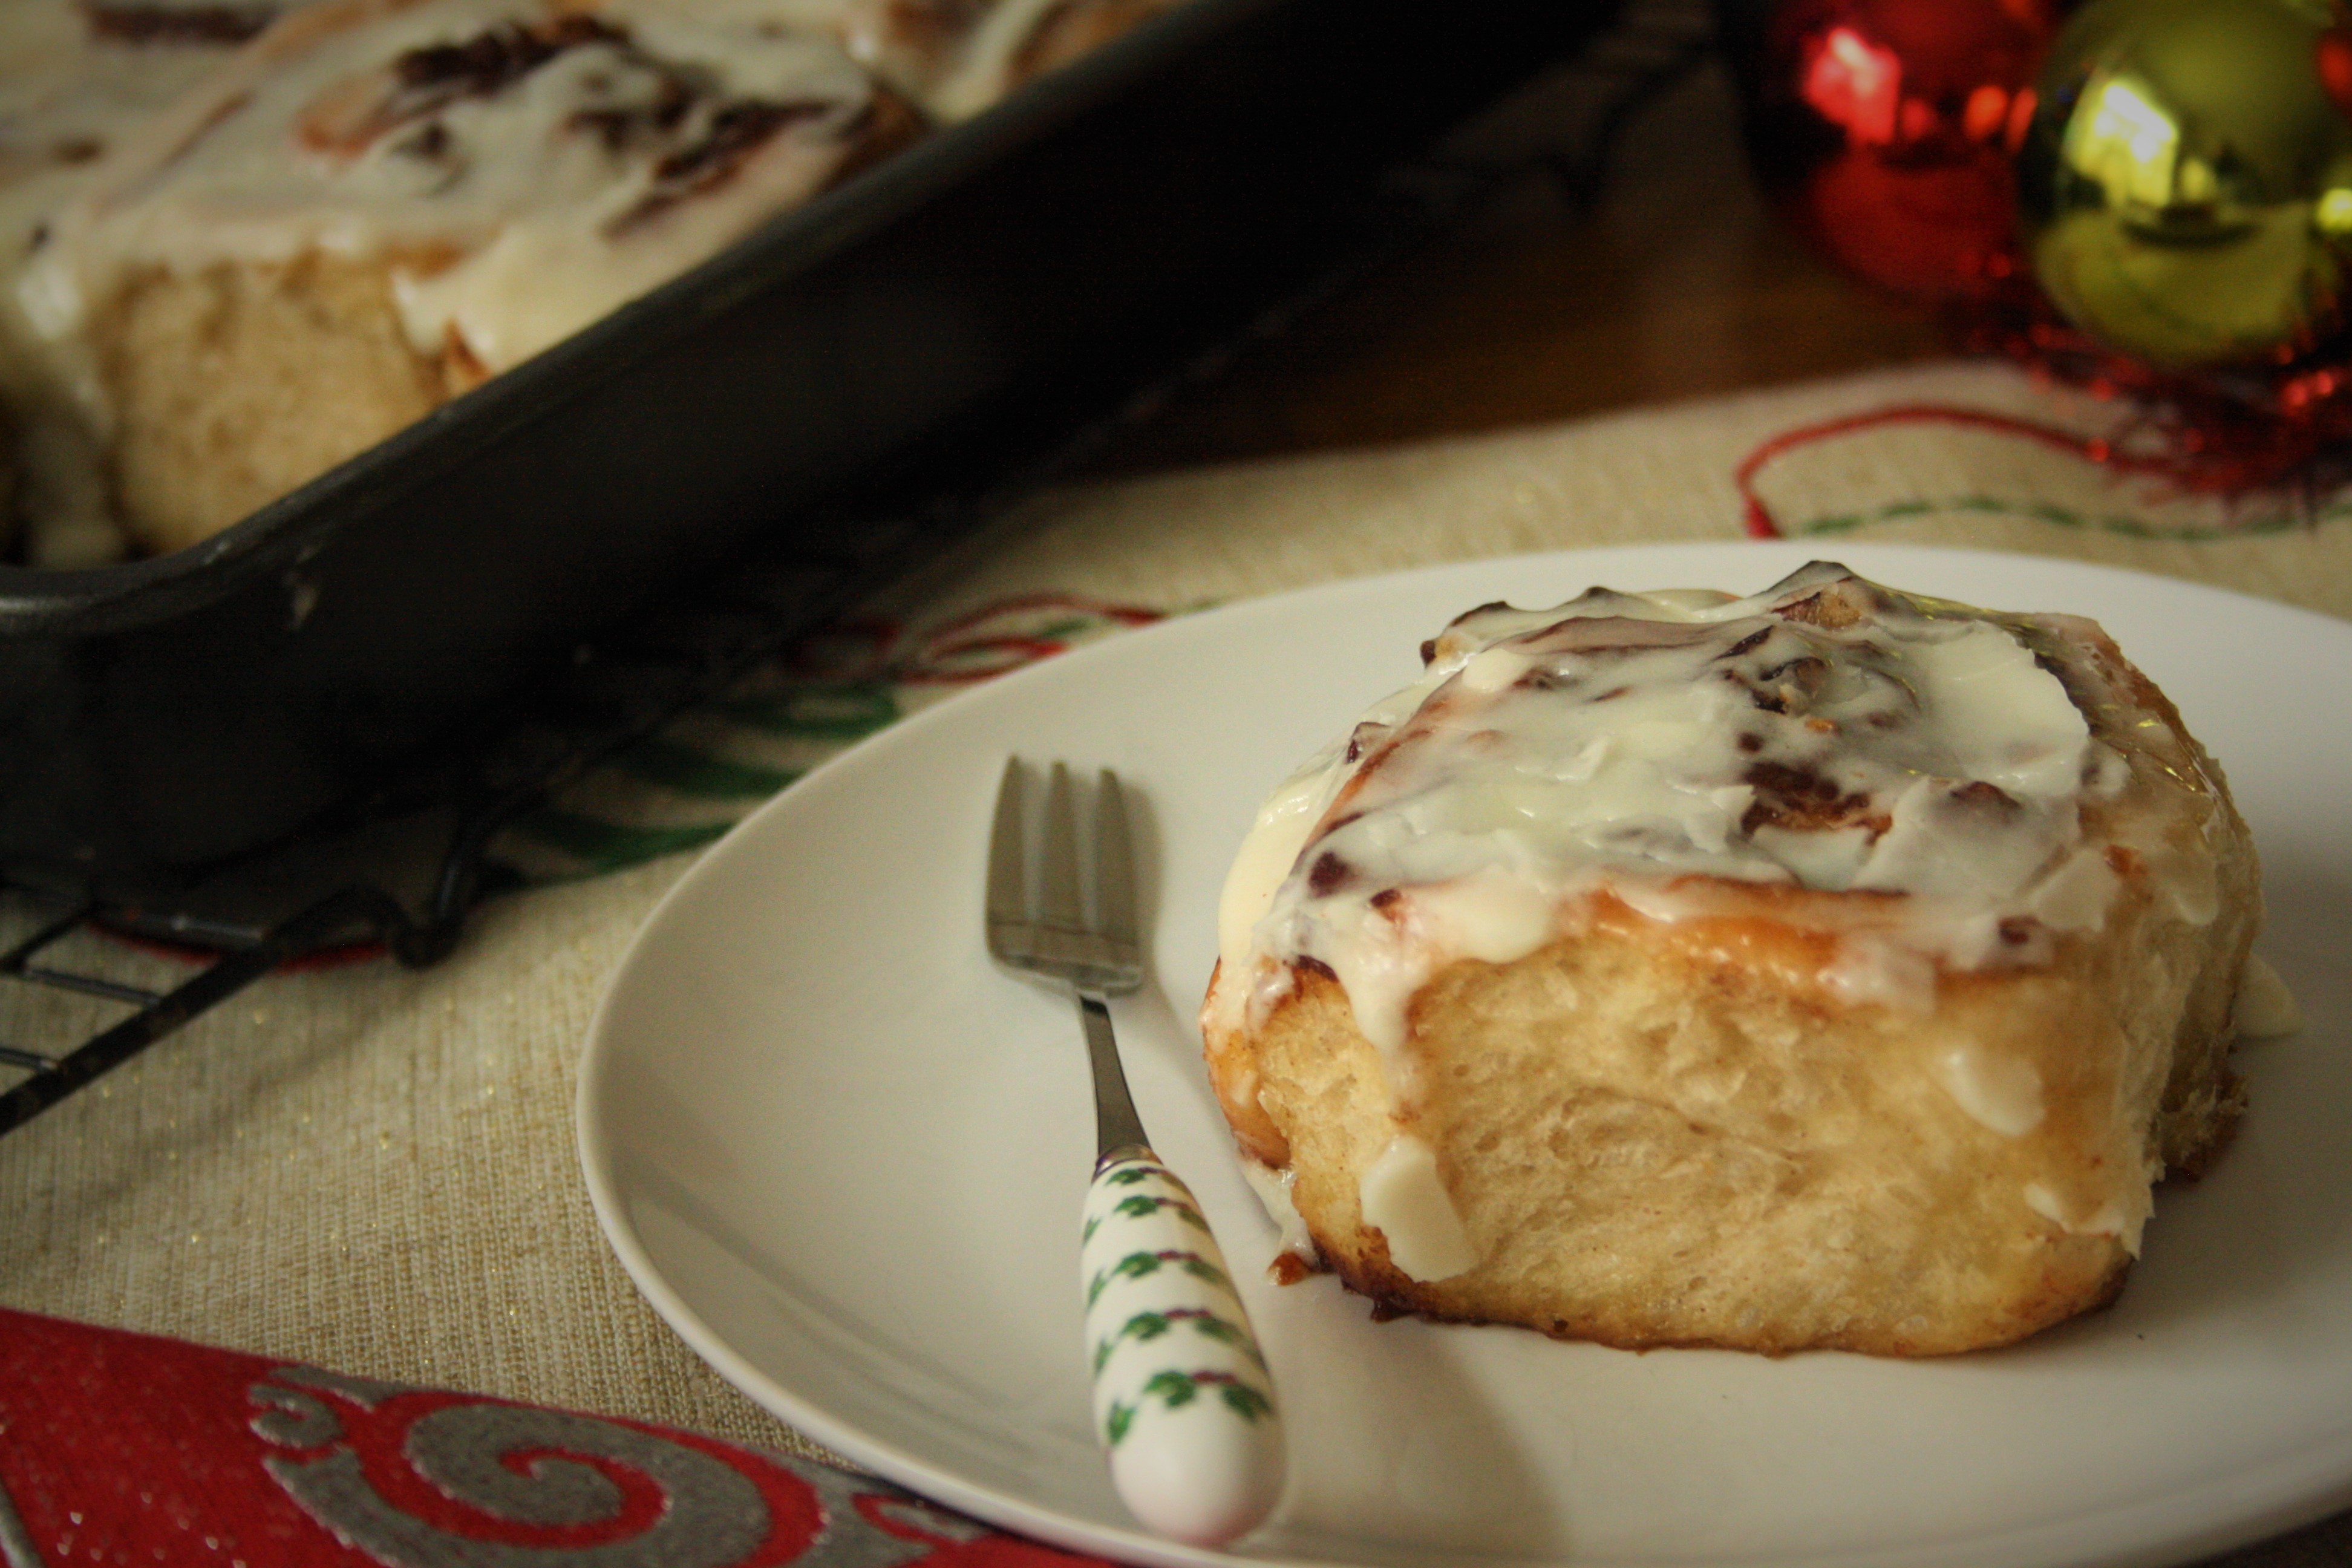
Christmas Morning Cinnamon Buns
Makes 12
For the dough
1 1/2 cups whole milk
1/4 cup (1/2 stick) butter, plus extra for greasing pan
1 tablespoon ground cinnamon
1/2 teaspoon dried orange zest
1/2 teaspoon dried lemon zest
4 cups white bread flour
2 1/2 tablespoons caster sugar
1 tsp salt
1 tablespoon fast-action yeast
1 egg, beaten
For the filling
1 cup dark brown sugar
3 tbsp ground cinnamon
1/3 cup butter, softened to room temperature
1/3 cup fried cranberries
1 cup pecans, toasted and roughly chopped
1 cup apple butter
For the glaze
2 cups icing (confectioners’) sugar
1/4 cup eggnog
Method
Put the milk, butter, cinnamon, orange zest and lemon zest in a small saucepan and heat very gently over the lowest available heat until the butter has melted. Set aside and leave it to cool to a lukewarm temperature
In a bowl of a stand mixer, mix together the flour and sugar. On one side of the bowl add the yeast, and on the opposite side add the salt
Into the flour bowl add the cooled milk/butter mix and the beaten egg.
With the dough hook attachment, knead this on medium for 8 minutes. It should become smooth, pliable and come together in a ball
Transfer the dough to a lightly oiled, large bowl and cover tightly with lightly oiled cling film. Leave the dough to rise in a warm place for 1- 1 1/2hrs
Grease with butter a 23cm x 33cm high sided baking tin and set aside until needed
Prepare the filling by mixing together the brown sugar, cinnamon and softened butter in a bowl. Beat until well combined. Set aside until needed
When your dough has risen, tip it out into a lightly oiled surface and roll out to 40x50cm
To fill , spread the cinnamon butter (as evenly as you can) over the surface of the dough. Next spread the apple butter in an even layer. After this sprinkle on the dried cranberries. Once this is done, finally sprinkle on the chopped pecans
Starting at the long edge, roll the dough into a tight log shape
Trim the ends off the roll and then cut into 12 even pieces*
Arrange the rolls in a 3×4 formation (cut side up) in your prepared baking tin. Cover loosely with oiled cling film and pop into the fridge. Leave to slow-proof overnight
On the morning of baking, remove the tray of risen cinnamon rolls from the fridge 30 minutes prior to baking
Preheat your oven to 180C/350F
Bake the rested rolls in the oven for 30 mins. If the edges start to brown too soon, lightly cover the pan with foil
When baked, remove the rolls from the oven and set aside to cool while you prepare the glaze
To prepare the eggnog glaze, combine the icing sugar and eggnog in a bowl or jug. Whisk until well combined and smooth
Drizzle the glaze over the still-warm cinnamon rolls and enjoy
A word of warning- these are very sticky and moreish…unwrapping gifts at the same time is not recommended!
*To cut the cinnamon rolls I use a length of either dental floss or fish-line. Loop it around the dough log where you want to make the cut, pull in opposite directions and there! You have a perfectly cut cinnamon roll ready for baking. Failing this of course, feel free to use a knife!
This post is dedicated to my mother, Anne, who passed away earlier this year. The lady who inspired a thousand cupcakes and so much more.
“But behind all your stories is always your mother’s story, because hers is where yours begins”
And now January has set in. Tinsel and lights have been packed away. Christmas tree carcasses litter the sidewalks- emaciated reminders of festivities past. On the whole January would appear to be a pretty “grey”- The Month of M’eh. Each mouthful of chocolate or candy is now succeeded by a guilty pang of remorse. “December was pretty indulgent, I really shouldn’t be eating this”…said no one in my kitchen. Ever!
“Seize the moment. Think of all those women on the Titanic who waved off the dessert cart.”
Erma Bombeck
There’s usually a surplus of sweet treats of some variety in my house after the festive season. This year is was candy canes. Having fulfilled their duty of adorning the christmas trees for the best past of a month (and surviving the voracious eyes of my children!) it’s now time to put them to an alternative, and somewhat tastier, use.
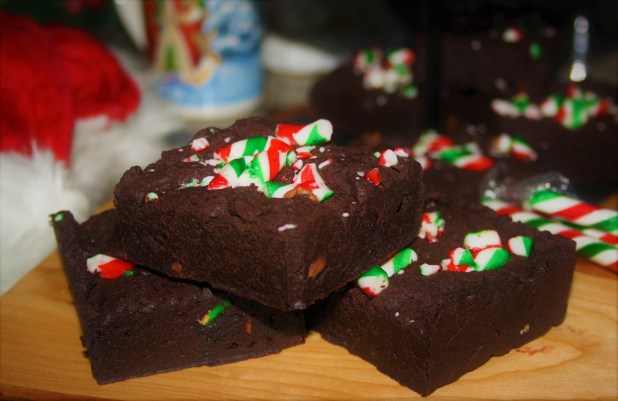
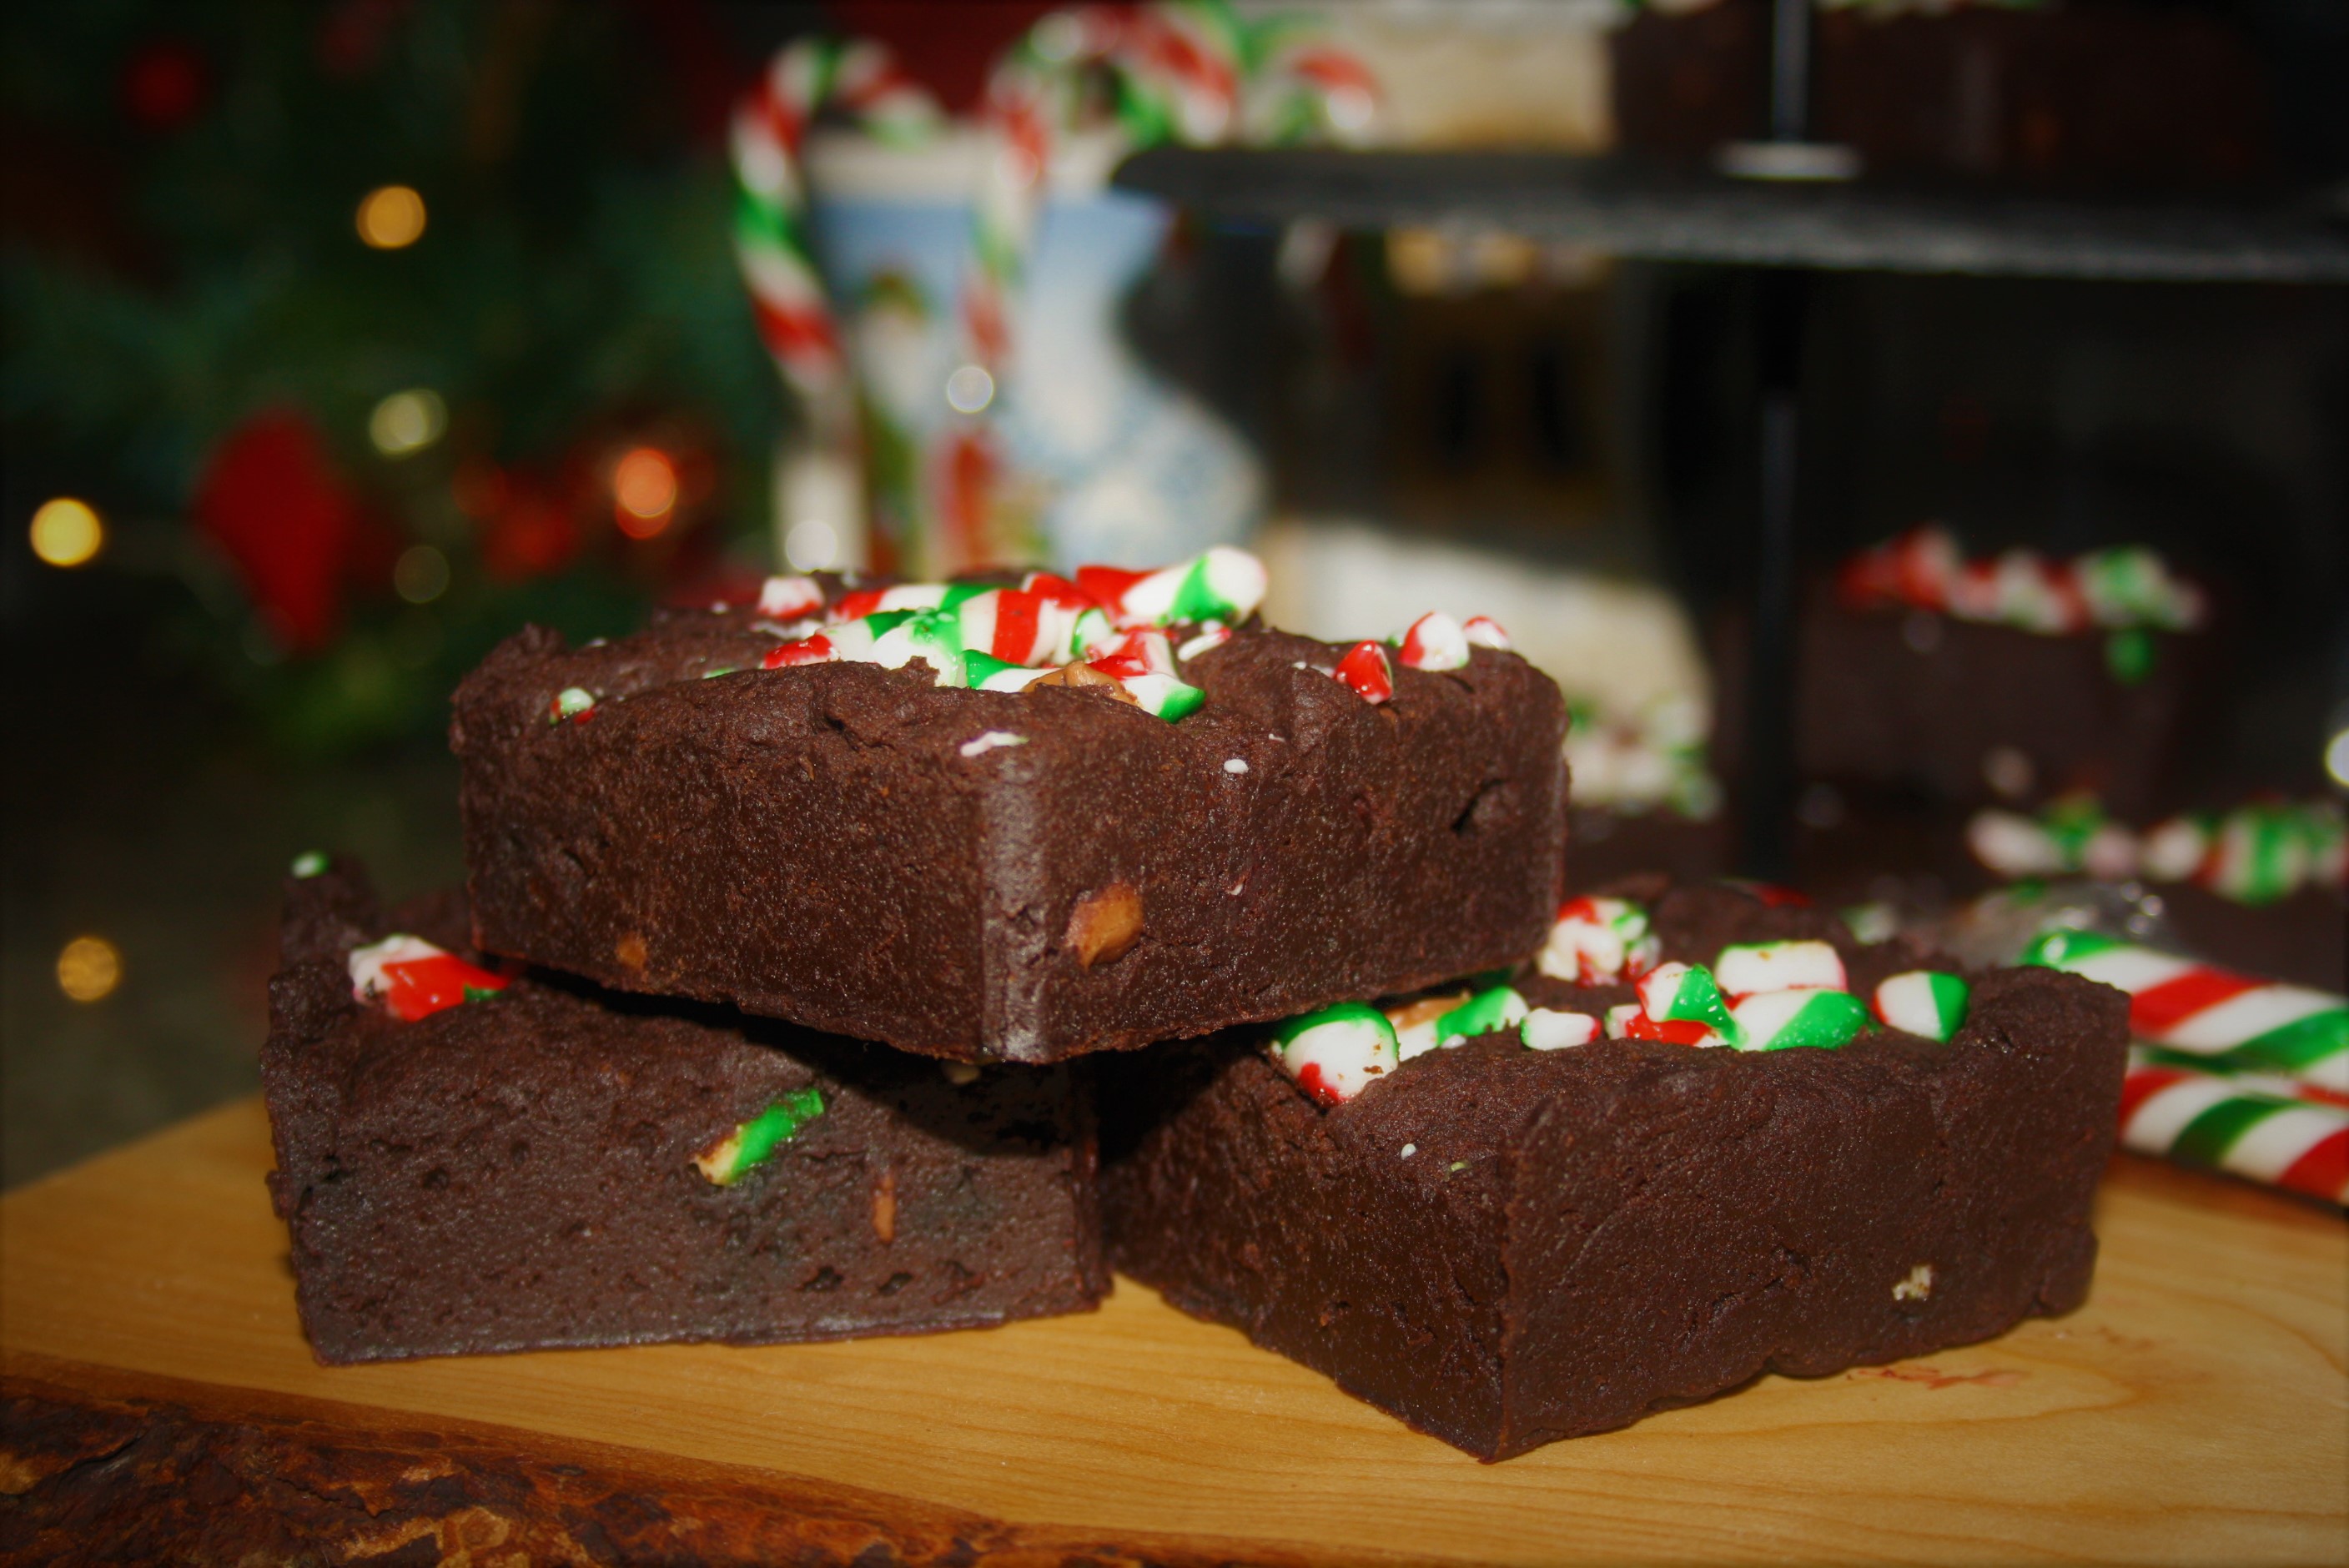
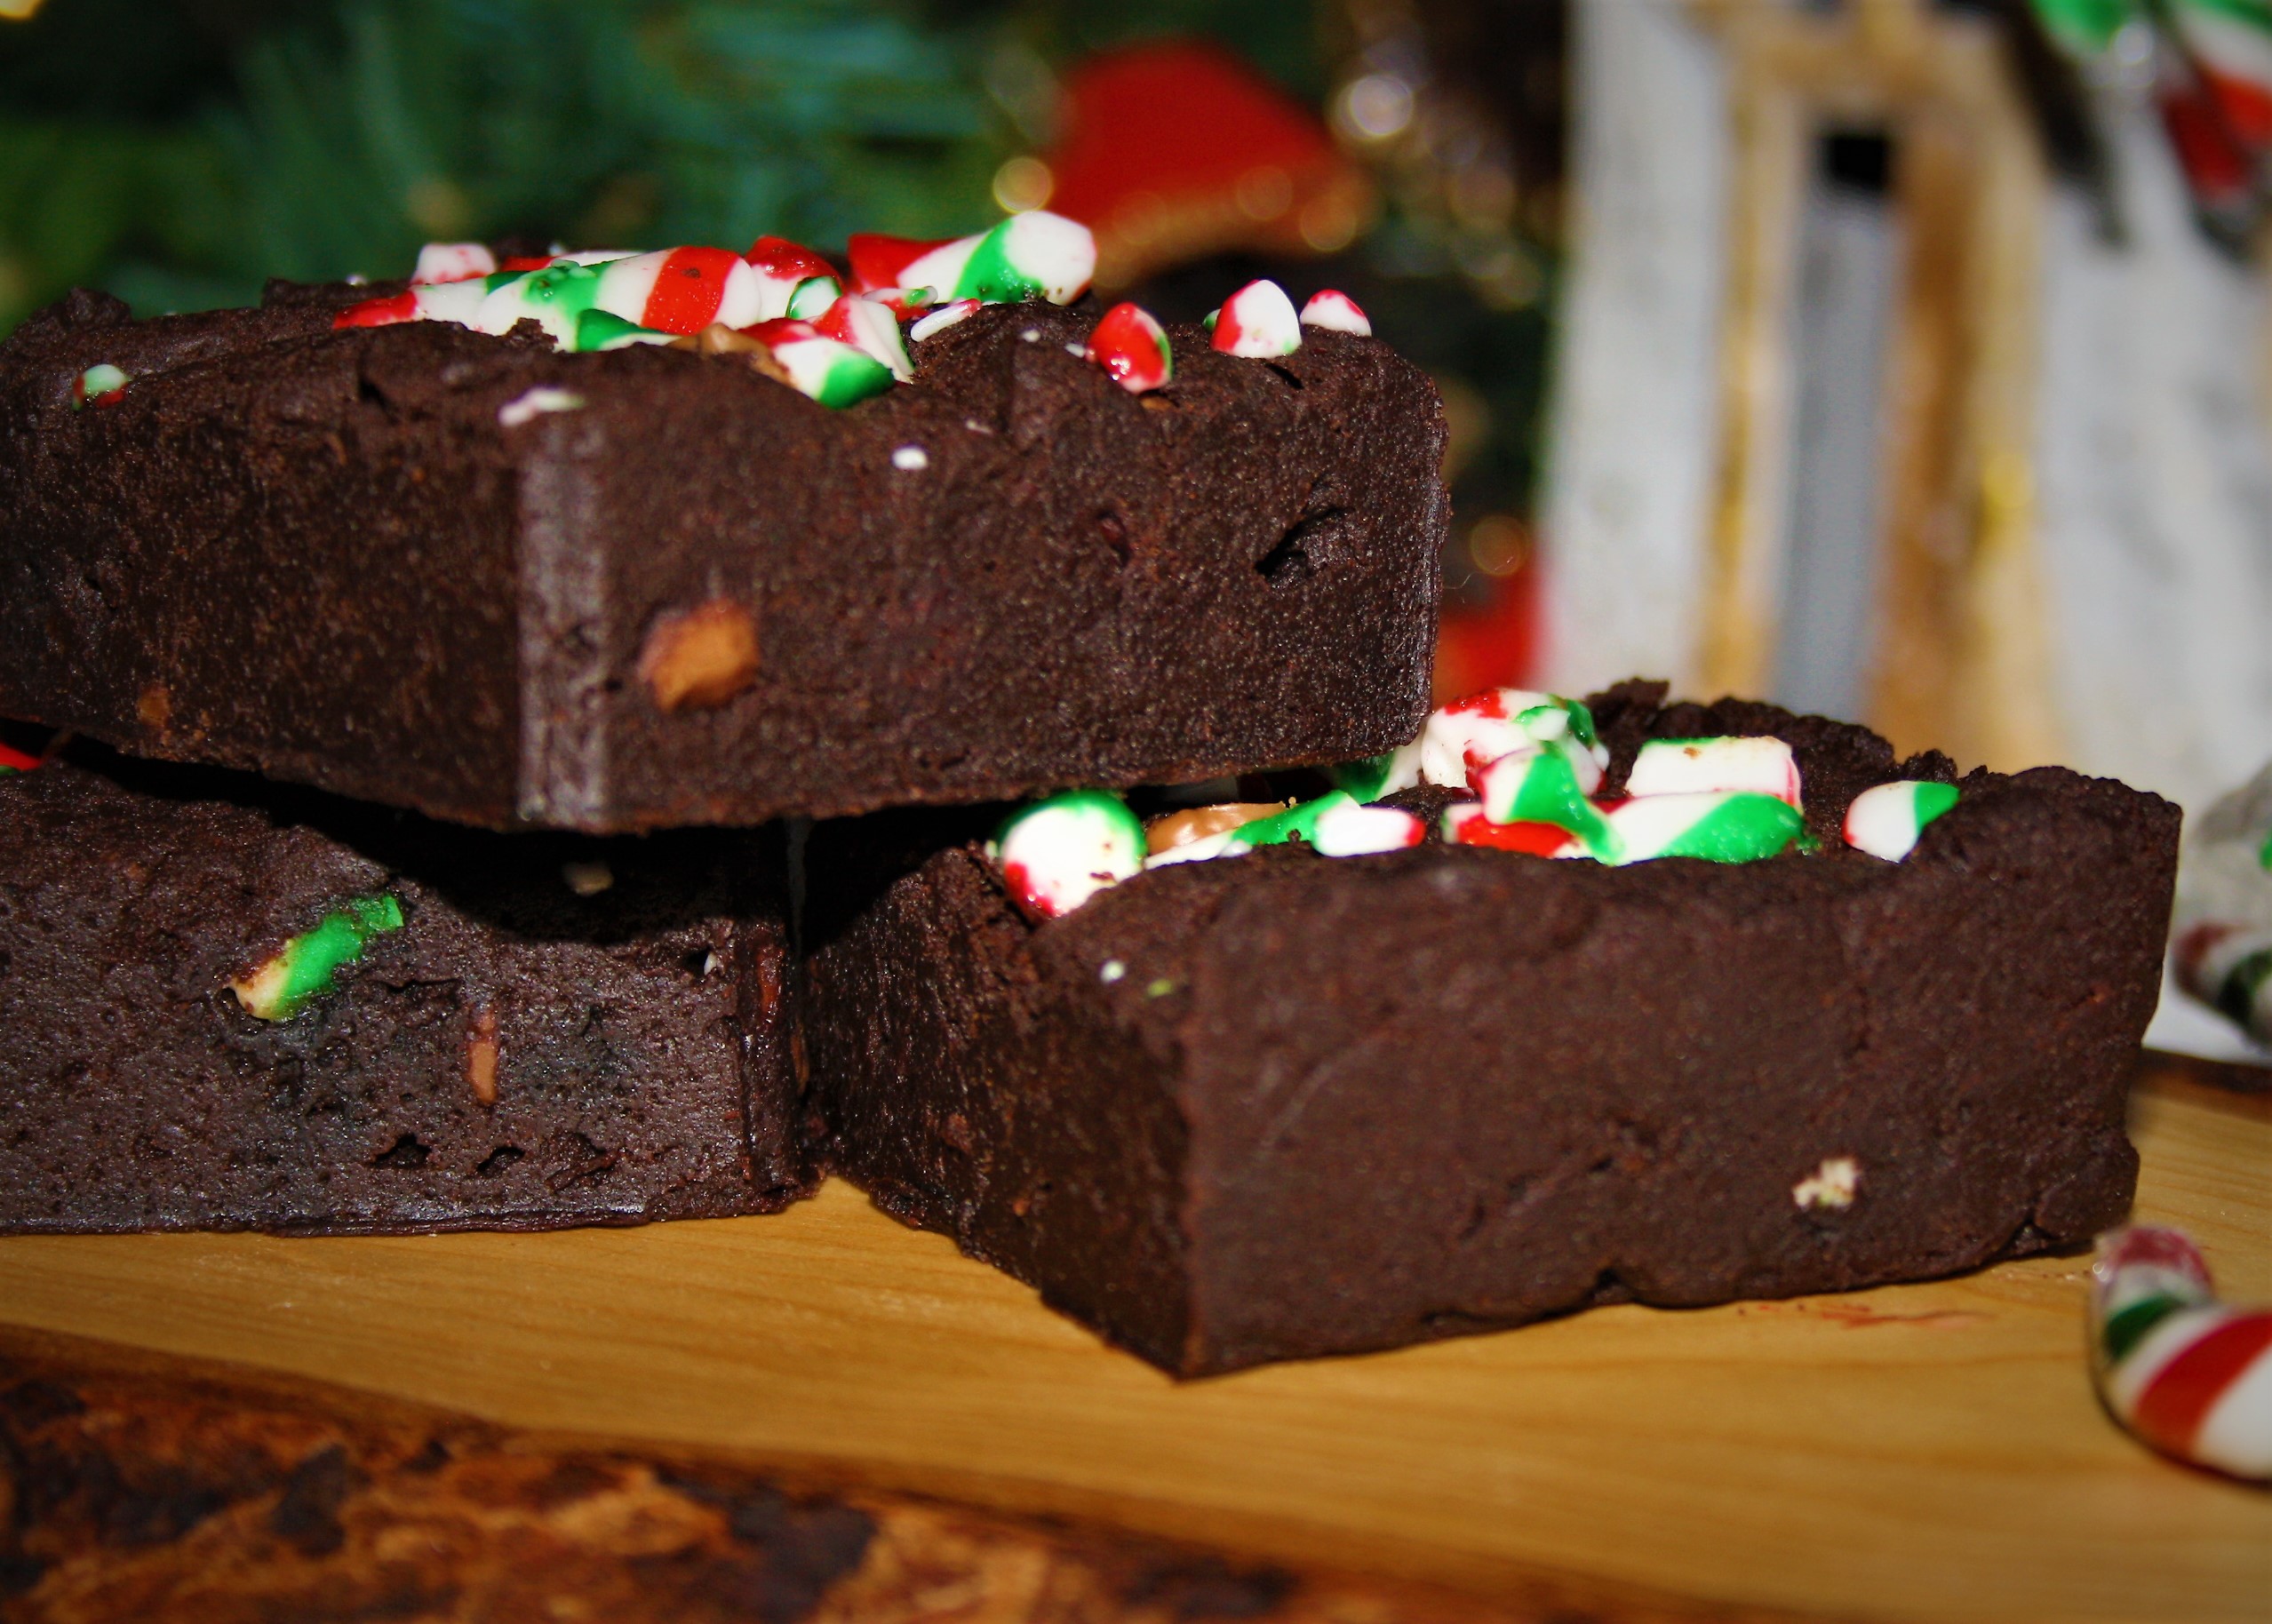
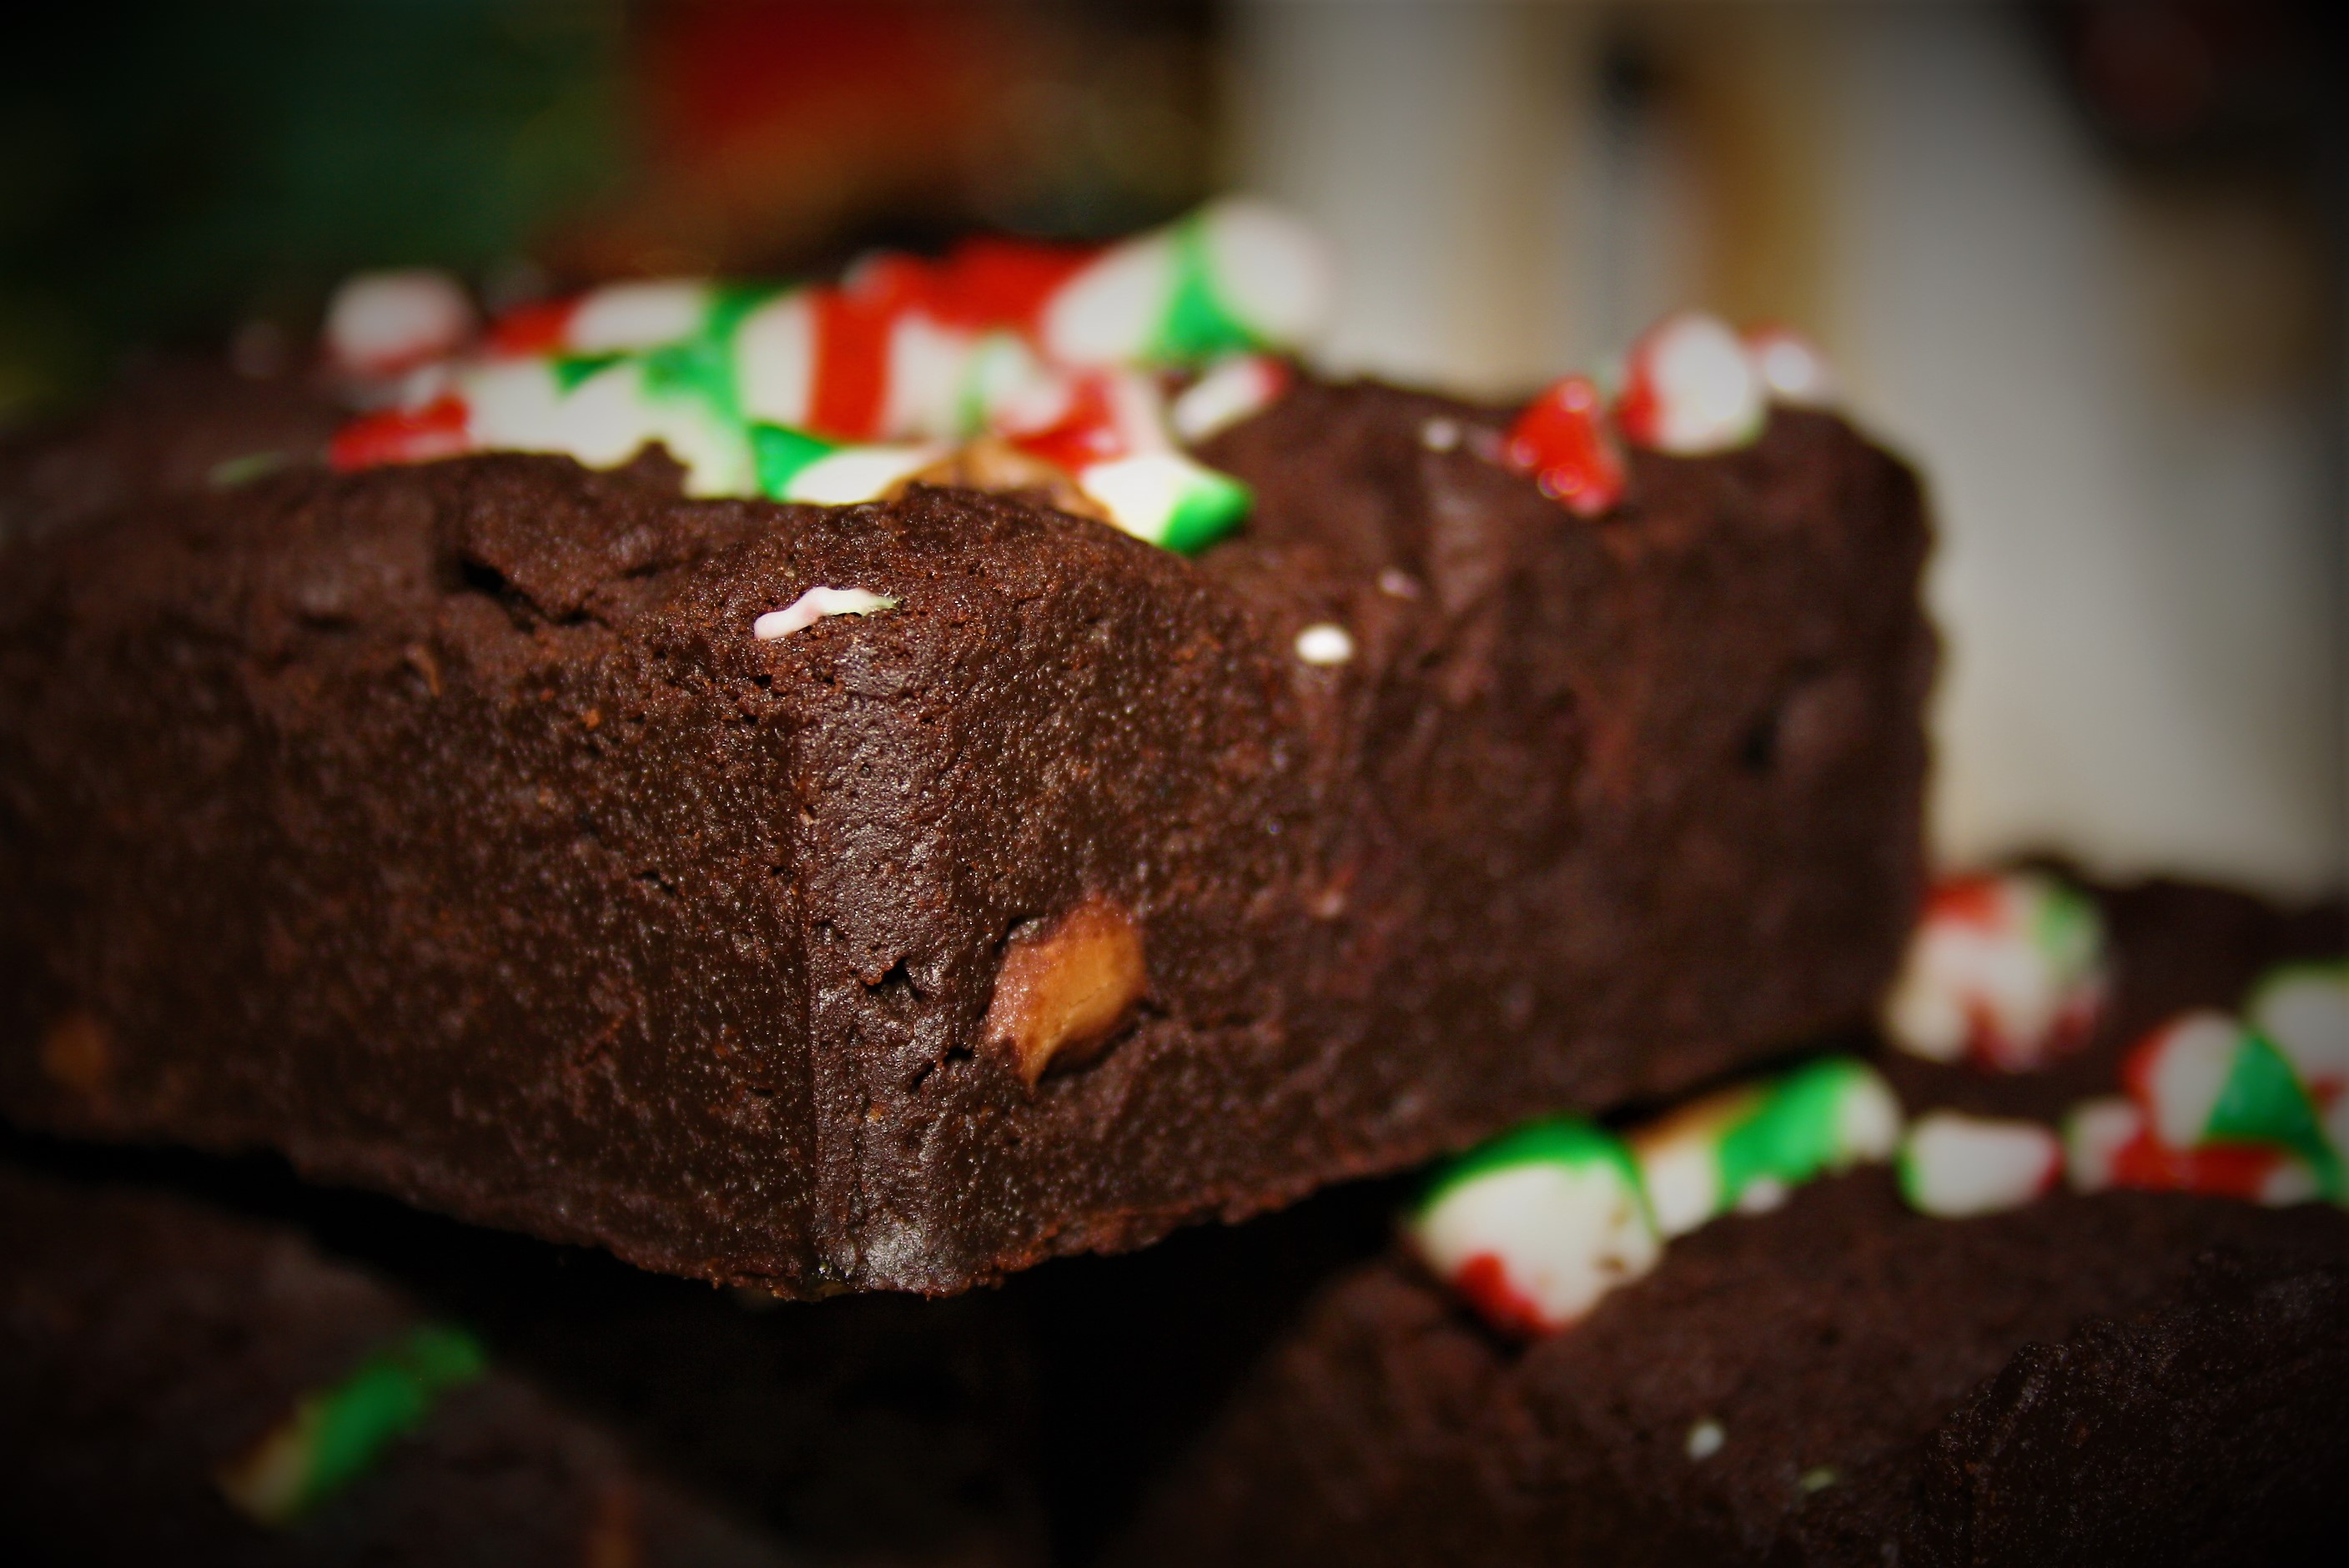
For something so small and simple candy cane have an assortment of end uses in the kitchen. Aside from having a good ol’ fashioned chomp on them, there are recipes available for flavoured vodkas, cupcakes, and hot chocolate. I opted for using them in one of my favourite flavour combinations- mint and chocolate. My Candy cane Brownies are rich, indulgent treats laced with peppermint and studded with chewy, mini nuggets of stripped cane and chocolate chumks. Just for good measure there’s an extra sprinkling of smashed candy canes topping each brownies with extra festive whimsy.
Having arrived in our new home of Canada just ahead of the festive blitz I had little time for baking and experimenting with the new array of ingredients that have since become available to me. New brands, varieties and flavours lined shelfs, all there for the taking in my greedy mitts. The cocoa powder I used here, Fry’s (which is a Dutch processed cocoa), resulted in a much darker and richer chocolate flavour compared to those I’ve used in the UK. I’d highly recommend trying to get your hands on some if you can! So this recipe provided the perfect excuse for not only using up the excess candy canes but also as a trial for using unfamiliar ingredients. I hope you like them. And yes I know it’s strictly speaking a christmas recipe and the festive season is done and dusted, but just them of them as a legitimate excuse for resurrecting it for a brief few minutes. Enjoy!
Candy cane Brownies
makes 12
Unsalted butter 185g, cubed
185g Bakers unsweetened chocolate, broken into pieces
1 tablespoon Nielsen Massey peppermint extract
3 eggs
275g caster (superfine) sugar
85g plain flour
½ teaspoon salt
50g Fry’s cocoa powder
50g Bakers semi-sweet chocolate, cut into small chunks
50g peppermint candy cane, broken into smalls pieces
To decorate
75g peppermint candy canes, smashed into irregular pieces
Set your oven to 180C/gas mark 4 and line a deep 12″x9″ baking tray with baking parchment.
Melt the butter and chocolate in a bowl over a saucepan of simmering water (or bain-marie), stirring occasionally. Once melted, remove from the heat and allow to cool.
Beat the eggs and sugar until the mixture is thickened and fluffy, then, in a separate bowl, combine the flour, cocoa powder and salt.
Stir the peppermint extract into the cooled chocolate mixture, and the fold into the egg mixture.
Sieve in the dry ingredients, and fold together.
Mix in the chocolate chunks and candy cane pieces. Fold again until well combined.
Pour your mixture into the lined tray and gently spread to level the surface. Place in the oven for 20-25 minutes. To test- insert a skewer into the mixture about 1 inch from the edge of the tin and it should come out clean.
To decorate-sprinkle the top of the brownies with the smashed candy cane pieces and gently push into the surface so the stick.
Leave to cool completely in the tin before cutting into squares, and serving.


")
")
")
")