
Coming from Waterford, in South-East Ireland, there are a few things that are corner stones of my childhood – Waterford Crystal; Hurling and…of course – the blaa. “The what?”, I hear you say. Well, are you sitting comfortably? The blaa is basically a bread roll. But there are a couple of features that set it apart. Roughly square-shaped, liberally dusted with flour, it has a soft chewy texture and pleasing bitter tasting crust that is dear to the heart of Waterford natives. Many a school lunch’s main feature was a buttered blaa with “Red Lead” (pink sliced deli sausage meat) or filled with Tayto crisps. Quintessential Deise fare if ever there was any!
Dating from 17th century, blaas are well ingrained into the history of Waterford. In their original form blaas were thought to be made from the scraps left over from families baking their own bread. The name “Blaa” is thought to have been possibly derived from the old Huguenot word ‘Blaad’ – an old French word for flour, or ‘Blanc,’ – a French word meaning white, which refers to the white floury appearance of the baked blaas. To the best of my knowledge there is yet to be a confirmed origin.
Such is the fame of the humble blaa that in 2013, the Waterford Blaa Bakers Association (yes there is such thing!) succeeded in getting PGI designation for the Waterford Blaa. “PGI” stands for Protected Geographical Indication, which essentially means that only Blaas made by specialist bakers in Waterford city and county can be called Blaas. This guarantees an authentic heritage product, based on the traditional methods and the unique skills of the bakers- think champagne; Parmigiano-Reggiano and Melton Mowbray pork pies. Basically if you see something called a “Blaa” for sale outside of Waterford? It’s not the real deal. Waterford Blaas are now supplied by traditional family bakers operating since the 1800’s. Sadly these days the family bakers have deminished with but a handful remiaining.
Whilst this recipe isn’t PGI approved, it has stood the test of time in my family. Having been passed down through generations (to date I’ve confirmed 3) there apparently has been no tweaks or amends to the original recipe. It remains true with a form that conjures memories of frenzied Saturday morning sibling debates as to whose turn it was to fetch the weekly dozen from the local store. I’ve eaten in some fancy restaurants with both divine and questionable cuisine. However I’ll be perfectly honest and say I have yet to experience anything that makes my heart swell and induce instant comfort like biting into a buttered blaa filled with Tayto cheese & onion crisps. Flour-dusted lips savouring that sweet chew contrasting with crunchy savoriness. Bliss!

Ingredients
- 4 cups Bread flour
- 2 1/4 tspns quick-rise instant yeast
- 1 tspn fine salt
- 1 tbspn fine sugar
- 1 tbspn butter
- 50ml milk
- 325ml water
- 1/2 cup AP flour (approximately) for final dusting
Method
- In a pan combine the milk and butter. Heat gently until the butter is melted. Set aside and leave to cool while you prep the rest of the ingredients, stirring occasionally
- Lightly oil a large bowl and set side until needed later
- Sift the flour into the bowl of a stand mixer. To one side of the bowl add the yeast and to the opposite side add the salt. Add the sugar in the middle
- Combine the warm water and milk/ butter mixture and stir well. With the dough hook attachment working on slow speed, slowly add the liquid to the dry ingredients in a steady stream. Continue to add until 50 ml remain. Depending on your kitchen conditions eg temperature and humidity, you may not need to add all the liquid- only add enough liquid for your dough to form a ball and clean the bottom of the bowl. Continue to knead on slow for 7 mins. The dough should come together in a ball that is smooth and elastic to touch, without cracking or breaking
- Remove the dough ball from your mixer bowl and place in the preoiled bowl. Cover and set aside to proof in a warm place for between 50-60 mins until doubled in size
- After this time, remove the bowl and punch down the risen dough to knock back the air. Gather the dough in to a smooth ball shape, place back in the preoiled bowl and recover for a second proof. This proof won’t take as long, between 30 – 40 mins. DO NOT SKIP this step as it helps to add to the distinctive flavor of the finished blaas
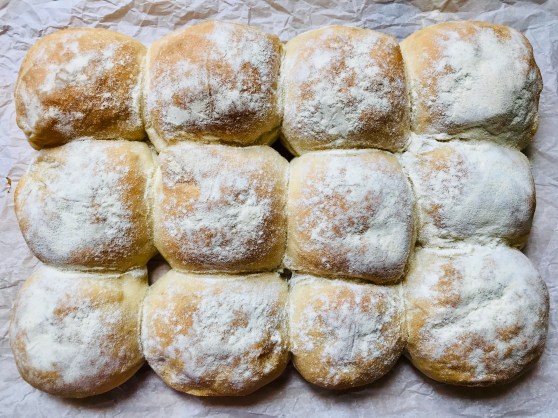
- Once the second proofing has been done, remove the dough from the bowl and divide equally into 9 or 12, depending on how big you want your final blaa to be. An amount of 9 will give a more traditional palm-sized blaa
- Roll each of the equally-sized pieces into a smooth ball and place together in a high-sided pan. I tend to use a roasting tray that I have dusted/ dredged with flour. Place the dough balls side by side until you have a “sheet formation”. Ideally they should be spaced so that when they finish rising they touch each other. The “mouths” that are formed from this at the sides of the baked blaa are a distinguishing feature allowing easy opening
- Cover the dough balls with oiled clingfilm and allow to rise in a warm place for a further 30 mins.
- Preheat your oven to 425 F. By this time the balls should have risen and be touching each other
- Dust the tops of the blaas liberally with flour and place on the middle shelf. Bake for 20-25 mins. The tops of the blaas should be lightly browned and bases sound hollow when tapped
- Remove the baked blaas from the tin and allow to cool to warm before serving
- Blaas are best eaten on the day they are baked. If you do have any left the following day you can refresh them by wrapping in foil and baking them at 375F for 10 mins. Overall they will keep in an airtight container for up to 3 days
Traditional fillings for blaas
- Bacon (rashers)
- Tayto crisps (Irish potato chips and they MUST be Tayto!)
- Sausages
- “Red Lead” (Irish deli meat sausage slices. Ultra-pink in color!)
Other fillings that can be delicious-
- Sliced roast chicken and stuffing
- Bacon and fried egg

A meeting of worlds- The Waterford blaa filled with Canadian peameal bacon
