#Recipe Chocolate & Orange Polenta Cake #glutenfree #noaddedsugar

Massive apologies for the delay in posting this recipe . But fear not! I am back in the kitchen and fervently baking and typing away. Albeit not at the same time! This recipe certainly seems to have proven popular and many thanks for your patience and enthusiasm in wanting to see the recipe.

So this is part of my #TheGreatBeardedBakeOff recipes and it ties in with the  “Alternative Ingredients” challenge. The first challenge of the show was to create a Sugar-Free bake and I instantly knew what I wanted to make. Whilst most of the contestants chose to use syrups and honey to replace the sugar, I was surprised no one chose alternative sweeteners like Xylitol or Stevia? Anytime I need to bake “FreeFrom” bakes, number 1 on my go to list is Xylitol. Derived from the Birch tree it’s a sugar replacement that can be substituted like-for-like for sugar and is suitable for diabetics. In this recipe I hesitate to use the term “Sugar Free” in the title as there is still sugar present from the fruit there’s no sugar added where normally there would be.

I had also recently taken a trip to Borough Market (my goodness how I had missed the place!) and got my hands on some fantastic rose water and orange blossom water from Saveur de Maroc (both products winners of this years Guild of Fine Foods Great Taste Awards). If you haven’t tried these waters then I seriously recommend you do. Highly floral but pure and light, they are distinctly refreshing and lack that acrid, artificial back-note that can be present in some brands of these exotic flavourings. Safe to say these are going to be a permanent fixture in my kitchen. Next on my list is trying their Argan Oil!

Soooo… I digress! My recent purchases provided inspiration for this recipe- a visit to a luxurious souk, the air wafting with the heady smell of oranges; stalls laid out before you abundant with figs and chocolate. You get the scene? And here we are…(did I mention as well as low sugar, it’s also gluten free!)

2015-09-02 16.48.26-1

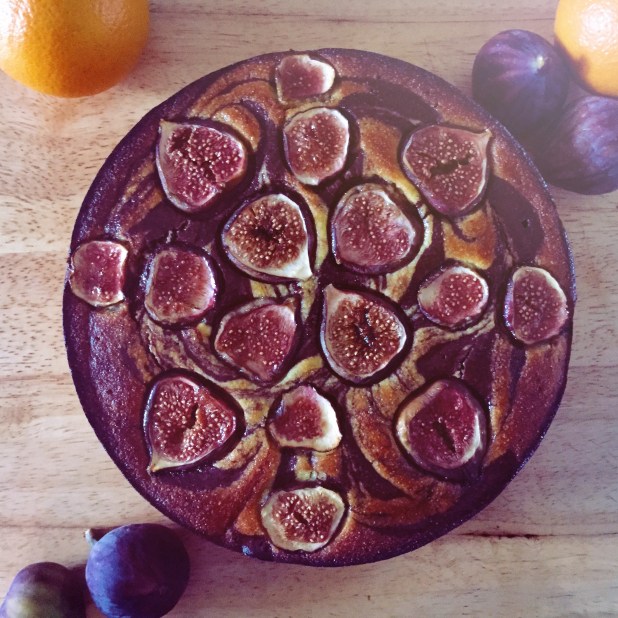
Chocolate & Orange Polenta Cake with figs and orange blossom glaze

Cake Batter

2 large oranges

250g xylitol

6 eggs

100g ground almonds

200g polenta

50g good quality cocoa

1 tablespoon good quality chocolate extract, eg Nielsen Massey

4 firm, fresh figs

To decorate

2 tablespoons xlylitol

1 tablespoon Orange Blossom water, eg Saveur de Maroc

Method

To make the batter

– Prepare a 23cm spring-form cake tin by either greasing or spray with cake release spray, and lining th base.

– Preheat the oven to 180°C/fan160°C/ gas 4. Divide the oranges into quarters and blitz them in a food processor, to a pulp.

– Add in the xylitol, eggs, ground almonds and polenta and blitz in the processor until well combined.

– From the processor bowl, ladle half of the cake batter into your prepared tin.

– To the remainder of the cake batter, still in the food processor bowl, add the cocoa and chocolate extract. Replace the lid and blitz until well combined.

– At this point you can place ladlefuls of the chocolate batter into the tin and swirl with the orange batter to create a marbled effect. I prefer to use a piping bag fitted with a plain nozzle and fill it with the chocolate batter. This allows me to pipe dollops of chocolate batter into the orange batter as well as on top of it. Once you have added the chocolate batter by either method use a skewer to swirl and create the marbled effect.

– Slice the figs into rounds- not too thin. I normally try slicing each fruit into 4 slices. Lay the fig slices on top of the cake in a pattern of your choosing.

– Place the cake tin into your preheating oven and bake for 40 to 45 mins. Check to see that top isn’t charring. Check that the cake is done by using a clean skewer test.

– Remove the cake from the oven and leave to cool in it’s tin on a wire rack.

– Whilst the cake is cooling, make the glaze by gently heating the xylitol with the orange blossom water. Heat until the xylitol has been dissolved. Leave to cool for 2-3 minutes.

– Gently brush the glaze over the cooling cake, on top of both sponge and fig fruits.

– Once the cake has cooled completely, remove from it’s tin and lining.

– Serve and enjoy! (Ideally with some Moroccan mint tea!)

2015-09-02 16.55.54-1

#recipe Spiced Apple Crumble with parmesan and rosewater

This recipe provided an ideal use for some apples from our back garden. Quick and easy it’s an ideal comfort food for this time of year when the temperature takes a turn. Warming and comforting with the right amout of spice it’s fantastic with custrd or cream alike. The addition of both the rosewater and parmesan may seem a bit strange but bear with me. You won’t regret it! The rose water lifts flavour of the apple filling while the parmesan in the crumb topping adds a savory note. Just think of a cheeseboard with fruit on it!

Spiced Apple Crumble with parmesan and rosewater

Filling

1 kg apples, peeled, cored and sliced

1 tablespoon lemon juice

3 tablespoon rosewater eg Saveur de Maroc

1 tablespoon mixed spice

50g light brown sugar

Crumble topping

150g plain flour

100g light brown sugar

90g cold butter, cubed

25g rolled oats

2 tablespoons parmesan cheese, finely grated

2015-09-01 11.00.49

Method

To make the filling

– Preheat the oven to 190C/170 fan/gas 5.

– Toss the apple pieces in the lemon juice, rosewater, mixed spice and light brown sugar until evenly coated.

– Transfer to a 10inch by 2 inch deep pie dish.

To make the topping

– In a large bowl combine the flour, light brown sugar, oats, parmesan and butter. Rub in with your finger tips until the mixture resmebles breadcrumbs.

– Sprinkle the crumb mixtureover the apple filling, gently pressing down where needed. Take care not to press it too tight as this will just make the crumble a solid topping- you dont wantthis.

– Bake in your preheated oven for 30-25 mins until the topping is golden. When you slide in a knife the apple should have softened and you should feel some give. If you prefer your filling softer, you can bake for another 5 to 10 minutes.

– Remove from the oven and allow to cool for 15 minutes before serving.

– Serve with custard, cream or ice cream and enjoy!

Recipe- Chilled Chocolate, Peanut Butter & Caramel Cheesecake

2015-08-28 17.53.15

Cheesecake- the dessert that can divide a nation. “Should it be chilled or baked?” is a question that could have come from the lips of Hamlet himself. After watching the “Desserts” episode of The Great British Bake Off I was throughly enthussed to try baked cheesecake. To be honest there has always been something about baked cheesecake that never hit the spot for me. Maybe I just never had a good one – they’ve ranged from custard tart-like to downright chalky and as a result my allegience and affections have always belonged to it’s cooler, and in my opinion, more sublime counter part- the chilled cheesecake. And here’s the result with my signature ubiquitious twist. Rich and chocolatey with a hint of peanut this is a thoroughly grow-up dessert. Little and often is the way ahead…little and often!

Chilled Chocolate, Peanut Butter & Caramel Cheesecake

200g digestive biscuits

90g  butter, cubed

110g caster sugar

150ml double cream

150g  dark chocolate, melted and cooled

3 tablespoons cocoa powder

560g cream cheese

4 tablespoons smooth peanut butter

200g Carnation tinned caramel

75g cocoa nibs

Chocolate curls, optional

2015-08-28 17.53.20

Method

– To make the base, blitz the biscuits in a food processor to make rough crumbs and then add the butter and 1 tablespoon of cocoa. Blitz again until it clumps together  and then spread them into a 23cm springform tin. Press the biscuit crumbs into the bottom of the tin to make an even base and refrigerate while you carry on making the filling.

– Carefully melt the chocolate in a bowl over hot water. Make sure the base of the bowl doesn’t touch the hot water. When melted, remove and leave to cool slightly.

– Whip cream until soft peak stage. Add cooled melted chocolate, then the cocoa powder. Mix well and set aside.

– In a stand mixer beat the cream cheese and sugar together for about 10 mins. Continue beating until there ae no sugar grains. Add in the peanut butter and mix until well combined.

– Fold in cream/chocolate mixture and mix thoroughly.

– Spread half the cheese filling on top of crushed biscuit base.

– Dot tablespoon size blobs of the caramel over the cheesecake filling. Once all the caramel has been used, spread the remaining cheese mix over this so the caramel it is completely covered.

– Decorate the top of the cheesecake with the cocoa nibs and the chocolate curls, if using.

– Place in refrigerate for minimum 3 hours, or overnight.

– Slice, serve and enjoy!

Recipe- Italian Stromboli

So this week on The Great British Bake Off it was ‘Bread’ week (step forward Mr. Paul Hollywood looking rather smug). The bakers were challenged to a quick bread (typically soda bread); make some baguettes- this ended up with me screaming repeatedly at the TV and finally a 3-d bread sculpture. Yup- bread. Now while I didn’t attempt any of these in the vein of Bake Off fever, I did make something to keep up the theme itself.

I’m not sure why but over the past couple of weeks I’ve had stromboli on the brain. Please don’t be alarmed it isn’t a medical condition. Strombloi is in fact a stuffed loaf of Italian origin. Or as some people like to call it ‘Pizza Roll Bread’. Now for me that name just doesn’t do it justice. I much prefer it’s ‘Stromboli’ title (go ahead call me bourgeoise!). And so stromboli would be my #TheGreatBeardedBakeOff recipe for this week’s theme. Yes I know it’s not one of the challenges but I like to think outside the box; left of the middle etc etc – ’cause I’m crazy like that!

2015-08-19 13.47.40-1

Italian Strombloi

500g strong white bread flour

7g fast yeast

10g fine sea salt

40ml extra virgin olive oil

350ml warm water

1 tablespoon dried oregano

4 tablespoons finely grated parmesan cheese, plus extra for topping

125g buffalo mozzarella cheese, torn into pieces

75g sun-dried tomatoes, patted fry of any oil, roughly chopped

12g fresh basil leaves

80g prosciutto ham

Method

– In the bowl of a stand mixer place the flour; salt (to one side); yeast (to the opposite side; oregano and 1 tablespoon of parmesan cheese.

– Add the olive oil and 300ml of water.

– Using the dough hook attachment, mix the ingredients for 2-3 mins until fully combined. Add the remaining water in 2-3 pours until it’s all incorporated. Increase the speed in accordance to your machines instructions and continue to knead for 8 minutes. By the end of the kneading time the dough should be smooth and elastic.

– Once the dough has risen, tip it out onto a lightly oiled work-surface and knock the dough back until all the air has been removed. Flatten in to a rectangular shape, roughly 40cm x30cm, with the long edge facing you. It doesn’t need to be perfect.

– Over the surface of the dough scatter the remaining 3 tablespoons of parmesan cheese. Then scatter the mozzarella pieces; the sun-dried tomatoes and the basil leaves. Lay the slices of prosciutto at intervals over the dough surface to finish filling it.

– Working on the long edge, roll up the dough in to a sausage shape, trapping the filling inside. Normally with stromboli it s left as a long loaf  but I prefer to roll itself into a spiral shape and tuck the end underneath. This is entirely up to you.

– Place the rolled up dough onto a baking sheet line with baking parchment. Leave to prove in a warm room until roughly doubled in size.

– Preheat you oven to 220 degrees C.

– When proved, lightly spray the surface of the dough with water, and sprinkle with semolina and some finely grated parmesan.

– Place a baking tray filled with water into the bottom fo the oven, and place the baking tray with the dough on the middle shelf. Bake the dough for 20 mins, after which reduce the oven temperature to 190 degrees C and bake for another 10 mins or until it golden and sounds hollow when tapped underneath.

– Once the loaf is baked remove from the oven place on a wire rack to cool. This tastes great as a picnic loaf or served with some fresh salad as a delicious alternative to pizza!

– Enjoy!

Recipe- Chocolate Popcorn Cake

I recently had the opportunity to work on a photoshoot with the rather fabulous Majella of Pavlova & Cream. This was  my first time working with a professional photographer and I would be willing to say Majella is second to none! I can’t wait for you to see the finished results but more about that to come. As only befitting of the occasion I brought along some cake. I wasn’t quite expecting the reaction it received on social media- it seemed to prove rather popular! A rich devil’s food chocolate cake with chocolate filling and icing, spiked with pistachios and cocoa nibs, and finished with Joe & Seph’s Caramel Popcorn and drizzled with caramel sauce it certainly seemed to tickle the public’s taste buds.

After numerous requests I posted the recipe here. It works really well with a scoop of vanilla bean ice cream to cut through the sweetness. Or just as good on it’s own!

2015-08-16 12.25.24-1

Chocolate Popcorn Cake

Cake sponge
100g dark muscovado sugar
250ml boiling water
150ml soured cream
60g cocoa powder, sifted
125g unsalted butter, softened
150g caster sugar
225g plain flour
1 tablespoon espresso coffee
½ tsp baking powder
½ tsp bicarbonate of soda
25g cocoa nibs
2 tsp vanilla extract
2 tsp chocolate extract
2 free-range eggs

Chocolate filling and icing
350g icing sugar
100g cocoa
160g unsalted butter, softened
100g dark chocolate, 70% min cocoa
1 tablespoon chocolate essence

Caramel Sauce
210g of sugar
85g butter
120ml double cream

To finish
50g pistachio nuts, shelled
20g cocoa nibs
15g Joe & Seph’s caramel popcorn

To make the caramel sauce:
– In a large saucepan, heat the sugar over a moderate heat. Continue to heat until the sugar turns a deep amber color. DO NOT STIR! If needed you can swirl the pan.
– When the deep amber color has been reached add in the butter and stir until melted.
– Once the butter has melted, remove the pan from the heat and stir in the cream. Take extra care here as adding the cream will cause the mixture to foam up and steam. Continue to whisk until the foaming subsides and the sauce is smooth.
– Leave to cool fully before proceeding.

To make the cake:
– Preheat the oven to 180C. Line the bottoms of two 20cm/8in sandwich tins with baking parchment and spray the sides with cake release spray, or grease with butter.
– Put the cocoa and the dark muscovado sugar into a large bowl and pour in the boiling water. Whisk to mix, add the soured cream, mix again, then set aside to cool.
– Cream the butter and caster sugar together in a stand mixer bowl, beating well until pale and fluffy.
– Stir the flour, baking powder, bicarbonate of soda and espresso coffee together in another bowl, and the cocoa nibs, and mix to combine.
– With the whisk running add the vanilla and chocolate extracts into the creamed butter and sugar – mixing all the while.
– Add the eggs, one at a time alternating with a heaped tablespoon of the dry flour mixture. Keep mixing after each addition.
– Incorporate the rest of the dry flour mixture little by little, then finally mix and fold in the cocoa mixture, ensuring it’s well combined.
– Divide the cake batter between the two prepared tins and put in the oven for about 30 minutes, or until a cake tester comes out clean.
– Remove the cake tins from the oven and leave the cakes to cool in their tins on a wire rack for 5-10 minutes, after which turn the cakes out and set aside to cool.

To make the filling/ icing:
– In a bowl set over a pan of hot water, melt the chocolate and 60g of the butter together. Stir to combine. When fully melted remove from the heat, add in chocolate essence and set aside to cool.
– In the bowl of a stand mixer, add the icing sugar, the remainder of the butter, and cocoa. Mix well to combine until it starts to clump together.
– Dribble in the melted chocolate mixture and mix well until fully combined. If the icing appears too slack (runny) add in a tablespoon if icing sugar until desired consistency is reached.

To finish/ assemble:
– Blitz the shelled pistachios in a food processor, or chop finely. Add in the cocoa nibs and stir to combine.
– Spread/ pipe some of the icing on a sponge layer.
– Sprinkle over the pistachio mixture.
– Place second sponge layer on top and pipe a border of icing to the edge. Spread the middle of the cake top with remaining icing.
– Arrange the popcorn pieces so they sit inside the piped border.
– Drizzle over some of the caramel sauce.*
– Serve and enjoy!

*Any remaining caramel sauce can be kept in the fridge for a couple of weeks.

2015-08-16 12.20.48-1