Banana & Prune Sticky Toffee Cakes

Makes 6

Ingredients

Banana & Prune Cakes

  • 1/4 cup orange juice
  • 1/2 cup boiling water
  • 1 cup pitted prunes, chopped
  • 1 teaspoon baking soda
  • 1 1/2 cups all-purpose flour
  • 1 teaspoon baking powder
  • 1 teaspoon ground cinnamon
  • 1/2 teaspoon kosher salt
  • 1/4 cup unsalted butter, at room temperature
  • 3/4 cups light brown sugar
  • 2 large eggs
  • 1 Tablespoon honey
  • 3 medium-size overripe bananas, mashed (1 cup)

Rum Toffee Sauce

  • 1/2 cup heavy cream
  • 1 cup light brown sugar
  • 1/4 cup unsalted butter
  • 2 teaspoons Rum (or omit for a kiddy-friendly version)

Method

Banana & Prune Cakes

  1. Preheat oven to 350°. Grease, or spray with baking spray, 6 mini-savarin or Bundt tins
  2. In a small heatproof bowl, pour orange juice followed by the boiling water over the chopped prunes; stir in the baking soda. Stir together to combine and set aside to soak for about 15-2 0minutes
  3. In a medium bowl, whisk together the flour, baking powder, ground cinnamon and salt. Set aside until needed
  4. In the bowl of a stand mixer fitted with the paddle, beat the butter with the brown sugar at medium speed until light and fluffy, about 9-10 minutes
  5. Beat in the eggs, one at a time until combined, followed by the honey
  6. Reduce speed to low, beat in the flour mixture until just combined
  7. Add the date mixture (including liquid) and bananas, and beat at low speed until just combined
  8. Divide the batter into the prepared mini-pans, and bake until a toothpick inserted in the center comes out clean, about 25 minutes

Rum Toffee Sauce

  1. With about 10 minutes left on the pudding baking time, in a small saucepan, combine the heavy cream, the butter, the brown sugar, and the rum.
  2. Bring to a gentle boil over moderate heat, stirring to melt the butter and sugar, cooking until slightly thickened and deep golden, about 3 minutes.
  3. Keep warm until serving

To finish

  1. Once you remove the cakes from the oven, using a skewer or toothpick, poke holes all over the exposed surface
  2. Spoon 4-5 teaspoons of the warm sauce over the cakes, and let stand until absorbed, about 10 minutes
  3. Serve warm*, turned out onto plates (they may take some gentle persuasion!) with the remaining sauce spooned over

*If your sauce sets or becomes too thick to pour, gently warm over a low heat until pourable and warm again.

Irish Tea Cake & Mixed Berry Coulis

Whilst my previous posts have covered the more well known fare of St. Patrick’s Day (Soda Bread; Báirín Breac to name a few) this cake may prove to be lesser-known blast from my childhood past in an Irish kitchen. It’s not the usual image of “Tea Cake” that might spring to mind- chocolate covered, marshmallow packed bundles of sweet joy. This is a “Tea Cake” in the sense of a cake to have with tea; similar to how a “Coffee Cake” can be not so much coffee flavored cake, but rather a cake to have with coffee.

For me the beauty in this bake lies in it’s simplicity. It’s ingredients aren’t extensive, nor it’s method demanding. And as for the results? Sublime in it’s modesty this can be a welcome relief to other “fussy” bakes. The flavor is smooth and buttery, with a close crumb structure (which reminds me almost of a Japanese cheesecake) this is perfectly paired with a Chantilly cream (not very synonymous with Paddy’s Day I know) or in this case a berry coulis.

I wanted something a little bit different than your standard berry coulis here (there’s a surprise huh?) and the additions of mead and birch syrup here offer that adding both sweetness and hint of bitterness. Don’t get to wrapped up on including these though- I’m aware these aren’t exactly pantry staples. They’ll work wonders if you can include them but the coulis will be tasty treat nonetheless without them.

On that note, whatever you get up with this year’s St. Patrick’s Day festivities I hope you enjoy- heck knows it’s long overdue!

Lá fhéile Pádraig sona dhaoibhe!

Irish Tea Cake & Mixed Berry Coulis Recipe #recipe

Ingredients

Irish Tea Cake

  • 1/2 cup butter
  • 1 cup white sugar
  • 2 eggs
  • 1 1/2 teaspoons vanilla extract
  • 1 3/4 cups all purpose flour
  • 2 teaspoons baking powder
  • 1/2 teaspoon salt
  • 1/2 cup milk
  • 1/4 cup confectioners sugar

Mixed Berry Coulis

  • 2 cups mixed berries, fresh or frozen
  • 1/2 cup sugar
  • 2 Tablespoons lemon juice
  • 2 Tablespoons mead
  • 1 Tablespoon birch syrup

Method

Irish Tea Cake

  1. Preheat oven to 350 degrees F (175 degrees C). Grease and line a 9-inch round pan
  2. In a bowl combine the flour, baking powder and salt and set aside
  3. In a separate bowl (of a stand mixer), cream together the butter and sugar until light and fluffy (about 10 minutes)
  4. Beat in the eggs, one at a time, and vanilla, mixing until fully incorporated
  5. Stir the dry flour mixture into the batter alternately with the milk. If the batter is too stiff, a tablespoon or two of milk may be added
  6. Spread the batter evenly into the prepared pan
  7. Bake for 30 to 35 minutes in the preheated oven, until a toothpick inserted into the center comes out clean.
  8. Cool in pan on a wire rack, then turn out for serving
  9. Dust with confectioners’ sugar and serve sliced with the mixed berry coulis

Mixed Berry Coulis

  1. In a medium pan combine the mixed berries, sugar and lemon juice
  2. Over a medium heat stir occasionally until sugar has dissolved
  3. Add in mead and birch syrup, reduce to a low heat and simmer for 10-15mins, stirring occasionally. Cool until berries have softened and broken down. Check taste for sweetness and stir in more sugar if needed
  4. Remove from heat and leave to cool for 10 minutes
  5. Using a standard blender or wand blender blitz berry mixture until smooth
  6. Leave to cool fully

Rum Chocolate Banana Pudding

I wish I could say this was inspired by some long-lost childhood memory or fortuitous epiphany but sadly no. The truth of the matter is that this Rum Chocolate Banana Pudding found it’s way in to my kitchen for no other reason than indulgence.

Since moving here to Canada I’ve succumbed to the North America love of “pudding”- that smooth, creamy, slippery dairy concoction of comforting goo. Yes I’m aware it has it’s nay-sayers who believe it should be kept to the confines of school lunchrooms and toddler snack times but… I LOVE it! Banana pudding hailing from the Deep South’s Hall of Comfort Food Fame, is one of Life’s simple pleasures and it’s easy to see why this layered dessert has made it’s way into the repertoire of home cooks on a national scale.

Personally I find it a reassuringly less pompous affair than it’s cousin- the English Trifle. Neat lines of composition are neither desired nor required here; and keep anything resembling jello to yourself! This dish is less about show and more about bringing sublime joy to the eater’s face- making them grin from ear to ear whilst filling their belly. Think of this as the oral equivalent of sliding into the comfiest armchair, wrapped in the fluffiest duvet, in the dusky porch twilight. Each spoonful a testament to the pudding’s sinfully indulgent, creamy cocoa laden, booze-tinged delights. Yes- I think it’s that good!

When you do try it feel free to disagree- all the more for me!

Ingredients

Pudding

  • 1 cup heavy cream
  • 2 cups milk
  • 4 oz semi-sweet chocolate, chopped in pieces
  • 1/2 cup fine sugar
  • 6 egg yolks, room temperature
  • 3 Tbspn cornstarch
  • 2-3 tspns dark rum , dependent on personal taste (if you prefer an alcohol-free version use artificial rum extract)
  • 1 tspn vanilla extract
  • 320g (1 box) vanilla wafers eg Nilla
  • 6 large bananas, peeled and sliced apx 1/4″ slices

Topping

  • 2 3/4 cups whipping cream, whipped
  • 1/4 cup graham crumbs
  • 1/2 cup semi sweet chocolate chips
  • 2 Tbspn light corn syrup
  • 3 Tbspn butter
  • I tspn Vanilla extract

Method

  1. Place milk and cream in a large saucepan and bring to a simmer. Whisk in the chocolate pieces and heat until melted and smooth. Remove from the heat
  2. In a separate bowl, whisk together the yolks, sugar, and cornstarch in a large bowl. Add in 1/4 cup of the chocolate/ milk mixture and whisk to combine. Add in another 1/4 cup of the chocolate mixture and again whisk until fully combined
  3. Pour the warmed egg/ chocolate/ milk mixture back in to the saucepan with the other part of the chocolate/ milk mixture. Whisk to combine and heat over medium-high heat and continuously whisk until thickened
  4. Remove from the heat, stir in 1 tspn vanilla extract, and transfer to a clean bowl. Place a piece of plastic wrap over the surface of the pastry cream and let cool to room temperature
  5. When cooled, spread about 1 cup of the chocolate pastry cream into an 11 by 11-inch glass dish. Layer the wafers, bananas, and pastry cream in the bowl, ending a layer of wafers. Cover tightly and refrigerate until chilled, at least 4 hours or overnight
  6. Just before serving, spread or pipe the top of the pudding with whipped cream and return to the fridge while you make the chocolate drizzle
  7. In a double-boiler combine the chocolate chips, corn syrup and butter. Stir until melted. Remove from heat and stir in the vanilla extract. Set aside to cool until slightly warm
  8. Remove the pudding from the fridge and drizzle over the chocolate sauce to personal taste and serve
  9. The finished pudding will keep in the fridge for up to 3 days. When storing cover lightly with cling-wrap

Strawberry & White Chocolate Frozen Cheesecake w/ Basil sugar

img_7672

Waaaaay back when, before cupcakes or brownies were my thing, cheesecake was my kitchen staple. Every Sunday, while my mom prepared Sunday roast dinner, I would be sent to amuse myself (and keep from under her feet) with a box of cheesecake mix. Yes- a box mix…we all have to start somewhere. after all. Whilst the brand name eludes me, it basically consisted of  two plastic packets…and that was it. A packet of crumb for the base, so far so good. The piece de resistance? A packet of dehyrated “cream cheese” powder. This was to be whisked with milk, poured on the prepared crumb base and left to set. Sounds delish, huh? Well to be honest it was- at least to 8 year old me. I experimented with various fillings and toppings but no matter how I tried to persuade myself it always tasted the same. But what did I care? I merrily dug in, spoon in hand full of exuberant abandon and prepubescent gusto.

So flash forward nearly 35 years and I have an endless debate going on- Baked or Non-baked? I’ve come to the conclusion that seasonal is best. Baked is my go-to during the colder brackets of the year, and the no-bake/ chilled variety is of course more suitable for the warmer stints of the year. And so we end up here- with frozen cheesecake.

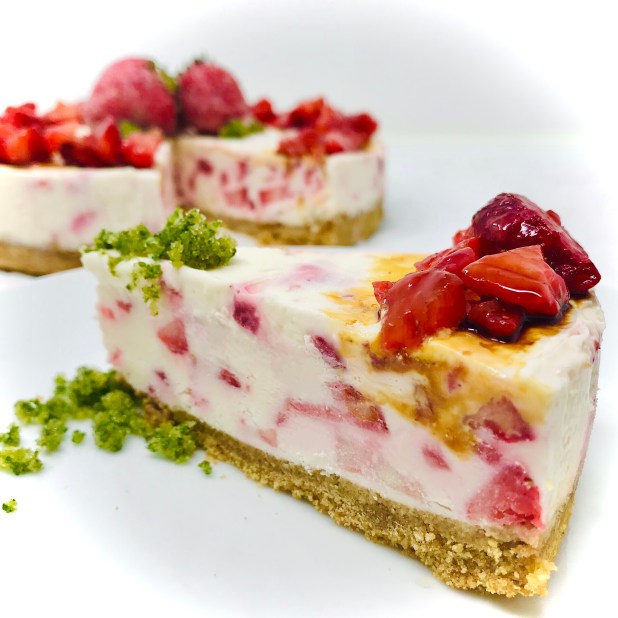
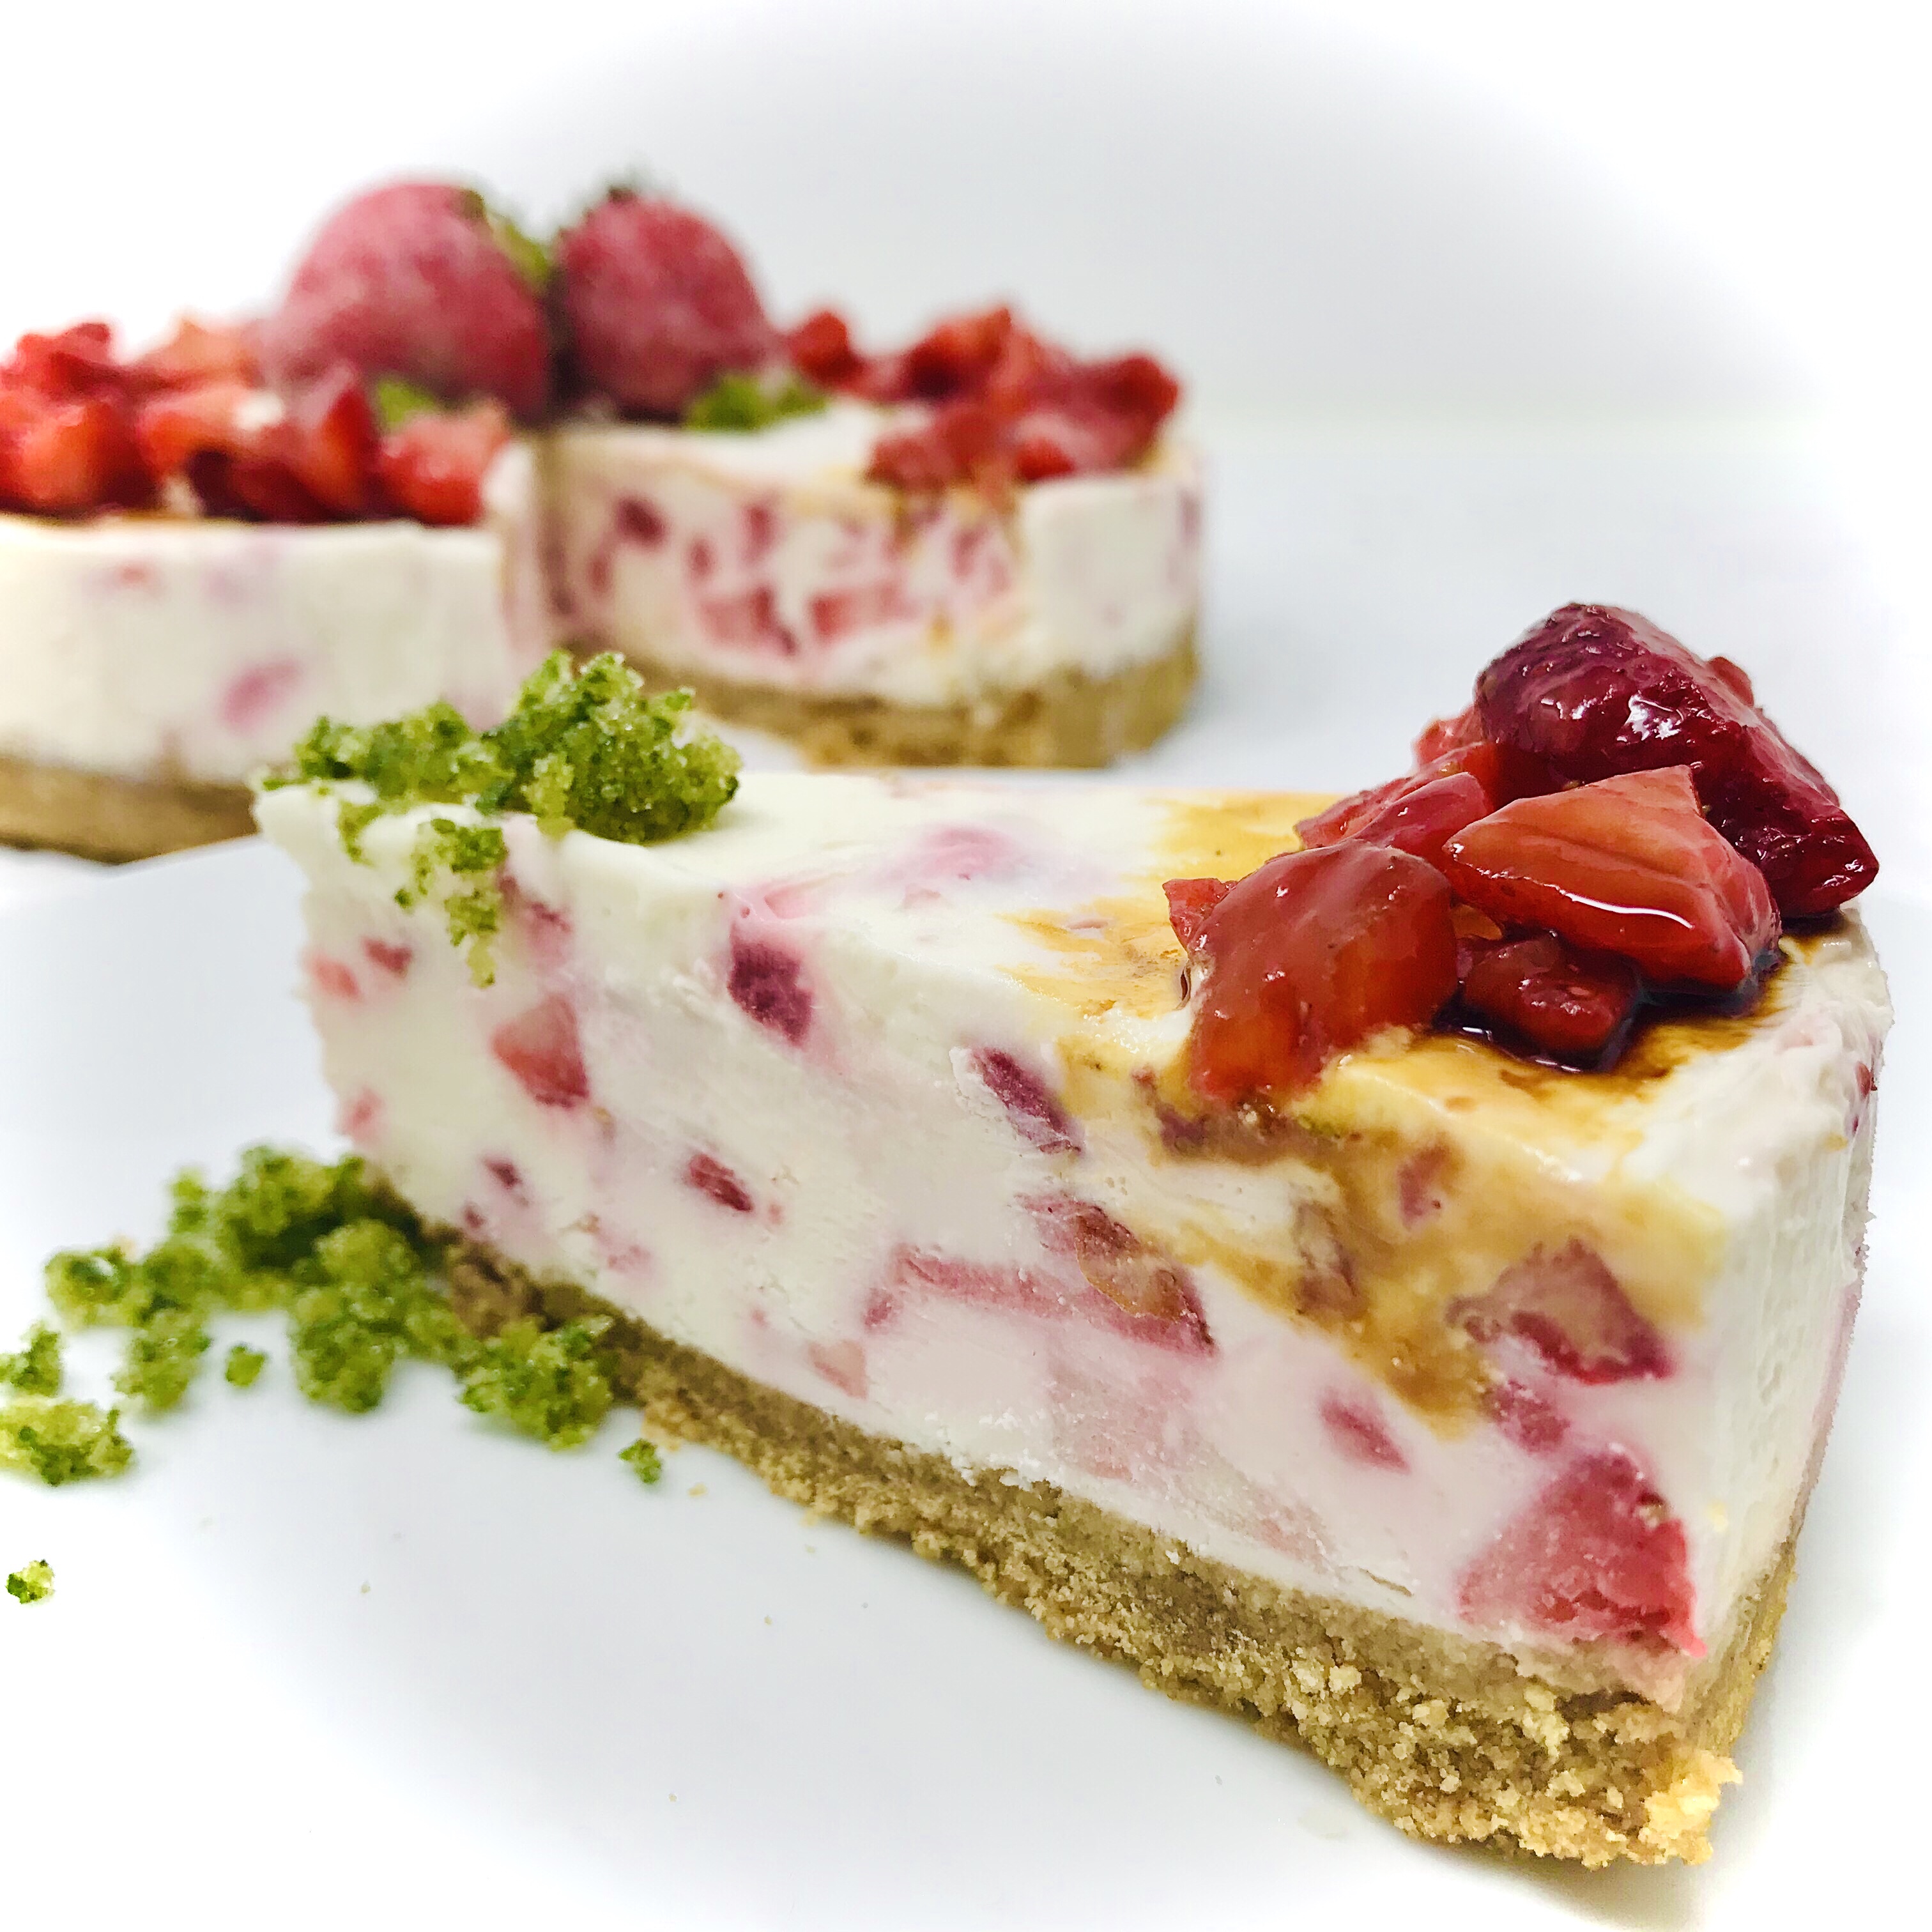
The freezing element of this recipe is not strictly necessary but it does help with achieving a much more stable filling. It’s also utterly addictive to have the frozen cheesecake layer slowly melt to creamy goodness on your tongue, with bursts of berry pieces, in the sweltering summer heat. As I mention in the recipe, once your initial freezing is done you can easily store in the fridge if you prefer a more chilled approach to things. A word to the wise though- this cheesecake is best eaten sooner rather than later so park your guilt and happily dig in- all in the line of duty!

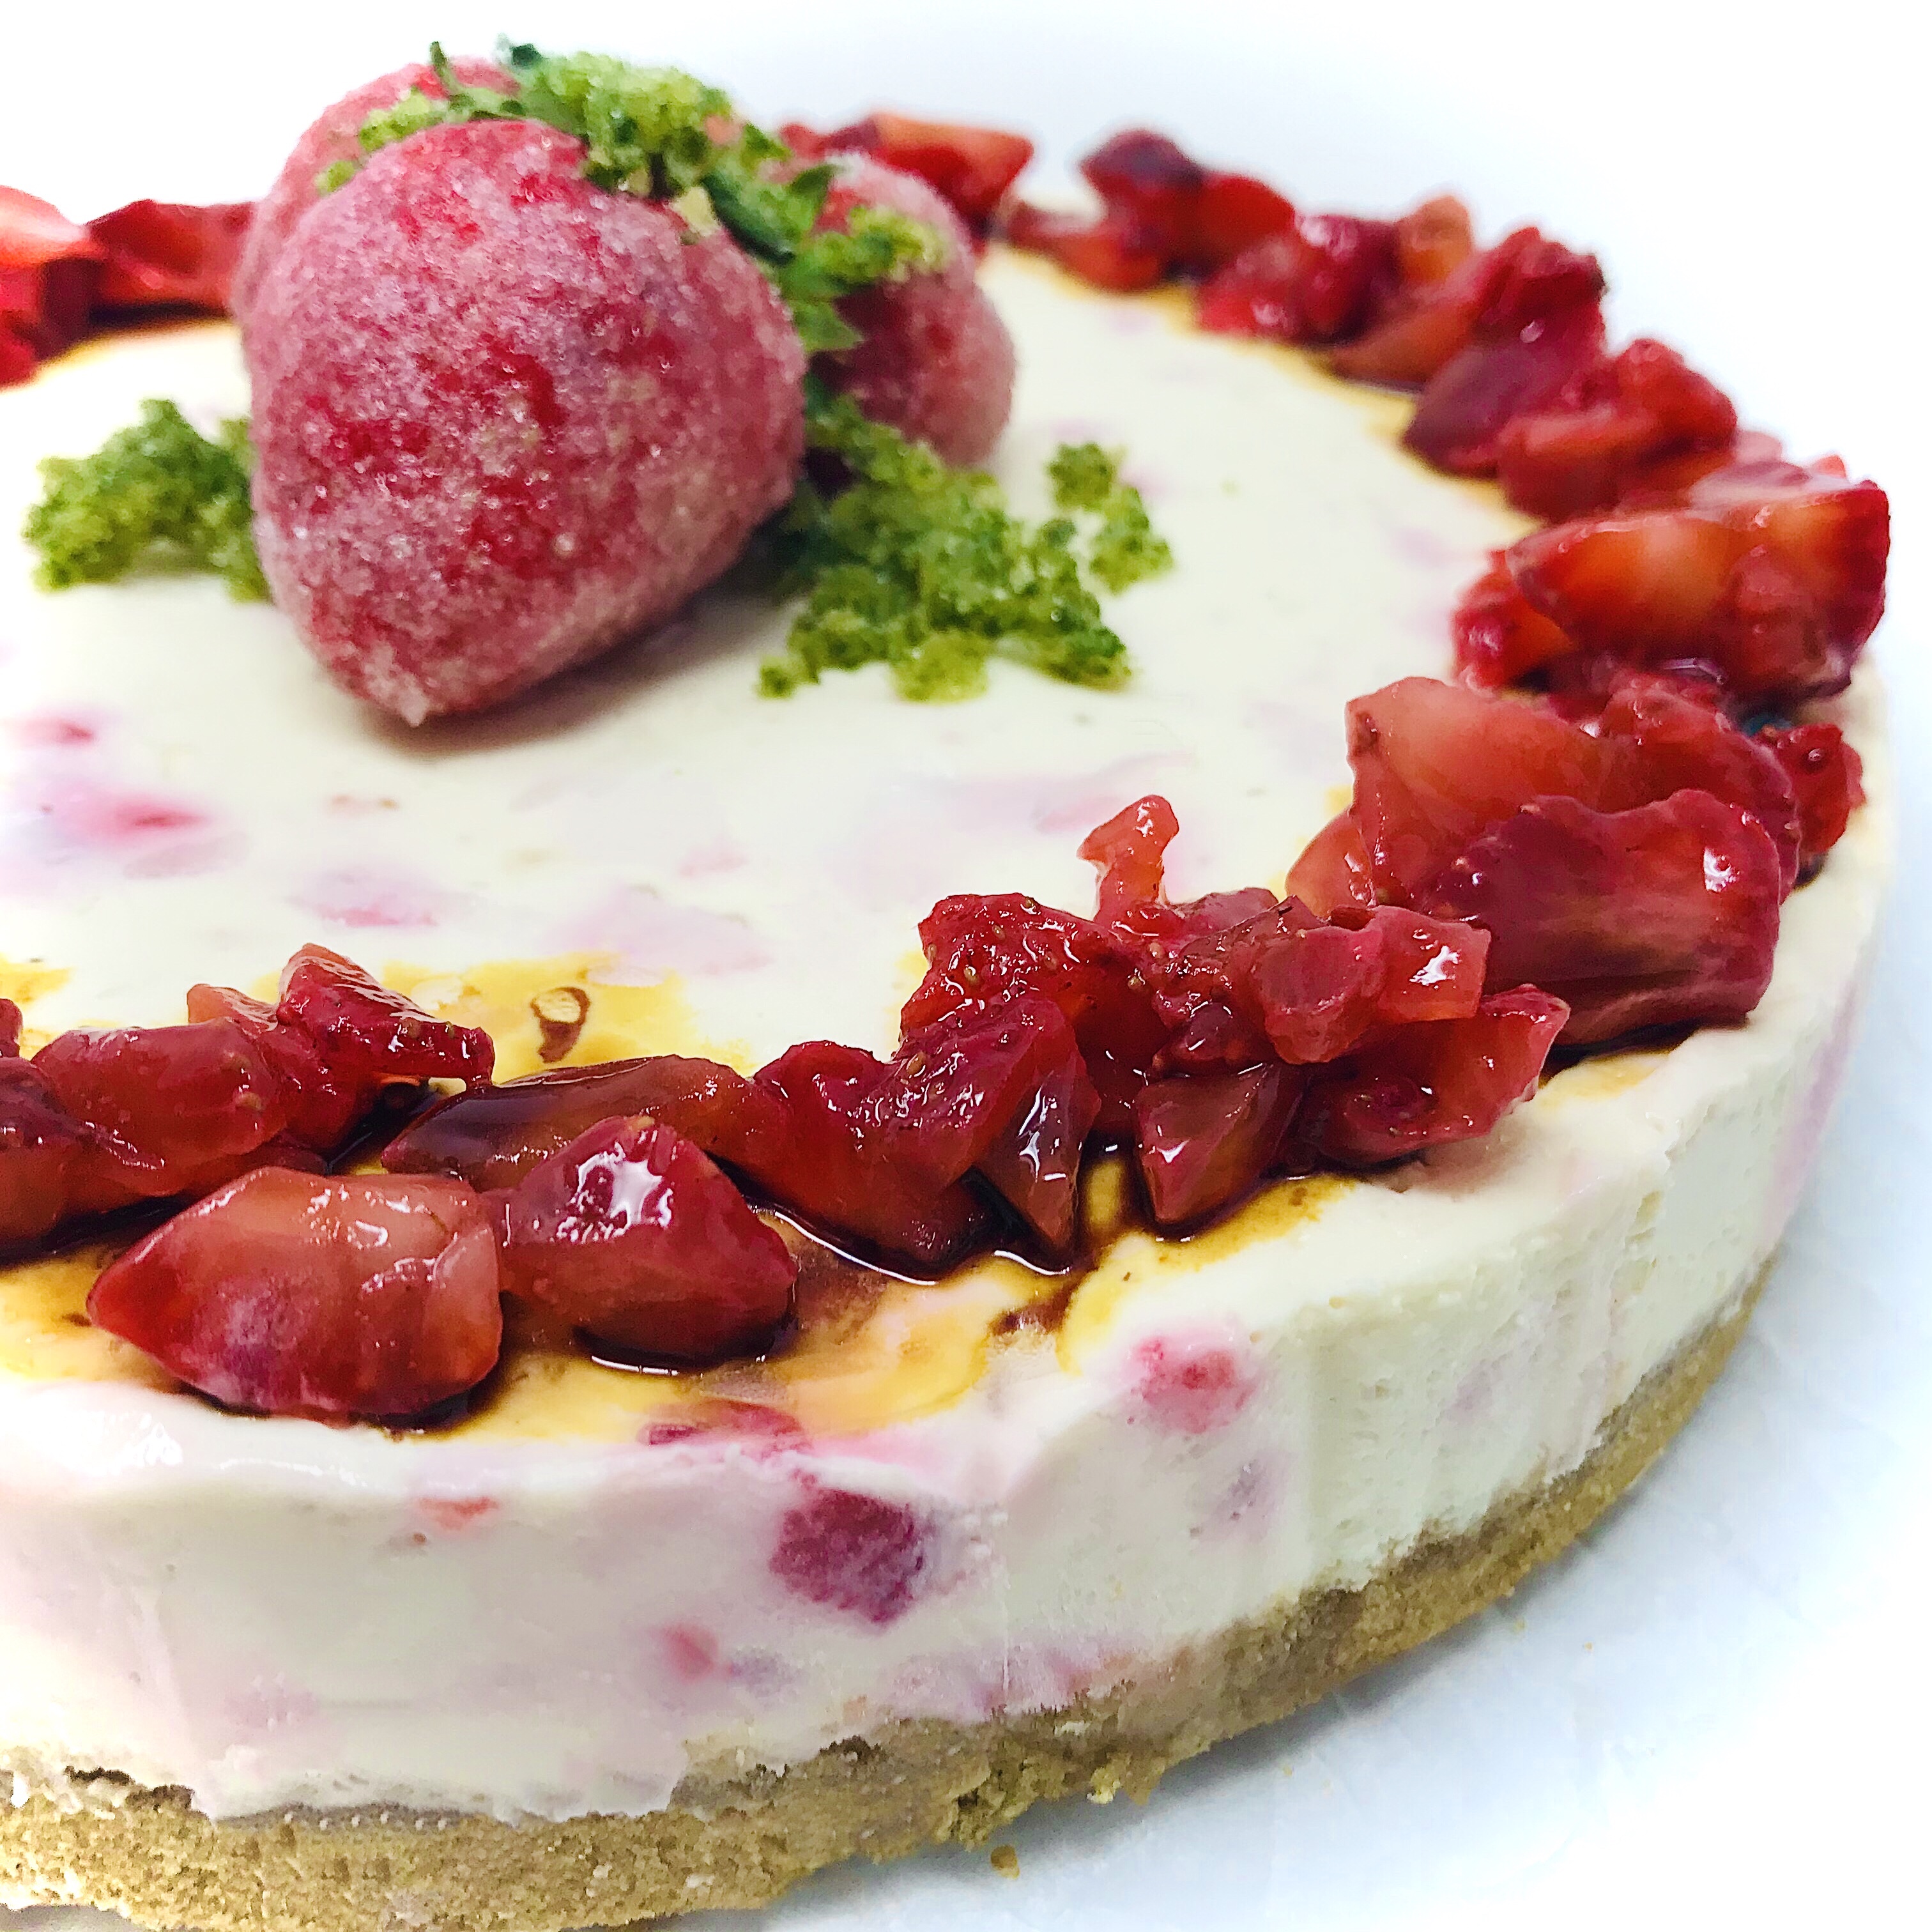
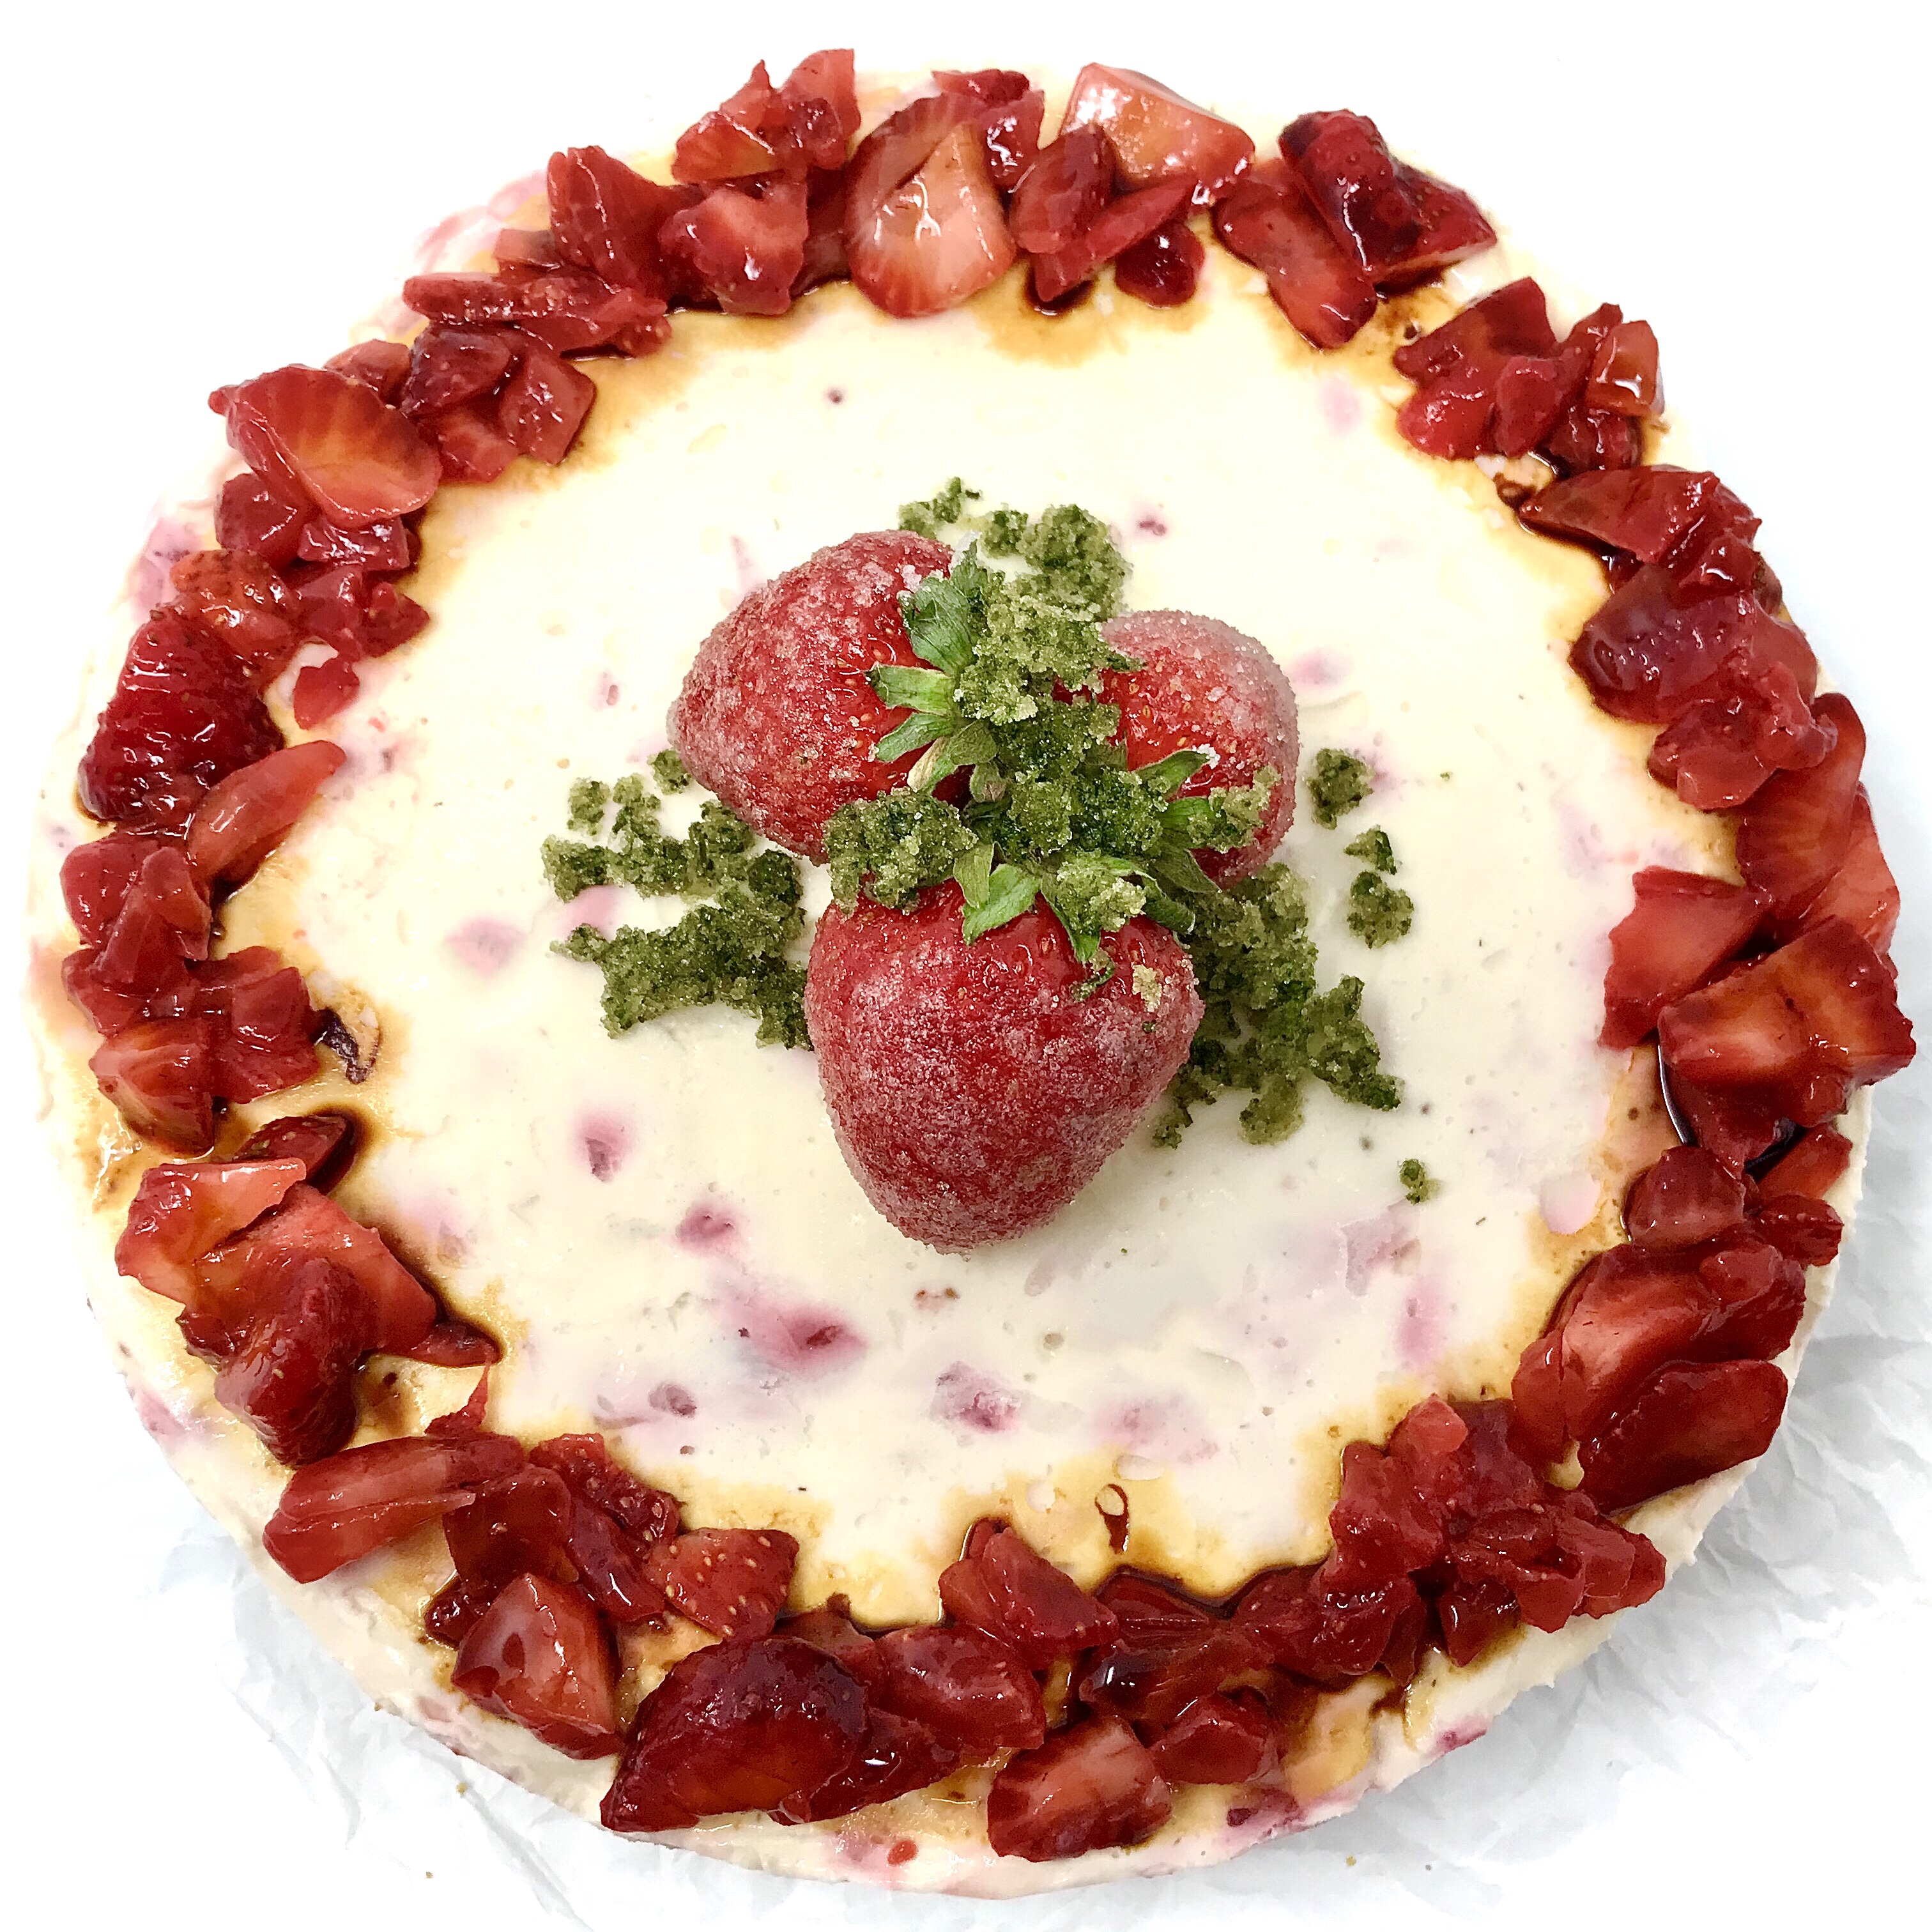
The additional finishing elements here are entirely optional. If you’re happy with the straight-forward, no fuss-no muss cheesecake then feel free to leave it at that- it’s plenty tasty as is. But lets face it- prepping the basil sugar and macerated strawberries isn’t exactly hard work and the end result of flavor explosions are completely worth it. Yes the addition of the herb Basil, so often a stalwart savory element of Italian cooking, might seem a bit of weird but the slightly anise, pepperiness stops the sweetness of  berries becoming cloying. The burnt caramel-like birch syrup used in the macerated strawberries also lends a hand in this way.

A google search for chilled strawberry cheesecake will yield numerous results but I like to think of this as an escalated version of that ultimate summer dessert of strawberries and cream, with each of the additional treatments adding to give you that delicious end result that just oozes summer decadence.

img_7676


Ingredients

Cheesecake Base

  • 1 1/2 cups Graham cracker crumbs (apx 10 full crackers, crushed)
  • 5 tbspns salted butter
  • 1/3 cup brown suar
  • 1 tbspn ground cinnamon

Cheesecake filling 

  • 5oz White chocolate, broken in to pieces
  • 12oz Full fat cream cheese, at room temperature
  • 1 cup Icing sugar
  • 1 tbspn Vanilla extract
  • 1 tbspn Maple syrup, or honey
  • 1 cup Whipping cream
  • 1 lb Strawberries, chopped small

Basil sugar

  • 1/2 cup Granulated sugar
  • 1/4 cup Fresh basil leaves, torn

Macerated strawberries

  • 1 cup Strawberries, chopped small
  • 3 tbspns Birch syrup

img_7671

Method

Cheesecake base

  1. Preheat oven to 300 degrees F
  2. Double line a 9″ cake pan (2″ high sides) or spring-form tin. Set aside until needed
  3. Heat a thick-bottomed pan on medium heat. Add the butter and stir until melted
  4. The butter will start to foam up a bit, then subside. Watch carefully as lightly browned specks begin to form at the bottom of the pan, and the foam starts to turn brown in spots. Smell the butter; it should have a nutty aroma
  5. Remove from the heat and pour the brown butter into a bowl to stop it from cooking further
  6. Add in the dry ingredients and stir until evenly combined
  7. Press the butter mixture into your prepared tin.  Use the back of a large spoon or measuring cup to press the crumbs into an even layer on the bottom of the tin
  8. Bake in the preheated oven for 10 mins
  9. After the cooking time remove from the oven and allow to cool fully before filling

Cheesecake filling

  1. Melt the chocolate in a bowl over a pan of simmering water, or in the microwave in 20 second bursts, stirring occasionally,  until full melted. Set aside to cool whilst preparing the rest of the filling
  2. In the bowl of a stand mixer combine the icing sugar, cream cheese, vanilla extract and maple syrup. Beat on medium speed until smooth and silky
  3. In a separate bowl whip the whipping cream until soft peaks. Transfer into the stand mixer bowl with the cream cheese mixture and beat on medium speed until thick
  4. Pour in to the cooled melted white chocolate and beat on medium until combined
  5. Remove the bowl and fold the chopped strawberries into the cream cheese mixture for a couple of minutes
  6. Pour the strawberry cream cheese mixture over the crumb base and smooth
  7. Gently press a layer of cling wrap over the surface of the cheesecake to protect it while it freezes. Place the cheesecake flat in the freezer for 3 hours until lightly frozen
  8. While the cheesecake freeze prepare the basil sugar

Basil sugar

  1. In a food processor, pulse the sugar and basil until uniform in color and nicely green. Store in a airtight jar in the fridge for up to 2 weeks. Shake/ stir the jar and contents occasionally to redistribute the flavor
  2. Set aside until needed for this recipe

cc614a07-7e0e-4cc3-b5e3-805b6edfa2a0

Macerated strawberries

  1. In a bowl, stir to combine the chopped strawberries and birch syrup.
  2. Cover and refrigerate until needed
  3. Stir well prior to using

To assemble and serve

  1. Remove the cheesecake from the freezer approximately 10 minutes before serving
  2. Run a warm knife under hot water and use to run the rim of the tin to loosen the cheesecake edge. Remove from the tin and garnish with basil sugar, macerated strawberries. Again use a warm knife to slice the cheesecake into portions
  3. If you prefer a more standard chilled cheesecake, remove from the freezer 2 hrs before serving and allow to defrost in the fridge prior to slicing and serving

The cheesecake will keep in the fridge, lightly wrapped in cling wrap for up to 3 days.

(I also used some sugar dipped strawberries on top. Lightly whisk 1 egg white until frothy. Lightly paint the berries with the egg white and dip in fine sugar to coat. Allow to set at room temperature for apx 4 hrs. Use as a garnish)

img_7676


Minneolas Tangelo & Cardamom Cheesecake

Okay I’m not gonna lie about this recipe- it came about completely by accident. Whilst looking for other ingredients for another recipe I stumbled up Minneolas Tangelos. Color me intrigued! These rather cute little citrus fruits are a hybrid between the grapefruit and the tangerine. The resulting fruit combines the sweetness of the mandarin with the tart flavors of the grapefruit, and has a wonderful juiciness, combination of sweet/sour flavors and is exceptionally easy-to-peel. The pear-shape of the fruit is also were it gets it’s other moniker from “Honeybell”.

I was hankering after a baked cheesecake and coming across them seemed too coincidental to ignore. Plus it was an ideal excuse to try something new and adventurous in the kitchen. The resulting flavour of the fruit is light and summery without having an overwhelming tartness. Adding cardamom to the base gives some complimentary citrus notes to the tangelo filling while at the same time cutting through the rich, creamy texture.

*In this recipe I use the terms Minneolas Tangelo, Tangelo and Honeybell interchangeably.

Ingredients

Base

  • 1 1/2cups graham cracker crumbs
  • 5 tablespoons salted butter, melted
  • 1/4 cup packed brown sugar
  • 1 teaspoon ground cardamom

Filling

  • Three 8 oz packs cream cheese, at room temperature
  • 1 1/3 cups sugar, divided 
  • 3 tablespoons cornstarch
  • 2 large eggs
  • Juice of 1 Minneolas tangelo (Honeybell)
  • Zest of 2  Minneolas tangelos (Honeybell)
  • 2/3 cup heavy whipping cream

Method

This cheesecake is best made the day before you plan to eat it. The extra time in the refrigerator will help firm it up and the flavours to intensify.

To make the crust/ base

  1. Preheat the oven to 350°F
  2. In a  bowl combine all the base ingredients and stir to ensure they’re well and evenly mixed
  3. Press the graham cracker crumbs into the bottom of an 8″ springform pan. Gently press down on the crumbs using a small (1/4) measuring cup, or your fingers, until the crumbs are an even layer at the bottom of the pan
  4. Bake the crust, on the bottom 1/3 shelf, for 10 mins. After baking remove and set aside to cool until needed later
  5. Keep the oven on at the current temperature. Move on the prepare the filling

To make the filling

  1. Wrap the cooled tin with a triple layer of aluminium foil. Do this gently so as to ensure you don’t damage the baked crust. Once you have triple-wrapped the tin, set aside and prepare the filling
  2. In a large bowl of a stand mixer, fitted with the paddle attachment, beat 1 package of the cream cheese, 1/3 cup of the sugar, and the cornstarch together on low until creamy, about 3 minutes, scraping down the bowl several times. Blend in the remaining cream cheese, one package at a time, beating well and scraping down the bowl after each. Here I find that beat for 3 minutes after each package on medium speed proves effective
  3. Beat in the remaining sugar, then the vanilla. Blend in the eggs, one at a time, beating well after each to make sure they’re incorporated
  4. Add in the tangelo zest, juice, and mix to incorporate. Beat in the cream until just completely blended. The filling will look light, airy, and smoot. Be careful not to overmix! Check the paddle attachment as sometimes the zest can stick and gather here. If it does simply scrap off into the mixture and fold in using a spoon or spatula
  5. Gently pour the batter over the cooled crust
  6. Place the cake pan in a large shallow pan containing hot water that comes halfway (about 1 inch) up the side of the springform. Bake until the edge is light golden brown, the top is light gold, and the center barely jiggles, about 1 1/4 hours. If the cake still feels soft around the edge, let it bake for 10 minutes more
  7. When the baking time is up, turn off the heat but leave the cheesecake in the oven with the oven door open a crack (you can use a wooden spoon to help here) for the next 2 hours. After this take the cheesecake out of the oven and remove it from the water bath, transfering to a wire rack, and let cool for another 2 hours minimum.  After this, leaving the cake in the pan, cover loosely with plastic wrap, and refrigerate until completely cold before serving, preferably overnight or for at least 6 hours

To serve

  • Release and remove the side of the springform, leaving the cake on the bottom of the pan. Refrigerate until ready to serve. Slice with a sharp straight-edge knife, not a serrated one, rinsing the knife with warm water between slices.

Refrigerate any leftover cake, tightly covered, and enjoy within 2 days, or wrap and freeze for up to 1 month.

Here I finished mine with a slice of candied Honeybell and some candied Honeybell peel. My advice would be to skip trying to candy the slices of fruit. Part of the attraction of the Honeybell is that it is quite easy to pull away from its rind and de-segment. This however has the downside that when you trying to flip the slices in sugar syrup they easily break  up. In fact the one centre slice that you see above was the sole survivor of 5 slices that I initially wanted to have candied. A much easier and straightforward garnish is to candy some sliced peel pieces (as I have on the perimeter of the finished cheesecake above).

These steps are entirely optional. You can finish the cheesecake whatever way you wish to your personal taste

  • Remove the rind from a Honeybell, trying to keep it as intact as possible. Using a teaspoon scrap away the bitter inner white rind. Slice the remaining outer orange rind into strips just less than 1/4″ thick
  • In a pan I combined 1 cup water with 1 cup of fine granulated sugar, bring to a boil and then reduce to a summer
  • Add in the Honeybell peel strips and stir to coat. Leave in the simmering liquid for 30 mins appx until the strips are translucent
  • While the strips are cooking line a baking sheet with baking parchment
  • After 30 mins carefully remove the strips from the sugar syrup with tongs and toss in some fine granulated fine sugar. When coated set on the baking parchment and leave overnight to dry out. Use as desired