½ cup (1 stick) unsalted butter, at room temperature
1 ½ cups sugar cookie mix (dry and heat treated*)
1 teaspoon vanilla extract
1 cup powdered sugar
1 cup sugar cookies, crushed
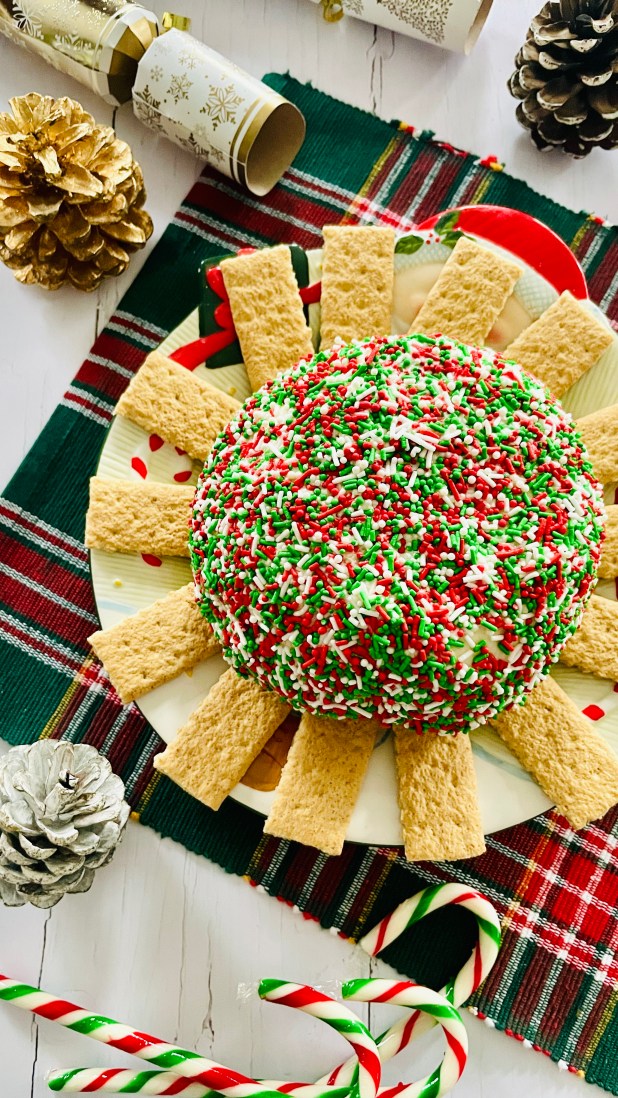
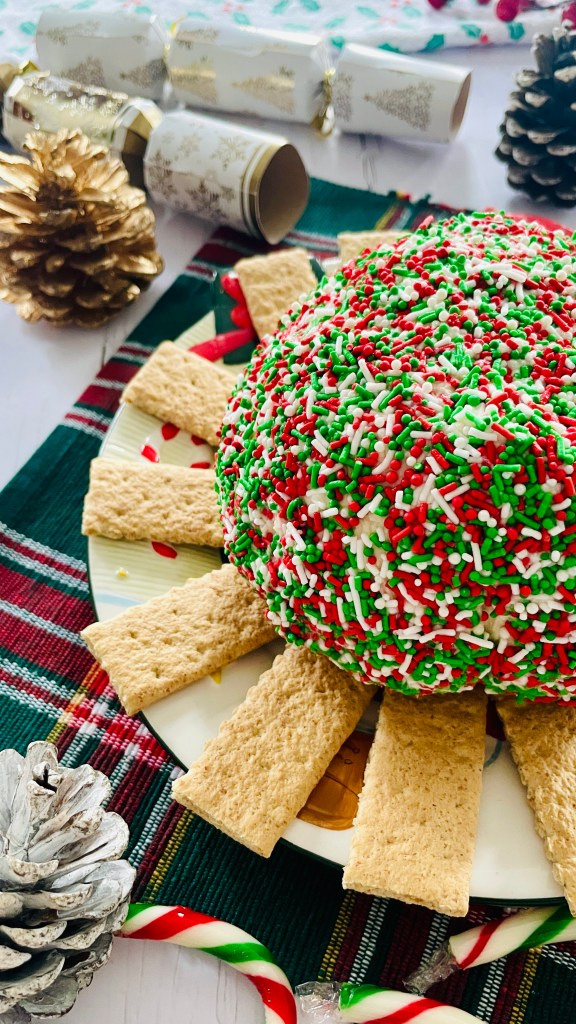
Festive sprinkles for decorating
Method
Beat together the softened cream cheese and the softened butter until fully incorporated
Add the cookie mix, powdered sugar, and vanilla extract and beat until well combined
Fold in the sugar cookie pieces, and mix until combined
Lay out a piece of cling wrap and scoop the cream cheese mixture onto it
Form a ball, then wrap up the ball in the cling wrap. Use an extra layer of cling wrap to help it keep its shape. (I find a small soup ball helps to act as a mould here)
Freeze for about 2 hours minimum, but preferably overnight
Place the sprinkles in a low shallow baking dish
Take the ball out of the freezer and unwrap. At this point you can use the heat from your hands to smooth out and geta more regular “ball” shape if needed
Roll the ball in the sprinkles making sure you cover as much of it as you can
Place the cheesecake ball on your serving plate and place in the fridge for between 30 minutes to an hour
Serve with additional cookies or graham crackers for scooping
If not serving that day, wrap in new cling wrap and place back in the freezer and then take out an hour before serving to come up to room temperature
*Heat treating the cookie mix
To heat treat the cookie mix, place it in a microwavable bowl and heat in 20 second bursts, stirring well between, until an internal temperature of 165F. Make sure that you stir between bursts to distribute the heat and avoid the mix catching to burn. Allow to cool before using
5 packs Tre Stelle® Natural Cream Cheese, original, room temperature
1 1/3 and 1/3 cup sugar, divided
¼ cup cornstrach
2 whole eggs
1 egg yolk
1 ½ teaspoons Rum extract
¾ cup whipping, or heavy, cream
1 cup Butterscotch flavour chips
1 Tablespoon All-purpose flour
Ganache Topping
200g Blonde chocolate, chopped into small pieces
65ml whipping, or heavy, cream
1 Tablespoon rum (light or dark- to your preference)
To decorate (optional)
Whipped cream
Edible glitter
Edible glitter stars
Method
Crumb Base
Reheat oven to 350 degrees F
Wrap the external of a 9” springform pan tightly with aluminium foil
Lightly grease or spray the sides of a spring form pan
In food processor, combine the gingersnap cookies and pecans and process to a crumb. Transfer to a bowl
Add in them melted butter, brown sugar, ground cinnamon, ground ginger, ground cinnamon, and salt. Stir until well combined
Tip into your prepared springform pan and using a spoon spread the crumb mixture to give an even layer to the bottom of the pan
Bake in your preheated oven for 10 minutes. Remove and allow to cool fully. Leave your oven running while you prepare the cheesecake filling
Cheesecake Filling
In a medium bowl, toss together the butterscotch chips and the All-purpose flour until the chisp are well coated. Set aside until needed later
In the bowl of a stand mixer combine 2 packs of Tre Stelle® Natural Cream Cheese, 1/3 cup sugar and the cornstarch. Beat on medium speed for 3 minutes until well combined
Add in the remaining packs of Tre Stelle® Natural Cream Cheese and beat until combined
Add in the remaining sugar and rum extract and beat on medium-high speed until well combined
Add in the eggs and the egg yolk one by one, beating well between each addition until fully incorporated
Finally, add in to whipping (heavy) cream, mixing on slow until just combined
Fold in your prepared butterscotch chips and gently pour the cheesecake mixture on to the crumb base in the springform pan
Place the cheesecake-filled springform pan into a larger, high-sided dish (a casserole or roasting pan works well) and fill to a height of 1” up the sides of the springform pan with water. Carefully transfer the filled pan to your preheated oven, taking care not to spill, or get any of the water into the cheesecake pan
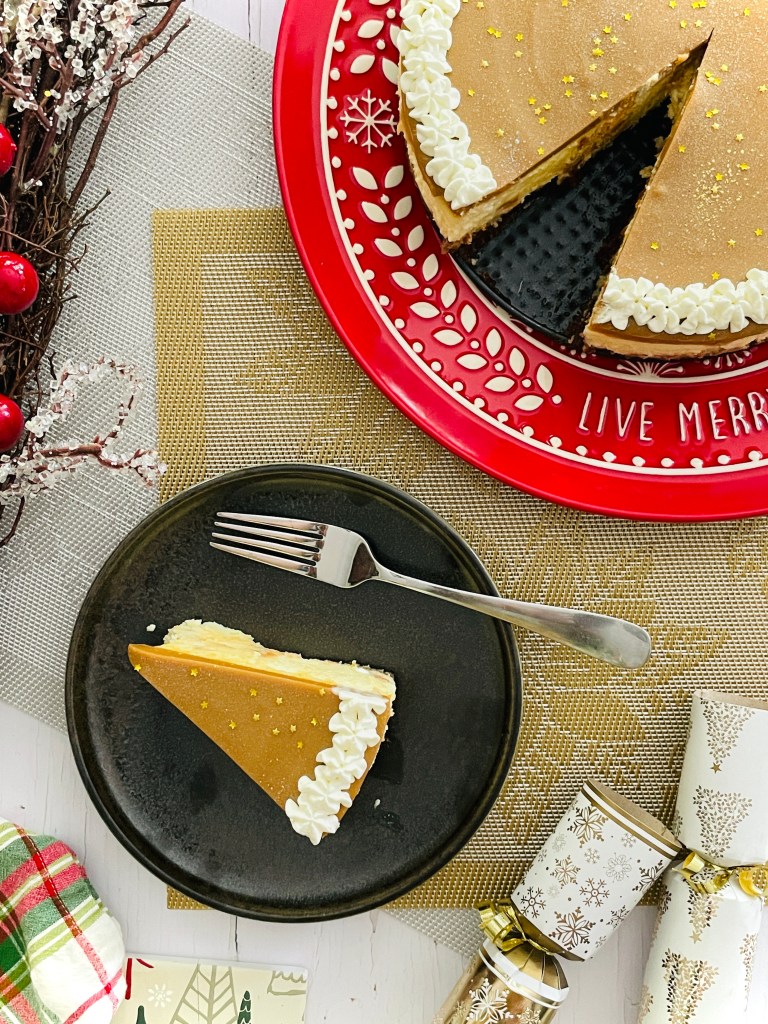
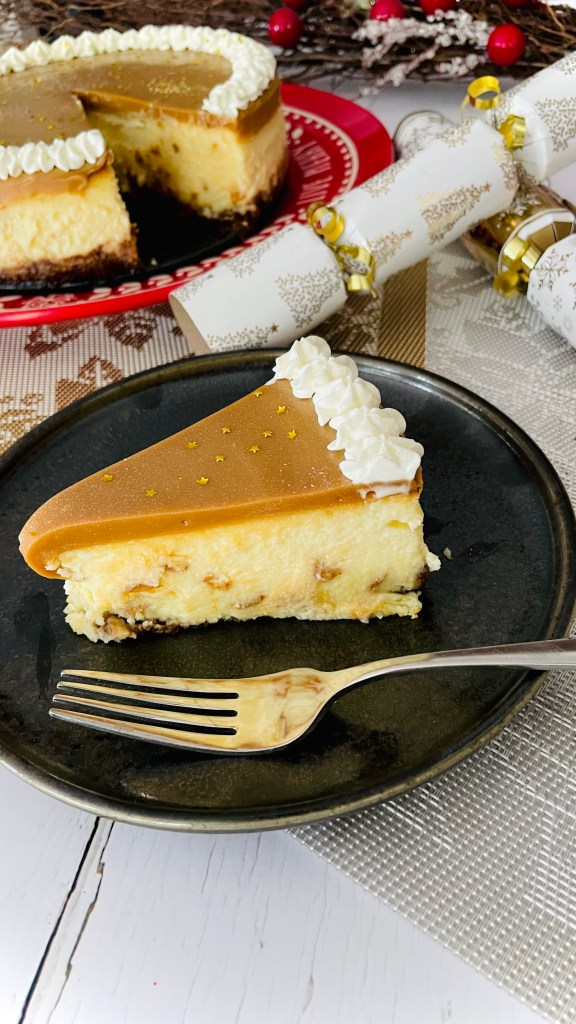
Bake for between 70-80 minutes, until the cheesecake top is lightly browned and slightly jiggles in the centre
Turn the oven off but do not remove the cheesecake. Leave to cool fully in the oven. (I use a wooden spoon to keep the oven door slightly ajar to help the cooking process)
Once fully cooled to room temperature, cover the top of the cheesecake with clingwrap and chill overnight in the refrigerator
Ganache Topping
Place your blonde chocolate pieces into a medium bowl
Heat the cream in a small pan over a medium heat until just simmering (you’ll see small bubbles forming at the edge with the pan
Remove and carefully pour the warmed cream over the chocolate pieces, then add the tablespoon of rum
Set aside for 5 minutes to melt
After this time, slowly stir to emulsify the mixture. If there are some larger pieces of chocolate which are not melting, a quick blast in the microwave (10 seconds, no more) will help you out
Continue stirring util the mixture is fully combined, smooth and shiny
Leave to cool for 5 minutes then spread on top of your cheesecake to form a finishing layer
Decorate (Optional)
If you choose to decorate the cheesecake, you can finish it with some whipped cream and dust with edible glitter and stars for that perfect seasonal touch!
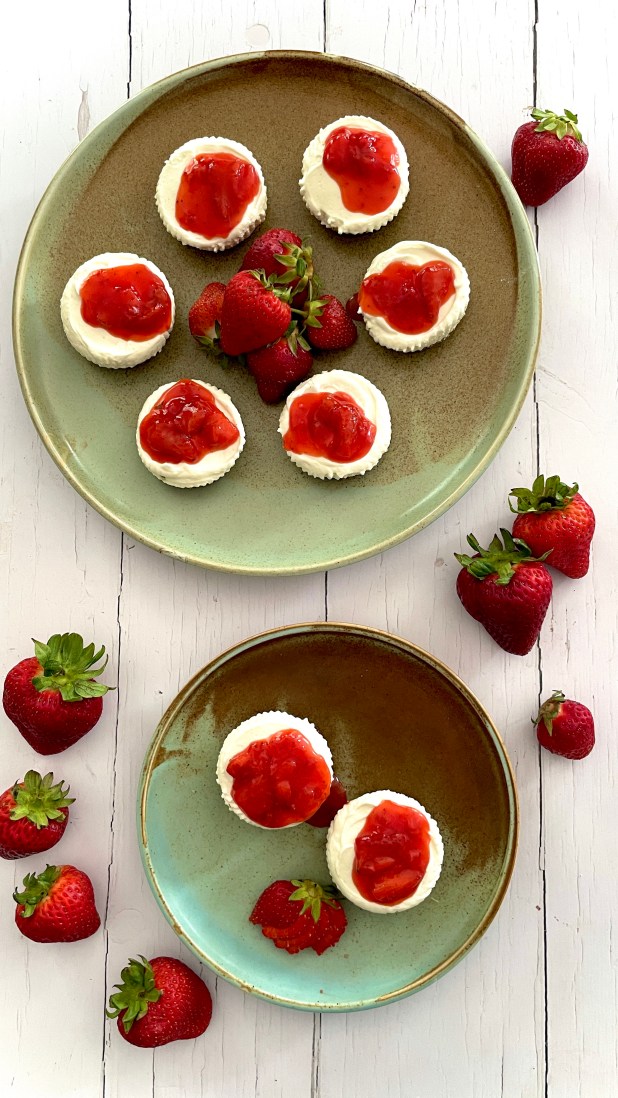
2 cups graham cracker crumbs (about 16 full sheet graham crackers)
1/3 cup packed light or dark brown sugar
½ cup unsalted butter, melted
Filling
1 cup cold heavy cream or heavy whipping cream
16 oz full-fat cream cheese, softened to room temperature
1/3 cup granulated sugar
2 Tablespoons sour cream or plain yogurt, at room temperature
1 teaspoon fresh lemon juice
½ teaspoon pure vanilla extract
Method
Crust
Preheat your oven to 350°F
Line two standard 12-count muffin pans with cupcake liners. Make sure you have room in your refrigerator for both pans
If your graham crackers aren’t crumbs yet, use a food processor to pulse them into fine crumbs. Pour crumbs into a medium bowl and stir in the brown sugar and melted butter until combined. Mixture will have the consistency of wet sand. Spoon 1 and ½ Tablespoons of the crust mixture into each cupcake liner and use the back of the spoon (or shot glass) to pack it down tightly
Bake the crusts in your preheated oven for 5 mins. Remove and let the warm crusts cool while you make the filling
Filling
Using a hand mixer or a stand mixer fitted with a whisk attachment, whip the cold heavy cream into stiff peaks on medium-high speed, about 3 minutes. Set aside.
Using a hand mixer or a stand mixer fitted with a whisk or paddle attachment, beat the cream cheese and granulated sugar together on medium speed until smooth and creamy. Scrape down the sides and up the bottom of the bowl with a rubber spatula as needed
Add the sour cream, lemon juice, and vanilla extract. Beat on medium-high speed until smooth and combined, about 1 minute. Make sure there are no large lumps of cream cheese. If there are lumps, keep beating until smooth.
Using a rubber spatula, fold the whipped cream into the cheesecake filling until combined. Combine slowly as you don’t want to deflate the mixture
Using a spoon or piping bag to transfer the filling on top of the crusts. Use the back of a spoon to smooth the tops so they are flat
Refrigerate the mini cheesecakes in the pans for at least 3 hours and up to 2 days
Keep refrigerated until ready to serve. Serve topped with whipped cream; fresh fruit or fruit sauce
Cover and store leftover mini cheesecakes in the refrigerator for up to 5 days
Are we sitting comfortably? Yes? Good…because here’s another pumpkin recipe. In the spirit of the season, and let’s face it impending CV-19 induced re-lockdown, I’m going to be trying out the wide and various ways of using that seasonal wonder that is pumpkin. You lucky, lucky people! I’ll say right away that they’ll all be sweet bakes – well that’s the plan at the moment, so if you’re holding out for an orgasmic recipe for pumpkin risotto I’m afraid you’re out of luck.
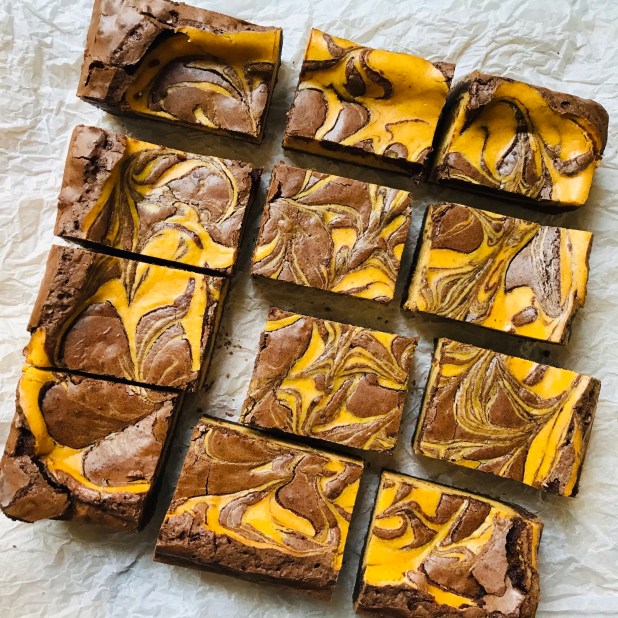
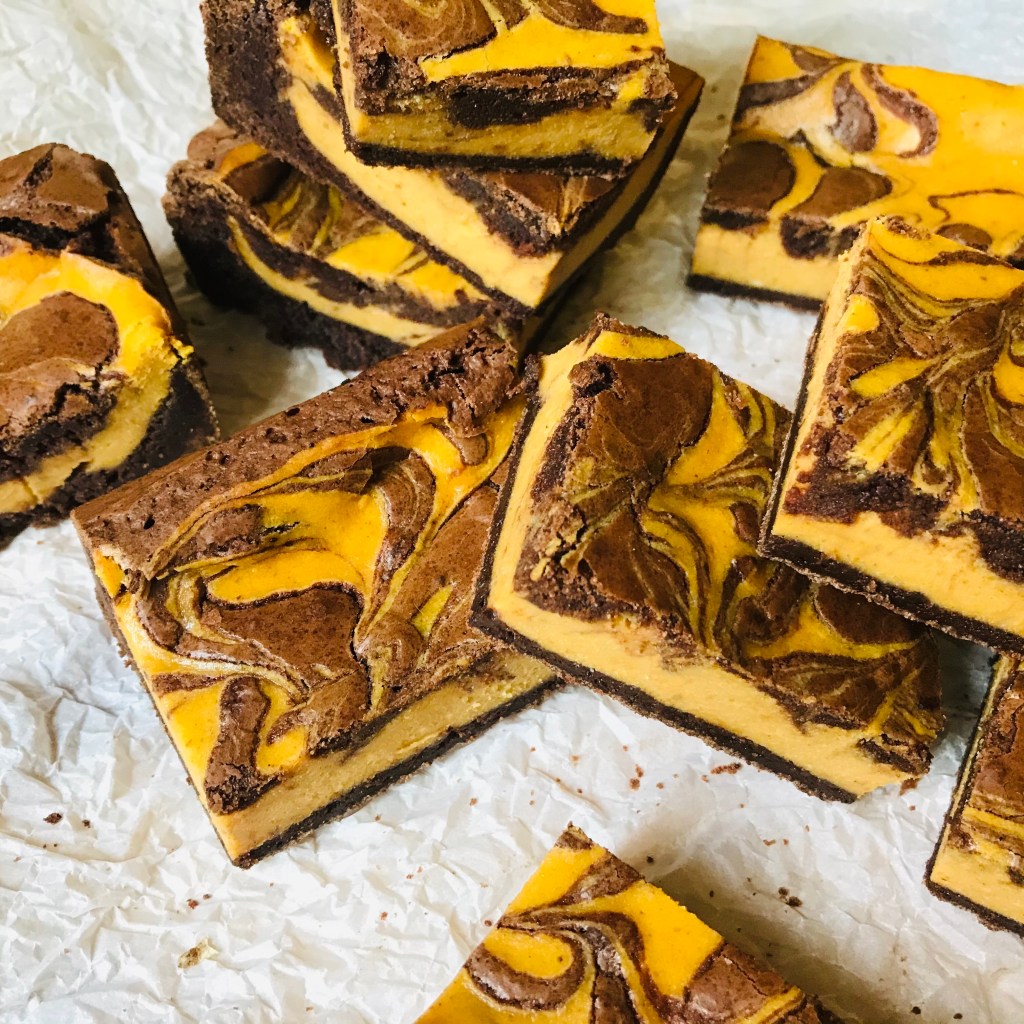
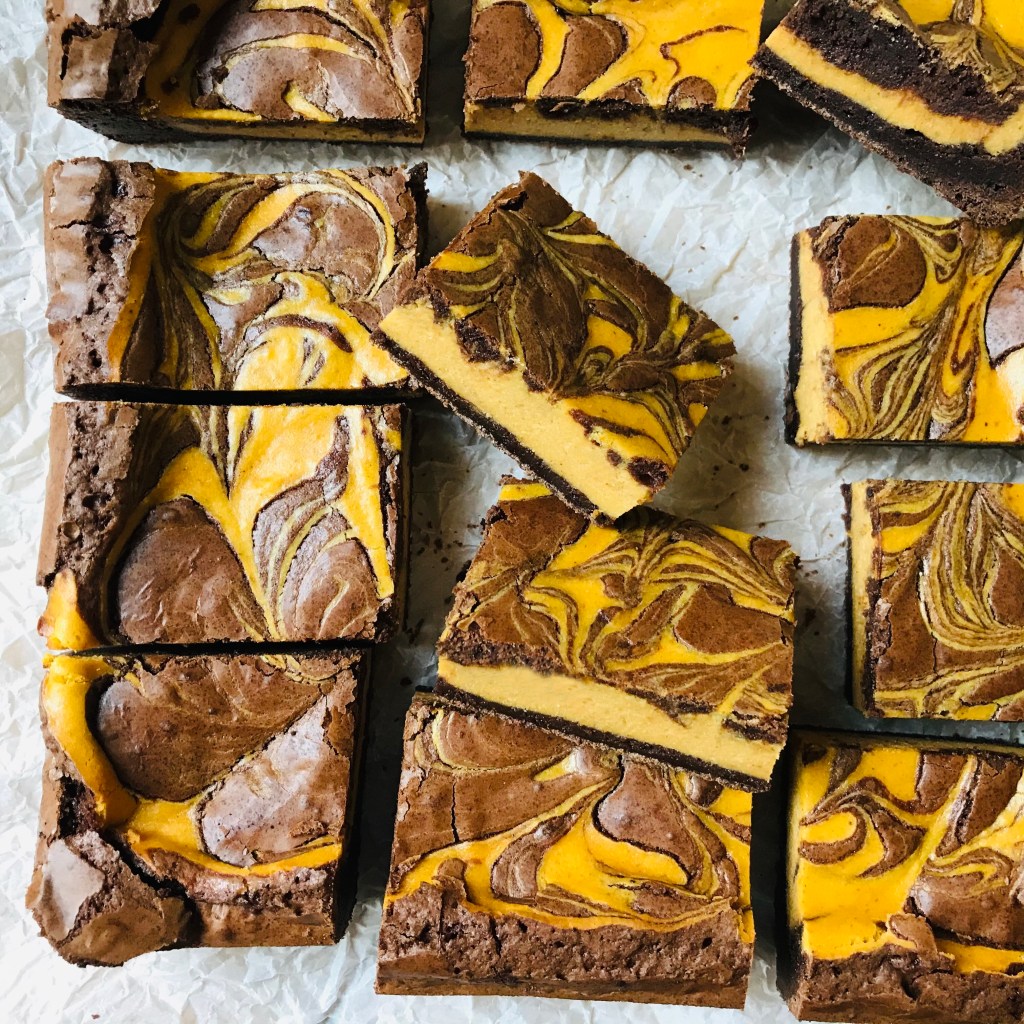
If you follow my blog and recipes you’ll know that brownies are near and dear to my heart. Some people have comfort blankies ala Linus, I have brownies. So it was only right that I should try weave together in kitchen mysticism (it is Halloween season after all!) my love the fudgey (never cakey) traybakes and that bulbous orange cucurbit.
Using pumpkin in the cheesecake element of these brownies instantly renders them fudgey and decadent. I wanted to add another layer there, something to counter thought of sugar-laden PSL. So why not introduce a smokey element- camp-fires, late night and extra complex earthiness working to counter any lingering memories of saccharine heavy beverages.
And why not make them a little more grown up too? These are, after all, brownies for the aficionado. Let’s chuck in some bourbon while we’re at it! For me the flavors of the sweet whiskey go so well with chocolate that it’s too good an opportunity to miss. I’ve also used some chocolate extract here as I really wanted to elevate the chocolate intensity too – like I said these ain’t no five ‘n’ dime brownies. To really bring out the texture of these brownies I find they taste so much better when served straight form the fridge.
So yes- buckle up people…I’ve got 4 weeks of pumpkin recipes left and so far it’s brownies and nanaimo bars down. Any guesses what’s next?
*All ingredients to be at room temperature unless otherwise stated
Method
Preheat your oven to 350 F degrees. Spray a 9×9 inch baking pan with cooking oil then line it with parchment paper
In a large bowl, add the cream cheese and beat it until smooth and creamy. Add the rest of the cheesecake batter ingredients mix until well combined and smooth. Set aside until needed later
In a small bowl a bowl set over simmering water, combine the butter and chocolate chips to melt, stirring them together to combine. Once fully melted remove the bowl from the heat and set aside to cool
In a large bowl if a stand mixer, combine the eggs and sugar and whisk at high speed until pale, fluffy and increased in volume
While you eggs are whisking in a bowl combine the AP flour, cocoa and salt
Into the melted chocolate/ butter mixture add the chocolate extract and bourbon. Stir well to combine. Add these wet ingredients into your whisked egg mixture. Gently fold in until fully combined and uniform in appearance
Sift in the dry ingredients and again gently fold in until well combined and uniform in appearance
Pour about 2/3 of the chocolate batter into the prepared pan and smooth it out. Spread the cheesecake batter over the brownie batter. Dollop the remaining brownie batter over cheesecake batter by spoonfuls. Swirl the batters together by running aknife or a skewer back and forth through the pan
Place the baking pan in the oven and bake for 40 to 50 minutes, or until center is set. Using a cake tester or skewer test the centre of the brownie pan – it should come out with few crumbs or a little mixture still on it. The brownies will continue to cook once removed from the oven
Remove from the oven and allow to cool completely on wire rack and chill before cutting and serving. I usually cut mine in to 4 x 3 giving me 12 brownies. They’re quite rich so I’ve found this to be the ideal size
Okay I’m not gonna lie about this recipe- it came about completely by accident. Whilst looking for other ingredients for another recipe I stumbled up Minneolas Tangelos. Color me intrigued! These rather cute little citrus fruits are a hybrid between the grapefruit and the tangerine. The resulting fruit combines the sweetness of the mandarin with the tart flavors of the grapefruit, and has a wonderful juiciness, combination of sweet/sour flavors and is exceptionally easy-to-peel. The pear-shape of the fruit is also were it gets it’s other moniker from “Honeybell”.
I was hankering after a baked cheesecake and coming across them seemed too coincidental to ignore. Plus it was an ideal excuse to try something new and adventurous in the kitchen. The resulting flavour of the fruit is light and summery without having an overwhelming tartness. Adding cardamom to the base gives some complimentary citrus notes to the tangelo filling while at the same time cutting through the rich, creamy texture.
*In this recipe I use the terms Minneolas Tangelo, Tangelo and Honeybell interchangeably.
Ingredients
Base
1 1/2cups graham cracker crumbs
5 tablespoons salted butter, melted
1/4 cup packed brown sugar
1 teaspoon ground cardamom
Filling
Three 8 oz packs cream cheese, at room temperature
1 1/3 cups sugar, divided
3 tablespoons cornstarch
2 large eggs
Juice of 1 Minneolas tangelo (Honeybell)
Zest of 2 Minneolas tangelos (Honeybell)
2/3 cup heavy whipping cream
Method
This cheesecake is best made the day before you plan to eat it. The extra time in the refrigerator will help firm it up and the flavours to intensify.
To make the crust/ base
Preheat the oven to 350°F
In a bowl combine all the base ingredients and stir to ensure they’re well and evenly mixed
Press the graham cracker crumbs into the bottom of an 8″ springform pan. Gently press down on the crumbs using a small (1/4) measuring cup, or your fingers, until the crumbs are an even layer at the bottom of the pan
Bake the crust, on the bottom 1/3 shelf, for 10 mins. After baking remove and set aside to cool until needed later
Keep the oven on at the current temperature. Move on the prepare the filling
To make the filling
Wrap the cooled tin with a triple layer of aluminium foil. Do this gently so as to ensure you don’t damage the baked crust. Once you have triple-wrapped the tin, set aside and prepare the filling
In a large bowl of a stand mixer, fitted with the paddle attachment, beat 1 package of the cream cheese, 1/3 cup of the sugar, and the cornstarch together on low until creamy, about 3 minutes, scraping down the bowl several times. Blend in the remaining cream cheese, one package at a time, beating well and scraping down the bowl after each. Here I find that beat for 3 minutes after each package on medium speed proves effective
Beat in the remaining sugar, then the vanilla. Blend in the eggs, one at a time, beating well after each to make sure they’re incorporated
Add in the tangelo zest, juice, and mix to incorporate. Beat in the cream until just completely blended. The filling will look light, airy, and smoot. Be careful not to overmix! Check the paddle attachment as sometimes the zest can stick and gather here. If it does simply scrap off into the mixture and fold in using a spoon or spatula
Gently pour the batter over the cooled crust
Place the cake pan in a large shallow pan containing hot water that comes halfway (about 1 inch) up the side of the springform. Bake until the edge is light golden brown, the top is light gold, and the center barely jiggles, about 1 1/4 hours. If the cake still feels soft around the edge, let it bake for 10 minutes more
When the baking time is up, turn off the heat but leave the cheesecake in the oven with the oven door open a crack (you can use a wooden spoon to help here) for the next 2 hours. After this take the cheesecake out of the oven and remove it from the water bath, transfering to a wire rack, and let cool for another 2 hours minimum. After this, leaving the cake in the pan, cover loosely with plastic wrap, and refrigerate until completely cold before serving, preferably overnight or for at least 6 hours
To serve
Release and remove the side of the springform, leaving the cake on the bottom of the pan. Refrigerate until ready to serve. Slice with a sharp straight-edge knife, not a serrated one, rinsing the knife with warm water between slices.
Refrigerate any leftover cake, tightly covered, and enjoy within 2 days, or wrap and freeze for up to 1 month.
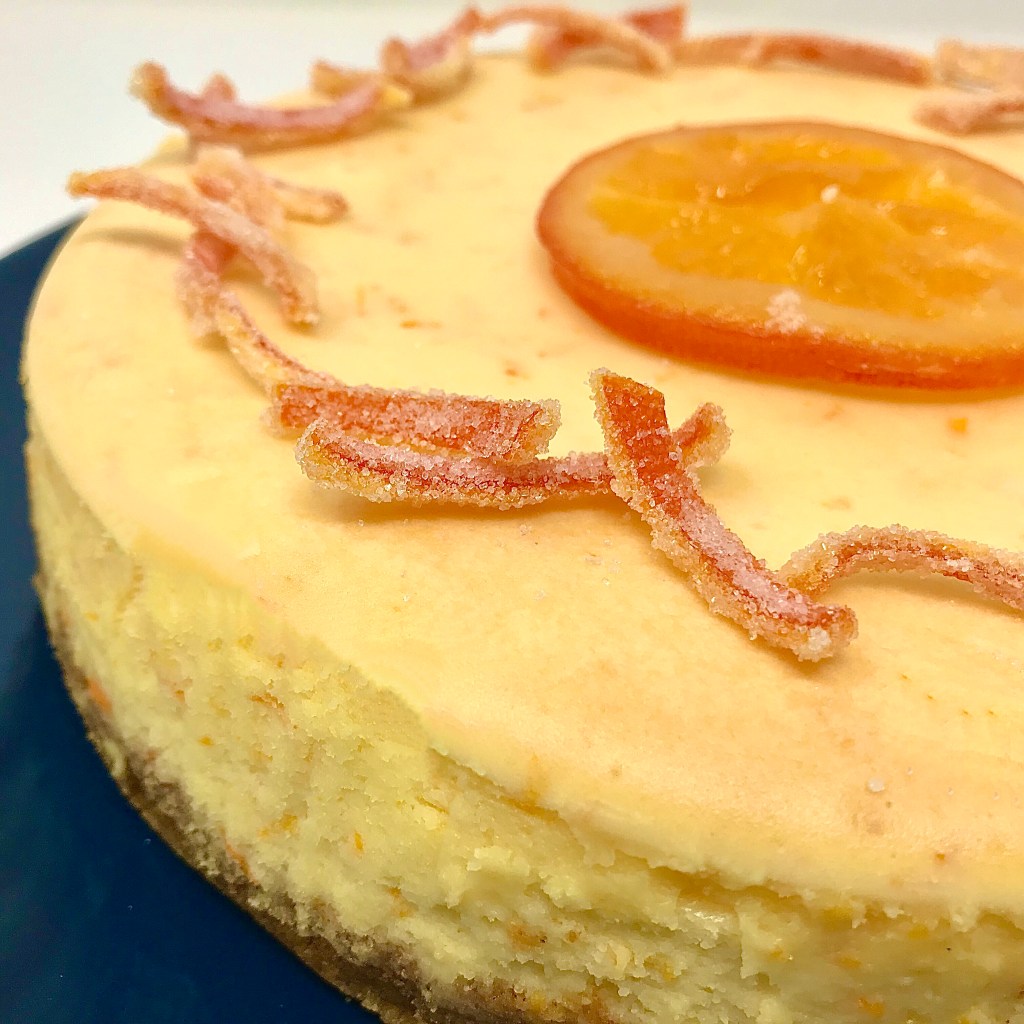
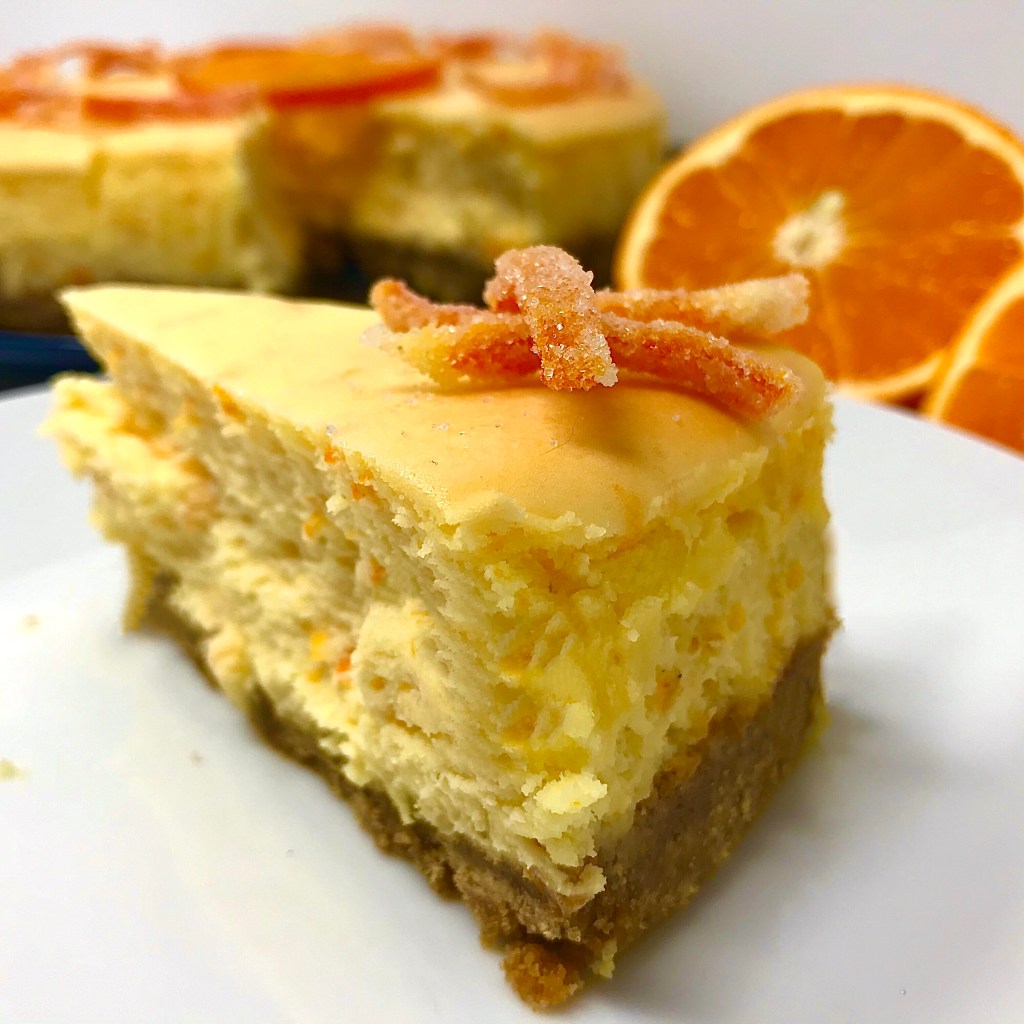
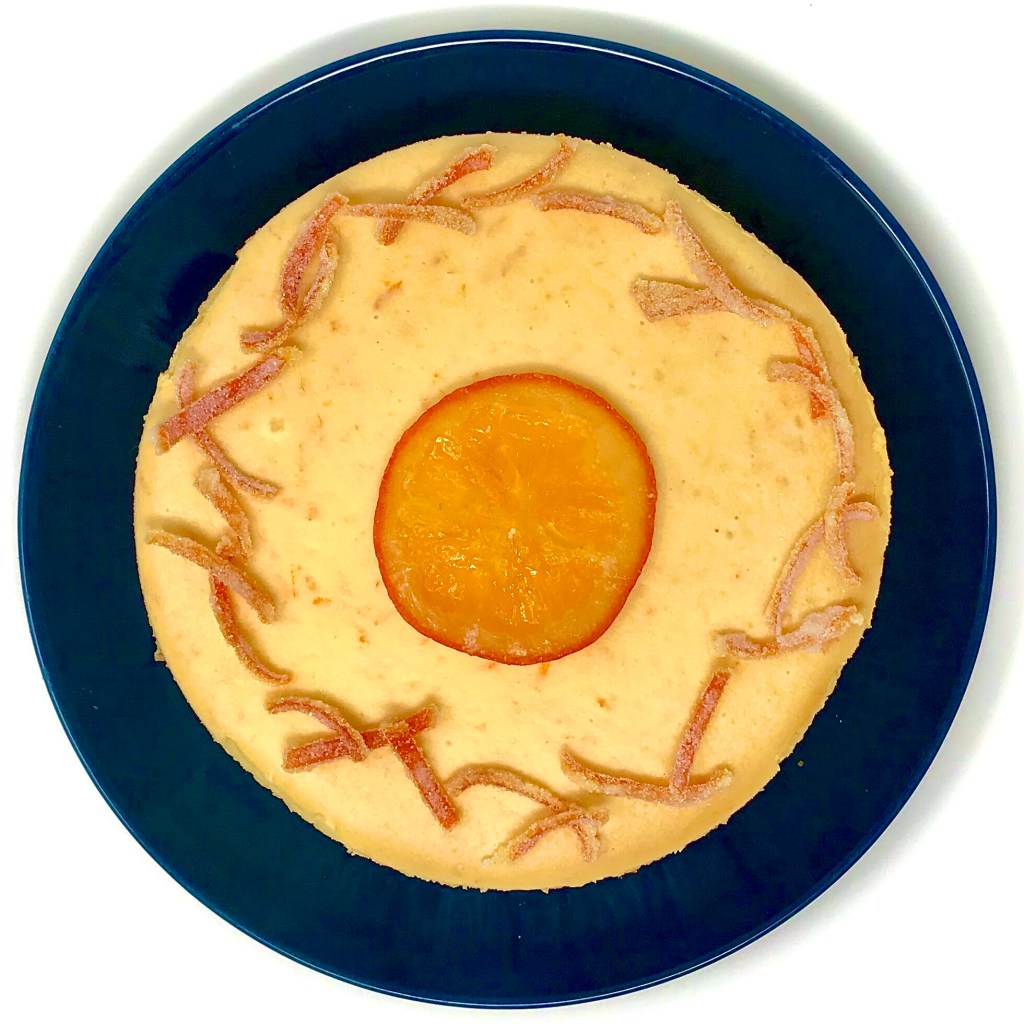
Here I finished mine with a slice of candied Honeybell and some candied Honeybell peel. My advice would be to skip trying to candy the slices of fruit. Part of the attraction of the Honeybell is that it is quite easy to pull away from its rind and de-segment. This however has the downside that when you trying to flip the slices in sugar syrup they easily break up. In fact the one centre slice that you see above was the sole survivor of 5 slices that I initially wanted to have candied. A much easier and straightforward garnish is to candy some sliced peel pieces (as I have on the perimeter of the finished cheesecake above).
These steps are entirely optional. You can finish the cheesecake whatever way you wish to your personal taste
Remove the rind from a Honeybell, trying to keep it as intact as possible. Using a teaspoon scrap away the bitter inner white rind. Slice the remaining outer orange rind into strips just less than 1/4″ thick
In a pan I combined 1 cup water with 1 cup of fine granulated sugar, bring to a boil and then reduce to a summer
Add in the Honeybell peel strips and stir to coat. Leave in the simmering liquid for 30 mins appx until the strips are translucent
While the strips are cooking line a baking sheet with baking parchment
After 30 mins carefully remove the strips from the sugar syrup with tongs and toss in some fine granulated fine sugar. When coated set on the baking parchment and leave overnight to dry out. Use as desired