Toffee Apple Oat Cookies

28f2d31c-c648-4e78-8ba7-5da4c8d4e2ec

Toffee apples are a signature childhood treat. Whether they conjure memories of sparkling carnivals and fairgrounds, or bring back memories of briny seaside meanderings the gloriously sticky treat is always sure to bring a smile to faces young and old.

When I was growing up Toffee Apples were synonymous with day trips to the beach. I much preferred them to ice cream cones, which I thought were far too over rated and messy, not to mention deceivingly bland! My inclination was much more for the glossy crimson globule on a stick. I say crimson as that’s the kind I grew up with. These weren’t coated in a sweet layer of tawny caramel. The toffee apples of my childhood were instead dipped in a rouge sugar syrup at hard-crack stage which set to a glossy, glass-like layer ready to shattered under eager bites and reveal the juicy tart fruit beneath. You’ll have to forgive me for indulging verbosely here. Family jaunts to the seaside were few and far between and lingering triggers for them are particularly powerful. Needless to say it was a constant question to my younger self, ” This red stuff isn’t like any toffee I know so why are they called Toffee Apples?”. Such were the juvenile mysteries that plagued me.

Over time I learned that the red hard-crack layer was easier to make and maintain on site (and let’s face it probably cheaper too!) I learned that the gleaming red orbs of my youth were in fact correctly named, “Candy Apples” and Toffee Apples as should have a layer a sticky sweet toffee, in the more familiar shade of brown, as their dressing. But who was I to argue with a childhood full of sweet cochineal-fueled indulgence!

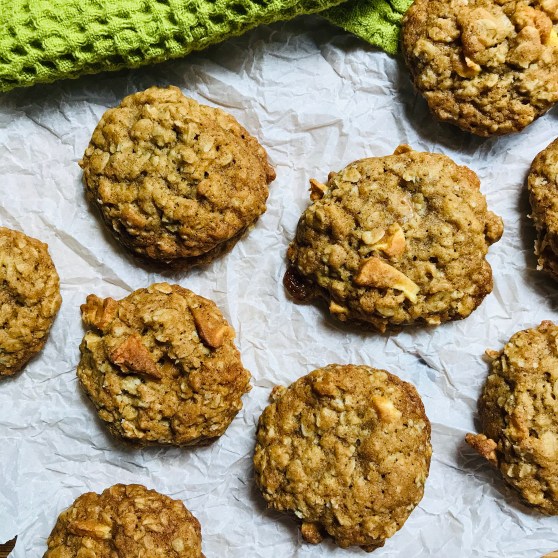
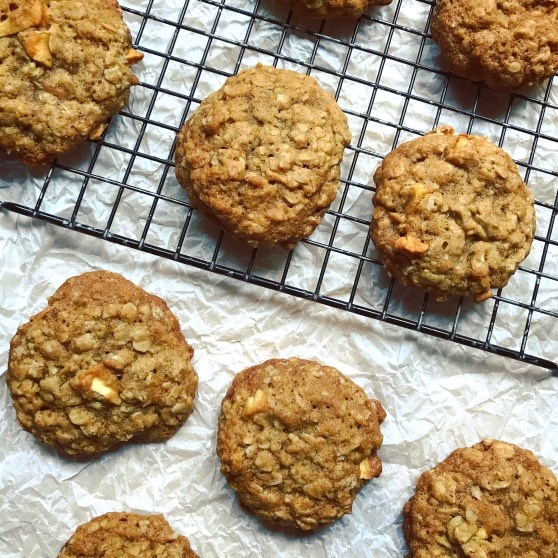
You can rest easy though. This recipe contains neither glassy red shards nor ruby bug extracts. You’ll of course know by now I have a weakness for oat cookies. And if they happen to be oat cookies that have been pimped up with a lil’ something then all the better. These are my homage to the classic Toffee Apple in all it’s beige, sticky goodness- albeit without the frustratingly wobbly perching on a ice-pop stick! As a combination themselves, outside of nostalgia, caramel and apple worked exceptionally well with oats, in my view. There’s something about the mellow combination of toffee and oats that instantly induces shoulder-slumping comfort & coziness. Chuck in some bites of apple and you introduce enough tart interest to compliment to earthiness of the other two. I’ll leave the beverage of choice to you – coffee, tea or dunking in to cold glass of milk. All are ideal and highly suggested.

Ingredients

  • 1 cup (2 sticks) salted butter, softened
  • 1 cup light brown sugar, packed
  • 1/2 cup granulated sugar
  • 1 1/2 cups All Purpose flour
  • 1 teaspoon ground cinnamon
  • 1 teaspoon apple pie spice
  • 1 teaspoon baking soda
  • 1 teaspoon salt
  • 2 large eggs
  • 1 tablespoon fancy molasses
  • 1/4 cup maple syrup
  • 1 teaspoon vanilla extract
  • 2 cups whole rolled oats
  • 1 cup quick oats
  • 1/2 cup toffee pieces
  • 1 cup dried apple pieces, (or dried slices chopped)

Method

  1. Whisk the flour, cinnamon, apple pie spice, baking soda, and salt together in a medium bowl. Set aside until needed
  2. In the bowl of a stand mixer, fitted with a paddle attachment, beat the butter and sugars on medium-high speed until blended, about 5 minute, then increase to high speed and whip for another 5-6 mins
  3. In a jug combine the eggs, molasses, maple syrup, vanilla and whisk to combine.  Add to the butter mixture and beat for 3 minutes until combined. Scrape down the sides and beat again as needed to combine
  4. Add the dry ingredient mixture to the wet ingredients (I usually do it in 1/4 cup increments) and mix on low until combined. Remove the bowl from the mixer and fold in the oats until well coating
  5. Next add in the toffee pieces and apple pieces. Mix well until fully combined. The final dough will be thick and sticky.
  6. Cover and chill the dough for at least 45 minutes in the refrigerator
  7. Preheat oven to 350°F (177°C). Line baking sheets with parchment paper or silicone baking mats
  8. Use a medium cookie scoop (about 2 tablespoon size) to scoop the cookie dough on to the prepared baking sheets, placing 2 inches apart 9 (I usually fit 12 per sheet). Bake for 17 minutes or until the edges are golden brown. The centres will look soft.
  9. Remove from the oven and allow cookies to cool on the baking sheet for 5 minutes before transferring to a wire rack to cool completely
  10. Cookies can be kept at room temperature in a sealed container for up to 1 week

img_7846

Chester Bread (aka Gur Cake)

img_7744

If you’ve followed my recipe blog for some time you’ll have no doubt have noticed that my childhood has various landmarks in the form of baked goods- Soda bread; Cheesecake; Queen of Puddings. This is yet another one of those anchor points with which nostalgia comes crashing in waves.

Known by various names including Gur Cake; Chester Slice; Donkey’s Gudge, it was Chester Bread that I knew this by growing up in South-East Ireland. Many an early adolescent afternoon was spent munching on these en route to my childhood home from school- oblivious to not only the background the baked treat I clutched but also ignorant to dubious history of where I was buying them from. My only preoccupation was how could something so delicious be so cheap!

At the bottom of the hill to my school was a building known simply to us as “The Good Shepherds”. All I knew of it, at the time, was that it was a convent and former orphanage. The expression “If you don’t behave I’ll take ya to The Good Shepherds” was frustratingly hissed by many a Waterford parent to the offspring, uttered in ominous overtones akin to summoning The Boogey Man. A fuller investigation later in life revealed the title of the building to be The Good Shepherd Magdalene Asylum (Laundry) and Orphanage, Without going in to it in too much detail it was one of number of locations of a religious order whose ethos and modus operandi was of a particularly sordid and horrific nature.  A sordid blemish on the hem of Ireland’s pious petticoat. Google it if your’re intreest has been piqued- but consider yourself forewarned.

The main institute had ceased operation in 1982, however there were still some occupant nuns in residence and as a means of charitable support income they ran a small bakery onsite. It was here that myself and many another transient school-goer would purchase our after-school sugar rush. Chester breads; Vanilla Slices (a more rustic version of Mille-feuille with pastry, vanilla custard filling and water icing topping) and cream doughnuts (think Long John doughnuts filled with jam and cream) were all greedily snapped up to the point of selling out.

Whilst they all would bear mentioning, as nostalgia renders them supremely tasty, it’s Chester Bread that brings us here today. I’ve already mentioned that this bake is known throughout Ireland under various monikers such was its popularity. Originally used in the 19th century as a novel, but nonetheless innovative, method to use up stale offcuts and surplus bakes in bakeries, the cake was inexpensive to make using a basic recipe template of filler, binder and sweetener. The finished bakes were then sold cheaply (but not so cheap as to not yield a profit) to youngsters playing truant from school as something to fill the gap until dinner. In Ireland, particularly Dublin, such kids were called “gurriers” who would “mitch”, “mooch” or just generally bunk off school. Hence the ‘Gur Cake” name. I have yet to unearth the link as to why it’s called ‘Chester Bread” where I grew up when that name is apparently derived from it’s place of origin in Chester in the United Kingdom. As for the ‘Donkey’s Gudge” version? I don’t know what a donkey has to do with it, let alone what their gudge is! Feel free to comment should you be able to shed some light here.

Whatever way you call it, I find that the finished bake is definitely memorable. What starts as simple stale bread is baked to a fudgy, slightly gelatinous, sweetly spiced filling. It’s almost like a dense ginger cake. I’m sure the pastry serves as nothing more than a utilitarian purpose to allow the filling to be handled with minimal mess. Try it out and see what you think. It’s an ideal accompaniment to a cup of tea- perhaps whilst researching The Magdalene Laundries?

Ingredients

Shortcrust pastry

  • 2 1/2 cups All purpose flour
  • 3/4 cup Butter, cold and diced
  • 1/4 tspn salt
  • 3 tbspn ice cold water
  • Flour, for dusting

Filling

  • 15 Slices of bread, at least 1 day old
  • 1 1/2 cups Cold strong tea (preferably Irish)
  • 1 cup, packed Brown sugar
  • 2 tbspns Mixed spice
  • 1 tspn Baking powder
  • 1/2 cup All purpose flour
  • 1/4 cup Salted butter, cut into pieces
  • 1 cup Raisins
  • 2 tbspn Treacle
  • Icing or fine sugar for dusting, optional

img_7752

Method

To make shortcrust pastry

  1. Combine the flour and salt into a bowl, coarsely rub in the butter/margarine. Continue to rub together until you have the texture of coarse meal. Some pea-sized granules of butter may remain
  2. Sprinkle over the water  and bring the ingredients together to make a soft dough. Additional water may be needed depending on your kitchen’s temperature/ humidity
  3. Lightly knead to bring it together in a ball. Flatten to a disc, wrap in cling wrap and refrigerate until needed

*Pastry is best chilled before rolling.

To make filling

  1. Preheat your oven to 375°F
  2. Grease and line a 9′ x 9′ tin (2″ high)
  3. Remove the crusts from the slices of bread and lie in a shallow casserole or baking dish.
  4. Pour over the cold tea and leave to soak for 1 hr
  5. After the hour, drain of any excess tea and using a fork mash the wet bread to thick pulp
  6. In a large bowl combine the flour, baking powder, sugar and mixed spice, stirring well to combine
  7. Rub in the cold diced butter until you have something that resembles coarse meal in texture (similar to making the pastry above)
  8. Add the bread mixture and treacle to the other flour/ sugar/ spice mixture and stir well to combine

To assemble

  1. Remove the pastry from the fridge and divide into 2
  2. Roll one 1/2 of the pastry large enough to fit your baking tin and use to line the bottom of it. Prick the pastry all over with a fork or knife
  3. Pour and spread the bread mixture over this pastry layer
  4. Roll the remaining pastry to fit the top of the tin and place over the filling, pressing to form a lid. Again prick the second layer of pastry all over with a fork or knife (helpful hint: I roll to size and prick BEFORE placing the pastry lid on to the filling. This stops the pastry being pushed down into the soft filling mixture)
  5. Bake in your preheated oven for 1 hr, after which remove and let to cool completely in the tin. The finished bake should have firmed up considerably but still have a slight wobble. Dust with sugar if using.
  6. Once fully cooled, cut into squares (using this tin I usually divide into 4 x 4)
  • The finished Chester bread can be dusted with sugar or left plain if preferred
  • Baked Chester bread can be stored in an airtight container at room temperature for up to 4 days

img_7746


The Classic Waterford Blaa

img_7301

Coming from Waterford, in South-East Ireland, there are a few things that are corner stones of my childhood – Waterford Crystal; Hurling and…of course – the blaa. “The what?”, I hear you say. Well, are you sitting comfortably? The blaa is basically a bread roll. But there are a couple of features that set it apart. Roughly square-shaped, liberally dusted with flour, it has a soft chewy texture and pleasing bitter tasting crust that is dear to the heart of Waterford natives. Many a school lunch’s main feature was a buttered blaa with “Red Lead” (pink sliced deli sausage meat) or filled with Tayto crisps. Quintessential Deise fare if ever there was any!

Dating from 17th century, blaas are well ingrained into the history of Waterford. In their original form blaas were thought to be made from the scraps left over from families baking their own bread. The name “Blaa” is thought to have been possibly derived from the old Huguenot word ‘Blaad’ – an old French word for flour, or ‘Blanc,’ – a French word meaning white, which refers to the white floury appearance of the baked blaas. To the best of my knowledge there is yet to be a confirmed origin.

Such is the fame of the humble blaa that in 2013, the Waterford Blaa Bakers Association (yes there is such thing!) succeeded in getting PGI designation for the Waterford Blaa. “PGI”  stands for Protected Geographical Indication, which essentially means that only Blaas made by specialist bakers in Waterford city and county can be called Blaas. This guarantees an authentic heritage product, based on the traditional methods and the unique skills of the bakers- think champagne; Parmigiano-Reggiano and Melton Mowbray pork pies. Basically if you see something called a “Blaa” for sale outside of Waterford? It’s not the real deal. Waterford Blaas are now supplied by traditional family bakers operating since the 1800’s. Sadly these days the family bakers have deminished with but a handful remiaining.

Whilst this recipe isn’t PGI approved, it has stood the test of time in my family. Having been passed down through generations (to date I’ve confirmed 3) there apparently has been no tweaks or amends to the original recipe. It remains true with a form that conjures memories of frenzied Saturday morning sibling debates as to whose turn it was to fetch the weekly dozen from the local store. I’ve eaten in some fancy restaurants with both divine and questionable cuisine. However I’ll be perfectly honest and say I have yet to experience anything that makes my heart swell and induce instant comfort like biting into a buttered blaa filled with Tayto cheese & onion crisps. Flour-dusted lips savouring that sweet chew contrasting with crunchy savoriness. Bliss!

img_7304

Ingredients

  • 4 cups Bread flour
  • 2 1/4 tspns quick-rise instant yeast
  • 1 tspn fine salt
  • 1 tbspn fine sugar
  • 1 tbspn butter
  • 50ml milk
  • 325ml water
  • 1/2 cup AP flour (approximately) for final dusting

Method

  1. In a pan combine the milk and butter. Heat gently until the butter is melted. Set aside and leave to cool while you prep the rest of the ingredients, stirring occasionally
  2. Lightly oil a large bowl and set side until needed later
  3. Sift the flour into the bowl of a stand mixer. To one side of the bowl add the yeast and to the opposite side add the salt. Add the sugar in the middle
  4. Combine the warm water and milk/ butter mixture and stir well. With the dough hook attachment working on slow speed, slowly add the liquid to the dry ingredients in a steady stream. Continue to add until  50 ml remain. Depending on your kitchen conditions eg temperature and humidity, you may not need to add all the liquid- only add enough liquid for your dough to form a ball and clean the bottom of the bowl. Continue to knead on slow for 7 mins. The dough should come together in a ball that is smooth and elastic to touch, without cracking or breaking
  5. Remove the dough ball from your mixer bowl and place in the preoiled bowl. Cover and set aside to proof in a  warm place for between 50-60 mins until doubled in size
  6. After this time, remove the bowl and punch down the risen dough to knock back the air. Gather the dough in to a smooth ball shape, place back in the preoiled bowl and recover for a second proof. This proof won’t take as long, between 30 – 40 mins. DO NOT SKIP this step as it helps to add to the distinctive flavor of the finished blaas
  7. Once the second proofing has been done, remove the dough from the bowl and divide equally into 9 or 12,  depending on how big you want your final blaa to be. An amount of 9 will give a more traditional palm-sized blaa
  8. Roll each of the equally-sized pieces into a smooth ball and place together in a high-sided pan. I tend to use a roasting tray that I have dusted/ dredged with flour. Place the dough balls side by side until you have a “sheet formation”. Ideally they should be spaced so that when they finish rising they touch each other. The “mouths” that are formed from this at the sides of the baked blaa are a distinguishing feature allowing easy opening
  9. Cover the dough balls with oiled clingfilm and allow to rise in a warm place for a further 30 mins.
  10. Preheat your oven to 425 F. By this time the balls should have risen and be touching each other
  11. Dust the tops of the blaas liberally with flour and place on the middle shelf. Bake for 20-25 mins. The tops of the blaas should be lightly browned and bases sound hollow when tapped
  12. Remove the baked blaas from the tin and allow to cool to warm before serving
  13. Blaas are best eaten on the day they are baked. If you do have any left the following day you can refresh them by wrapping in foil and baking them at 375F for 10 mins. Overall they will keep in an airtight container for up to 3 days

Traditional fillings for blaas

  • Bacon (rashers)
  • Tayto crisps (Irish potato chips and they MUST be Tayto!)
  • Sausages
  • “Red Lead” (Irish deli meat sausage slices. Ultra-pink in color!)

Other fillings that can be delicious-

  • Sliced roast chicken and stuffing
  • Bacon and fried egg
img_7309

A meeting of worlds- The Waterford blaa filled with Canadian peameal bacon