Corn Husk Meringue w/ White Chocolate Sweetcorn Mousse

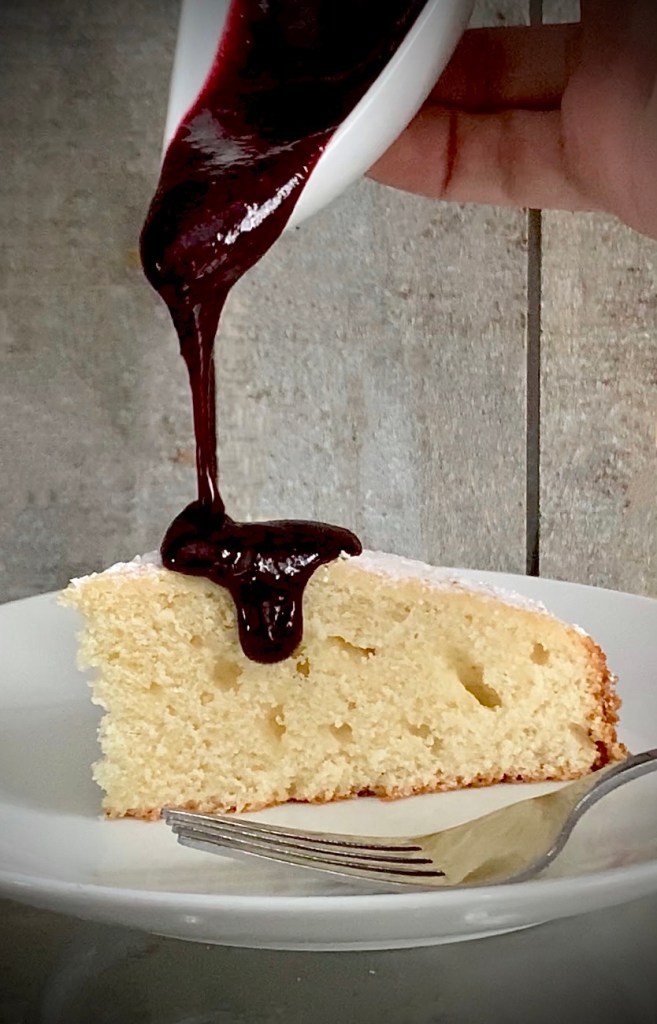
So this is a dish that in a sense “never was”. Episode 3 of Food Network Canada’s Great Chocolate Showdown had an elimination challenge of selecting from a preset range of vegetables and using said vegetable as the feature item in a dish of your creation. Along with chocolate of course! I got to sit this out thanks to winning “Sweet Safety” that week but nonetheless I couldn’t help but think that I’d have loved to have done this challenge as it’s right in my wheelhouse of using unexpected ingredients in unexpected places.

I’d have been hoping for Sweetcorn from the Parsnip; Pumpkin; Beets; Fennel and Sweetcorn). This would have given me the ideal opportunity to pay homage one of my food idols Enrique Olvera. Taking one of his feature desserts from the menu at his Pujol restaurant and tweaking it somewhat (hopefully not too irreverently!) to facilitate the over-riding brief of the show and yes- include chocolate.

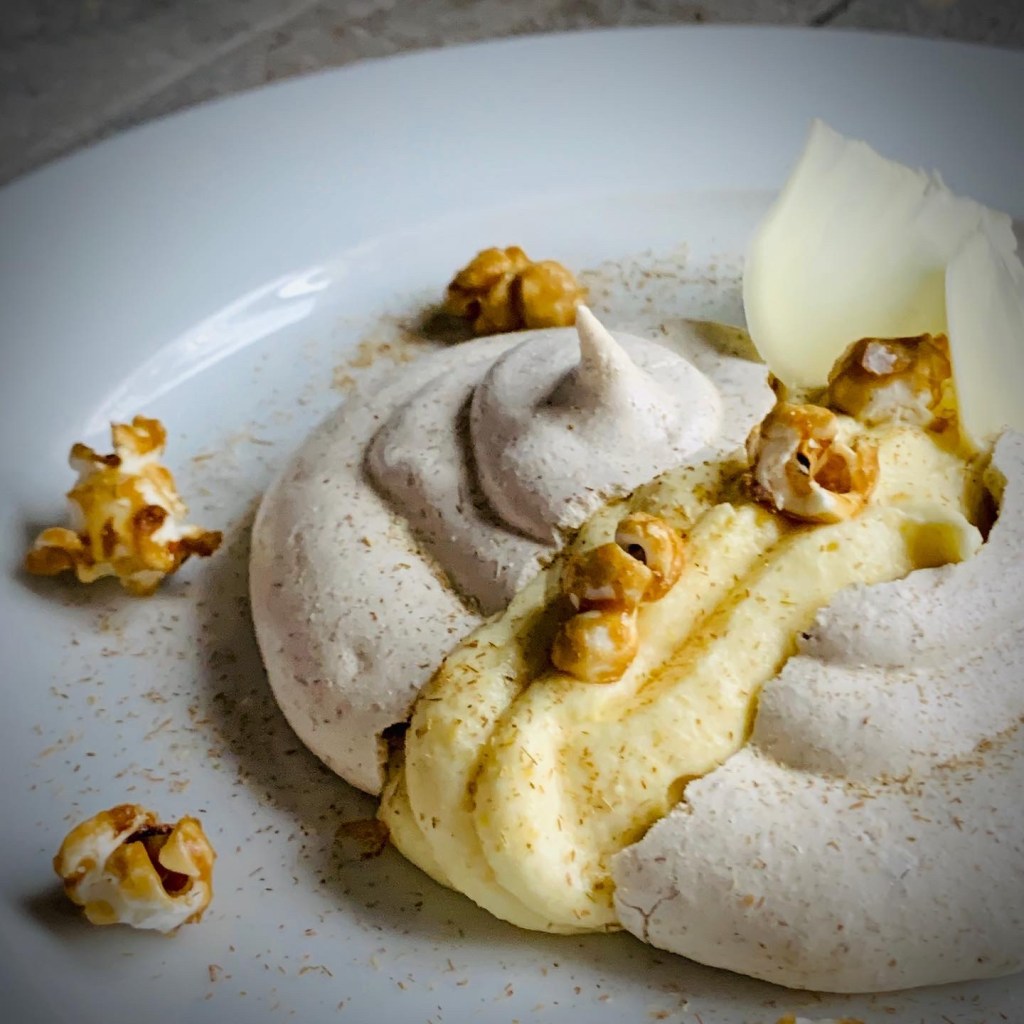
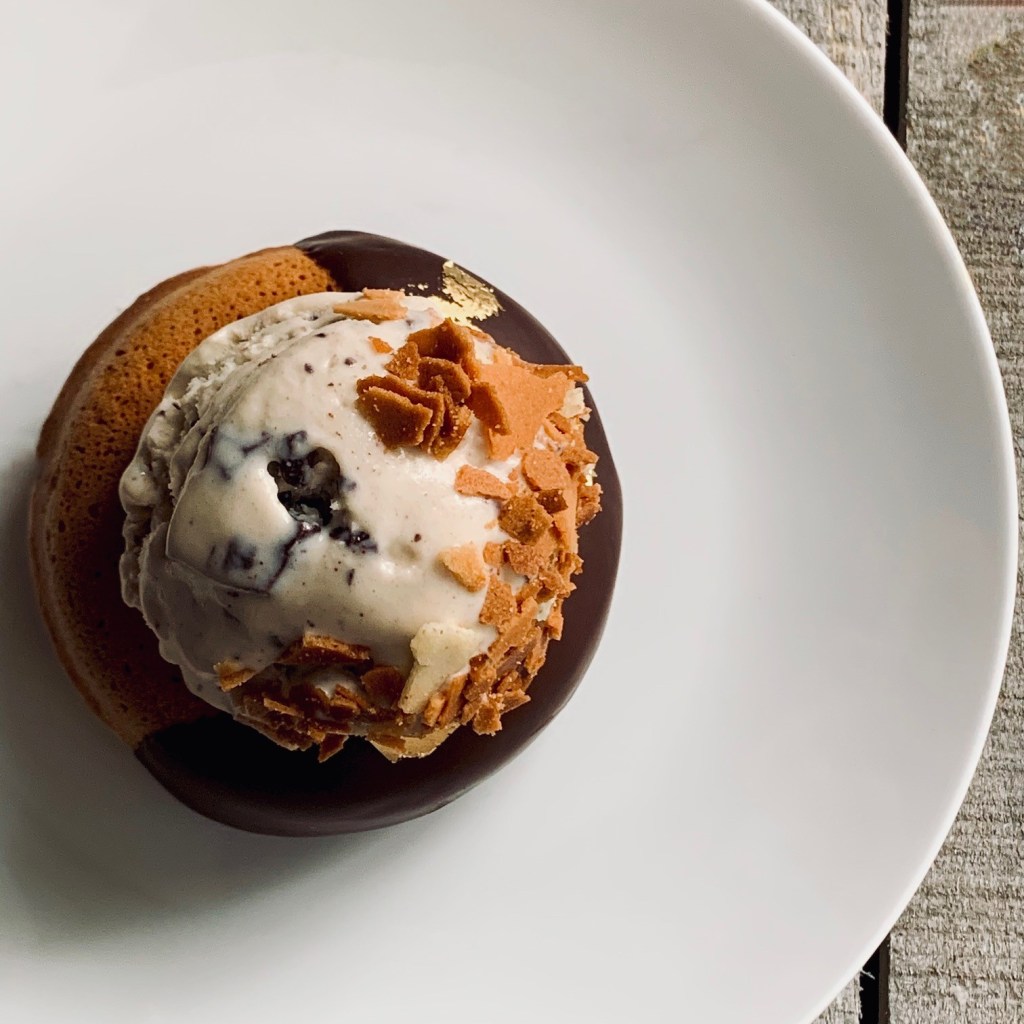
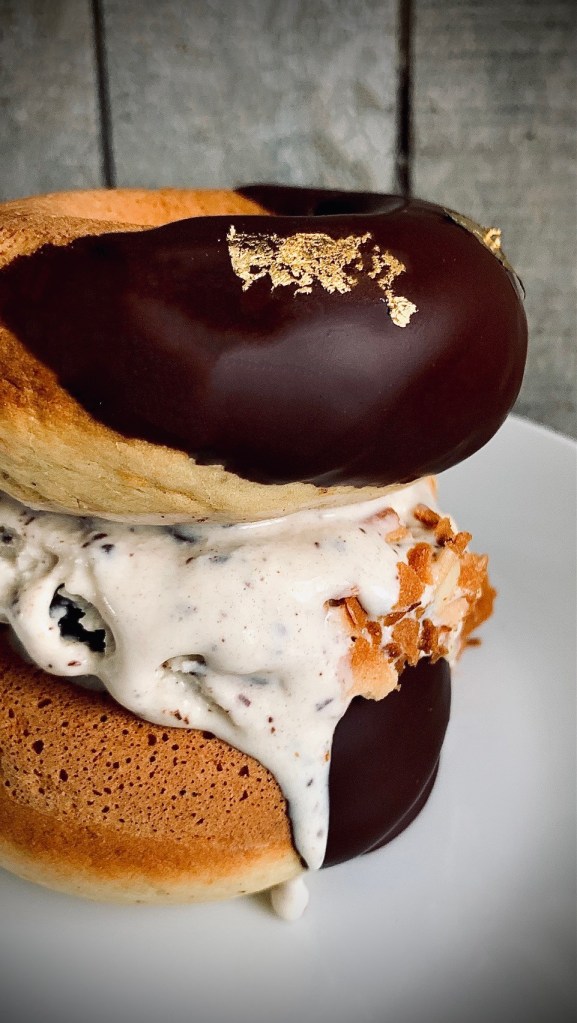
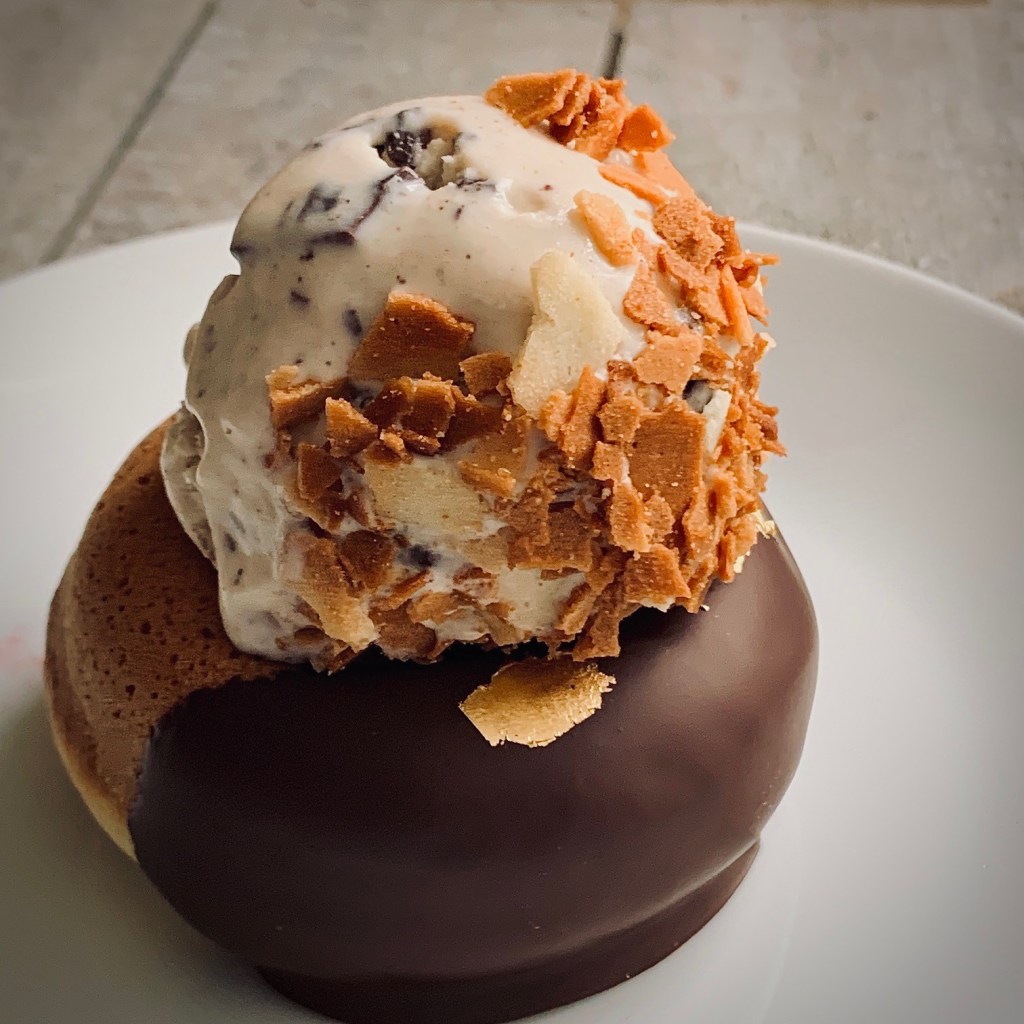
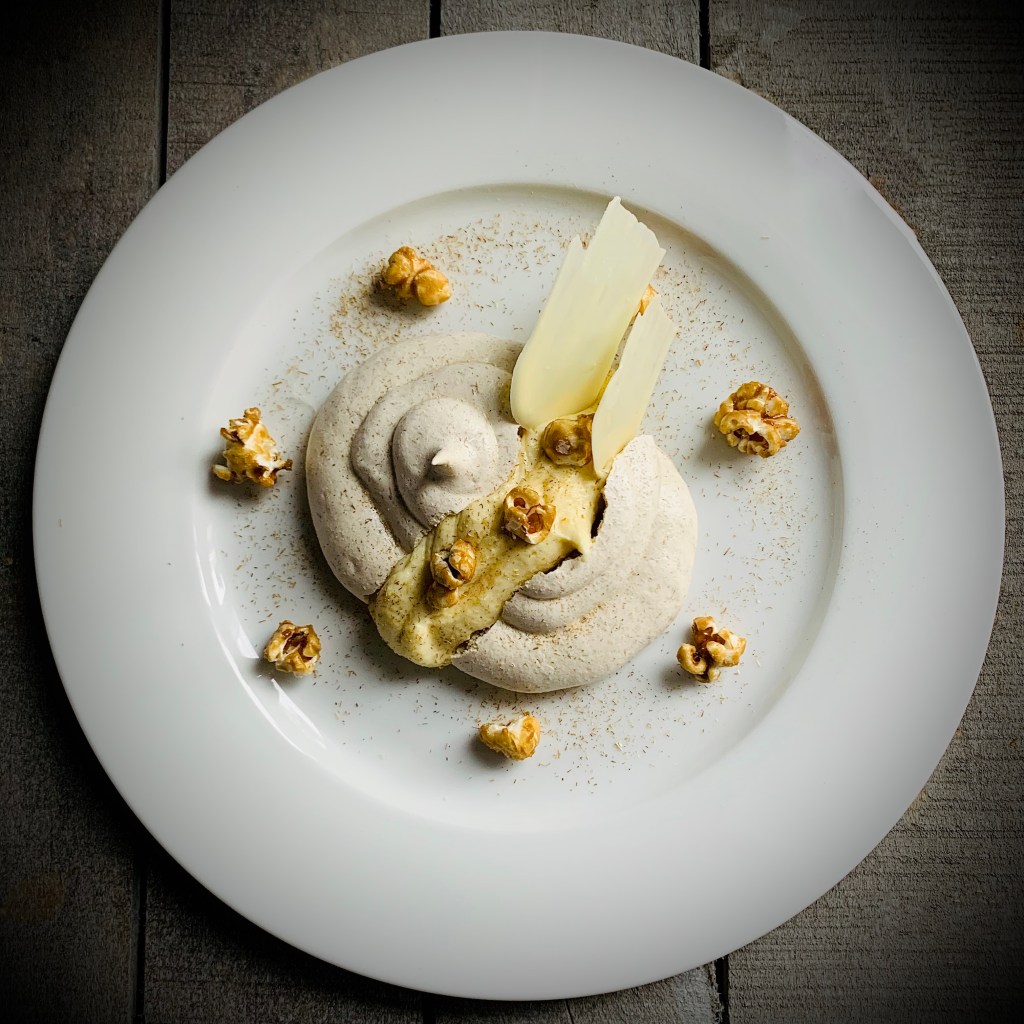
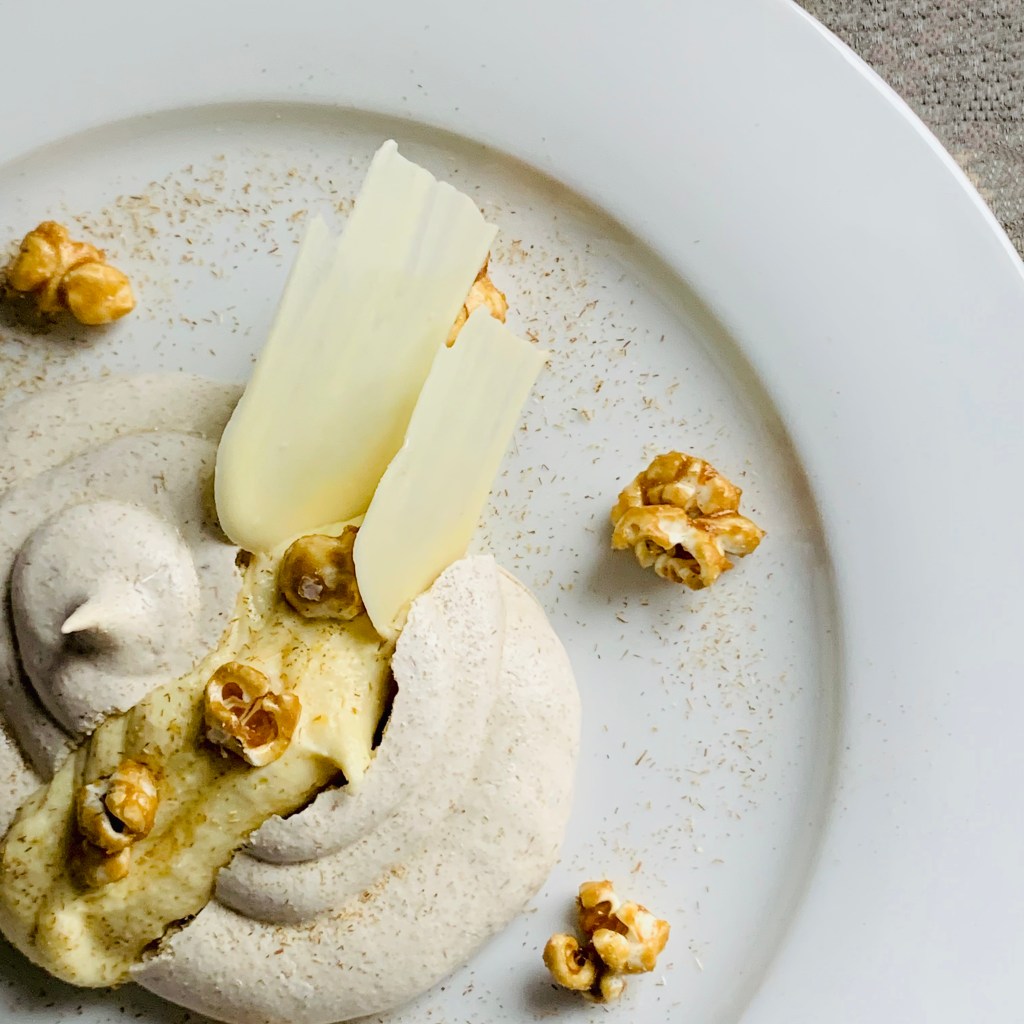
Corn Husk Meringue w/ White Chocolate Sweetcorn Mousse #recipe #greatchocolateshowdown

Preview in new tab

Ingredients

Makes 4

Meringue

  • 4 dried cornhusks
  • 2 large egg whites
  • 1/2 cup sugar

Mousse

  • 1 1/2 cups fresh corn kernels (from 3 ears)
  • 1 tablespoon sugar
  • 1/8 teaspoon kosher salt
  • 1 cup heavy cream
  • 2 oz white chocolate, grated
  • 1/4 cup mascarpone

Salted Bitter Caramel Popped Corn

  • 1/3 cup popping corn kernels
  • 2 Tablespoons Canola, or other flavorless, oil
  • 1/2 cup dark brown sugar
  • 3 Tablespoons water
  • 1/2 teaspoon Kosher salt
  • Additional sea salt to taste

Method

Meringue

  1. Preheat the oven to 450° F. Spread the husks on a large baking sheet; bake for 8 to 10 minutes, until browned. Remove the browned husks from the oven and reduce the oven temperature to 200° F
  2. Cut any unbrowned ends from the husks, discard and break the remaining browned husks into small pieces Transfer to a spice grinder in batches and grind to a powder. Sift the husk powder through a fine sieve and discard the larger remnants
  3. In a stand mixer fitted with the whisk, beat the egg whites until soft peaks form. With the mixer on, gradually beat in the sugar until medium peaks form. Add 2 1/2 tablespoons of the husk powder; beat at medium-high speed until stiff. Reserve any remaining husk powder for serving
  4. Transfer the meringue to a pastry bag fitted with a round tip. Pipe four 3-inch rounds of meringue onto a parchment paper–lined baking sheet. Bake for about 1 hour and 10 minutes, until the meringues are set and sound hollow when lightly tapped on the bottom. Set aside and set cool completely while you make the mousse

Mousse

  1. In a skillet, combine the corn, sugar, salt and 3/4 cup of the cream and bring just to a boil. Simmer over moderate heat, stirring, until the corn is tender, 8-10 minutes. Transfer to a blen­der and puree until smooth.
  2. Strain the puree through a fine sieve, pressing on the solids. Add in the white chocolate and stir until melted and fully combined. Let cool completely, then whisk in the mascarpone
  3. In a bowl, beat the remaining 1/4 cup of cream until stiff. Fold into the corn mixture until no streaks remain. Chill until ready to serve

Salted Bitter Caramel Popped Corn

  1. Measure corn kernels and oil into a large pan
  2. Cover pan leaving lid slightly ajar and place over a medium heat
  3. Kernels will start to pop, shake occasionally. When popping slows and stops remove pan from heat and carefully remove the lid
  4. Leave to cool for 5 minutes, then transfer to a bowl to cool fully while you prep the caramel coating*
  5. Line and oil spray a baking sheet
  6. In a pan combine the brown sugar and water. Heat over a medium heat until sugar has melted, swirling the pan often
  7. Increase heat to high and boil for 6-8 minutes until sugar syrup has thickened
  8. Remove pan from heat, stir in the Kosher salt and leave to cool for 5 minutes. Carefully toss in 1 1/2 cups popped corn and gently stir to fully coat the popped corn pieces. Transfer to your prepared baking sheet, spreading the pieces out before leaving to cool and set.
  9. Once cooled toss the pieces in additional seas salt to taste

Assembly/ To Serve

  1. Transfer the meringues to plates and gently crack open with a table knife. Spoon the corn mousse between the meringues
  2. Arrange a sprinkling of the salted bitter caramel popped corn around the plate and sprinkle the remaining corn husk powder over. Serve right away

*This recipe makes more popped corn than needed. Any surplus can be stored in an air-tight bag or container for scoffing later!

**In the photos here I have also garnished with some tempered white chocolate “corn husks”.

Irish Tea Cake & Mixed Berry Coulis

Whilst my previous posts have covered the more well known fare of St. Patrick’s Day (Soda Bread; Báirín Breac to name a few) this cake may prove to be lesser-known blast from my childhood past in an Irish kitchen. It’s not the usual image of “Tea Cake” that might spring to mind- chocolate covered, marshmallow packed bundles of sweet joy. This is a “Tea Cake” in the sense of a cake to have with tea; similar to how a “Coffee Cake” can be not so much coffee flavored cake, but rather a cake to have with coffee.

For me the beauty in this bake lies in it’s simplicity. It’s ingredients aren’t extensive, nor it’s method demanding. And as for the results? Sublime in it’s modesty this can be a welcome relief to other “fussy” bakes. The flavor is smooth and buttery, with a close crumb structure (which reminds me almost of a Japanese cheesecake) this is perfectly paired with a Chantilly cream (not very synonymous with Paddy’s Day I know) or in this case a berry coulis.

I wanted something a little bit different than your standard berry coulis here (there’s a surprise huh?) and the additions of mead and birch syrup here offer that adding both sweetness and hint of bitterness. Don’t get to wrapped up on including these though- I’m aware these aren’t exactly pantry staples. They’ll work wonders if you can include them but the coulis will be tasty treat nonetheless without them.

On that note, whatever you get up with this year’s St. Patrick’s Day festivities I hope you enjoy- heck knows it’s long overdue!

Lá fhéile Pádraig sona dhaoibhe!

Irish Tea Cake & Mixed Berry Coulis Recipe #recipe

Ingredients

Irish Tea Cake

  • 1/2 cup butter
  • 1 cup white sugar
  • 2 eggs
  • 1 1/2 teaspoons vanilla extract
  • 1 3/4 cups all purpose flour
  • 2 teaspoons baking powder
  • 1/2 teaspoon salt
  • 1/2 cup milk
  • 1/4 cup confectioners sugar

Mixed Berry Coulis

  • 2 cups mixed berries, fresh or frozen
  • 1/2 cup sugar
  • 2 Tablespoons lemon juice
  • 2 Tablespoons mead
  • 1 Tablespoon birch syrup

Method

Irish Tea Cake

  1. Preheat oven to 350 degrees F (175 degrees C). Grease and line a 9-inch round pan
  2. In a bowl combine the flour, baking powder and salt and set aside
  3. In a separate bowl (of a stand mixer), cream together the butter and sugar until light and fluffy (about 10 minutes)
  4. Beat in the eggs, one at a time, and vanilla, mixing until fully incorporated
  5. Stir the dry flour mixture into the batter alternately with the milk. If the batter is too stiff, a tablespoon or two of milk may be added
  6. Spread the batter evenly into the prepared pan
  7. Bake for 30 to 35 minutes in the preheated oven, until a toothpick inserted into the center comes out clean.
  8. Cool in pan on a wire rack, then turn out for serving
  9. Dust with confectioners’ sugar and serve sliced with the mixed berry coulis

Mixed Berry Coulis

  1. In a medium pan combine the mixed berries, sugar and lemon juice
  2. Over a medium heat stir occasionally until sugar has dissolved
  3. Add in mead and birch syrup, reduce to a low heat and simmer for 10-15mins, stirring occasionally. Cool until berries have softened and broken down. Check taste for sweetness and stir in more sugar if needed
  4. Remove from heat and leave to cool for 10 minutes
  5. Using a standard blender or wand blender blitz berry mixture until smooth
  6. Leave to cool fully

Black Garlic Ice Cream Sandwich, with Fennel & Orange Donuts

I can just bet your reaction upon reading the title of this recipe post. Furrowed brow, wrinkled nose…who knows…maybe even a snort of disbelief? “Garlic in a dessert? Well surely that CAN’T be right. He’s pushed fooling around with flavors too far this time!” Well for those of you who have been on this weirdly, wonderful flavor train of mine for while you might remember I have long been a advocate of black garlic and it’s uses in the sweeter side of things in the kitchen- check out my Living in the Black from a few years ago. Yes THAT long!

To give any newcomers a quick rundown-

Black garlic is fresh raw garlic that changes with time through the use of low heat and humidity of about 70% in a process called the Maillard reaction. During this process, the cloves turn a distinct black color. The garlic’s texture and flavor change as well. The flavor of black garlic has the slight tang of tamarind or balsamic vinegar and a mild sweetness that resembles rich molasses with the complexity and umami notes of soy sauce. Its cloves are much softer than fresh garlic, and stickier.

Thank you for coming to my TED talk.

Here I’ve initially paired the black garlic itself with some dark chocolate in an ice cream. The ice cream itself is left wholly unflavored save for a touch of sweetness from a little honey. This allows the flavor of the black garlic to shine through, and work really well with the bitter sharpness of the dark chocolate. for me it’s a wonderfully decadent, almost avant-garde treatment of the humble stalwart dessert. I should point out that for me this recipe is all the more appealing as it’s a “no churn” recipe, you just need to tale a bit more time in the planning of it.

As for the donuts (which are baked, not fried) the whole idea for this came from a quest to create an ice cream sandwich that was just “a little bit” different. Black Garlic was my “gimmick” in the ice cream and well off course something left of center was needed as the sandwich vessel itself. That’s where the donuts come in. The flavors of orange and fennel aren’t just a random selection for intrigue value. The fennel anise, citrus of orange and that molasses-like tang of black garlic work together in a combination that takes on a herbaceous-like quality that does indeed elevate this beyond your usual ice cream sandwich.

Be warned though- unique elevated flavors or not, this is still an ice cream sandwich- so be prepared to get messy!

Black Garlic Ice Cream Sandwich Recipe #recipe #greatchocolateshowdown

Ingredients

Makes 12 donuts and 1.25 litres ice cream

Black Garlic Ice Cream

  • 2 cups and 1/2 cup heavy whipping cream, separated
  • 2 cloves black garlic, squashed to a paste
  • 1 1/2 teaspoons honey
  • 1 can (14oz) sweetened condensed milk
  • 4oz dark chocolate, cut in to chunks

Orange & Fennel Donuts

  • ½ cup (1 stick) butter, softened at room temp
  • ½ cup sugar
  • ¼ cup light brown sugar
  • Zest of 2 large oranges
  • 2 ½ cups AP flour
  • 1 ½ teaspoon baking powder
  • ¼ teaspoon bicarb of soda
  • ¾ teaspoon salt
  • 2 teaspoons ground fennel
  • 2 eggs, room temperature
  • 1 Tablespoon orange juice
  • 1 teaspoon vanilla extract
  • 1 cup whole milk, room temperature

To Decorate

  • 6oz Dark chocolate, melted
  • Gold leaf, optional
  • Dragees, optional
  • Feuilletine, optional

Method

Black Garlic Ice Cream

  1. In a large saucepan combine 2 cups of heavy whipping cream and the black garlic paste
  2. Heat over a medium heat, stirring occasionally until small bubbles start to form at the edge of the milk
  3. Reduce heat to low for 5 mins
  4. After 5 mins remove from heat and leave to infuse for 15 mins. After this time strain the cream/ garlic mixture in to a small bowl to remove the garlic pieces
  5. Cover surface with plastic wrap to prevent skin and place in refrigerator to cool fully
  6. Once the cream mixture has cooled fully, transfer to a large bowl, add in the 1/2 cup of whipping cream and whisk to soft peak stage
  7. Fold in honey and condensed sweetened milk until fully incorporated
  8. Pour the mixture into a freezer-proof container, cover the surface with plastic wrap and freeze for 2 hours
  9. After 2 hours, remove ice cream from freezer and fold in chocolate chunks
  10. Return to freezer and leave until fully frozen, minimum 6 hours
  11. To serve ice-cream remove from freezer and leave at room temperature for 5 mins before scooping to serve

Orange & Fennel Donuts

  1. Preheat oven to 425 degrees C. Prepare donut pans with butter, or baking spray
  2. In stand mixer bowl with paddle attachment, cream the butter, sugars and orange zest until light and fluffy (apx 3 mins)
  3. In a separate medium bowl combine the flour, baking powder, baking soda, salt, ground fennel and whisk together
  4. Reduce mixer speed to medium, add eggs and vanilla extract and beat until combined, scraping the sides occasionally
  5. Reduce speed to low and add in flour mixture in 2 batches, alternating with milk. Mix until just combined
  6. Transfer batter to piping bag with an open nozzle (or just snip the end off) and pipe in donut pan. Bang to remove bubbles
  7. Bake for 10- 12 minutes until springy, skewer test until clear
  8. Leave to cool in pan for 5 minutes then remove to rack to cool fully
  9. To finish the donuts dip in the melted chocolate and decorate to you liking

*Serve the ice cream and donuts however you like. Single scoop on a single donut and dusted with some feuilletine, adding some tasty textural crunch (I highly recommend this!); single scoop in an epic double donut sandwich or double scoop in a double donut extravaganza. The choice is yours- go WILD!

Midnight Ginger Cake

So this started as riff on my Spiced Chocolate Cake and grew from there. I absolutely love those chocolate-covered ginger biscuits. You know the ones – those crunchy, brittle ginger-snap like ones that have that slow-burning throaty heat, enrobed in decadent dark chocolate? Yup- I can easily demolish an questionably inhuman amount of them in one sitting! So I thought of recreating that addictive marriage of heat and bitterness in cake form. Not content with just any form if chocolate flavor I wanted an extra oomph! Switching up to using black cocoa not only gives in my view wonderfully deep, earthy chocolate flavor but also the alluring sumptuous midnight-black of the title. Although it does provide a chocolate flavor, it’s a world away from the sometimes cloying richness of a traditional cocoa-fueled cake.

I also thought it would provide the perfect canvas for my newly acquired stock of Rosen Bun’s bun-inspired spreads– here, the deliciously addictive Babka variety, with it’s “deep chocolate flavor with a cinnamon left hook”. The darkly, luxurious flavors of the spread combining with the spicy, gingery antics of the cake. You can rest easy as using the spread here is nothing more complicated than spreading, or rather smearing, it in hypnotic, glossy waves of velvety, sweet goodness over the top of the cooled cake. In fact the hardest part is restraining yourself from scoffing the cinnamony-cocoa spread straight from the jar! Seriously – this is sinfully finger-licking good stuff. Check out the Rosen Buns website for a list of stockists.

Decoration of the finished covered cake is entirely to your own taste. I used dehydrated pear slices as I was experimenting with a newly purchased kitchen gadget. Using the dried pear slices as decoration rather than munching them straight out of the bag providing some form of self-deluding restraint in my mind!

As always with my posts where I mention, or name drop, specific items it’s done from a place of support and elevation. The producing companies are small, local Toronto businesses whose products have earned a special place in this cynical, hungry heart (and I mean LITERALLY). If there has been any compensation, sponsorship or re-imbursement, I’ll clearly flag it up for clarity and yes, it usually still involves me being head-over-heels with the product (case in point here, with the awesome team at Station Cold Brew Coffee).

I hope you enjoy this little exercise and experiment in flavors from me- who knows there may be more to come! In the meantime stay safe, stay home (and bake!) and mask up!

Ingredients

  • 1 cup all-purpose flour
  • 1/2 cup black cocoa powder
  • 3/4 tsp baking soda
  • 1/4 tsp salt
  • 3 tsps ground ginger
  • 1 tsp ground cinnamon
  • 1/4 tsp ground cloves
  • 1/2 cup Canola oil
  • 1/2 cup fancy molasses
  • 1/4 cup orange juice
  • 3/4 cup dark brown sugar
  • 2 eggs
  • 1/2 tsp vanilla extract
  • 1/4 cup whole milk
  • 1 jar Rosen’s Babka Spread

Method

  1. Combine the oil, molasses, juice and sugar in a small saucepan. Set it on low heat and stir till the sugar has dissolved. Set aside to cool for about 10 minutes
  2. In a bowl combine the flour, cocoa, baking soda, salt and spices. Whisk to combine and set aside until needed
  3. Preheat your oven to 325 degrees F. Grease an 8″ x 8″ square cake pan with oil and line it with baking parchment, allowing allow the edges to overhang for easy removal
  4. Transfer the cooled molasses mixture to a large mixing bowl and add in the eggs, vanilla and milk. Whisk well until smooth and well combined
  5. Fold in the flour mixture gradually into the liquid until incorporated. Make sure the there are no pockets of dried flour mixture. The final batter may look a little lumpy- this is okay
  6. Pour the batter into the prepared tin, level the top and bake for 35 to 40 minutes until a toothpick inserted into the center comes out clean. If the top is darkening quickly, cover the tin loosely with foil and continue baking
  7. Allow the cake to cool in the tin for 15 minutes, then invert, remove and place on a wire rack to cool completely.
  8. Once completely cool spread the babka spread over the top as you would a ganache. Decorate as you like. Here I’ve used some dehydrated pear slices (for no other reason than I was playing with a new piece of kitchen equipment!)
  9. Slice and enjoy!
  10. Store in an airtight container for about 3-4 days at room temperature

Pumpkin Spice Toffee

A li’l bit late to the game but here we are- Pumpkin Toffee. Enough said.

Ingredients

  • 1 1/2 cups pecan pieces
  • 1 cup salted butter, chopped
  • 1/2 cup warm water
  • 1 cup sugar
  • 1 tspn salt
  • 1 tspn light corn syrup
  • 1/2 cup pumpkin puree
  • 1 and 1/4 teaspoons pumpkin pie spice, divided
  • 1 cup semi-sweet chocolate chips

Method

  1. Line a large baking sheet with parchment paper or a silicone baking mat- the silicone baking mat being the better of the two. Set aside until needed later
  2. In a pan lightly toast pecan pieces for 7-8 minutes or until fragrant and lightly browned. Set aside on a plate until needed
  3. In a large heavy pan, melt the butter over medium heat. Once melted, add the water, 1 cup sugar, salt, corn syrup and pumpkin puree. Stir constantly until the sugar dissolves, then brush down the sides of the pan with a water-moistened pastry brush. Attach a candy thermometer to the pan
  4. Now get comfortable- you’re going to be stirring a LOT. Constantly but gently stir the mixture until it reaches 290°F (143°C; soft crack stage). Be watchful– the temperature slowly rises in the beginning, but then moves quickly. I usually take mine off the heat when the toffee reaches 285°F (141°C), as it will continue to cook in the few seconds after
  5. Immediately remove the pan from heat and stir in 1 teaspoon pumpkin pie spice and 1 cup toasted pecans. Pour the toffee out onto the prepared. lined baking mat. Your mixture should be thick and not spread all the way to the edges of the pan. Cool the toffee for 5-10 minutes
  6. In a microwaveable bowl melt the chocolate chips until smooth. I melt it in the microwave in 20 second increments, stopping and stirring after each
  7. Spread the melted chocolate on top of the toffee, then sprinkle with remaining pecan pieces and sprinkle over the remaining pumpkin pie spice
  8. Refrigerate toffee for 20 minutes or until the chocolate has set. Peel off the silicone baking mat and break toffee into pieces- sized to personal preference of course!
  9. Store toffee in an airtight container at room temperature in a cool dry place for up to 2 weeks

*If you notice the butter separating at any time during the cooking process, remove the pan from heat and beat vigorously (but carefully!) to bring the mixture back together