Chocolate Vinegar Cake

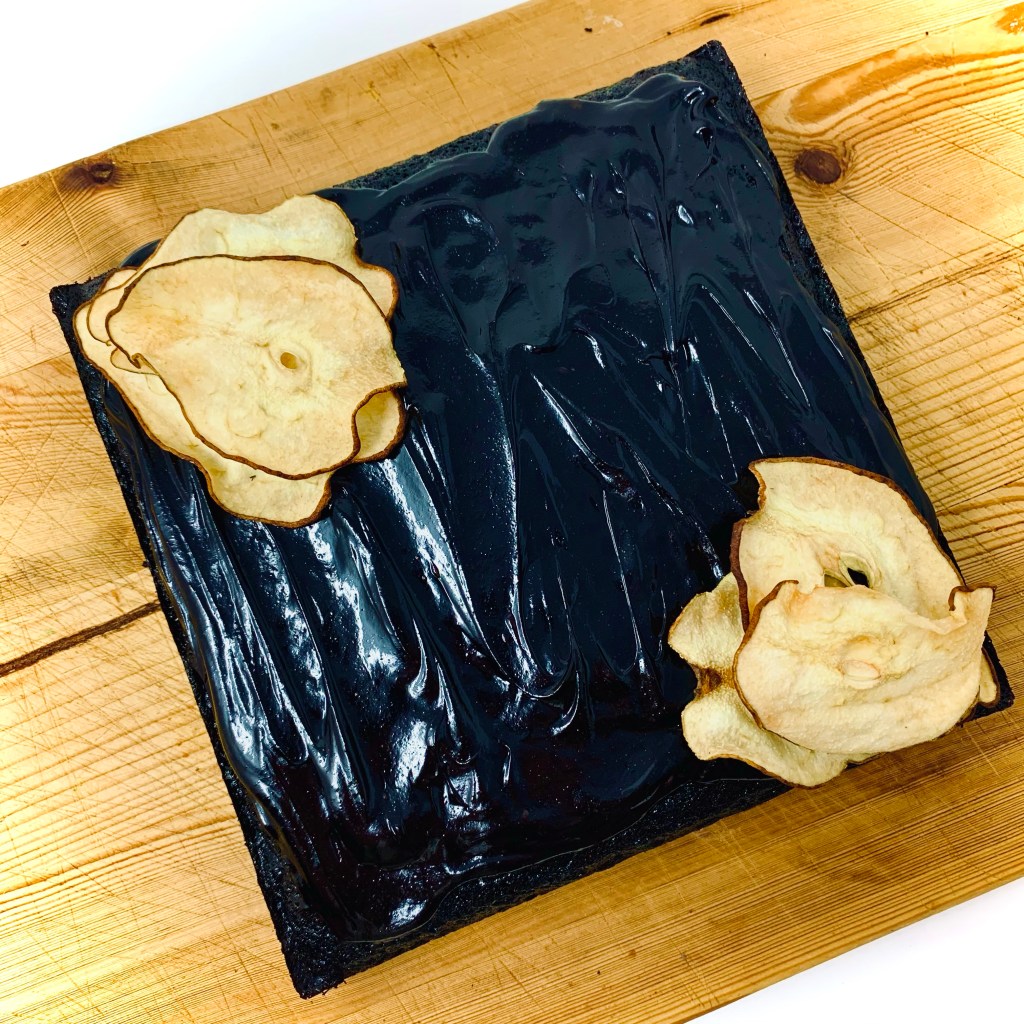
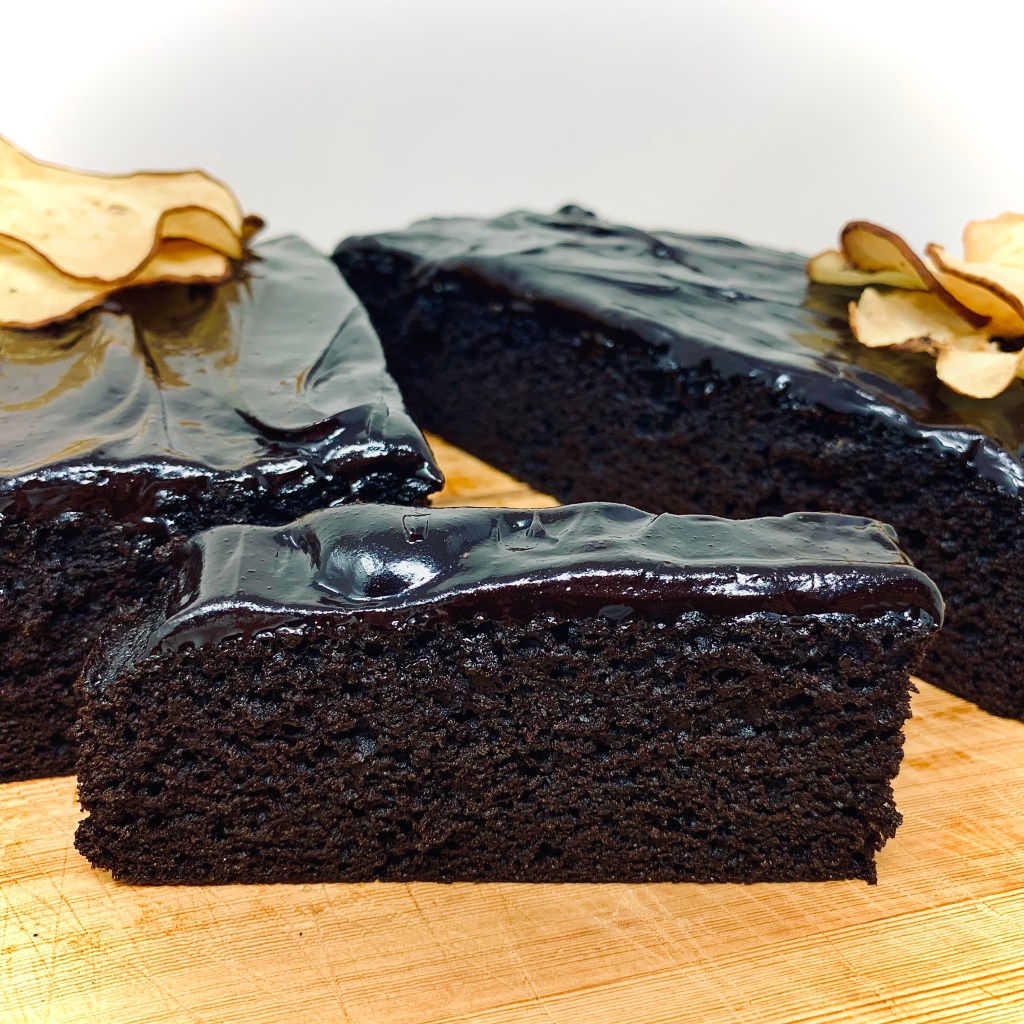
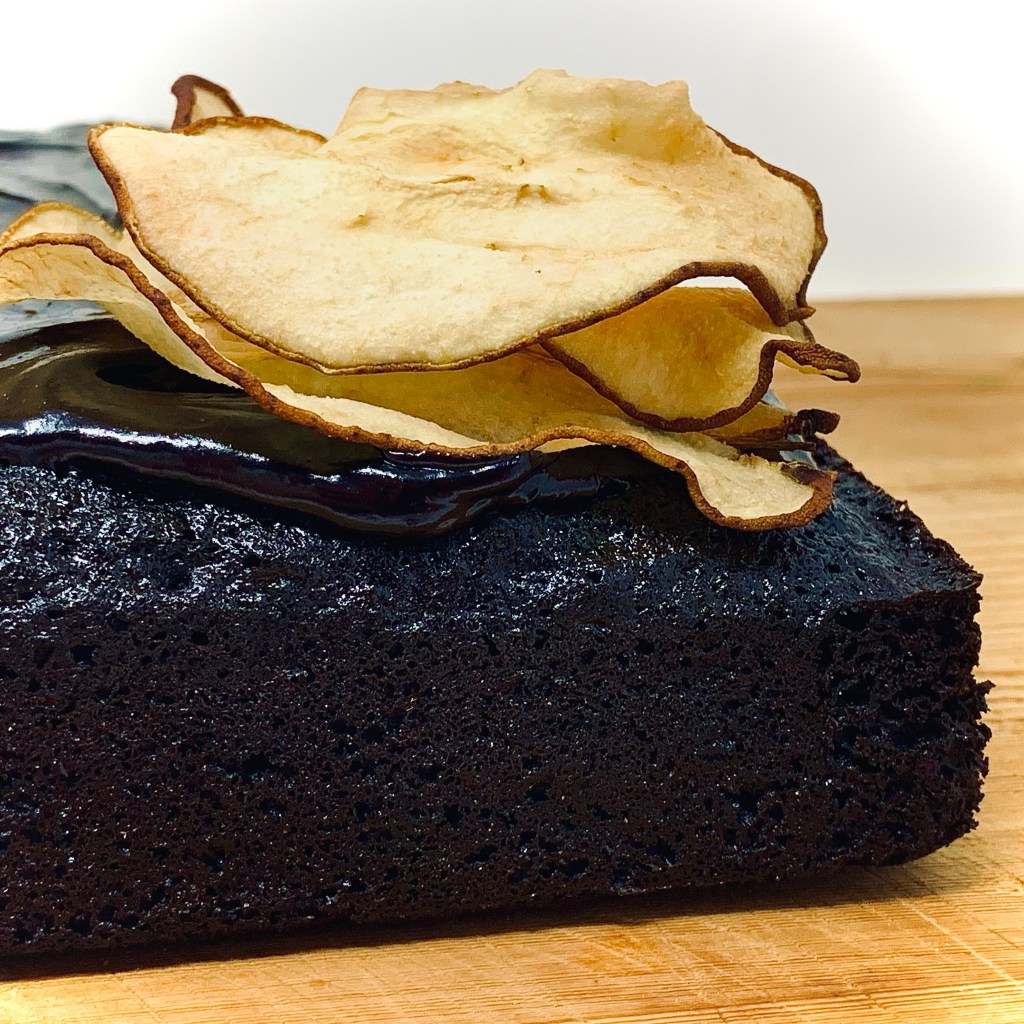
Now don’t raise your eyebrows like that! No, I it’s not a typo- there is indeed vinegar listed in this cake. Going by it’s other moniker “Depression Chocolate Cake”, this may well be one of those recipes that probably everyone’s baking inclined grandparent would probably have in their repertoire. Dating from a time of the Great Depression, when things like eggs, milk, butter and sugar were really expensive and scarce, this recipe keeps them to a minimum. So much that with it’s absence of eggs and dairy the sponge itself can be considered vegan. If you want to finish to completion with it’s delectable ganache topping and still remain vegan-friendly, I’ve included some recommendations at the end of the recipe.

Another bonus with this recipe? Minimal washing up! In fact if you choose to cake it the classic way as a sheet cake to be eaten from the pan, you can save on that singular, additional bowl for clean up. Just make sure to omit the baking parchment lining and use a non-stick pan. Dump everything in the pan, exert a bit more restraint when mixing together and away you go! No bowl, all-in-one sheet cake.

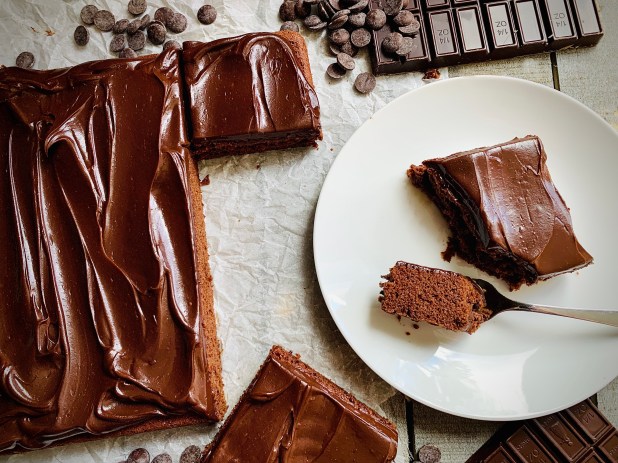
Finishing with chocolate ganache is entirely optional. Some people prefer just a simple dusting of powdered sugar, others prefer just to leave it completely naked and bask in the unadulterated chocolatiness of the sponge itself. Whatever way you decide to finish it, I’m pretty sure you wont be making it just the once!

Chocolate Vinegar Cake #recipe

Ingredients

Makes 1 no. 9” x 12” sheet cake

Chocolate Vinegar Cake

  • 2 cups All Purpose Flour
  • 1 ½ cups granulated sugar
  • ½ cup unsweetened cocoa powder
  • 1 ½ teaspoons baking soda
  • ¾ teaspoon salt
  • 1 ½ cups water
  • ¾ cup canola oil
  • 1 ½ teaspoons vanilla extract
  • 1 ½ teaspoons white vinegar

Chocolate Ganache topping*

  • 1 cup heavy cream, or whipping cream*
  • 8oz semi-sweet chocolate, in small pieces

Method

  1. For the ganache topping, place the chocolate pieces in a medium heatproof bowl
  2. Heat the heavy cream/ whipping cream, in a small pan over a medium heat until just below boiling (look for small bubbles at the edge of the cream in the pan)
  3. Remove the cream from the heat and gently pour the warmed cream over the chocolate pieces in the bowl. Leave to rest for 5 minutes
  4. After 5 minutes, gently stir the chocolate/ cream mixture with a whisk to emulsify it. It will appear mottled and speckled at first but continue gently stirring until it thickens and is uniform in color
  5. Once fully smooth and uniform in color, set aside and leave to fully cool before spreading (usually takes about 2 hours at room temperature). The mixture will thicken to spreadable consistency after this time
  6. Preheat your oven to 350F
  7. Prepare a 9” x 12” baking pan by greasing and lining with baking parchment
  8. In a large bowl combine all the cake ingredients- the flour, sugar, cocoa powder, baking soda, salt, water, canola oil, vanilla extract, and vinegar
  9. Whisk until fully combined, making sure to scrape the bottom of the bowl to avoid any dry ingredient residue. Continue mixing until fully blended and smooth
  10. Pour into your prepared pan. If needed gently tilt the pan to allow the cake batter to flow into the corners
  11. Bake in your preheated oven for between 20-25minutesm or until a cake tester, or skewer, comes out clean when inserted into the centre of the cake. Remove the cake from the oven allow to cool in tin for 5 minutes in a rack
  12. After allowing to cool for 5 minutes, invert the cake onto a cooling rack lined with baking parchment
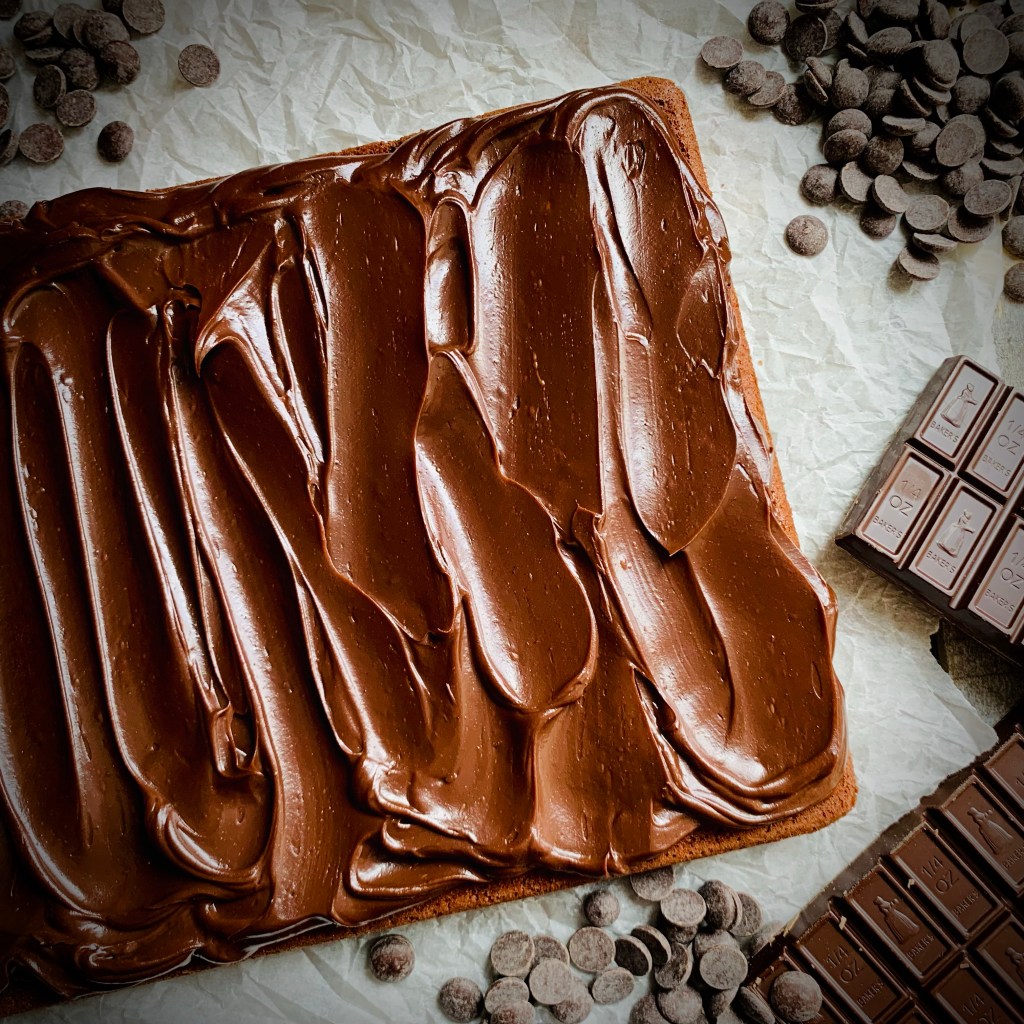
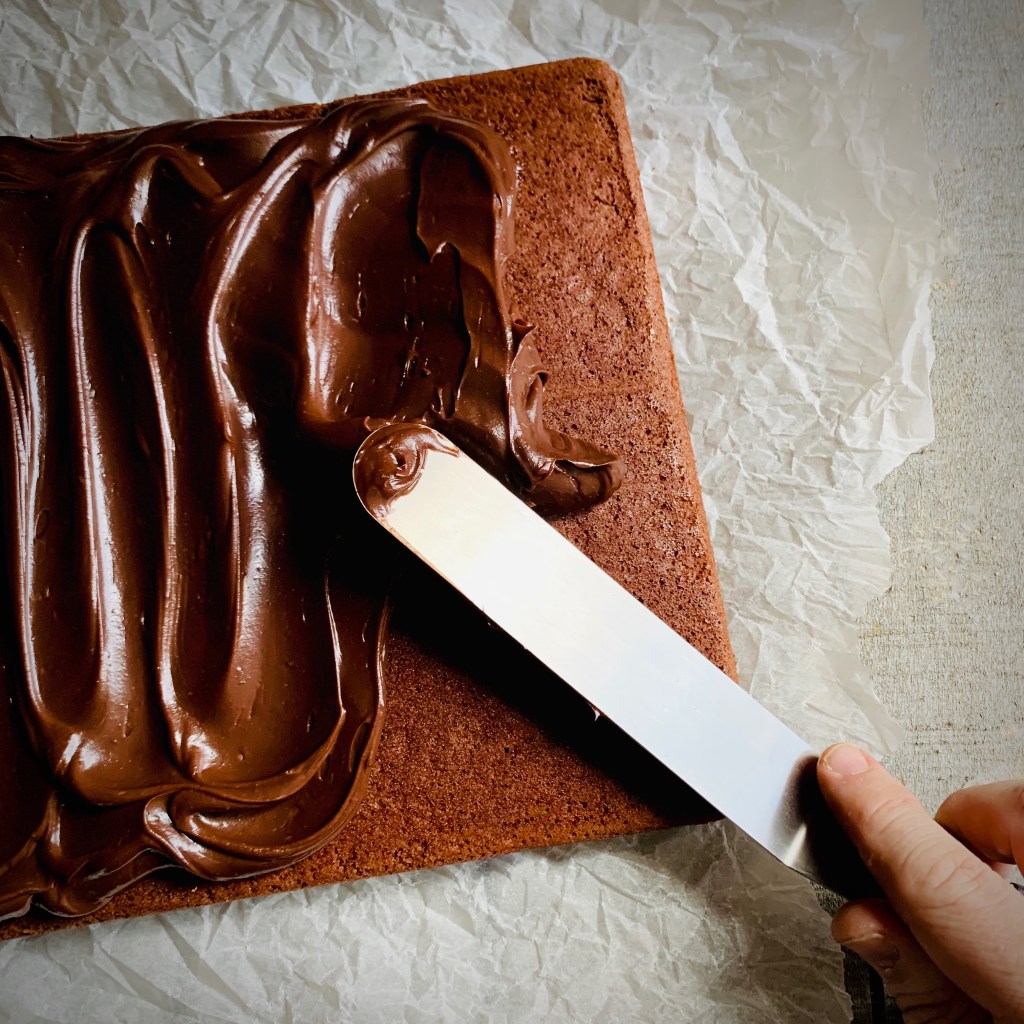
  13. Remove the tin and lining baking parchment paper and allow the cake to cool fully below finishing with your chocolate ganache topping
  14. Once your cake has fully cooled, pour your chocolate ganache topping over the surface and spread with an offset spatula to cover the cake
  15. Slice however you like and enjoy!

*Whilst the cake sponge in this recipe is vegan, the chocolate ganache isn’t. If you want a complete vegan friendly cake substitute 1 cup full-fat coconut milk (Make sure to fully shake it before using). Also make sure that your chocolate that your using is vegan-friendly.

Queen of Puddings Brunch Pancakes

Yet another bake that came about from my time on Food Network Canada’s show Great Chocolate Showdown. The elimination challenge in Episode 4 was to bake a brunch dish inspired by a favorite childhood dessert, using QuakerTM oat flour. The items for selection were coffee cake, tart, pancakes, crepes and biscuits. While I’m definitely partial to a good breakfast biscuit, pancakes are much closer to my heart. Waffles give me a savory brunch option, whilst pancakes are the perfect vehicle for a sweet option.

My childhood memory would have been firmly anchored in my mom and her synonymous dessert that is Queen of Puddings. My mother was solely responsible for my ability, passion and sometimes foolhardy ambition when I bake. In my childhood memories, she’s permanently enrobed in a gingham tabard, and there was nothing this woman couldn’t make, bake or generally concoct in the kitchen. If I were to sum up a childhood of kitchen memories in one delicious dessert, Queen Of Puddings, instantly springs to mind. With layers of breadcrumb enriched vanilla custard layered with sweet, tangy raspberry jam and topped with billowy clouds of fluffy, golden toasted meringue it was my mom’s go-to dessert when ingredients were scarce. For me it’s a classic case of my mom being a kitchen alchemist and turning a few mundane ingredients into something fantastic- a fine example of the whole being more than the sum of it’s parts. The original recipe is easy and comforting, and it’s warmth, familiarity and soothing nature will always remind me a a childhood at my mother’s hip.

Of course trying to marry such a quintessentially classic comfort pudding with the concept of brunch was always going to be a fun challenge at best! In my head the signature layers of the original recipe lend themselves perfectly to create a layered, stacked brunch dessert. Here I’ve created a pancake stack bordering on an entremet- layers of pancake with ganache, custard, and jelly regally crowned with peaks of soft, fluffy meringue. Anyone for a boujee brunch?

Yes I’ve taken shortcuts here with the use of Jello-O and custard powder. For me, when making brunch, shortcuts are ALWAYS welcome. Anything that helps me get to the table fast and get the bubbles flowing even faster is always acceptable in my books! I’m not one to stand on ceremony.

Bottoms up!

Queen of Puddings Brunch Pancakes #recipe #greatchocolateshowdown

Makes 4

Ingredients

Oat Pancakes

  • 2 cups oat flour
  • 1 1/2 tsp baking powder
  • 1/2 cinnamon
  • 1/8 tsp Kosher salt
  • 2 eggs
  • Zest 1 large orange
  • 1 cup whole milk
  • 1/4 cup butter, melted
  • 1 Tbsp agave syrup
  • 1/2 tsp vanilla extract
  • 1 cup chocolate chips

Whipped Chocolate Ganache

  • 1/2 cup whipping cream
  • 2oz dark chocolate, cut in to chunks
  • 1 Tbsp Raspberry liqueur
  • 1/8 tsp Kosher salt

Prosecco Raspberry Gelee

  • 1 pack Raspberry Jell-O
  • 1 cup boiling water
  • 1 cup Prosecco

Chocolate Custard

  • 2 Tbsp custard powder
  • 2 tsp sugar
  • 1 cup whole milk
  • 2 oz dark chocolate, cut in to chunks

Meringue

  • 2 egg whites
  • 1/2 cup fine sugar

To Serve

  • 1 1/2 cups fresh raspberries, sliced lengthwise in half

Method

Prosecco Raspberry Gelee

  1. In a jug combine Jell-O powder and boiling water. Stir until dissolved
  2. Slowly add in prosecco and stir gently to incorporate
  3. Pour into 3″ dia silicone tartlet mold to 1/4″ depth
  4. Place in refrigerator to set

Chocolate custard

  1. Mix the custard powder and sugar together in a small pan
  2. Add the milk, and stir to combine
  3. Continue heating, stirring constantly, until the custard is smooth and well thickened
  4. Remove pan from heat and stir in chocolate chunks until melted and fully incorporated
  5. Leave to cool for 5 mins before placing into a piping bag fitted with a plain round tip
  6. Pipe discs of the custard into a silicone tartlet mold to match your Jell-O tartlet mold
  7. Cover the surface of the custard with cling wrap to prevent skin forming on the surface
  8. Place in refrigerator to set

Whipped Chocolate Ganache

  1. Gently heat the cream in a pan until just below boiling. (look for small bubble starting to appear at the edge of the cream)
  2. Remove from heat, add the raspberry liqueur, salt and chocolate chunks and leave for 2-3 minutes
  3. After this time gently stir to emulsify the mixture until it is smooth and uniform in color
  4. Leave to cool to room temperature
  5. Using a whisk or hand held mixer whip the mixture until light and fluffy. Be careful not to overwhisk in case of separation
  6. Cover and set aside until needed

Oat Pancakes

  1. In a medium bowl, whisk together the oat flour, baking powder, cinnamon, and salt
  2. In a separate larger bowl, mix together the eggs, milk, melted butter, orange zest, and vanilla extract
  3. Add the dry ingredients and stir to combine. Once nearly combined stir in the chocolate chips
  4. Heat a griddle pan over a medium high heat. Lower heat to medium low, and using 1/3 cup measurement pour circles of pancake batter to give you 8 pancakes. Your pancakes should spread to approximately 4-4 1/2″ diameter
  5. Cook on each side for 3-2 minutes until golden brown, flipping when done.
  6. Remove from heat and set aside until serving

Meringue

  1. In a stand mixer fitted with the whisk, beat the egg whites until soft peaks form
  2. With the mixer on, gradually beat in the sugar until stiff peaks form. meringue should be glossy and smooth
  3. Transfer to a piping bag fitted with a desired piping nozzle

Assembly/ To Serve

  1. Remove whipped ganache from refrigerator and transfer to a piping bag fitted with a round plain nozzle
  2. Pipe a round of ganache onto a pancake placed on a plate, leaving 1/4-1/2″ border
  3. Set raspberries halves around on the border, standing up against the ganache
  4. Place a second pancake on top
  5. Carefully remove a round of chocolate custard* from the mold and place on top of second pancake
  6. Carefully remove a round of raspberry gelee* from the mold and place on top of the chocolate custard round
  7. Set raspberries halves around on the border, standing up against the custard & gelee rounds
  8. Top with peaks of meringue piped in desired arrangement and torch to finish until toasted and browned
  9. Serve with any remaining raspberries

*Chocolate custard and gelee rounds can be placed in the freezer, after setting, for 10-15mins to firm up to aid removal

Black Garlic Ice Cream Sandwich, with Fennel & Orange Donuts

I can just bet your reaction upon reading the title of this recipe post. Furrowed brow, wrinkled nose…who knows…maybe even a snort of disbelief? “Garlic in a dessert? Well surely that CAN’T be right. He’s pushed fooling around with flavors too far this time!” Well for those of you who have been on this weirdly, wonderful flavor train of mine for while you might remember I have long been a advocate of black garlic and it’s uses in the sweeter side of things in the kitchen- check out my Living in the Black from a few years ago. Yes THAT long!

To give any newcomers a quick rundown-

Black garlic is fresh raw garlic that changes with time through the use of low heat and humidity of about 70% in a process called the Maillard reaction. During this process, the cloves turn a distinct black color. The garlic’s texture and flavor change as well. The flavor of black garlic has the slight tang of tamarind or balsamic vinegar and a mild sweetness that resembles rich molasses with the complexity and umami notes of soy sauce. Its cloves are much softer than fresh garlic, and stickier.

Thank you for coming to my TED talk.

Here I’ve initially paired the black garlic itself with some dark chocolate in an ice cream. The ice cream itself is left wholly unflavored save for a touch of sweetness from a little honey. This allows the flavor of the black garlic to shine through, and work really well with the bitter sharpness of the dark chocolate. for me it’s a wonderfully decadent, almost avant-garde treatment of the humble stalwart dessert. I should point out that for me this recipe is all the more appealing as it’s a “no churn” recipe, you just need to tale a bit more time in the planning of it.

As for the donuts (which are baked, not fried) the whole idea for this came from a quest to create an ice cream sandwich that was just “a little bit” different. Black Garlic was my “gimmick” in the ice cream and well off course something left of center was needed as the sandwich vessel itself. That’s where the donuts come in. The flavors of orange and fennel aren’t just a random selection for intrigue value. The fennel anise, citrus of orange and that molasses-like tang of black garlic work together in a combination that takes on a herbaceous-like quality that does indeed elevate this beyond your usual ice cream sandwich.

Be warned though- unique elevated flavors or not, this is still an ice cream sandwich- so be prepared to get messy!

Black Garlic Ice Cream Sandwich Recipe #recipe #greatchocolateshowdown

Ingredients

Makes 12 donuts and 1.25 litres ice cream

Black Garlic Ice Cream

  • 2 cups and 1/2 cup heavy whipping cream, separated
  • 2 cloves black garlic, squashed to a paste
  • 1 1/2 teaspoons honey
  • 1 can (14oz) sweetened condensed milk
  • 4oz dark chocolate, cut in to chunks

Orange & Fennel Donuts

  • ½ cup (1 stick) butter, softened at room temp
  • ½ cup sugar
  • ¼ cup light brown sugar
  • Zest of 2 large oranges
  • 2 ½ cups AP flour
  • 1 ½ teaspoon baking powder
  • ¼ teaspoon bicarb of soda
  • ¾ teaspoon salt
  • 2 teaspoons ground fennel
  • 2 eggs, room temperature
  • 1 Tablespoon orange juice
  • 1 teaspoon vanilla extract
  • 1 cup whole milk, room temperature

To Decorate

  • 6oz Dark chocolate, melted
  • Gold leaf, optional
  • Dragees, optional
  • Feuilletine, optional

Method

Black Garlic Ice Cream

  1. In a large saucepan combine 2 cups of heavy whipping cream and the black garlic paste
  2. Heat over a medium heat, stirring occasionally until small bubbles start to form at the edge of the milk
  3. Reduce heat to low for 5 mins
  4. After 5 mins remove from heat and leave to infuse for 15 mins. After this time strain the cream/ garlic mixture in to a small bowl to remove the garlic pieces
  5. Cover surface with plastic wrap to prevent skin and place in refrigerator to cool fully
  6. Once the cream mixture has cooled fully, transfer to a large bowl, add in the 1/2 cup of whipping cream and whisk to soft peak stage
  7. Fold in honey and condensed sweetened milk until fully incorporated
  8. Pour the mixture into a freezer-proof container, cover the surface with plastic wrap and freeze for 2 hours
  9. After 2 hours, remove ice cream from freezer and fold in chocolate chunks
  10. Return to freezer and leave until fully frozen, minimum 6 hours
  11. To serve ice-cream remove from freezer and leave at room temperature for 5 mins before scooping to serve

Orange & Fennel Donuts

  1. Preheat oven to 425 degrees C. Prepare donut pans with butter, or baking spray
  2. In stand mixer bowl with paddle attachment, cream the butter, sugars and orange zest until light and fluffy (apx 3 mins)
  3. In a separate medium bowl combine the flour, baking powder, baking soda, salt, ground fennel and whisk together
  4. Reduce mixer speed to medium, add eggs and vanilla extract and beat until combined, scraping the sides occasionally
  5. Reduce speed to low and add in flour mixture in 2 batches, alternating with milk. Mix until just combined
  6. Transfer batter to piping bag with an open nozzle (or just snip the end off) and pipe in donut pan. Bang to remove bubbles
  7. Bake for 10- 12 minutes until springy, skewer test until clear
  8. Leave to cool in pan for 5 minutes then remove to rack to cool fully
  9. To finish the donuts dip in the melted chocolate and decorate to you liking

*Serve the ice cream and donuts however you like. Single scoop on a single donut and dusted with some feuilletine, adding some tasty textural crunch (I highly recommend this!); single scoop in an epic double donut sandwich or double scoop in a double donut extravaganza. The choice is yours- go WILD!

Coming to a small screen soon

If you follow any of my social media channels you will know by now that I’ll be a competitor on an upcoming baking reality TV show. If you don’t follow them and just happened to stumble upon this page, well the show in question is Food Network Canada’s “Great Chocolate Showdown“. Premiering on Tuesday, March 1st at 9pm ET/PT the show features 10 highly skilled home bakers from all walks of life.

Great Chocolate Showdown is an ooey-gooey, decadent chocolate dessert competition series where 10 home bakers go head-to-head in the indulgent world of chocolate, vying for the grand prize in a range of creative and exciting chocolate-based challenges. In order to survive the competition from week-to-week and avoid elimination, the chocoholic dessert-makers must dazzle our panel of world-renowned chocolatiers and food expert judges with their delicious, inventive creations. In the end, three bakers take on the biggest chocolate challenge of their lives, but only one is crowned ‘Great Chocolate Showdown Champion’ and wins the $50,000 grand prize

During the course of the competition I’m hoping to deliver some amazing bakes, cakes and sweets while staying through to my flair for flavors, all the while competing for the grand prize of $50k. Hopefully you’ll get to tune in, watch along and route for me.

Great Chocolate Showdown, Season 3 premieres March 1 at 9 p.m. ET/PT on Food Network Canada and is available to stream live and on-demand with STACKTV and the Global TV App.

New episodes air Tuesdays at 9 p.m. ET/PT on Food Network Canada and are available to stream live and on-demand with STACKTV and the Global TV App.

You can follow ME, if you don’t already, at my accounts below

Instagram: https://www.instagram.com/crumbsinmybeardyyz/

Twitter: https://twitter.com/MrMomsYYZ

TikTok: https://www.tiktok.com/@crumbsinmybeardyyz?lang=en

You can follow Food Network Canada, Great Chocolate Showdown and all it’s happenings at the accounts below

Facebook: https://www.facebook.com/foodnetworkcanada

Twitter: https://twitter.com/foodnetworkca

Instagram: https://www.instagram.com/foodnetworkca

TikTok: https://www.tiktok.com/@foodnetworkca?lang=en

#GreatChocolate Showdown

Online: See exclusive content at www.foodnetwork.ca

For the official press release see here

That’s all for now. Stay tuned!

Toronto’s only contender for Great Chocolate Showdown Season 3 #greatchocolateshowdown

Midnight Ginger Cake

So this started as riff on my Spiced Chocolate Cake and grew from there. I absolutely love those chocolate-covered ginger biscuits. You know the ones – those crunchy, brittle ginger-snap like ones that have that slow-burning throaty heat, enrobed in decadent dark chocolate? Yup- I can easily demolish an questionably inhuman amount of them in one sitting! So I thought of recreating that addictive marriage of heat and bitterness in cake form. Not content with just any form if chocolate flavor I wanted an extra oomph! Switching up to using black cocoa not only gives in my view wonderfully deep, earthy chocolate flavor but also the alluring sumptuous midnight-black of the title. Although it does provide a chocolate flavor, it’s a world away from the sometimes cloying richness of a traditional cocoa-fueled cake.

I also thought it would provide the perfect canvas for my newly acquired stock of Rosen Bun’s bun-inspired spreads– here, the deliciously addictive Babka variety, with it’s “deep chocolate flavor with a cinnamon left hook”. The darkly, luxurious flavors of the spread combining with the spicy, gingery antics of the cake. You can rest easy as using the spread here is nothing more complicated than spreading, or rather smearing, it in hypnotic, glossy waves of velvety, sweet goodness over the top of the cooled cake. In fact the hardest part is restraining yourself from scoffing the cinnamony-cocoa spread straight from the jar! Seriously – this is sinfully finger-licking good stuff. Check out the Rosen Buns website for a list of stockists.

Decoration of the finished covered cake is entirely to your own taste. I used dehydrated pear slices as I was experimenting with a newly purchased kitchen gadget. Using the dried pear slices as decoration rather than munching them straight out of the bag providing some form of self-deluding restraint in my mind!

As always with my posts where I mention, or name drop, specific items it’s done from a place of support and elevation. The producing companies are small, local Toronto businesses whose products have earned a special place in this cynical, hungry heart (and I mean LITERALLY). If there has been any compensation, sponsorship or re-imbursement, I’ll clearly flag it up for clarity and yes, it usually still involves me being head-over-heels with the product (case in point here, with the awesome team at Station Cold Brew Coffee).

I hope you enjoy this little exercise and experiment in flavors from me- who knows there may be more to come! In the meantime stay safe, stay home (and bake!) and mask up!

Ingredients

  • 1 cup all-purpose flour
  • 1/2 cup black cocoa powder
  • 3/4 tsp baking soda
  • 1/4 tsp salt
  • 3 tsps ground ginger
  • 1 tsp ground cinnamon
  • 1/4 tsp ground cloves
  • 1/2 cup Canola oil
  • 1/2 cup fancy molasses
  • 1/4 cup orange juice
  • 3/4 cup dark brown sugar
  • 2 eggs
  • 1/2 tsp vanilla extract
  • 1/4 cup whole milk
  • 1 jar Rosen’s Babka Spread

Method

  1. Combine the oil, molasses, juice and sugar in a small saucepan. Set it on low heat and stir till the sugar has dissolved. Set aside to cool for about 10 minutes
  2. In a bowl combine the flour, cocoa, baking soda, salt and spices. Whisk to combine and set aside until needed
  3. Preheat your oven to 325 degrees F. Grease an 8″ x 8″ square cake pan with oil and line it with baking parchment, allowing allow the edges to overhang for easy removal
  4. Transfer the cooled molasses mixture to a large mixing bowl and add in the eggs, vanilla and milk. Whisk well until smooth and well combined
  5. Fold in the flour mixture gradually into the liquid until incorporated. Make sure the there are no pockets of dried flour mixture. The final batter may look a little lumpy- this is okay
  6. Pour the batter into the prepared tin, level the top and bake for 35 to 40 minutes until a toothpick inserted into the center comes out clean. If the top is darkening quickly, cover the tin loosely with foil and continue baking
  7. Allow the cake to cool in the tin for 15 minutes, then invert, remove and place on a wire rack to cool completely.
  8. Once completely cool spread the babka spread over the top as you would a ganache. Decorate as you like. Here I’ve used some dehydrated pear slices (for no other reason than I was playing with a new piece of kitchen equipment!)
  9. Slice and enjoy!
  10. Store in an airtight container for about 3-4 days at room temperature