In the bowl of a stand mixer fitted with a paddle attachment, beat the butter on medium-high speed until smooth. Add both the sugars and beat on medium-high speed until creamed
Add the eggs, molasses, and vanilla and beat on high speed until combined, about 1 minute. Scrape down the sides and up the bottom of the bowl and beat again as needed to combine
While the butter and sugars are creaming, Whisk the flour, ground cinnamon, ground ginger, baking soda, and salt together in a separate medium bowl. Set aside until needed
Once the butter and sugars have been creamed, add the dry ingredients to the wet ingredients and mix on low until combined.
Once fully combined, fold in the oats, dried cherries and crystalised ginger. Your dough should be quite thick and sticky. Cover and chill the dough for at least 45 minutes in the refrigerator
Preheat oven to 350°F. Line baking sheets with parchment paper or silicone baking mats
Use a large cookie scoop to scoop the cookie dough, about 3 Tablespoons of dough per cookie, and place well apart on the baking sheets. Bake for 13-14 minutes or golden brown. The edges will appear slightly darker than the centre of the cookie
Remove from the oven and allow cookies to cool on the baking sheet for 5 minutes before transferring to a wire rack to cool completely
Yet another bake that came about from my time on Food Network Canada’s show Great Chocolate Showdown. The elimination challenge in Episode 4 was to bake a brunch dish inspired by a favorite childhood dessert, using QuakerTM oat flour. The items for selection were coffee cake, tart, pancakes, crepes and biscuits. While I’m definitely partial to a good breakfast biscuit, pancakes are much closer to my heart. Waffles give me a savory brunch option, whilst pancakes are the perfect vehicle for a sweet option.
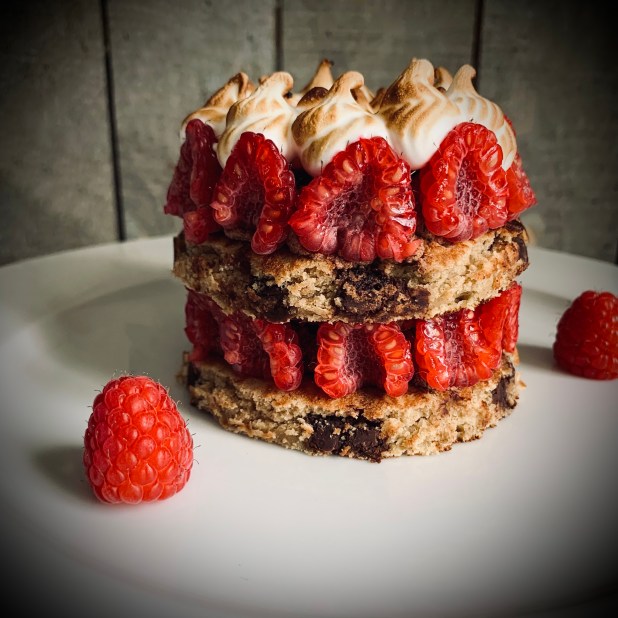
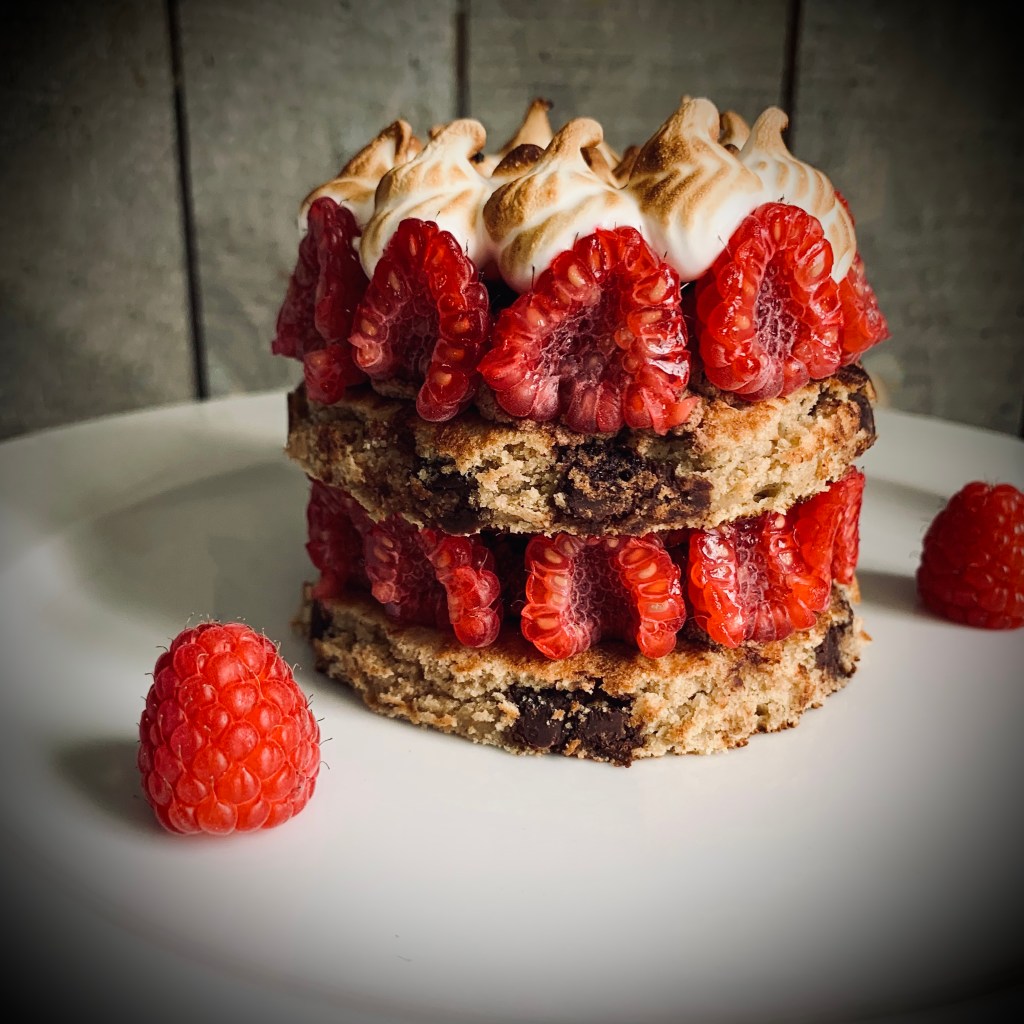
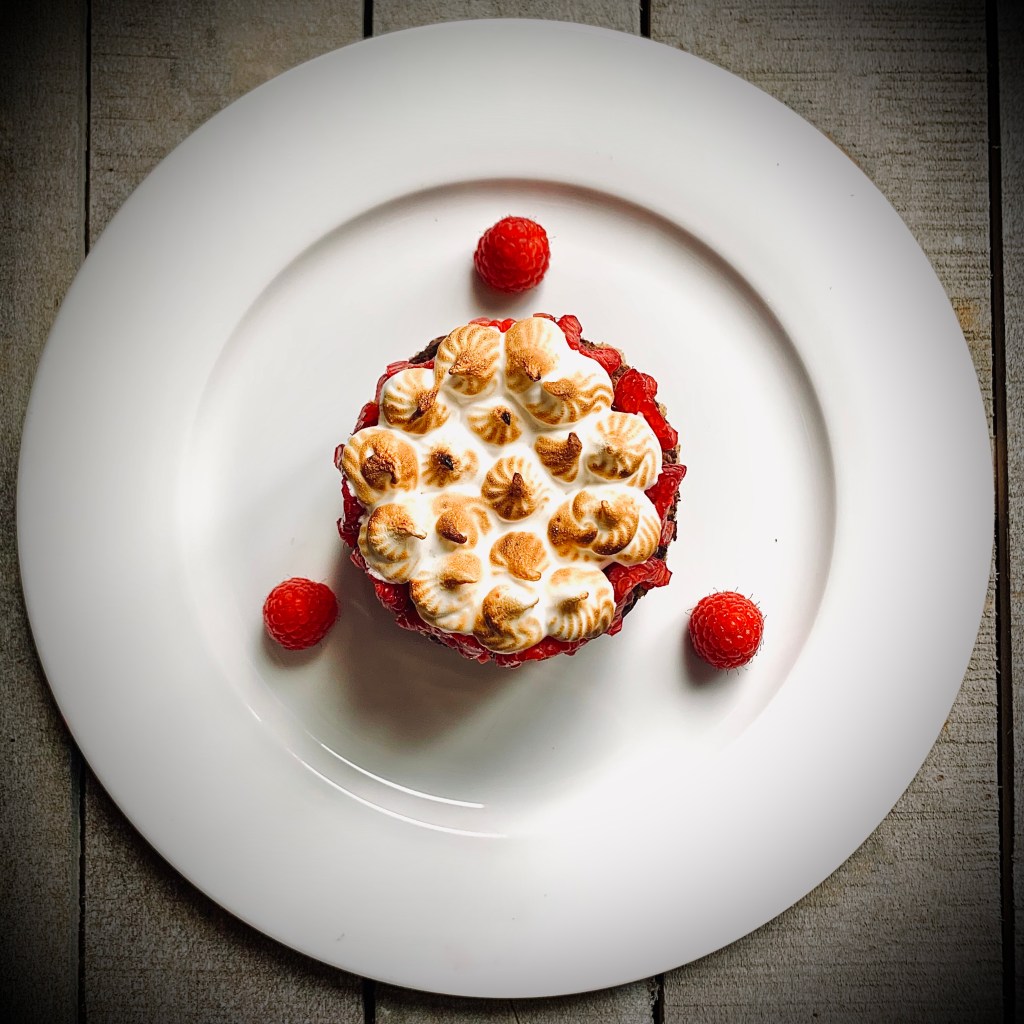
My childhood memory would have been firmly anchored in my mom and her synonymous dessert that is Queen of Puddings. My mother was solely responsible for my ability, passion and sometimes foolhardy ambition when I bake. In my childhood memories, she’s permanently enrobed in a gingham tabard, and there was nothing this woman couldn’t make, bake or generally concoct in the kitchen. If I were to sum up a childhood of kitchen memories in one delicious dessert, Queen Of Puddings, instantly springs to mind. With layers of breadcrumb enriched vanilla custard layered with sweet, tangy raspberry jam and topped with billowy clouds of fluffy, golden toasted meringue it was my mom’s go-to dessert when ingredients were scarce. For me it’s a classic case of my mom being a kitchen alchemist and turning a few mundane ingredients into something fantastic- a fine example of the whole being more than the sum of it’s parts. The original recipe is easy and comforting, and it’s warmth, familiarity and soothing nature will always remind me a a childhood at my mother’s hip.
Of course trying to marry such a quintessentially classic comfort pudding with the concept of brunch was always going to be a fun challenge at best! In my head the signature layers of the original recipe lend themselves perfectly to create a layered, stacked brunch dessert. Here I’ve created a pancake stack bordering on an entremet- layers of pancake with ganache, custard, and jelly regally crowned with peaks of soft, fluffy meringue. Anyone for a boujee brunch?
Yes I’ve taken shortcuts here with the use of Jello-O and custard powder. For me, when making brunch, shortcuts are ALWAYS welcome. Anything that helps me get to the table fast and get the bubbles flowing even faster is always acceptable in my books! I’m not one to stand on ceremony.
Bottoms up!
Queen of Puddings Brunch Pancakes #recipe #greatchocolateshowdown
1 1/2 cups fresh raspberries, sliced lengthwise in half
Method
Prosecco Raspberry Gelee
In a jug combine Jell-O powder and boiling water. Stir until dissolved
Slowly add in prosecco and stir gently to incorporate
Pour into 3″ dia silicone tartlet mold to 1/4″ depth
Place in refrigerator to set
Chocolate custard
Mix the custard powder and sugar together in a small pan
Add the milk, and stir to combine
Continue heating, stirring constantly, until the custard is smooth and well thickened
Remove pan from heat and stir in chocolate chunks until melted and fully incorporated
Leave to cool for 5 mins before placing into a piping bag fitted with a plain round tip
Pipe discs of the custard into a silicone tartlet mold to match your Jell-O tartlet mold
Cover the surface of the custard with cling wrap to prevent skin forming on the surface
Place in refrigerator to set
Whipped Chocolate Ganache
Gently heat the cream in a pan until just below boiling. (look for small bubble starting to appear at the edge of the cream)
Remove from heat, add the raspberry liqueur, salt and chocolate chunks and leave for 2-3 minutes
After this time gently stir to emulsify the mixture until it is smooth and uniform in color
Leave to cool to room temperature
Using a whisk or hand held mixer whip the mixture until light and fluffy. Be careful not to overwhisk in case of separation
Cover and set aside until needed
Oat Pancakes
In a medium bowl, whisk together the oat flour, baking powder, cinnamon, and salt
In a separate larger bowl, mix together the eggs, milk, melted butter, orange zest, and vanilla extract
Add the dry ingredients and stir to combine. Once nearly combined stir in the chocolate chips
Heat a griddle pan over a medium high heat. Lower heat to medium low, and using 1/3 cup measurement pour circles of pancake batter to give you 8 pancakes. Your pancakes should spread to approximately 4-4 1/2″ diameter
Cook on each side for 3-2 minutes until golden brown, flipping when done.
Remove from heat and set aside until serving
Meringue
In a stand mixer fitted with the whisk, beat the egg whites until soft peaks form
With the mixer on, gradually beat in the sugar until stiff peaks form. meringue should be glossy and smooth
Transfer to a piping bag fitted with a desired piping nozzle
Assembly/ To Serve
Remove whipped ganache from refrigerator and transfer to a piping bag fitted with a round plain nozzle
Pipe a round of ganache onto a pancake placed on a plate, leaving 1/4-1/2″ border
Set raspberries halves around on the border, standing up against the ganache
Place a second pancake on top
Carefully remove a round of chocolate custard* from the mold and place on top of second pancake
Carefully remove a round of raspberry gelee* from the mold and place on top of the chocolate custard round
Set raspberries halves around on the border, standing up against the custard & gelee rounds
Top with peaks of meringue piped in desired arrangement and torch to finish until toasted and browned
Serve with any remaining raspberries
*Chocolate custard and gelee rounds can be placed in the freezer, after setting, for 10-15mins to firm up to aid removal
Elvis. The very name conjures up images of sweaty excess, sexy rhythms and snake-hipped gyrations. I have to admit to not being a fan of the man himself but there’s one thing that I can’t deny and that’s his impact on the world.
Aside from his groundbreaking impact on the world of music and movies, Elvis’s impact even stretched as far as the food world. Yes it may not be fancy but the grassroots ingredients of peanut and banana have become synonymous with the Graceland god. Google “The Elvis” and you will find a plethora of entries on the unnervingly mouth-watering combination of peanut butter, banana and bacon- usually in sandwich form. Is this actually a combination so off the wall it works? The answer is actually- yes. The unctuous smoothness of the peanut butter and banana spiked by the salty bites of bacon crispiness stopping it becoming overwhelming and bland.
It was within a week of watching cookery competition shows and Netflix culinary food-show binging that I noticed a bizarrely serendipitous trend- the theme of PB&J and Elvis appeared to crop up rather a lot. We’re talking epiphany-like levels folks. The universe was speaking to me and it was saying, “Elvis”. But how to incorporate this make-up into something unexpected? The answer was literally right under my nose- I pondered the question whilst munching on a slice of last week’s banana loaf.
Now whilst I love banana bread, a certain Covid-quarantine ennui had settled on my taste buds in regards to it. I had become a lockdown Lancelot in a quest to revamp the moist. rich loaf- as my recipe for Buttermilk & Cardamom Banana Bread bares testament to. And this Memphis-kissed combination provided another excuse for kitchen experimentation.
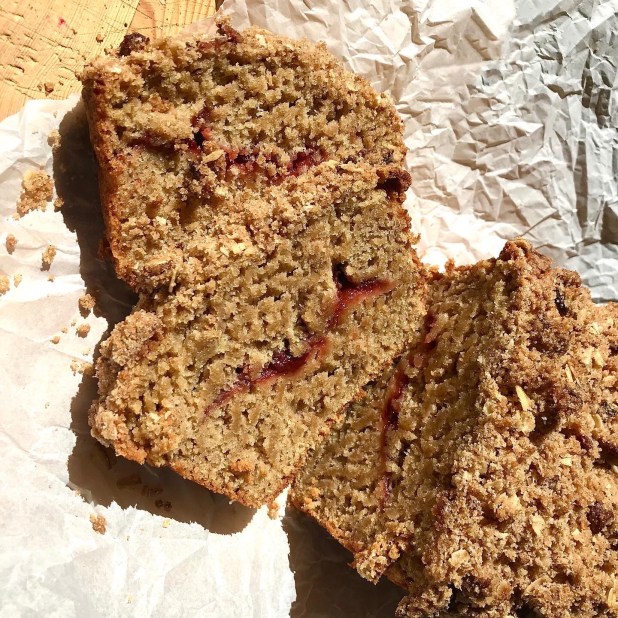
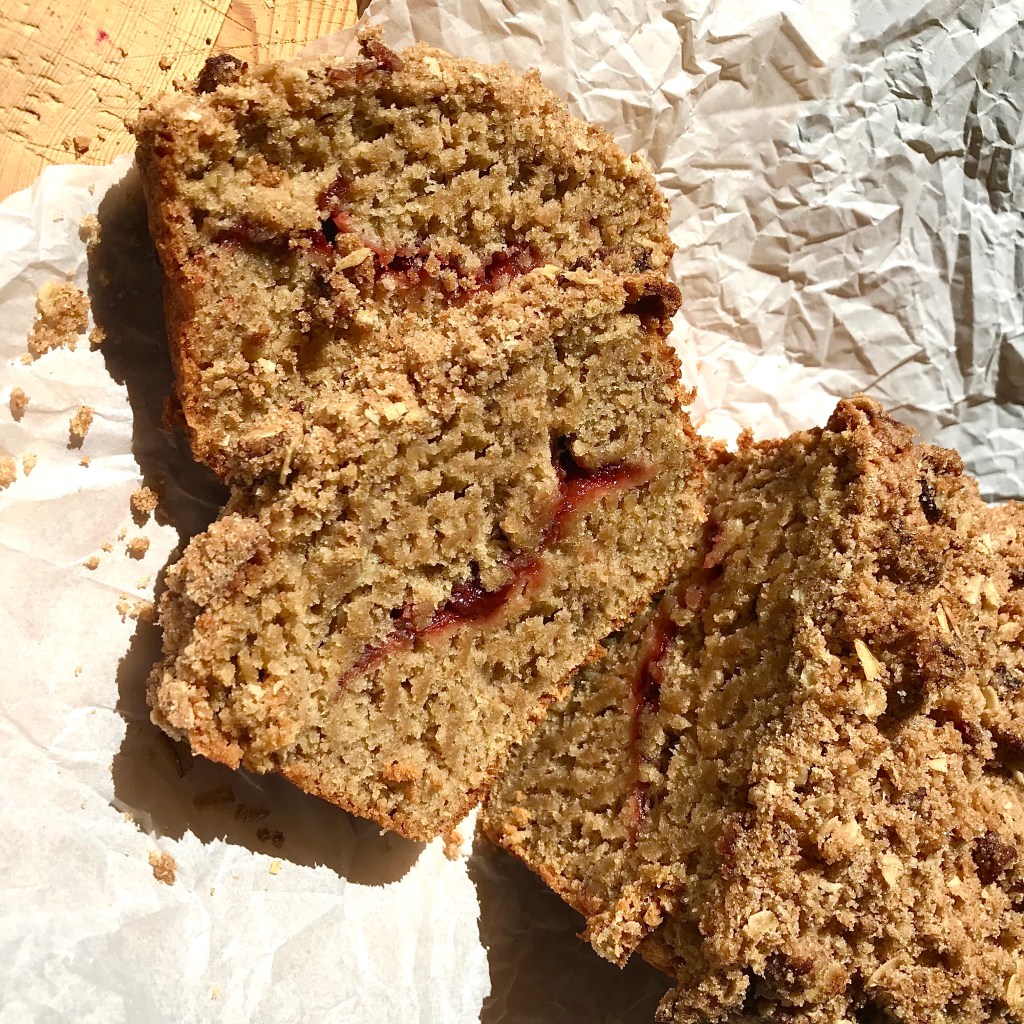
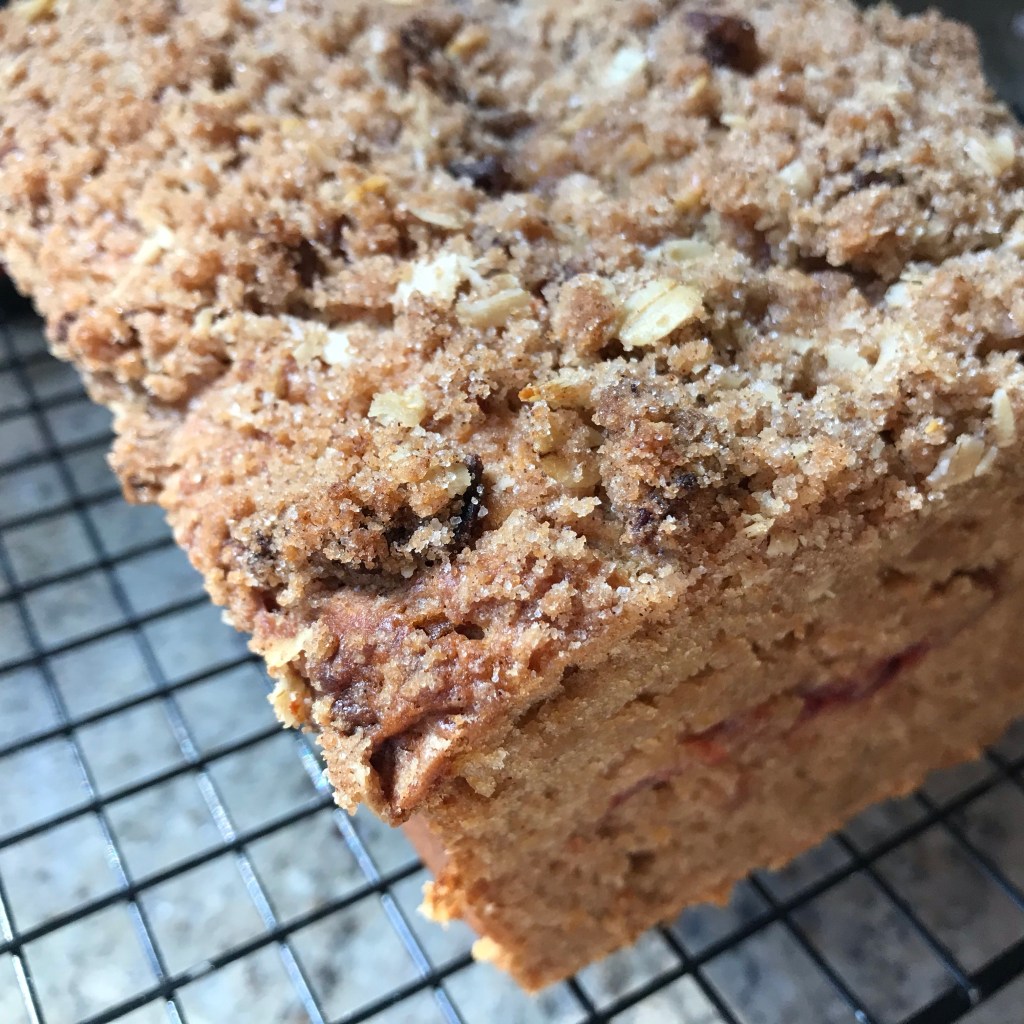
The peanut/ banana combination was an obvious treatment for the loaf itself, and pockets of flavored jelly would of course provide surprising nuggets of sweet, sticky joy in the dough. But where to work in the final signature ingredient of the King? I didn’t want anything as obvious as just a couple of bacon slices on top. My other concern was that mixing bacon pieces into the batter would cause them to become chewy and soft gribene-esque morsels in the batter. So how better to avoid them becoming gummy crumbs than to put them outside the batter…on top…in a topping…a STREUSEL topping!
Et viola! Elvis Banana Bread…enjoy!
Ingredients
3 large bananas
4 Tbspn Peanut butter (smooth or crunchy to you taste)
1/2 cup Canola oil
1/3 cup milk
1 tspn Vanilla extract
2 1/3 cup AP flour
3/4 cup Dark brown sugar
2 tspn Baking powder
1 tspn cinnamon
1/4 tspn Kosher salt
1/3 cup Grape jelly (feel free to sub with whatever flavour you like)
Streusel Topping
5 slices bacon, cooked and crispy
1/4 cup Dark brown sugar
1/4 cup fine sugar
1/4 cup AP flour
1/2 tspn cinnamon
2 Tbspn Butter, cold and diced
Pinch Kosher salt
Method
To make the streusel topping
In a bowl combine both the sugars, flour, cinnamon, salt and butter pieces. Rub the mixture together with your fingertips until a pea-sized sand texture is achieved and a crumble is formed. Crumble in the crispy bacon slices, mix through and set aside until needed later. *This makes more than enough streusel topping with plenty left over for additional uses. It’ll keep in the fridge for up to 3 days in an airtight jar
To make the banana bread
Preheat the oven to 350°F. Grease a 9″ x 5″ loaf pan and line the bottom & with parchment paper (this will help to lift the baked loaf out)
In a large bowl, mash the bananas. Add the peanut butter, oil, milk and vanilla, whisk well to combine and set aside. In a separate bowl, whisk together the flour, sugar, baking powder, cinnamon and salt
Pour the banana mixture into the dry ingredients and fold together until just combined and there are no spots of dry floury residue
Pour 1 /2 of the batter into the loaf pan. Using a piping bag or spoon, place dollops of the jelly along the top of the loaf batter leavings about 1 inch border around. Once you’ve got the jelly piped in how you’d like, pour the remaining loaf batter over to cover the jelly and roughly level the top. Generously sprinkle over the streusel topping to an amount of your liking
Bake for 50 to 60 minutes, or until well risen and a toothpick inserted into the center comes out clean
Remove the baked loaf from the oven, allow to cool for 5 minutes in the loaf pan before lifting out using the parchment paper, and leave to cool completely on a rack before slicing
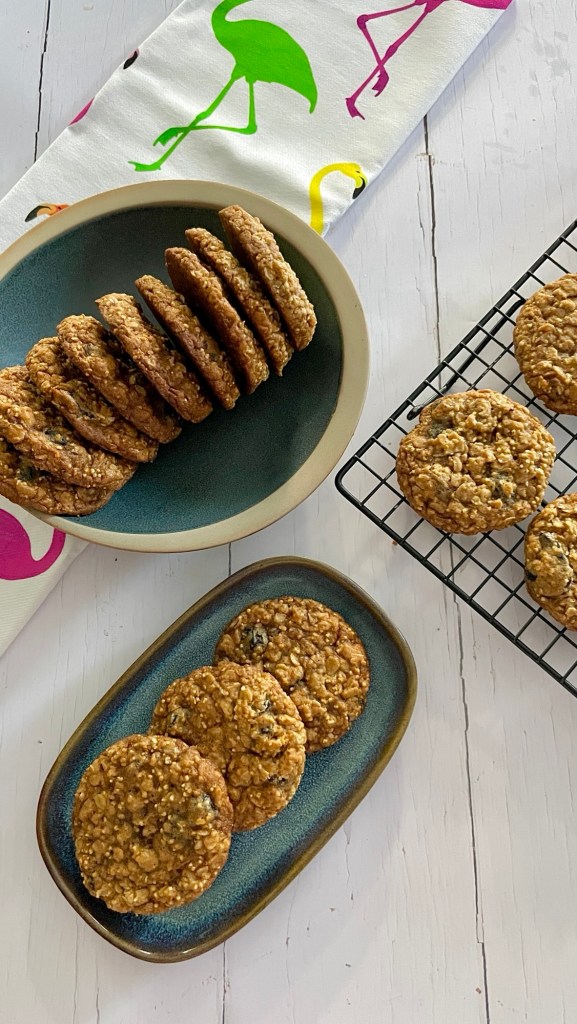
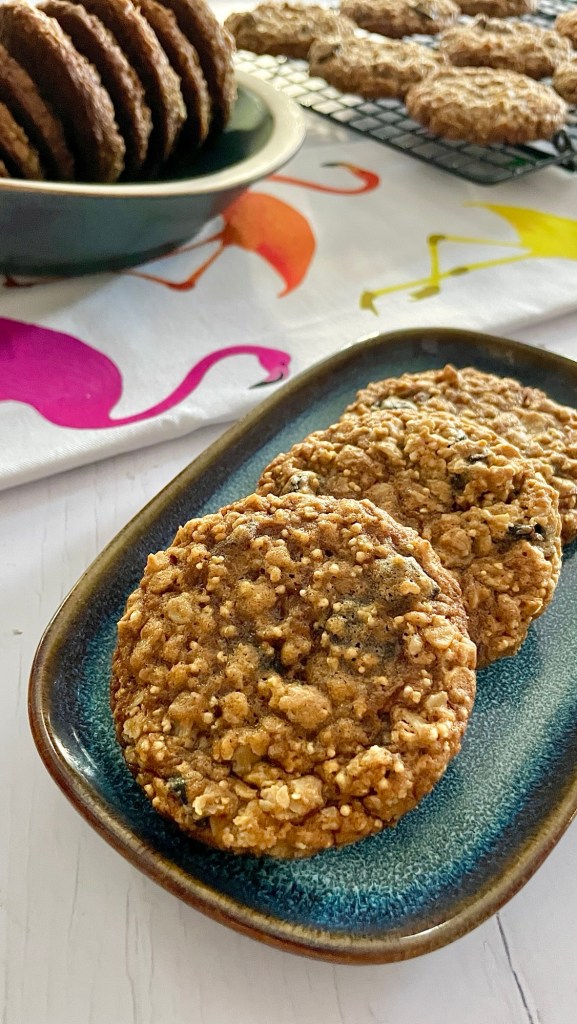
Toffee apples are a signature childhood treat. Whether they conjure memories of sparkling carnivals and fairgrounds, or bring back memories of briny seaside meanderings the gloriously sticky treat is always sure to bring a smile to faces young and old.
When I was growing up Toffee Apples were synonymous with day trips to the beach. I much preferred them to ice cream cones, which I thought were far too over rated and messy, not to mention deceivingly bland! My inclination was much more for the glossy crimson globule on a stick. I say crimson as that’s the kind I grew up with. These weren’t coated in a sweet layer of tawny caramel. The toffee apples of my childhood were instead dipped in a rouge sugar syrup at hard-crack stage which set to a glossy, glass-like layer ready to shattered under eager bites and reveal the juicy tart fruit beneath. You’ll have to forgive me for indulging verbosely here. Family jaunts to the seaside were few and far between and lingering triggers for them are particularly powerful. Needless to say it was a constant question to my younger self, ” This red stuff isn’t like any toffee I know so why are they called Toffee Apples?”. Such were the juvenile mysteries that plagued me.
Over time I learned that the red hard-crack layer was easier to make and maintain on site (and let’s face it probably cheaper too!) I learned that the gleaming red orbs of my youth were in fact correctly named, “Candy Apples” and Toffee Apples as should have a layer a sticky sweet toffee, in the more familiar shade of brown, as their dressing. But who was I to argue with a childhood full of sweet cochineal-fueled indulgence!
You can rest easy though. This recipe contains neither glassy red shards nor ruby bug extracts. You’ll of course know by now I have a weakness for oat cookies. And if they happen to be oat cookies that have been pimped up with a lil’ something then all the better. These are my homage to the classic Toffee Apple in all it’s beige, sticky goodness- albeit without the frustratingly wobbly perching on a ice-pop stick! As a combination themselves, outside of nostalgia, caramel and apple worked exceptionally well with oats, in my view. There’s something about the mellow combination of toffee and oats that instantly induces shoulder-slumping comfort & coziness. Chuck in some bites of apple and you introduce enough tart interest to compliment to earthiness of the other two. I’ll leave the beverage of choice to you – coffee, tea or dunking in to cold glass of milk. All are ideal and highly suggested.
Ingredients
1 cup (2 sticks) salted butter, softened
1 cup light brown sugar, packed
1/2 cup granulated sugar
1 1/2 cups All Purpose flour
1 teaspoon ground cinnamon
1 teaspoon apple pie spice
1 teaspoon baking soda
1 teaspoon salt
2 large eggs
1 tablespoon fancy molasses
1/4 cup maple syrup
1 teaspoon vanilla extract
2 cups whole rolled oats
1 cup quick oats
1/2 cup toffee pieces
1 cup dried apple pieces, (or dried slices chopped)
Method
Whisk the flour, cinnamon, apple pie spice, baking soda, and salt together in a medium bowl. Set aside until needed
In the bowl of a stand mixer, fitted with a paddle attachment, beat the butter and sugars on medium-high speed until blended, about 5 minute, then increase to high speed and whip for another 5-6 mins
In a jug combine the eggs, molasses, maple syrup, vanilla and whisk to combine. Add to the butter mixture and beat for 3 minutes until combined. Scrape down the sides and beat again as needed to combine
Add the dry ingredient mixture to the wet ingredients (I usually do it in 1/4 cup increments) and mix on low until combined. Remove the bowl from the mixer and fold in the oats until well coating
Next add in the toffee pieces and apple pieces. Mix well until fully combined. The final dough will be thick and sticky.
Cover and chill the dough for at least 45 minutes in the refrigerator
Preheat oven to 350°F (177°C). Line baking sheets with parchment paper or silicone baking mats
Use a medium cookie scoop (about 2 tablespoon size) to scoop the cookie dough on to the prepared baking sheets, placing 2 inches apart 9 (I usually fit 12 per sheet). Bake for 17 minutes or until the edges are golden brown. The centres will look soft.
Remove from the oven and allow cookies to cool on the baking sheet for 5 minutes before transferring to a wire rack to cool completely
Cookies can be kept at room temperature in a sealed container for up to 1 week
So I wanted a bar. But it had to be the right kind. I had previously made Hello Dolly Bars, or as they’re also known as Magic Cookies Bars, but I had found them too sweet and gloopy. Maybe I added too much condensed milk caramel or not enough dry ingredients? Either way I was far from happy with them and the resulting bars were deliciously mutated into ice cream topping instead. “Waste not, want not” etc etc.
However like a dog with a bone I couldn’t (okay I WOULDN’T) acknowledge failure. There were also a few tweaks I wanted to try. The crumb base layer of the original cookie bar was far too flimsy IMO. I wanted something with more stability and which would carry itself and the topping. Well what better way to go than with shortbread? Simplifying my Golden Coconut Shortbread with a wholewheat flour was the ideal solution. The nuttiness of the wholewheat grains perfectly complementing the oats I would add.
Another tweak was based on a pet peeve of mine – wet cookie bars. I don’t mean a bake that’s underbaked and soggy. It’s the excess of wet topping ingredients that spoils it for me. And so in with the aforementioned oats! Insider tip here- I’ve found that if a recipe calls for using jumbo rolled oats, using a mix of jumbo oats and quick oats gives a much better result. The smaller quick oats fill in the gaps and voids made between the larger oat flakes and you end up with more oaty bang for your buck. It’s a win!
The quick “caramel” of butter and sugar works as a good binder here but if it’s one thing I’m a sucker for it’s chewy bite (Samoas are my WEAKNESS!) and with that I added in some caramel pieces. These would bake to perfectly chewy morsels adding some extra interest to bars. A little fiddly work is involved here in cutting the caramels into smaller pieces but it’s absolutely worth it.
So they’re you have it- “Hey Dolly Bars”. Not quite traditional “Hello Dolly Bars” but baked bars with a lil extra something and sass.
Ingredients
Shortbread Base
1 2/3 cup Wholewheat Flour
1/3 cup Semolina
2 Tablespoons Rice Flour
1 1/2 Tablespoons Cornstarch
1/2 cup and 2 tablespoons fine sugar, divided
1/2 Teaspoon Kosher salt
1 cup/ 2 sticks salted butter, cold and cubed
Oat Topping
1/2 cup salted butter
1/2 cup granulated sugar
3/4 cup dark brown sugar
1/4 teaspoon Kosher salt
3 large eggs, beaten together
1 teaspoon vanilla extract
2 cups jumbo rolled oats
1 cup quick oats
1/2 cup shredded coconut, sweetened or unsweetened
1/2 cup toffee bits apx (I use 12 Kraft caramels, chopped in half, then each half chopped in to 4)
1 1/2 cups semisweet chocolate chips
Method
Shortbread base
Lightly grease and line a 9″ x 12″ traybake tin
In a large bowl combine the flour, semolina, rice flour, cornstarch, sugar and salt. Whisk together to further combine
Add in the cubed butter and rub together with your fingertips until the mixture is just beginning to bind together. Every so often do a quarter turn of the bowl to make sure you’re using all the dry mixture. You’ll want a texture somewhere between breadcrumbs and damp sand before you stop. Be wary of overworking the butter into the mixture – you want to avoid a dough that is feels slimey from the butter melting too much into the dry ingredients
Tip the crumb mixture into your prepared tin and press the dough so that it forms a solid layer. Level the surface with the back of a spoon or measuring cup, making sure the mixture is evenly spread and uniform. Prick all over with a fork
Refrigerate for 30 mins minimum
Preheat your oven to 325°F
Remove the shortbread from the fridge and bake for about 30 minutes
Remove from the oven and allow to set side to cool in the tin while you make the topping
Oat topping
Increase oven temperature to 350°F
Prepare the topping by melting the butter in a medium saucepan over medium heat. Cook the butter, stirring often, until it melts completely. Continue to heat. The butter will start to foam up a bit, reduce the temperature if needed. Watch carefully as lightly browned specks begin to form at the bottom of the pan, and the foam starts to turn brown in spots. Smell the butter; it should have a nutty aroma
Remove the pan and off the heat, stir in the granulated sugar, brown sugar and salt. The mixture will be thick. Let it cool for a few minutes
Whisk in the eggs and vanilla until the mixture is well-combined. Transfer to a large bowl
Stir in the oats, quick oats, shredded coconut, toffee bits and chocolate chips. Mix all the ingredients to combine well. Spread the mixture evenly over the shortbread crust.
Bake for 20-25 minutes until the bars are set around the edges and the middle is a little jiggly. They’ll firm up as they cool.
Once fully cooled remove from the tin and slice in to 18 pieces (3 x 6 bars)
These bars will keep in an airtight container at room temperature for up to 5 days


 So I wanted a bar. But it had to be the right kind. I had previously made Hello Dolly Bars, or as they’re also known as Magic Cookies Bars, but I had found them too sweet and gloopy. Maybe I added too much condensed milk caramel or not enough dry ingredients? Either way I was far from happy with them and the resulting bars were deliciously mutated into ice cream topping instead. “Waste not, want not” etc etc.

