Brace yourselves- it’s that time of year again. No, I’m not talking about the impending rush of Valentine’s Day. I’m speaking of Super Bowl. That annual tradition of swole men fighting to deposit an inflatable pig skin at one end of a grass field, only to fish it out again and start over upon successful completion. You can tell I’m a fan right?
Well what I am a fan of is the Super Bowl halftime show (this year it’s Scarborough’s own The Weeknd); the cinematic advert premiers and of course….the FOOD! What’s a Super Bowl without the food you say? Possibly 4 hours of my life I’ll never get back I say. But an ample supply of snacks, and edible treats, provide not only fuel for the event but a distracting highlight.
My advice is to take a two-pronged approach. During the game you want something snackable, easy to handle with minimum effort (I’m talking no utensils here people) and that you can eat on auto-pilot. Whether it’s because you’re too focused on the defense strategy of the Buccaneers, or Kansas City’s Tight End’s…well…tight end, less fuss is more eating here. There’s the old classic chips ‘n’ dip – Guacamole; Salsa; Blue Cheese and Ranch are all solid favorites. Have on hand a selection of chips and crackers and you’re good to go.
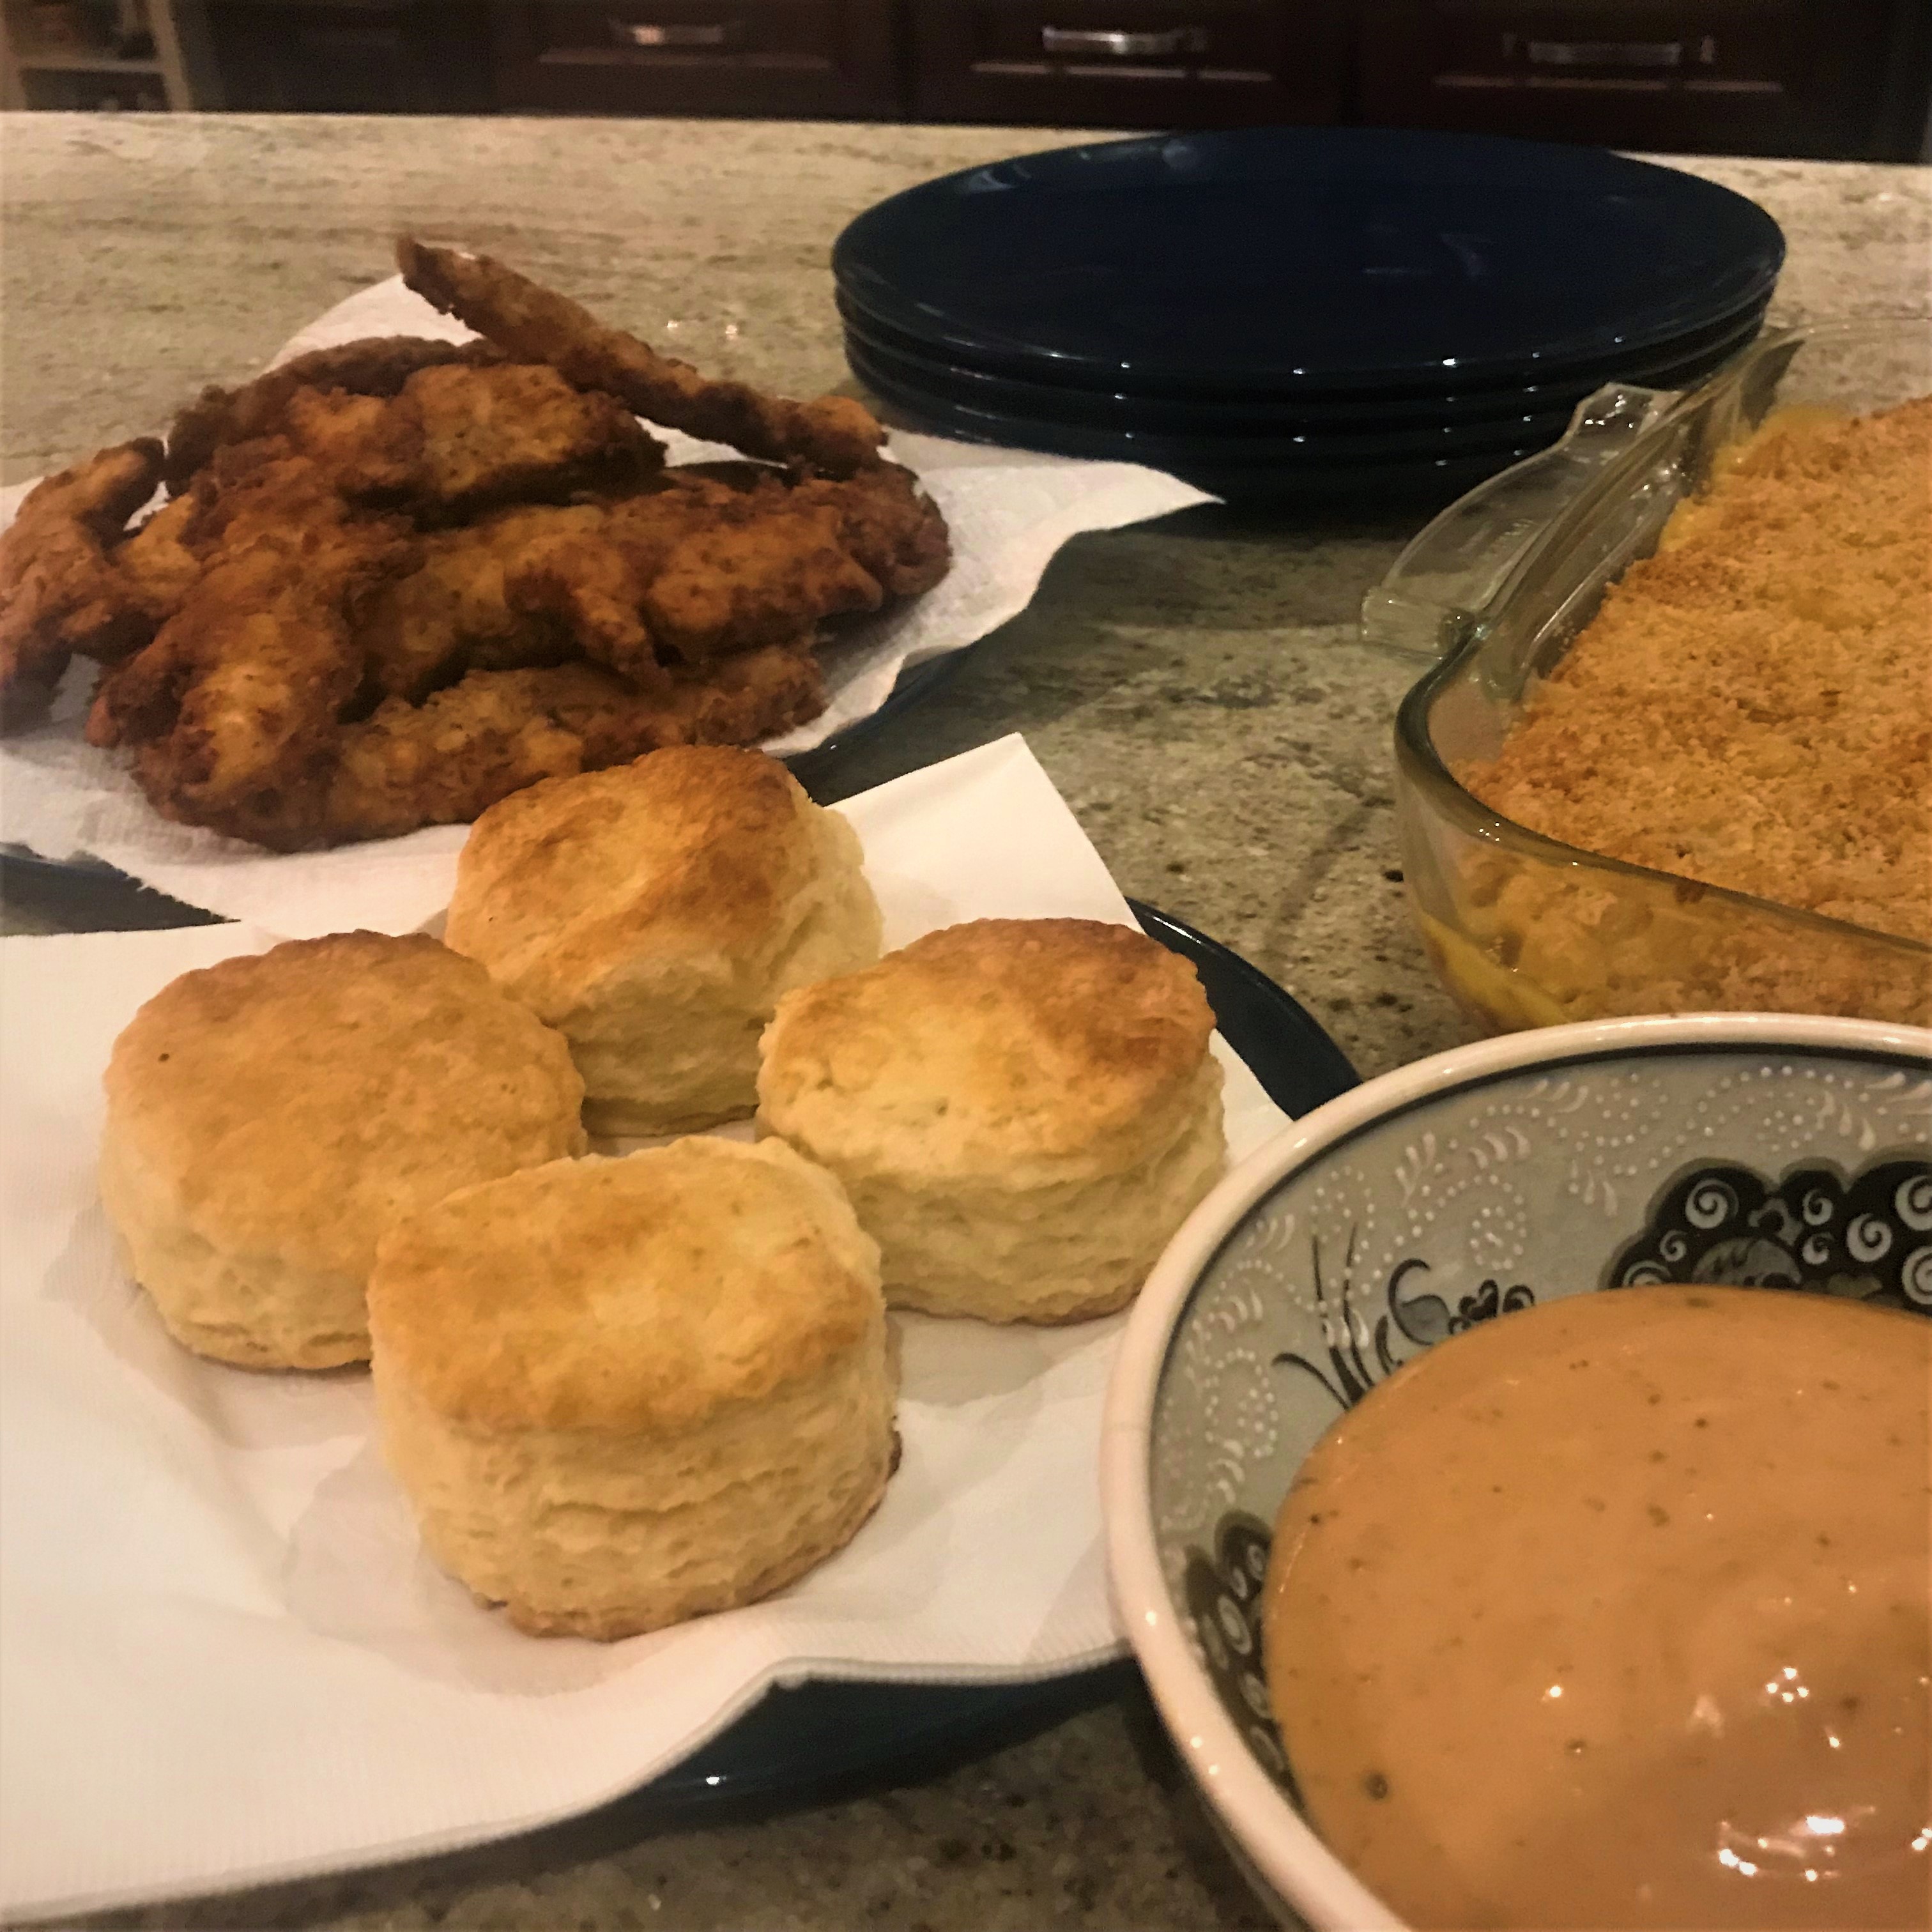
Speaking of crackers, another firm favorite that no Super Bowl viewing is complete without is the Cheese Ball. An amalgamation of cheese in it’s many forms and seasoned however you like, it’s sure to be a touchdown success (see what I did there?) In fact why not get into the spirit of the event and mold it into football shape- themed eating at it’s best! If you’re feeling particular artistic you can complete the look with a layer of pepperoni for…ahem… “authenticity”- much as I have below.
Halftime is when you want to bring out the big guns. I’m talking food that needs a plate, possibly a knife and fork. Heck we want convivence here so get yourself a spork! Right up there with the cheese ball, Super Bowl means “wings” to me. Crispy, succulent, and packed full of flavor wings. It’s a matter of personal taste as to whether you want them dripping in sauce, there for the dunking or dry coated to retain their crispy goodness. I’m a fan of the latter so I’ve included my recipe for “Chicken Dust”. Now before you get to thinking it’s some sort of anti-mite treatment for foul stock, I discovered the term whilst researching fried chicken treatments. I don’t spend ALL my time eating you know. It’s a versatile little number in that you can use it as a dry rub or, as I have done, combine it with some oil to lend extra crispiness to the finished wings. I’ve left the actual cooking method up to you as everyone seems to have their own preference. I, myself, air-fried them for 15mins, tuning occasionally to ensure even golden, crispness.
My last recipe is for that other feel-good favorite… tacos. I definitely do suggest you have a plate here, jam packing the tortilla with flavorsome fillings can often mean they’ll try to make a break for it! These tacos take advantage of one the prominent food trends emerging from this pandemic era…Plant-based alternatives to meat. Being confined indoors has brought about a dawn of a new age in the food world, the rise of the “Flexitarian”. Less strict than classic healthy diets it allows for the inclusion of occasional meat, with a prominence of plant based meat alternatives. Living in the time of Covid has people wanting a feeling of security and normalcy, often found in comfort food. But a deeper knowledge of associated health issues and ingredients has also meant a more health conscious approach. The abundance of plant based meat alternatives can now mean that people can enjoy their “meaty” experience and be content in the knowledge they’ve made a healthier, and at times more socially conscious, choice. The growth in the market means there are plenty of tasty varieties to try. Trust me- I love ribs and steak as much as your next carnivore so I was skeptical to say the least when plant based meat alternatives first arrived. But I have since been convinced (mainly due to Kristin & Justin at Guerilla Burger Co. ) and remain open to sampling the possibilities.
In this case with tacos. I’ve used ‘beef’ strips here coated in a sticky, glossy sweet ‘n’ spicy sauce with just the right amount of heat. The tacos themselves can be filled whatever way you like- be as restrained or as adventurous as you like. Just be plenty!
A parting word in the spirit of the weekend. Aside from food, the Super Bowl is also synonymous with gathering with friends at the likes of “tailgate parties”. However this year, like everything else since ‘Rona reared it’s head, we’re having to take a different approach to things. It’s definitely NOT a case of safety in numbers this time around. Think less Tailgating party and more ‘Homegating Huddle”. Let’s celebrate Super Bowl LV in fun way that’s still safe and socially responsible. Stay indoors, stick to your own family units, be adventurous and cook new things yourself. Celebrate separately this year, so that we can all celebrate together next year.
Enjoy the recipes, stay safe and mask up!

Superbowl Cheese Ball
Ingredients
- 16 oz cream cheese (2 x 8oz packs), room temperature
- 1 cup shredded mozzarella cheese blend
- 1 cup shredded sharp cheddar
- 1 cup finely grated parmesan
- 1 Tbsp Parsley
- 2 cloves Garlic, minced
- 1 tspn red pepper flakes
- 1 tspn Garlic powder
- 1 tspn Onion powder
- 1 tspn Hot sauce, or sriracha
- 1 tspn Worcestershire sauce
- Kosher salt, to taste
- Ground black pepper, to taste
- 2 cups Sliced pepperoni
- 1 slice Processed cheese
Method
- In a large bowl, combine all the ingredients except the pepperoni slices and cheese slice, season with salt and pepper and stir together until fully combined
- Gather the mixture into a rough ball shape and transfer to serving platter. Using a cranked spatula or spoons, smooth and form into a football shape
- Finish the surface all over with a layer of pepperoni slices
- Slice the processed cheese slice into strips and arrange in a “football lace” pattern on top of the cheese ball
- Cover with cling wrap and refrigerate for at least 2 hours to allow the flavor to develop
- Remove the cheese ball from the refrigerator 30 minutes before serving, and serve with crackers, vegetable crudités or pretzels
- The cheese ball can be stored in the fridge wrapped in parchment paper and cling wrap for up to 1 week

Dusted Wings
Serves 1lb Chicken wings
Ingredients
For the Chicken Dust
- 2 Tbsp. Onion powder
- 2 Tbsp. Garlic powder
- 2 Tbsp. Brown sugar
- 1 Tbsp. Dried lemon peel
- 1 Tbsp. Dried oregano
- 1 Tbsp. Dried thyme
- 1 Tbsp. Dried parsley
- 1 Tbsp. White pepper
- 1 Tbsp. Szechuan peppercorns
- 1 Tbsp. Baking powder
- 1 tsp. Celery salt
- 1 tsp. Mace
- 1 tsp. Cayenne pepper
- 1 tsp. Mustard powder
- 1 tsp. Smoked paprika
- 1lb Chicken Wings
- 2 Tbsp Canola oil (if using)
Method
- Place all the ingredients in a spice grinder, or clean coffee grinder. Blitz until a uniform powder, or dust, is formed
- Transfer to an airtight plastic container for storage
- The chicken dust can either be used in it’s own as a dry rub , or combined with the canola oil in a ziplock bag. Place the seasoning in a zip-lock bag, add in 1lb of prepared chicken wing pieces (drumettes and flats) and the tablespoons of canola oil. Shake and rub the bag contents together until the chicken pieces are fully coated
- Cook by your preferred method – baking, air-frying
- Remove and serve with preferred dip, or solo
- Sit back and tuck in!
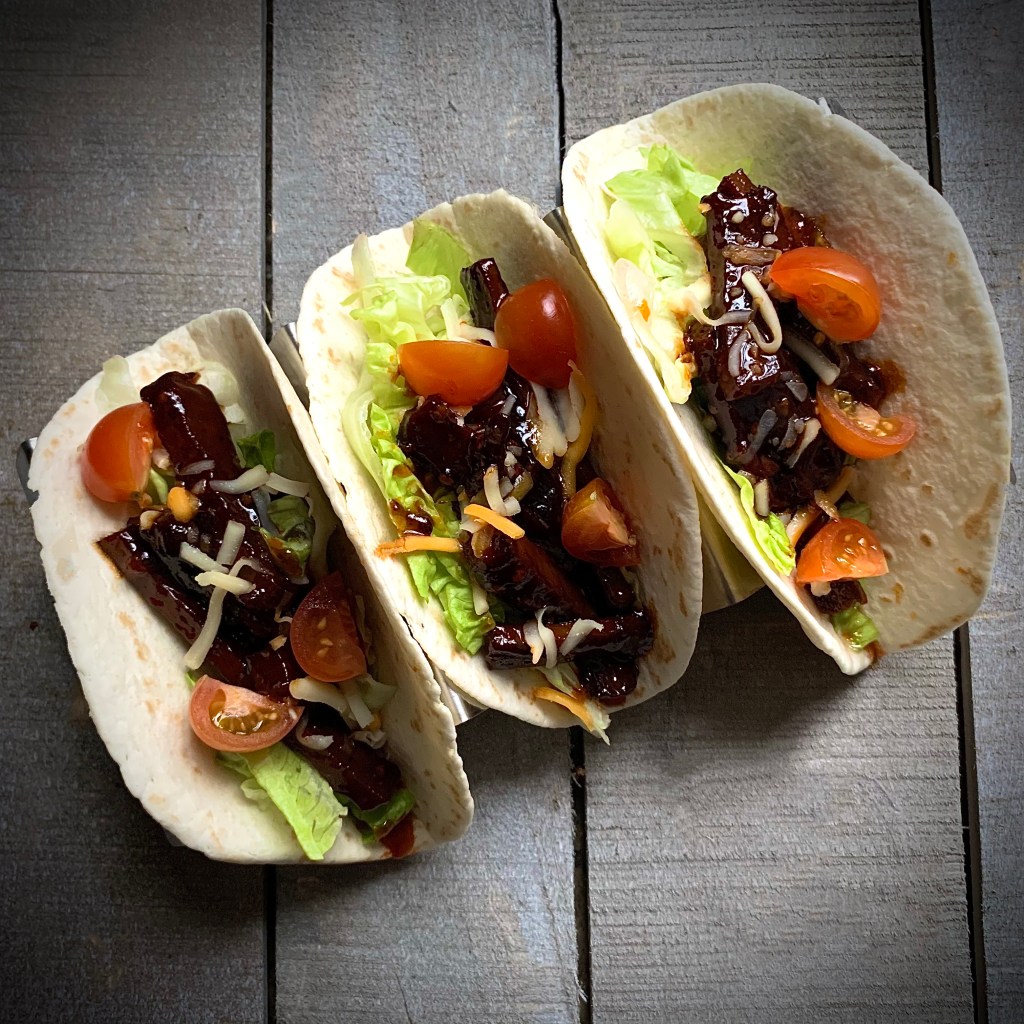
Sticky Beef-free Tacos
Makes 6 tacos
Ingredients
“Beef” Strip sticky glaze
- 2 Tbsp. Sesame oil
- 3 cloves Garlic, minced
- 1 Tbsp. fresh Ginger, minced
- 2 tsp. Rice wine vinegar (white vinegar also works here)
- 4 Tbsp. Honey (if vegan diet extends to honey, maple syrup can be used)
- 4 Tbsp. Sweet chili sauce
- 6 Tbsp. Vegan-friendly Tomato ketchup
- 4 Tbsp. Soy sauce
Taco Filling suggestions
- 500g Plant-based “Beef” (or “Chicken”) strips
- 6 medium (8″) soft flour tortillas
- Shredded lettuce (I find Iceberg works best)
- Sliced red onions
- Shredded cheese, strength to preference
- Soured cream
- Guacamole, or sliced avocados
Method (for the sauce)
- Combine all the sticky glaze ingredients in a medium pan
- Heat over a high heat until boiling
- Reduce heat to low/ medium and simmer until reduced by 1/3
- Whilst the sticky glaze is reducing, prepare your protein in accordance with packet instructions
- Toss the prepared/ cooked protein in the sticky glaze
- Assembly tacos using additional ingredients to personal taste
- Serve and enjoy!