MACARONS! The very word alone is enough to induce a nervous twitch in most bakers. These deliciously delicate Franco delights are notoriously tricky to make and master. Requiring high maintenance and careful handling I think of them as the Madonna of the cookie world. However fickle they are, they are NOT impossible to make though. Slow, steady precision is the key here. I’ll be perfectly honest and say this is not recipe to attempt whilst young kids are running around your legs in the kitchen!
There are a few keys things I would advise-
- The recipe for the macarons themselves is in metric. A more precise way of measuring this helps with achieving a better result
- Let your egg whites “mature” overnight at room temperature. This helps increase their elasticity which yields a better whipped meringue
- Sift your almond mix. You want to avoid knobby almond bits!
- Add your sugar slowly and in stages
- Work out any frustration- make sure you bang them on the counter, and leave to rest afterwards
- As disheartening as it may be- if at first you don’t succeed, try again. You’re not the only person who may have a bake fail- macarons have a tricky reputation for a reason. Take courage!
I wanted to create something a little different here – surprise! A few years ago, I had tried a “macaron burger” at a food event. This was exactly as it sounds- a miniature beef patty sandwiched between two macaron shells and finished with a bun-mimicking sprinkle of seeds. Did it work? For me, no. There was something jarring about the chargrilled beef flavour against the sweet almond macaron. It didn’t manage to hit the mark of that pleasing interplay of sweet and savoury.
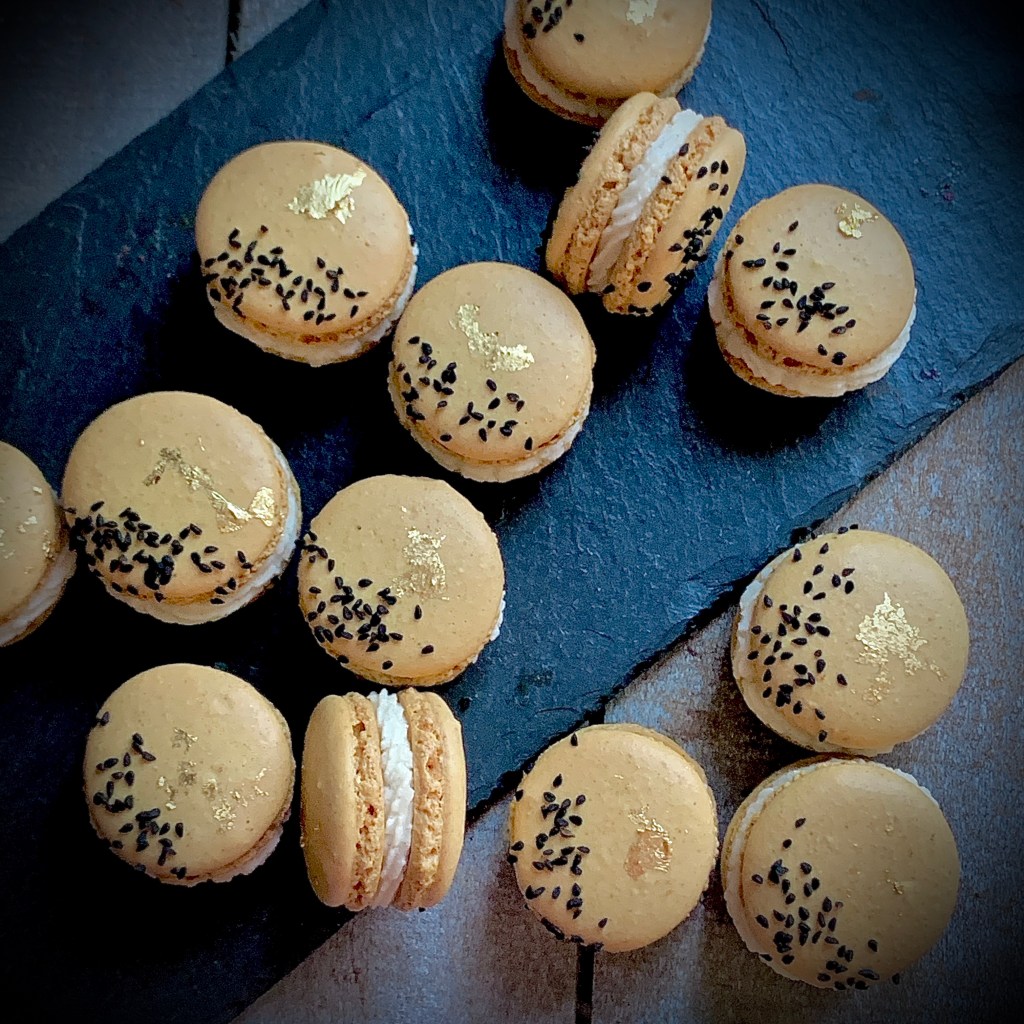
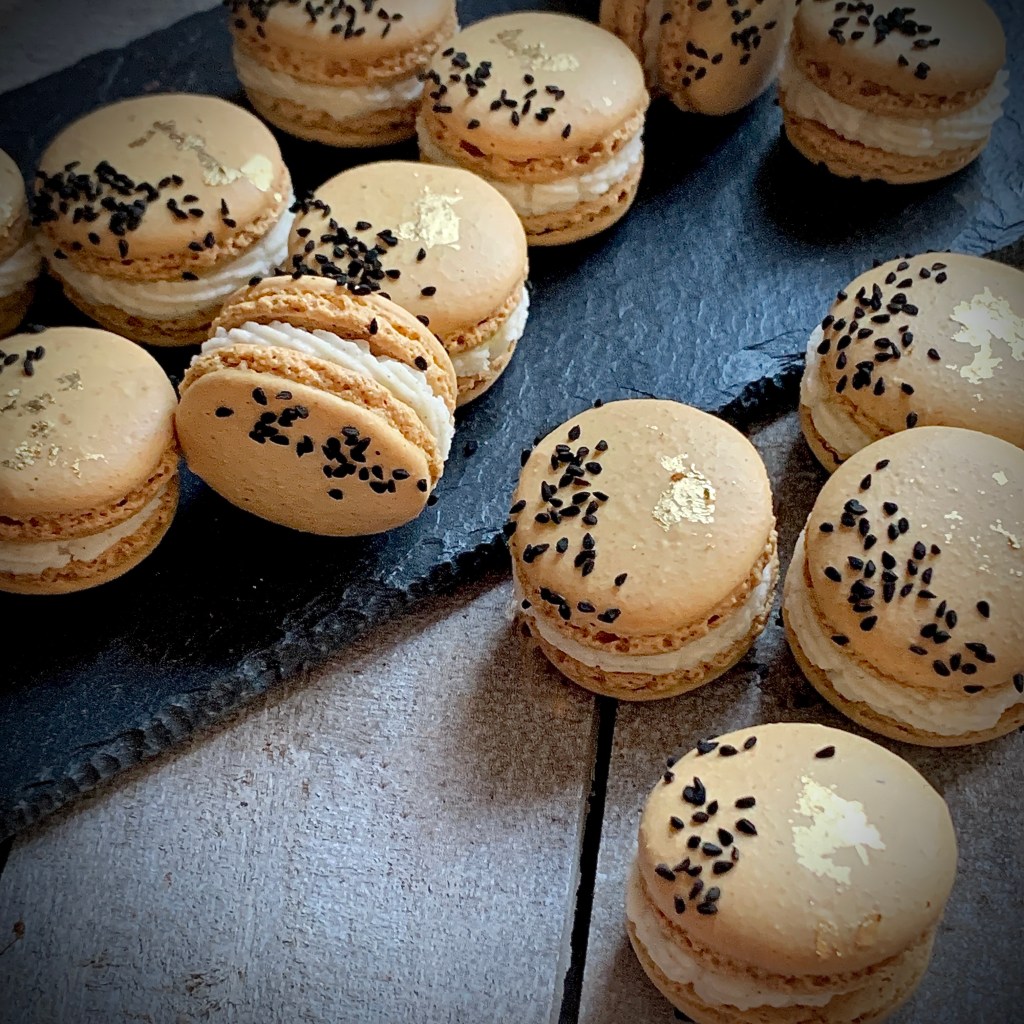
With this idea as a springboard, I started thinking that the sweet/ savoury interplay was the route I wanted to take. Could I improve on a “macaron burger”? Maybe but I also thought it was visually predictable. What else could work with an almond rich flavour? The next stop on my train of thought was of course…curry. There’s an abundance of curry dishes which use almond as a base in their gravies. And so, development began! Research led to a dish called “Badami Curry”, from Mughlai cuisine of Northern India. Using a creamy almond soup made with finely ground almonds I decided this would be the main inspiration for this macaron recipe. For the filling elements, I wanted to keep flavours that worked with the concept of Badami- a centre of mango & ginger curd nestled inside a rim of rich cardamom buttercream- all ingredients often featured in Mughlai cooking. Topping of with a sprinkling of Nigella seeds gives a pleasing gentle mustardy hit to cut through the almond sweetness.
Please don’t be daunted by these. Yes, they are a project requiring some planning but trust me they are well worth it. You and anyone who tries them will be talking about them for a long time afterwards.
Makes 28 macarons
*For best results start this recipe 2 days before you want to serve the macarons
Ingredients
Macarons
- 100g egg whites (usually between 3–4 large egg whites)
- ¼ teaspoon cream of tartar
- 80g fine sugar
- 1–2 drops yellow gel food
- 125g ground almonds (make sure it’s made with blanched almonds)
- 125g powdered sugar
- 3 teaspoons good quality curry powder
Cardamom Buttercream
- ¼ cup unsalted butter, softened to room temperature
- 1 ½ cups powdered sugar
- 1-2 Tablespoons heavy cream, or whipping cream, at room temperature
- ¼ teaspoon vanilla extract
- 2 ½ teaspoons ground cardamom
- salt, to taste
Mango & Ginger Curd
- 1 cup fresh mango, chopped
- 1 inch piece fresh ginger
- ½ cup sugar
- 2 ½ Tablespoons fresh lemon juice
- 2 large whole eggs
- 2 egg yolks, from large eggs
- 1 stick unsalted butter, cubed and cold
Decoration to finish
- 1 Tablespoon Nigella seeds
- Gold leaf (optional)
Method
48 HOURS BEFORE
- Add egg whites to a dry, clean bowl. Cover with cling wrap and set aside on your counter for 24 hours
To make Mango & Cardamom Curd
- Puree the mango pieces and ginger together in a blender
- Whisk together the mango/ ginger puree, sugar, lemon juice, eggs, and egg yolks in a heavy based saucepan over low heat. Stir over low-medium heat until the sugar has dissolved and it’s just starting to bubble
- Add the cold butter 3-4 pieces at a time, stirring until each addition is melted and incorporated
- Turn the heat to low and continue stirring and cooking the mixture for 2-3 minutes until it is thickened and coats the back of a spoon. (Test by drawing a line through the curd on the back of the spoon and the line should not drip)
- Pour into a clean bowl. Cover the surface with cling warp to prevent a skin forming and store in the fridge until needed
*This recipe makes more than needed, the curd can be kept in the fridge in and used for a range of things from drizzling over pavlovas, to spreading on toast, to swirling in homemade ice-cream.
To make macarons
- In the bowl of a food processor, combine the ground almonds, powdered sugar, and curry powder. Pulse 4-5 times making sure that all the ingredients are blitzed. Line your counter with baking paper and using a large sieve, sift the mixture from the food processor to remove any large almond husks pieces, onto the baking paper. You can use a spoon to work through any large lumps as you don’t want to discard a lot of the dry mix because then you won’t have enough dry ingredients in the batter. Transfer this almond mixture to a large dry, clean bowl. Set aside until later
- To the bowl of a stand mixer add the eggs whites (prepared from the day before) and cream of tartar. With the whisk attachment fitted. beat together on medium speed until very soft peaks form. Once the egg whites begin leaving tracks, you have soft peaks. Stop beating.
- Add about 1/3 of the sugar. Beat on medium-high speed for about 10 seconds, then with the mixer continuing to run, add another 1/3 of the sugar. Beat for 10 seconds, then with the mixer continuing to run, add the remaining sugar. Beat on medium-high speed until stiff glossy peaks form. Using a rubber spatula, slowly and gently fold the food colouring into the egg whites
- This is the tricky bit! Slowly fold the beaten egg whites into the almond mixture in 3 separate additions, folding until combined before adding the next addition. After you add all the egg whites, pay very close attention to the consistency of your macaron batter. Continue folding the batter until it thins out into the consistency of a thick syrup. A more helpful cue is the “V-test”. Drop the macaron batter off your spatula back into the bowl. The batter mixture should fall off the spatula in semi-fluid globs, leaving a “V-shaped” trail of batter hanging from the spatula It’s best to go very slow so you don’t accidentally overmix and damage the batter consistency
- Spoon the macaron batter into a piping bag fitted with a medium round piping tip. This may be somewhat messy as the macaron batter is very drippy
- Holding the piping bag at a 90-degree angle over the baking sheet, pipe batter in 1.5 – 2 inch rounds about 1-2 inches apart on prepared baking sheets. The piped macaron batter flattens out. Bang the pan a couple times on the counter to pop any air bubbles, then use a toothpick to pop any further remaining air bubbles. If using, sprinkle the tops of the flattened macarons with a few Nigella seeds to your liking
- Let the piped macarons sit out until they are dry and no longer tacky on top, usually 30-60 minutes dependant on your kitchen humidity. This time allows the top to firm up and form a skin. Do not let them sit out for longer than they need to because they could begin to deflate
- Meanwhile, preheat the oven to 325°F
- Bake for 15-20 minutes. Note: as the macaron shells bake, they should form feet. To test for doneness, lightly touch the top of a macaron your finger. If the macaron seems wobbly, it’s not done and needs another few minutes. If it seems set, remove them from the oven
- Let the shells cool on the baking sheet for 15 minutes, then transfer to a cooling rack to continue cooling. (The macaron shells may stick to the parchment paper/baking sheet if you try to remove them too early. If this is happening, let them cool on the baking sheet a little longer before removing. Nonetheless I’ve found they sometimes need some gentle persuasion)
- While the shells are cooling you can prepare your buttercream filling
To make Cardamom Buttercream
- Make sure your butter is softened to room temperature before beginning. In the bowl of a stand mixer, beat butter until creamy.
- Add powdered sugar, cream, and ground cardamom. Beat on low speed until these ingredients are incorporated, then increase to medium-high speed. At this point, you can add more powdered sugar if the frosting is too thin or a splash of heavy cream if it’s too thick
- Add salt to taste. This helps the filling from being overly sweet. Transfer to a piping bag with a small round piping tip. Set aside until needed
To finish
- Once your macarons shells have fully cooled, pair up together with those of a same size
- Transfer your chilled cured into a piping bag, with no nozzle fitted. Set aside until needed
- Using your prepared bagged buttercream, pipe a ring of buttercream around the edge on the flat side of half of the macaron shells. This will form a barrier for your curd filling
- Snip the end from your bagged cured (you want an opening about 3-4mm wide), and pipe a dollop of curd into the void inside your buttercream ring
- Using another macaron shell of similar size, sandwich together, giving a slight twist to trap the curd and buttercream inside
- Repeat until all shells have been filled and paired up. The finished macarons can be further decorated with gold leaf if using
- Refrigerate the 24 hours so the macarons and flavours can mature. Bring to room temperature before serving for best taste
- Cover leftover macarons and refrigerate for up to 5 days