Blue Cheese, caramelised pear & crispy prosciutto pizza

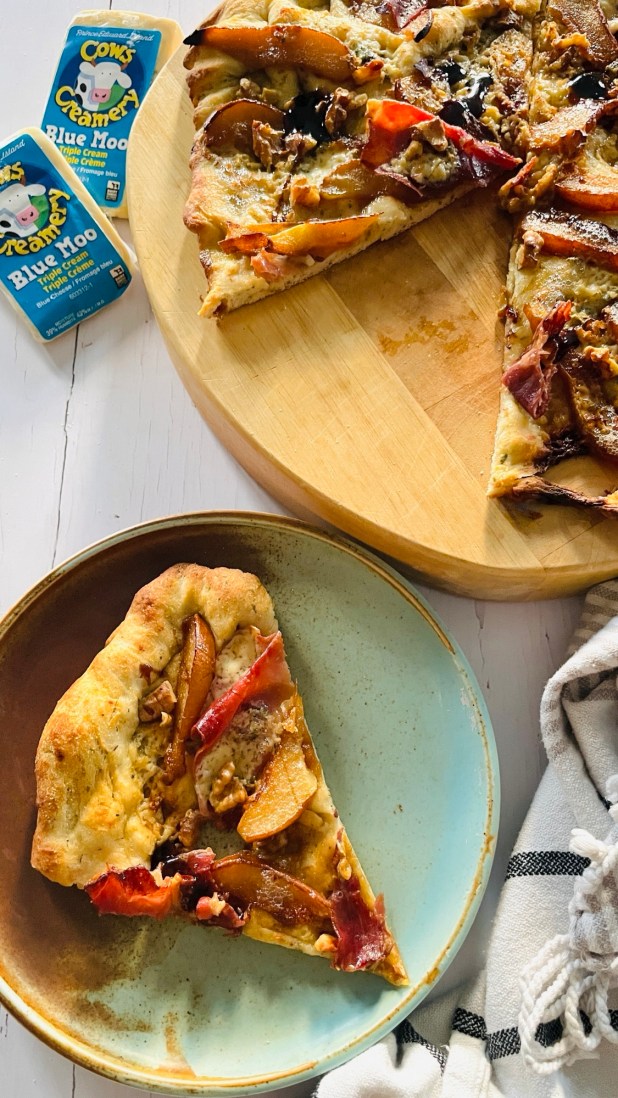
feat. Cow’s Creamery “Blue Moo” cheese

Makes enough dough for 2x 12inch pizzas; toppings for 1x 12inch pizza

Ingredients

Pizza Dough (makes enough for 2x 12 inch pizzas)

  • 1 1/3 cups) warm water
  • 2 ¼ teaspoons instant yeast
  • 1 Tablespoon sugar
  • 3 ½  cups all-purpose flour
  • 1 Tablespoon garlic powder
  • 1 Tablespoon Italian seasoning
  • 2 Tablespoons cornmeal
  • 1 teaspoon salt

Topping (for 1, 12 inch pizza)

  • ¼ cup extra virgin olive oil
  • 2 cloves garlic
  • 4 oz thinly sliced prosciutto,
  • 5oz Cows Creamery “Blue Moo”, soft blue cheese
  • 1/3 cup balsamic vinegar
  • 2 large Bosc pears, cored and sliced, ½ inch thick
  • 2 Tablespoons butter
  • 2 Tablespoons brown sugar
  • ¼ cup chopped walnut pieces
  • ½ cup fresh arugula

Method

Pizza Dough

  1. Whisk the warm water, yeast, and granulated sugar together in the bowl of a stand mixer.
  2. Cover and allow to rest for 5 minutes
  3. Add the olive oil, salt, and flour. Beat on low speed for 2 minutes
  4. Beat the for an additional 5 full minutes, or knead by hand on a lightly floured surface for 5 full minutes. After kneading, the dough should still feel a little soft. Poke it with your finger—if it slowly bounces back, your dough is ready
  5. Lightly grease a large bowl with oil. Place the dough in the bowl. Cover the bowl with oiled cling wrap. Allow the dough to rise at room temperature for 60-90 minutes or until double in size
  6. Preheat a pizza stone in a 500°F oven for 20-25 minutes

To prepare the toppings

  1. Finely chop garlic and heat in the olive oil over medium heat for 1-2 minutes, being careful not to allow the garlic to burn. Turn off the heat and set aside to cool
  2. Simmer the balsamic vinegar to reduce the volume by about half. It should thicken slightly. Set aside until needed
  3. In a large skillet, melt the butter and brown sugar together over medium heat. Add the pears in a single layer and cook for about 10 minutes turning once, to caramelize the pears. Remove the skillet from the heat and set aside until needed

To finish and bake the pizza

  1. When the dough is ready, punch it down to release any air bubbles. Divide the dough in half. (If not making 2 pizzas, freeze half of the dough for another time. Stretch the dough into about a 12-13inch round
  2. Place the dough round on a wooden peel that has been well sprinkled with cornmeal. Make sure your pizza is sliding on the cornmeal base before adding your toppings
  3. Brush the garlic olive oil from earlier all over the center of the dough
  4. Add the Cows Creamery blue cheese in about 1 teaspoon sized pieces along with arranging  the pears and prosciutto. (Keep the ingredients in a single layer as this helps the pizza crust stay crisp and cook quickly) Sprinkle over the walnut pieces
  5. Shake your peel to make sure the pizza is not stuck. Slide the pizza onto the hot stone
  6. Bake for about 8-10 minutes or until the bottom is evenly brown and the top cheese begins to brown slightly. Remove from oven and allow to stand for 5 minutes. Slide off you pizza stone to serving board
  7. Sprinkle over the fresh arugula and drizzle with the balsamic reduction
  8. Slice, serve and enjoy!

Irish Spice Bag- Mála spíosrach na hÉireann

Serves 2

Ingredients

Crispy Chicken

  • 1 large chicken breast, cut into strips
    • Marinade
  • 1 cup buttermilk
  • 1 Tablespoon sesame oil
  • 1 Tablespoon dark soy sauce
  • 1 Tablespoon sriracha
    • Chicken coating
  • 1 1/2 cups All-purpose flour
  • 1 1/2 teaspoons baking powder
  • 3 Tablespoons corn starch

Spice Bag seasoning*

  • 1/2 Tablespoon fine salt (less if you prefer)
  • 2 teaspoons Chinese Five Spice powder
  • 1 teaspoon smoked paprika
  • 1 teaspoon red pepper flakes
  • 1 teaspoon garlic powder
  • 1 teaspoon sugar
  • 1/2 teaspoon white pepper
  • 1/2 teaspoon onion powder
  • 1/2 teaspoon ground ginger
  • 1/4 teaspoon ground ginger
  • 1/4 teaspoon ground cumin
  • 1/8 teaspoon ground cardamom

Stir-fried vegetables

  • 1 Tablespoon sesame oil
  • 1 red pepper, thinly sliced
  • 1 small onion, thinly sliced
  • 3 cloves garlic, sliced
  • 2 small red Birdseye chilis, sliced
  • 2 small green Birdseye chilis, sliced
  • 2 green onions, sliced

Additional

  • 750g bag Frozen potato fried, to preference

Method

Spice Mix

  1. In a bowl combine all the Spice Mix ingredients and whisk together until combined. Transfer to an airtight storage jar or container until needed

Crispy Chicken

  1. In a small bowl combine the buttermilk, sesame oil, dark soy sauce, sriracha and whisk to combine. Add in the sliced chicken, ensuring all the pieces are coating in the marinade. Allow to marinade for at least 3 hours, or preferable overnight, in your refrigerator
  2. Once you want to make your spice bag, start cooking the potato fries in accordance with the manufacturer’s instructions
  3. While the potato fries are cooking, combine the chicken coating ingredients of all-purpose flour, baking powder, corn starch in a bowl and whisk to combine
  4. In a high-sided skillet heat about 1-1 ½ inches of canola oil until hot, 350°F
  5. While the oil is heating, remove all the chicken strips from the marinade, allowing excess the drip off,  then dredge piece by piece  in the flour coating. Repeat by dipping the pieces in the marinade and then in the flour coating again until all the pieces are double-coated
  6. Shallow fry the chicken (two batches may be needed) in the hot oil skillet until golden brown and crispy. Drain and remove to a wire rack set over some paper towel while you make the stir-fried vegetables

Stir fried vegetables

  1. Heat a wok or frying pan to a high heat and add sesame oil. When the oil is hot, add in the sliced peppers and onions and stir to keep them moving. You want them to soften but not to color too much
  2.  After a couple of minutes add in the sliced garlic and continue to fry until slightly brown. Finally add in the sliced Birdseye chilis and green onions just before you finish frying, giving all the vegetables a final stir. Remove from heat

To assemble

  1. In a large bowl combine the cooked fries, crispy chicken and stir-fried vegetables. Sprinkle over 2-3 Tablespoons of the Spice Bag seasoning (to personal taste) and toss everything together to combine and coat in the seasoning
  2. For traditional serving, transfer to a paper bag and serve along with curry sauce

Curry sauce*

  • 2 Tablespoons, butter
  • 2 Tablespoons All-purpose flour
  • 1 Tablespoon curry powder
  • 1 ½ cups chicken stock
  • 1 Tablespoon honey
  • 1 teaspoon regular soy sauce
  • Salt & Pepper to taste
  1. Put butter in a small pot over medium heat, and when melted add the flour and curry powder – stir well about a minute, to cook off the flour
  2. Whilst whisking, slowly add the chicken broth, about a half cup at a time until it’s the thickness you want, then add the honey, soy and salt & pepper to taste
  3. Simmer for 2-3 minutes, then remove from heat and serve

*This recipe makes more Spice Bag seasoning and Curry Sauce than needed. The surplus Spice Bag seasoning can be stored in an airtight jar or container at room temperature for up to 2 years. Any remaining curry sauce can be transferred to an airtight container and stored in the refrigerator for up to 3 days. To serve again, remove from refrigerator and gently reheat in a pan to serve

Low Carb Corned Beef Hash

with Pork Panko Eggs

(paid partnership with PALM Corned Beef)

Serves 3- 4

Ingredients

Seasoning*

  • 2 Tablespoons smoked paprika
  • 2 Tablespoons Kosher salt
  • 2 Tablespoon garlic powder
  • 1 Tablespoon ground black pepper
  • 1 Tablespoon onion powder
  • 1 Tablespoon cayenne pepper
  • 1 Tablespoon dried thyme
  • 1 Tablespoon celery salt
  • 1 Tablespoon cumin

Corned Beef Hash

  • 1 head cauliflower
  • 1 Tablespoon vinegar
  • 1 medium onion, chopped
  • 1 red bell pepper, chopped
  • 1x 12oz can PALM Corned Beef
  • 3 green onions, white part removed, green parts finely sliced
  • 1 cup Swiss cheese, grated
  • 1 medium avocado, sliced

Panko Eggs

  • 2/3 cup pork panko
  • 2 teaspoons parmesan cheese, finely grated
  • ½ black peppercorns, ground
  • 3 eggs (or 4 dependent on serving)

Method

Seasoning

  1. In a medium bowl, combine all the seasoning ingredients and whisk well to combine. Set aside until needed

*Note: This recipe makes more than required offer this dish. Store any remaining seasoning bland in an air-tight container for future use.

Corned Beef Hash

  1. Prep your cauliflower by removing any green leaves and/ or bruised stem from the bottom. Soak the cauliflower in a large bowl with a solution of 1 part vinegar to 3 parts water for 10 minutes. After this time remove, discard the water and rinse the cauliflower until cold, running water
  2. Transfer to a large pot filled 1 Tablespoon vinegar and enough water to cover the head of cauliflower. Boil for between 6-8 minutes (dependant on size of cauliflower), should have slight resistance to a fork
  3. Remove from heat, drain and leave to cool. Once cool use a knife to cut off small florets of cauliflower. Once all florets have been removed, cut and dice the remaining cauliflower stem in medium, home-fries size pieces. Set aside together in a bowl until needed
  4. In a 10 or12 inch cast-iron skillet, add some canola, or avocado oil, and heat over a high heat. While the skillet heats, prep the onion and peppers by trimming and dicing
  5. Add the prepared onion and pepper to the hot skillet and sauté for 3-4 mins. After this time add in the prepared cauliflower and season with seasoning mix to taste. I usually use 3 heaped teaspoons. Continue to sauté vegetables and seasoning for 2-3 minutes, stirring occasionally to avoid breaking up the cauliflower too much
  6. Addi in the PALM Corned Beef, gently breaking it up and folding it in so as to incorporate it through the seasoned vegetables
  7. Continue to cook for 3-4 minutes until PALM Corned Beef is heated through. Reduce heat to medium and leave the hash mixture to cook undisturbed. This will give that wonderful “crust” to the hash when cooked

Panko Eggs

  1. While the hash cooks, combine the pork panko, parmesan cheese and black pepper in a bowl and mix
  2. Turn on the broiler to high. Heat a 9-inch pan over medium heat. Once it’s hot, add the seasoned pork panko in a single layer. Swish them around with a wooden spoon to toast.
  3. Once the crumbs are sizzling and starting to turn a shade darker and form in three roughly “fried egg” size disc shapes, crack the eggs into the hot pan over the crumb areas
  4. Fry the pork panko and eggs until the whites are almost set, then transfer the pan under the broiler. Broil, watching closely and checking frequently, until the egg yolks are as gooey or firm as you’d like

To Serve

  • Check that your corned beef hash has a nice crust and remove from heat. Top with a sprinkling of grated Swiss cheese and finely sliced green onions. Use a spatula to transfer your cooked eggs to the top of the hash and top with some additional avocado slices. Sprinkle over any remaining stray pork panko crumbs from frying the eggs and enjoy!

Chicken Paprikash w/ Hot Buttered Spaetzle

With this recipe I should point out that I am neither German nor Hungarian in heritage. I am in fact Irish…and a massive lover of food (If you’ve ever seen me you’d be able to tell trust me!) Aside from baking, this love particularly includes comfort food.  You know the type of food- dishes crafted from seemingly humble ingredients and resulting in that sublime feeling of snug…content…”Hygge” to use the Nordic phrase.

This dish was one that on my first attempt I tentatively made my way through. Most of the recipes I researched commented that care needs to be taken with the paprika, if it’s dry cooked too long it can scorch giving the dish an underlying acrid taste. Next, care had to be taken when adding the soured cream/ cream mixture. If you dump it straight into the pan with the paprika mixture there’s a very high chance of it splitting and curdling the sauce, flecking it with gloopy, white nodules. Whilst it’s still edible it is no where on par with the velvety smooth, ochre sauce that you get by taking that little additional step of tempering the cold cream mixture with a few tablespoons of the hot paprika sauce.

Now, after making it a number of times, I can navigate the recipe with that intrinsic muscle memory that is so synonymous with cooking or baking comfort food dishes. It’s very easy to see why this dish has stood the test of time.

As well as the chicken paprikash I’ve included a recipe for spaetzle. For me the two go together like every cliched pairing you could think of. Spaetzle (“Little Sparrows) are toothy little dumplings of German origin. I first had these in a Bavarian restaurant in Vermont having ordered them not knowing what to expect. When they arrived I was prepared for something like pasta from the visual. I was more than pleasantly surprised upon first bite at how chewy they were, with an addictive density smothered in rich butter. A beautiful love affair was born!

Try these out- you won’t be disappointed!

Ingredients

Serves 4*

*for this dish I usually serve 1-2 drumsticks and 2 thigh pieces per person.

  • 8 drumstick portions of chicken
  • 8 thigh potions of chicken
  • 1 medium white onion, chopped
  • 4 cloves garlic, finely chopped or minced
  • 1 tablespoon fresh thyme leaves
  • 3 1/2 tablespoons Hungarian paprika (at a push you can use standard paprika but the Hungarian variety gives a much better flavour)
  • 1 tin chopped tomatoes
  • 3 cups chicken broth
  • 3/4 cup soured cream
  • 1/4 cup heavy/ whipping cream
  • 3 tablespoons flour
  • Flat leaf parsley, chopped

Method

  1. Preheat oven to 375 degrees F
  2. In a jug, stir to combine the soured cream and heavy/whipping cream. Add the flour and stir until fully incorporated. Set aside until needed later
  3. In a large pan over a medium heat, brown the chicken drumsticks and thighs until golden brown. Remove and place in a casserole dish or Dutch oven. Place in the preheated oven until needed near the end of the recipe
  4. In the same pan as the chicken was cooked, add the onion sauté until softened, then add 1/2 cup of chicken stock and stir to deglaze the pan of chicken fronds
  5. Add the chopped garlic and thyme leaves and sauté with the onions for a few minutes until the garlic is lightly browned
  6. Off the heat stir in the paprika and stir to coat the pan contents
  7. Return the pan to the stove, add the chopped tomatoes and chicken broth. Cook over a medium heat until bubbling. Check and adjust seasoning to taste
  8. Whilst the paprika mixture cooks, to the jug of soured cream/cream mixture add 2-3 tablespoons of the hot paprika mixture and stir well to combine. Add the contents of the jug to the main pan of the paprika mixture and stir for a few minutes to fully incorporate and thicken. The paprika sauce should now be thick and bright orange in color
  9. Remove dish of chicken pieces from the oven and pour over the paprika sauce, covering and coating all the chicken pieces
  10. Return the dish of chicken pieces and sauce to the oven and continue to bake for a further 10mins. After this time check the chicken to be fully cooked (should be an internal temperature of 165degrees F)
  11. Remove from the oven, sprinkle with the chopped flat leave parsley and serve. Chicken paprikash goes particularly well with a side helping of hot buttered spaetzle (and I just happen to include it below!)

Hot Buttered Spaetzle

Ingredients

  • 2 cups all-purpose flour
  • 1 teaspoon white pepper
  • 1/4 teaspoon nutmeg
  • 2 teaspoons kosher salt
  • 3 teaspoons dried parsley
  • 4 eggs
  • 1/3 cup milk

Method

  1. In a jug, whisk together the eggs and milk. Set aside
  2. In a large bowl, combine the flour, salt, pepper, nutmeg and parsley. Whisk to combine and make a well in the centre
  3. Pour in the egg/milk mixture and stir well until combined. The mixture will be quite thick and stretchy
  4. Cover and set the spaetzli batter aside for at least an hour at room temperature. (I usually prepare mine in the morning if I’m cooking them in the evening- a lengthy sitting of 3-4 hours. This helps the dough to develop both taste and texture)
  5. *This next bit depends entirely on what method you use to make you spaetzle. There are a number of gadgets that can be used for making spaetzle. These range from a sapetzle “press” (similar to a potato ricer) to a spaetzle “slider” (looks like a mandolin) but the method I use is with a spaetzle “lid and scraper”.
  6. Place large dollops of the reared batter on the lid and use the scraper to push the batter through. Admittedly this make take some more skill and dexterity but it’s what I’m used to. The main thing here is to use a method that you’re comfortable with.

    Spaetzle lid and scraper

  7. *Make the spaetzle according to your device method. With all the methods exercise immense caution as you’re working in close proximity to the boiling water
  8. (Lid and scraper method) Place the spaetzle lid over the pot of boiling water. Take a ladle full of batter and drop it onto the lid.
  9. Force the batter through the device. The batter will form droplets and drip in to the salted boiling water below and let them cook for 1 to 2 minutes until floating on the surface. Continue until all the batter is squeezed through the lid.  Remove with a slotted spoon and transfer to the large bowl of iced water
  10. Repeat until you have used up all the spaetzle batter
  11. In a large pan, head 5-6 tablespoons of butter until sizzling over a medium heat
  12. Drain the spaetzle of all water, add to the butter and toss to coat
  13. Continue to stir and toss over a medium heat until they start to get flecked with golden brown flecks
  14. Serve hot with chicken paprikash

• The spaetzli may be cooked a few hours in advance to the point where they are placed in the iced water. If you want to store them remove them from iced water, shake dry and place in a covered container in the refrigerator. I have made mine the day before, stored in the fridge and then cooked the evening of the following day. Still perfection!

#Recipe Cajun Chicken Alfredo

Cajun Chicken Alfredo

Something a little different for you all now, and not a baked good in sight! One of the few pasta dishes I actually enjoy eating, this a perfect comfort food dish in my view. A one-pot wonder dish thats great on so many levels. No fuss no muss and easy to prepare. It’s great if you want something indulgent in front of your favourite TV program or equally as good for al fresco dining with a chilled white wine. Hope you enjoy!

Cajun Chicken Alfredo

Serves 2

Mirepoix vegetable base

1 red pepper, halved

5 sticks celery heart, roughly chopped

200g onions, roughly chopped

Main chicken dish

2 chicken breast fillets, cut in to cubes

2 tablespoons Cajun seasoning, I use Barts

4 cloves garlic, crushed

150g button mushrooms, halved

50g streaky bacon, chopped and fried until crisp

1 litre Chicken stock

125ml Milk, semi-skimmed is fine

50ml Double cream

250g fettuccine pasta

Salt and Pepper, to season

To serve

Parmesan cheese, grated

Mire Poix

To make the “Mirepoix”

  • Blitz the red pepper, chopped celery and chopped onion in food processor until combined and well chopped.
  • Remove and place in a bowl. Cover until needed.*

Method

  • Heat some oil in a large pan, or wok, and add the chicken pieces. Fry until lightly browned.
  • Sprinkle on the Cajun seasoning and fry for another 2 -3 minutes.
  • Add in 4 tablespoons of the mirepoix and the crushed garlic cloves. Saute for another 5 minutes.
  • Add the mushrooms and crispy bacon and fry for another 2-3 minutes.
  • Pour in the chicken stock, milk and double cream. Stir to combine all the ingredients. Season with salt and pepper.
  • Break the fettuccine in half, add to the chicken mixture and stir so that the dried pasta is mixed well into the other ingredients.
  • Cover and simmer over a medium heat for about 20 mins, stirring occasionally. Remove cover for last 5 mins of cooking. Cook until the sauce has thickened and the pasta cooked until al dente.
  • Remove from the heat and transfer to serving bowls.
  • Sprinkle liberally with parmesan cheese and enjoy!

*This make more than enough mirepoix base. I keep mine in the fridge covered and use it whenever I need a quick season base for dishes. I don’t just use it for Cajun or Creole dishes either – it goes rather well in a Bolognese too!

Cajun Chicken Alfredo