1 pack Ready-to-Bake biscuit dough, thawed if required
Crispy Chicken
10-20* store-bought crispy chicken tenders (* number dependent on size of tender pieces)
To Finish
Pickled red onion slivers
Bread and butter pickle slices
Method
Crispy Chicken
Cook in accordance with manufacturer’s instructions
Hot Honey Pumpkin Butter
While the chicken is cooking, in the bowl of a stand mixer combine all the hot honey pumpkin butter ingredients
Whisk at medium speed until combined, then increase speed to maximum until mixture appears whipped and translucent. Stop the mixer and set hot honey pumpkin butter mixture aside until needed
*You can also use a handheld electric whisk but it will take longer for the mixture to become “whipped”
Donuts
Poke hole in centre of each biscuit with finger and stretch dough to create a 1-inch hole
Drop dough, in batches, in fryer oil preheated to 350°F; cook between 1-2 minutes per side until golden and cooked through
Remove from oil, drain on a rack before moving on to assemble the donut sandwiches
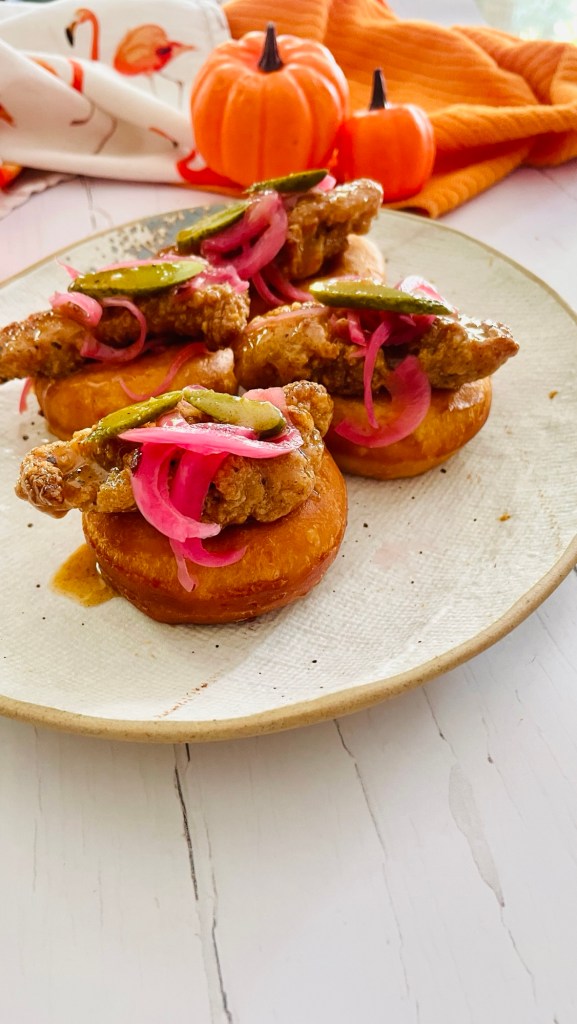
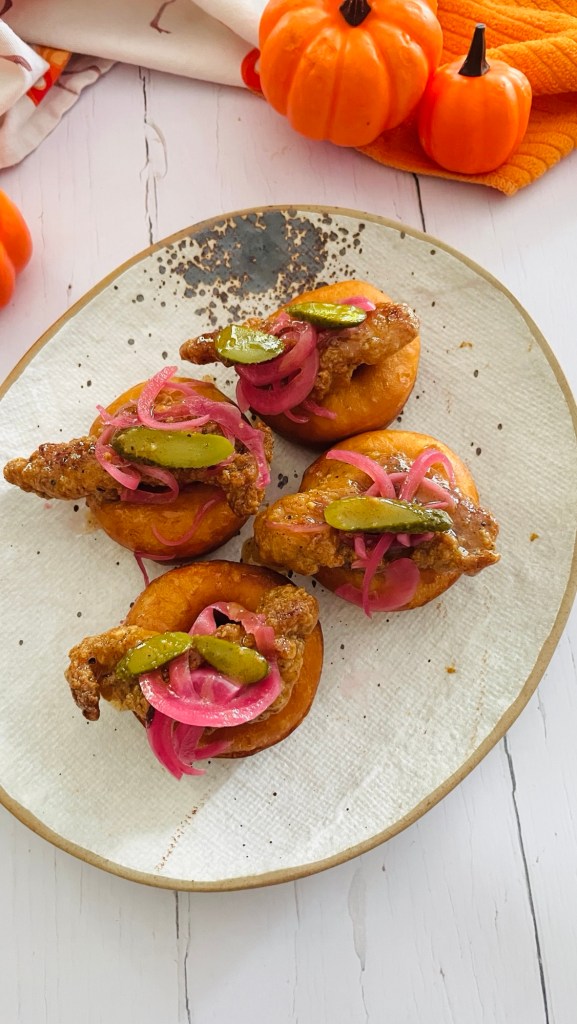
To assemble
Assemble your dounts on serving plate(s)
Place the hot chicken crispy chicken pieces in a large bowl. Add some of the hot honey pumpkin butter, amount to your liking, then stir and toss to coat the chicken pieces
Arrange 1-2 pieces of coated crispy chicken on top of the donuts and finish with pickled red onion and pickle slices
In a bowl combine all the Spice Mix ingredients and whisk together until combined. Transfer to an airtight storage jar or container until needed
Crispy Chicken
In a small bowl combine the buttermilk, sesame oil, dark soy sauce, sriracha and whisk to combine. Add in the sliced chicken, ensuring all the pieces are coating in the marinade. Allow to marinade for at least 3 hours, or preferable overnight, in your refrigerator
Once you want to make your spice bag, start cooking the potato fries in accordance with the manufacturer’s instructions
While the potato fries are cooking, combine the chicken coating ingredients of all-purpose flour, baking powder, corn starch in a bowl and whisk to combine
In a high-sided skillet heat about 1-1 ½ inches of canola oil until hot, 350°F
While the oil is heating, remove all the chicken strips from the marinade, allowing excess the drip off, then dredge piece by piece in the flour coating. Repeat by dipping the pieces in the marinade and then in the flour coating again until all the pieces are double-coated
Shallow fry the chicken (two batches may be needed) in the hot oil skillet until golden brown and crispy. Drain and remove to a wire rack set over some paper towel while you make the stir-fried vegetables
Stir fried vegetables
Heat a wok or frying pan to a high heat and add sesame oil. When the oil is hot, add in the sliced peppers and onions and stir to keep them moving. You want them to soften but not to color too much
After a couple of minutes add in the sliced garlic and continue to fry until slightly brown. Finally add in the sliced Birdseye chilis and green onions just before you finish frying, giving all the vegetables a final stir. Remove from heat
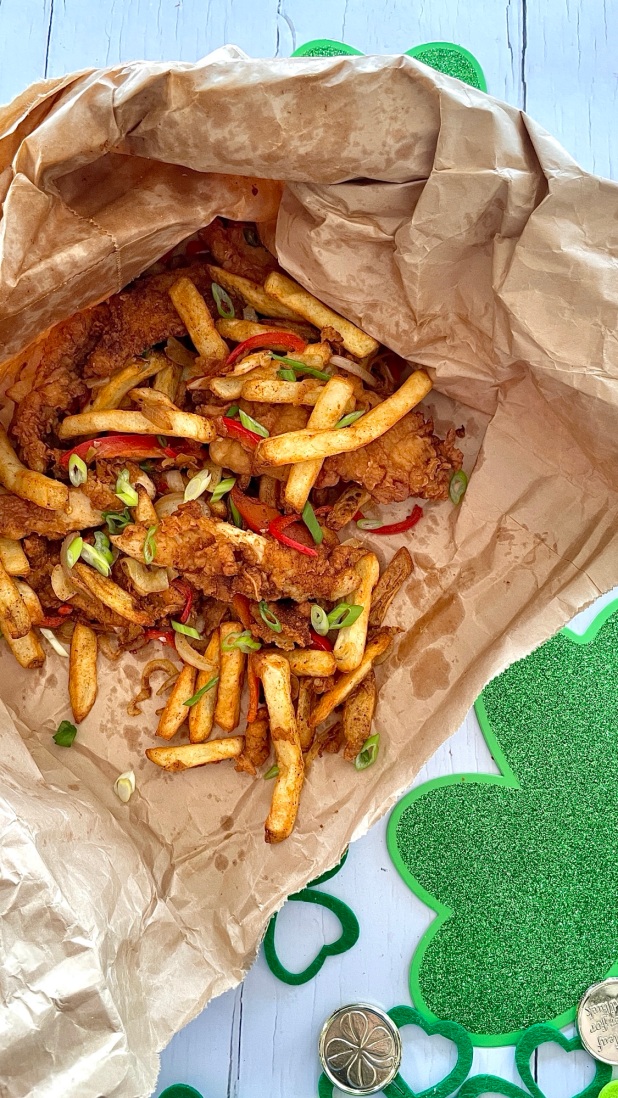
To assemble
In a large bowl combine the cooked fries, crispy chicken and stir-fried vegetables. Sprinkle over 2-3 Tablespoons of the Spice Bag seasoning (to personal taste) and toss everything together to combine and coat in the seasoning
For traditional serving, transfer to a paper bag and serve along with curry sauce
Curry sauce*
2 Tablespoons, butter
2 Tablespoons All-purpose flour
1 Tablespoon curry powder
1 ½ cups chicken stock
1 Tablespoon honey
1 teaspoon regular soy sauce
Salt & Pepper to taste
Put butter in a small pot over medium heat, and when melted add the flour and curry powder – stir well about a minute, to cook off the flour
Whilst whisking, slowly add the chicken broth, about a half cup at a time until it’s the thickness you want, then add the honey, soy and salt & pepper to taste
Simmer for 2-3 minutes, then remove from heat and serve
*This recipe makes more Spice Bag seasoning and Curry Sauce than needed. The surplus Spice Bag seasoning can be stored in an airtight jar or container at room temperature for up to 2 years. Any remaining curry sauce can be transferred to an airtight container and stored in the refrigerator for up to 3 days. To serve again, remove from refrigerator and gently reheat in a pan to serve
Line a baking sheet with aluminum foil and place a wire rack on top. Spray the rack with non-stick spray
Use paper towels to pat the wings dry and place them in a large bowl
Combine dry ingredients in a small bowl. Then sprinkle the seasoning over the wings, tossing to evenly coat.
Arrange wings, skin side up, in single layer on prepared wire rack
Bake in the oven for 20 minutes, at which point the turn wings over. reduce the temperature to 425F Convection setting and bake for a further 20 minutes until browned and crispy. Check the internal temperature of pieces for doneness
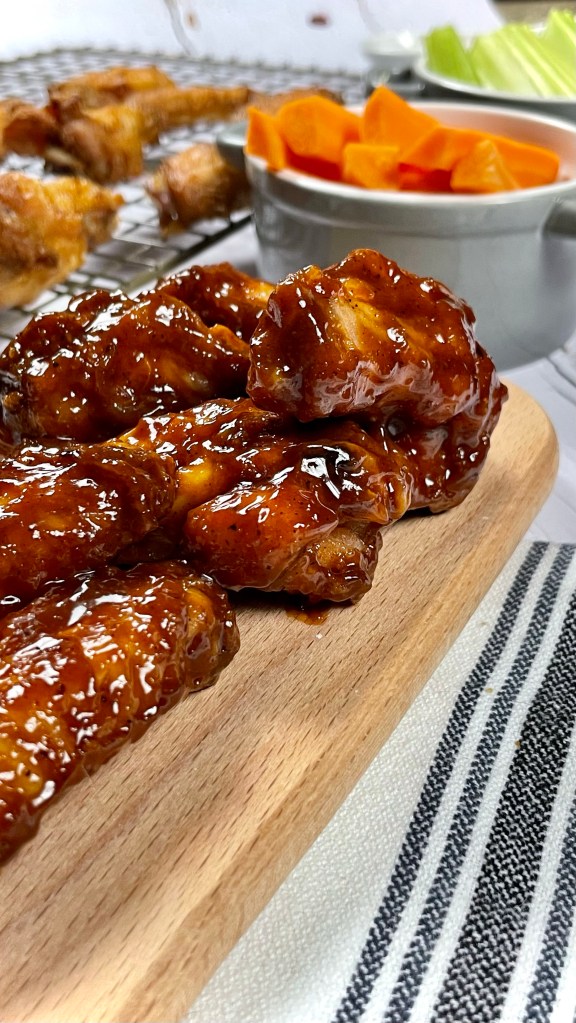
Remove from oven and let stand for 5 minutes. Transfer wings to bowl and toss with sauce
Sauce
Place all the ingredients in a medium saucepan and stir to combine. Bring to a simmer over medium heat
Reduce the heat to medium low so that the sauce is simmering. Cook for 15 minutes, stirring occasionally, until the sauce has thickened
Remove from heat and toss to coat your prepared wings. The quantity here make about 2 cups of sauce so there’s plenty for coating and surplus for dipping. Any remaining sauce can be left to cool and transferred to a glass container or squeeze bottle for use later
Brace yourselves- it’s that time of year again. No, I’m not talking about the impending rush of Valentine’s Day. I’m speaking of Super Bowl. That annual tradition of swole men fighting to deposit an inflatable pig skin at one end of a grass field, only to fish it out again and start over upon successful completion. You can tell I’m a fan right?
Well what I am a fan of is the Super Bowl halftime show (this year it’s Scarborough’s own The Weeknd); the cinematic advert premiers and of course….the FOOD! What’s a Super Bowl without the food you say? Possibly 4 hours of my life I’ll never get back I say. But an ample supply of snacks, and edible treats, provide not only fuel for the event but a distracting highlight.
My advice is to take a two-pronged approach. During the game you want something snackable, easy to handle with minimum effort (I’m talking no utensils here people) and that you can eat on auto-pilot. Whether it’s because you’re too focused on the defense strategy of the Buccaneers, or Kansas City’s Tight End’s…well…tight end, less fuss is more eating here. There’s the old classic chips ‘n’ dip – Guacamole; Salsa; Blue Cheese and Ranch are all solid favorites. Have on hand a selection of chips and crackers and you’re good to go.
Speaking of crackers, another firm favorite that no Super Bowl viewing is complete without is the Cheese Ball. An amalgamation of cheese in it’s many forms and seasoned however you like, it’s sure to be a touchdown success (see what I did there?) In fact why not get into the spirit of the event and mold it into football shape- themed eating at it’s best! If you’re feeling particular artistic you can complete the look with a layer of pepperoni for…ahem… “authenticity”- much as I have below.
Halftime is when you want to bring out the big guns. I’m talking food that needs a plate, possibly a knife and fork. Heck we want convivence here so get yourself a spork! Right up there with the cheese ball, Super Bowl means “wings” to me. Crispy, succulent, and packed full of flavor wings. It’s a matter of personal taste as to whether you want them dripping in sauce, there for the dunking or dry coated to retain their crispy goodness. I’m a fan of the latter so I’ve included my recipe for “Chicken Dust”. Now before you get to thinking it’s some sort of anti-mite treatment for foul stock, I discovered the term whilst researching fried chicken treatments. I don’t spend ALL my time eating you know. It’s a versatile little number in that you can use it as a dry rub or, as I have done, combine it with some oil to lend extra crispiness to the finished wings. I’ve left the actual cooking method up to you as everyone seems to have their own preference. I, myself, air-fried them for 15mins, tuning occasionally to ensure even golden, crispness.
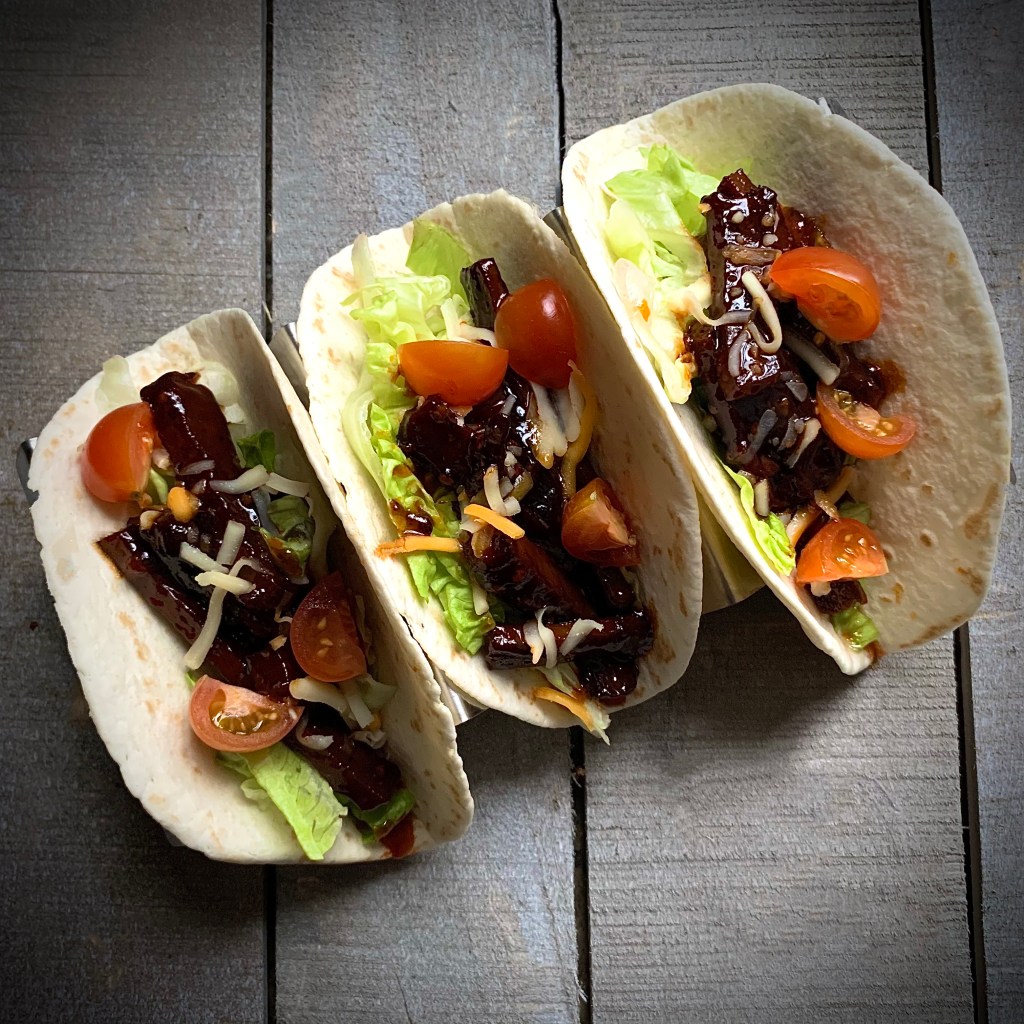
My last recipe is for that other feel-good favorite… tacos. I definitely do suggest you have a plate here, jam packing the tortilla with flavorsome fillings can often mean they’ll try to make a break for it! These tacos take advantage of one the prominent food trends emerging from this pandemic era…Plant-based alternatives to meat. Being confined indoors has brought about a dawn of a new age in the food world, the rise of the “Flexitarian”. Less strict than classic healthy diets it allows for the inclusion of occasional meat, with a prominence of plant based meat alternatives. Living in the time of Covid has people wanting a feeling of security and normalcy, often found in comfort food. But a deeper knowledge of associated health issues and ingredients has also meant a more health conscious approach. The abundance of plant based meat alternatives can now mean that people can enjoy their “meaty” experience and be content in the knowledge they’ve made a healthier, and at times more socially conscious, choice. The growth in the market means there are plenty of tasty varieties to try. Trust me- I love ribs and steak as much as your next carnivore so I was skeptical to say the least when plant based meat alternatives first arrived. But I have since been convinced (mainly due to Kristin & Justin at Guerilla Burger Co. ) and remain open to sampling the possibilities.
In this case with tacos. I’ve used ‘beef’ strips here coated in a sticky, glossy sweet ‘n’ spicy sauce with just the right amount of heat. The tacos themselves can be filled whatever way you like- be as restrained or as adventurous as you like. Just be plenty!
A parting word in the spirit of the weekend. Aside from food, the Super Bowl is also synonymous with gathering with friends at the likes of “tailgate parties”. However this year, like everything else since ‘Rona reared it’s head, we’re having to take a different approach to things. It’s definitely NOT a case of safety in numbers this time around. Think less Tailgating party and more ‘Homegating Huddle”. Let’s celebrate Super Bowl LV in fun way that’s still safe and socially responsible. Stay indoors, stick to your own family units, be adventurous and cook new things yourself. Celebrate separately this year, so that we can all celebrate together next year.
Enjoy the recipes, stay safe and mask up!
Superbowl Cheese Ball
Ingredients
16 oz cream cheese (2 x 8oz packs), room temperature
1 cup shredded mozzarella cheese blend
1 cup shredded sharp cheddar
1 cup finely grated parmesan
1 Tbsp Parsley
2 cloves Garlic, minced
1 tspn red pepper flakes
1 tspn Garlic powder
1 tspn Onion powder
1 tspn Hot sauce, or sriracha
1 tspn Worcestershire sauce
Kosher salt, to taste
Ground black pepper, to taste
2 cups Sliced pepperoni
1 slice Processed cheese
Method
In a large bowl, combine all the ingredients except the pepperoni slices and cheese slice, season with salt and pepper and stir together until fully combined
Gather the mixture into a rough ball shape and transfer to serving platter. Using a cranked spatula or spoons, smooth and form into a football shape
Finish the surface all over with a layer of pepperoni slices
Slice the processed cheese slice into strips and arrange in a “football lace” pattern on top of the cheese ball
Cover with cling wrap and refrigerate for at least 2 hours to allow the flavor to develop
Remove the cheese ball from the refrigerator 30 minutes before serving, and serve with crackers, vegetable crudités or pretzels
The cheese ball can be stored in the fridge wrapped in parchment paper and cling wrap for up to 1 week
Dusted Wings
Serves 1lb Chicken wings
Ingredients
For the Chicken Dust
2 Tbsp. Onion powder
2 Tbsp. Garlic powder
2 Tbsp. Brown sugar
1 Tbsp. Dried lemon peel
1 Tbsp. Dried oregano
1 Tbsp. Dried thyme
1 Tbsp. Dried parsley
1 Tbsp. White pepper
1 Tbsp. Szechuan peppercorns
1 Tbsp. Baking powder
1 tsp. Celery salt
1 tsp. Mace
1 tsp. Cayenne pepper
1 tsp. Mustard powder
1 tsp. Smoked paprika
1lb Chicken Wings
2 Tbsp Canola oil (if using)
Method
Place all the ingredients in a spice grinder, or clean coffee grinder. Blitz until a uniform powder, or dust, is formed
Transfer to an airtight plastic container for storage
The chicken dust can either be used in it’s own as a dry rub , or combined with the canola oil in a ziplock bag. Place the seasoning in a zip-lock bag, add in 1lb of prepared chicken wing pieces (drumettes and flats) and the tablespoons of canola oil. Shake and rub the bag contents together until the chicken pieces are fully coated
Cook by your preferred method – baking, air-frying
Remove and serve with preferred dip, or solo
Sit back and tuck in!
Sticky Beef-free Tacos
Makes 6 tacos
Ingredients
“Beef” Strip sticky glaze
2 Tbsp. Sesame oil
3 cloves Garlic, minced
1 Tbsp. fresh Ginger, minced
2 tsp. Rice wine vinegar (white vinegar also works here)
4 Tbsp. Honey (if vegan diet extends to honey, maple syrup can be used)
4 Tbsp. Sweet chili sauce
6 Tbsp. Vegan-friendly Tomato ketchup
4 Tbsp. Soy sauce
Taco Filling suggestions
500g Plant-based “Beef” (or “Chicken”) strips
6 medium (8″) soft flour tortillas
Shredded lettuce (I find Iceberg works best)
Sliced red onions
Shredded cheese, strength to preference
Soured cream
Guacamole, or sliced avocados
Method (for the sauce)
Combine all the sticky glaze ingredients in a medium pan
Heat over a high heat until boiling
Reduce heat to low/ medium and simmer until reduced by 1/3
Whilst the sticky glaze is reducing, prepare your protein in accordance with packet instructions
Toss the prepared/ cooked protein in the sticky glaze
Assembly tacos using additional ingredients to personal taste
With this recipe I should point out that I am neither German nor Hungarian in heritage. I am in fact Irish…and a massive lover of food (If you’ve ever seen me you’d be able to tell trust me!) Aside from baking, this love particularly includes comfort food. You know the type of food- dishes crafted from seemingly humble ingredients and resulting in that sublime feeling of snug…content…”Hygge” to use the Nordic phrase.
This dish was one that on my first attempt I tentatively made my way through. Most of the recipes I researched commented that care needs to be taken with the paprika, if it’s dry cooked too long it can scorch giving the dish an underlying acrid taste. Next, care had to be taken when adding the soured cream/ cream mixture. If you dump it straight into the pan with the paprika mixture there’s a very high chance of it splitting and curdling the sauce, flecking it with gloopy, white nodules. Whilst it’s still edible it is no where on par with the velvety smooth, ochre sauce that you get by taking that little additional step of tempering the cold cream mixture with a few tablespoons of the hot paprika sauce.
Now, after making it a number of times, I can navigate the recipe with that intrinsic muscle memory that is so synonymous with cooking or baking comfort food dishes. It’s very easy to see why this dish has stood the test of time.
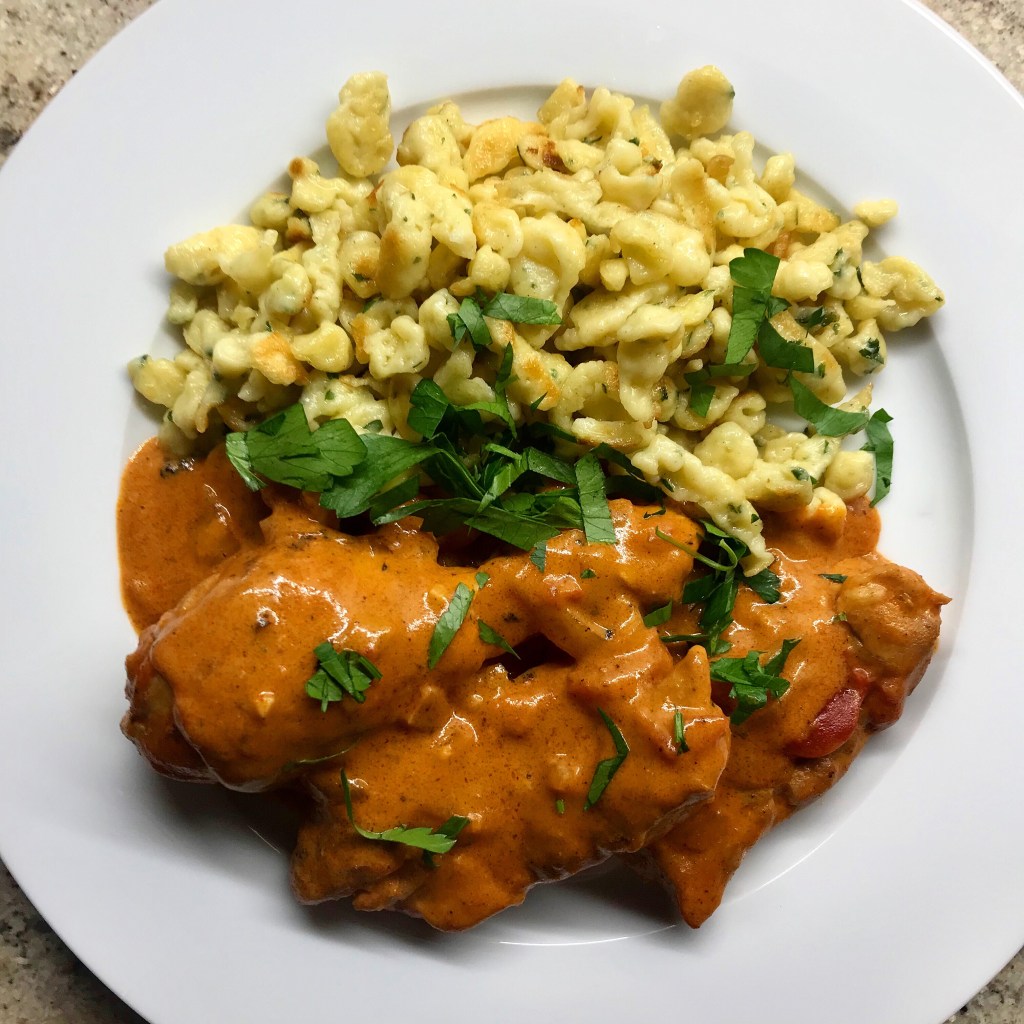
As well as the chicken paprikash I’ve included a recipe for spaetzle. For me the two go together like every cliched pairing you could think of. Spaetzle (“Little Sparrows) are toothy little dumplings of German origin. I first had these in a Bavarian restaurant in Vermont having ordered them not knowing what to expect. When they arrived I was prepared for something like pasta from the visual. I was more than pleasantly surprised upon first bite at how chewy they were, with an addictive density smothered in rich butter. A beautiful love affair was born!
Try these out- you won’t be disappointed!
Ingredients
Serves 4*
*for this dish I usually serve 1-2 drumsticks and 2 thigh pieces per person.
8 drumstick portions of chicken
8 thigh potions of chicken
1 medium white onion, chopped
4 cloves garlic, finely chopped or minced
1 tablespoon fresh thyme leaves
3 1/2 tablespoons Hungarian paprika (at a push you can use standard paprika but the Hungarian variety gives a much better flavour)
1 tin chopped tomatoes
3 cups chicken broth
3/4 cup soured cream
1/4 cup heavy/ whipping cream
3 tablespoons flour
Flat leaf parsley, chopped
Method
Preheat oven to 375 degrees F
In a jug, stir to combine the soured cream and heavy/whipping cream. Add the flour and stir until fully incorporated. Set aside until needed later
In a large pan over a medium heat, brown the chicken drumsticks and thighs until golden brown. Remove and place in a casserole dish or Dutch oven.
Place in the preheated oven until needed near the end of the recipe
In the same pan as the chicken was cooked, add the onion sauté until softened, then add 1/2 cup of chicken stock and stir to deglaze the pan of chicken fronds
Add the chopped garlic and thyme leaves and sauté with the onions for a few minutes until the garlic is lightly browned
Off the heat stir in the paprika and stir to coat the pan contents
Return the pan to the stove, add the chopped tomatoes and chicken broth. Cook over a medium heat until bubbling. Check and adjust seasoning to taste
Whilst the paprika mixture cooks, to the jug of soured cream/cream mixture add 2-3 tablespoons of the hot paprika mixture and stir well to combine. Add the contents of the jug to the main pan of the paprika mixture and stir for a few minutes to fully incorporate and thicken. The paprika sauce should now be thick and bright orange in color
Remove dish of chicken pieces from the oven and pour over the paprika sauce, covering and coating all the chicken pieces
Return the dish of chicken pieces and sauce to the oven and continue to bake for a further 10mins. After this time check the chicken to be fully cooked (should be an internal temperature of 165degrees F)
Remove from the oven, sprinkle with the chopped flat leave parsley and serve. Chicken paprikash goes particularly well with a side helping of hot buttered spaetzle (and I just happen to include it below!)
Hot Buttered Spaetzle
Ingredients
2 cups all-purpose flour
1 teaspoon white pepper
1/4 teaspoon nutmeg
2 teaspoons kosher salt
3 teaspoons dried parsley
4 eggs
1/3 cup milk
Method
In a jug, whisk together the eggs and milk. Set aside
In a large bowl, combine the flour, salt, pepper, nutmeg and parsley. Whisk to combine and make a well in the centre
Pour in the egg/milk mixture and stir well until combined. The mixture will be quite thick and stretchy
Cover and set the spaetzli batter aside for at least an hour at room temperature. (I usually prepare mine in the morning if I’m cooking them in the evening- a lengthy sitting of 3-4 hours. This helps the dough to develop both taste and texture)
*This next bit depends entirely on what method you use to make you spaetzle. There are a number of gadgets that can be used for making spaetzle. These range from a sapetzle “press” (similar to a potato ricer) to a spaetzle “slider” (looks like a mandolin) but the method I use is with a spaetzle “lid and scraper”.
Place large dollops of the reared batter on the lid and use the scraper to push the batter through. Admittedly this make take some more skill and dexterity but it’s what I’m used to. The main thing here is to use a method that you’re comfortable with.
Spaetzle lid and scraper
*Make the spaetzle according to your device method. With all the methods exercise immense caution as you’re working in close proximity to the boiling water
(Lid and scraper method) Place the spaetzle lid over the pot of boiling water. Take a ladle full of batter and drop it onto the lid.
Force the batter through the device. The batter will form droplets and drip in to the salted boiling water below and let them cook for 1 to 2 minutes until floating on the surface. Continue until all the batter is squeezed through the lid. Remove with a slotted spoon and transfer to the large bowl of iced water
Repeat until you have used up all the spaetzle batter
In a large pan, head 5-6 tablespoons of butter until sizzling over a medium heat
Drain the spaetzle of all water, add to the butter and toss to coat
Continue to stir and toss over a medium heat until they start to get flecked with golden brown flecks
Serve hot with chicken paprikash
• The spaetzli may be cooked a few hours in advance to the point where they are placed in the iced water. If you want to store them remove them from iced water, shake dry and place in a covered container in the refrigerator. I have made mine the day before, stored in the fridge and then cooked the evening of the following day. Still perfection!