Irish Spice Bag- Mála spíosrach na hÉireann

Serves 2

Ingredients

Crispy Chicken

  • 1 large chicken breast, cut into strips
    • Marinade
  • 1 cup buttermilk
  • 1 Tablespoon sesame oil
  • 1 Tablespoon dark soy sauce
  • 1 Tablespoon sriracha
    • Chicken coating
  • 1 1/2 cups All-purpose flour
  • 1 1/2 teaspoons baking powder
  • 3 Tablespoons corn starch

Spice Bag seasoning*

  • 1/2 Tablespoon fine salt (less if you prefer)
  • 2 teaspoons Chinese Five Spice powder
  • 1 teaspoon smoked paprika
  • 1 teaspoon red pepper flakes
  • 1 teaspoon garlic powder
  • 1 teaspoon sugar
  • 1/2 teaspoon white pepper
  • 1/2 teaspoon onion powder
  • 1/2 teaspoon ground ginger
  • 1/4 teaspoon ground ginger
  • 1/4 teaspoon ground cumin
  • 1/8 teaspoon ground cardamom

Stir-fried vegetables

  • 1 Tablespoon sesame oil
  • 1 red pepper, thinly sliced
  • 1 small onion, thinly sliced
  • 3 cloves garlic, sliced
  • 2 small red Birdseye chilis, sliced
  • 2 small green Birdseye chilis, sliced
  • 2 green onions, sliced

Additional

  • 750g bag Frozen potato fried, to preference

Method

Spice Mix

  1. In a bowl combine all the Spice Mix ingredients and whisk together until combined. Transfer to an airtight storage jar or container until needed

Crispy Chicken

  1. In a small bowl combine the buttermilk, sesame oil, dark soy sauce, sriracha and whisk to combine. Add in the sliced chicken, ensuring all the pieces are coating in the marinade. Allow to marinade for at least 3 hours, or preferable overnight, in your refrigerator
  2. Once you want to make your spice bag, start cooking the potato fries in accordance with the manufacturer’s instructions
  3. While the potato fries are cooking, combine the chicken coating ingredients of all-purpose flour, baking powder, corn starch in a bowl and whisk to combine
  4. In a high-sided skillet heat about 1-1 ½ inches of canola oil until hot, 350°F
  5. While the oil is heating, remove all the chicken strips from the marinade, allowing excess the drip off,  then dredge piece by piece  in the flour coating. Repeat by dipping the pieces in the marinade and then in the flour coating again until all the pieces are double-coated
  6. Shallow fry the chicken (two batches may be needed) in the hot oil skillet until golden brown and crispy. Drain and remove to a wire rack set over some paper towel while you make the stir-fried vegetables

Stir fried vegetables

  1. Heat a wok or frying pan to a high heat and add sesame oil. When the oil is hot, add in the sliced peppers and onions and stir to keep them moving. You want them to soften but not to color too much
  2.  After a couple of minutes add in the sliced garlic and continue to fry until slightly brown. Finally add in the sliced Birdseye chilis and green onions just before you finish frying, giving all the vegetables a final stir. Remove from heat

To assemble

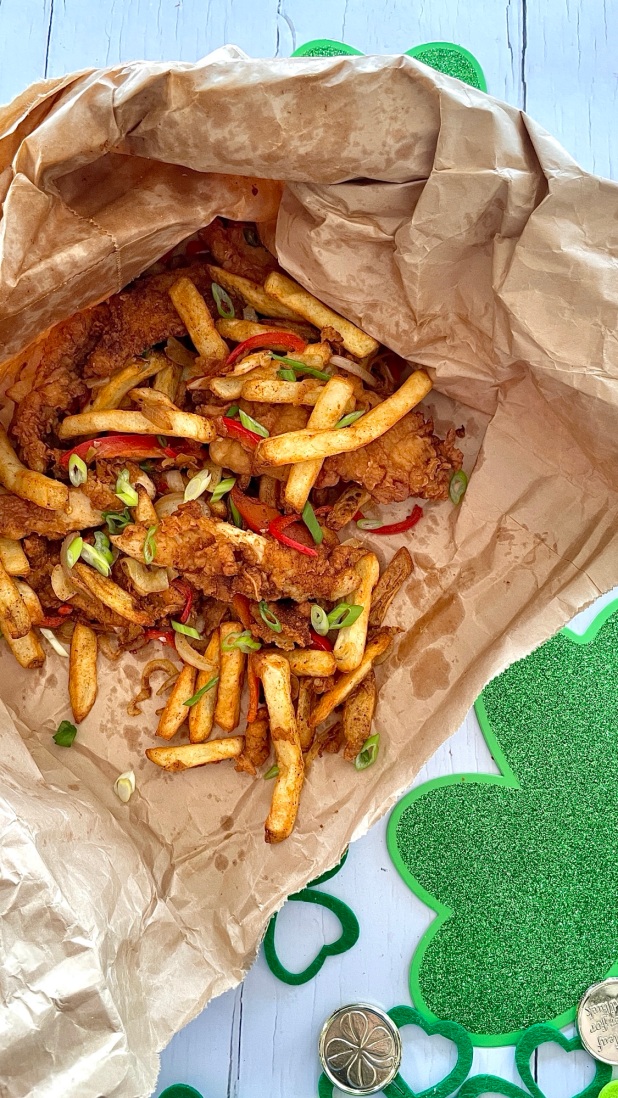
  1. In a large bowl combine the cooked fries, crispy chicken and stir-fried vegetables. Sprinkle over 2-3 Tablespoons of the Spice Bag seasoning (to personal taste) and toss everything together to combine and coat in the seasoning
  2. For traditional serving, transfer to a paper bag and serve along with curry sauce

Curry sauce*

  • 2 Tablespoons, butter
  • 2 Tablespoons All-purpose flour
  • 1 Tablespoon curry powder
  • 1 ½ cups chicken stock
  • 1 Tablespoon honey
  • 1 teaspoon regular soy sauce
  • Salt & Pepper to taste
  1. Put butter in a small pot over medium heat, and when melted add the flour and curry powder – stir well about a minute, to cook off the flour
  2. Whilst whisking, slowly add the chicken broth, about a half cup at a time until it’s the thickness you want, then add the honey, soy and salt & pepper to taste
  3. Simmer for 2-3 minutes, then remove from heat and serve

*This recipe makes more Spice Bag seasoning and Curry Sauce than needed. The surplus Spice Bag seasoning can be stored in an airtight jar or container at room temperature for up to 2 years. Any remaining curry sauce can be transferred to an airtight container and stored in the refrigerator for up to 3 days. To serve again, remove from refrigerator and gently reheat in a pan to serve

Irish Cream Nanaimo Bars

Makes 18

Ingredients

Base layer

  • 1/2 cup butter
  • 1/3 cup cocoa powder
  • 1/4 cup fine sugar
  • 1 large egg, beaten
  • 1 1/2 cups graham cracker crumbs
  • 1 cup brown (wholewheat) bread crumbs
  • 3/4 cup sweetened shredded coconut

Middle layer

  • 1 cup powdered sugar
  • 1/2 cup butter, softened to room temperature
  • 2 Tbsp custard powder
  • Pinch salt
  • 2-3 Tbsp Irish Cream (Baileys), to taste
  • 1 tsp vanilla extract

Top layer

  • 6 oz semi-sweet chocolate, broken/ chopped into pieces
  • 2 Tbsp butter
  • 2oz white chocolate, broke/ chopped in to pieces
  • 1 tsp butter

Method

Base layer

  1. Preheat oven to 350 degrees F. Line a 9 inch square baking pan with parchment paper 
  2. In small saucepan over medium heat, combine butter, cocoa and sugar, stirring occasionally until butter has melted and mixture is smooth. Set aside to cool
  3. In a separate medium bowl combine the egg, graham cracker crumbs, brown bread crumbs and shredded coconut. Add in the cooled cocoa/ butter mixture and stir to fully combine
  4. Transfer to your prepared pan. Press firmly and level as much as possible
  5. Bake for 10 mins, then remove from oven and leave to cool completely

Middle layer

  1. In bowl of a stand mixer with paddle attachment, cream together powdered sugar, butter, custard powder, salt, Irish cream and vanilla extract. Spread the mixture evenly over the cooled bottom layer; smooth and chill for at least an hour

Top layer

  1. In a bowl set over barely simmering water, melt semi-sweet chocolate, and butter together, stirring occasionally, until smooth and shiny.
  2. In a microwave, heat the white chocolate and butter together in a small bowl until melted. Transfer to a small piping bag.
  3. Pour over the melted semi-sweet chocolate over the Irish cream layer and smooth. Pipe on the white chocolate and feather to a design of your liking
  4. Chill in the refrigerator overnight, or 2 hours minimum. Cut into bars (I usually get 18, cutting into 3 x 6)
  5. Keep the cut bars in a covered container either in the refrigerator (3 days) or frozen (3 months)

Chester Bread (aka Gur Cake)

img_7744

If you’ve followed my recipe blog for some time you’ll have no doubt have noticed that my childhood has various landmarks in the form of baked goods- Soda bread; Cheesecake; Queen of Puddings. This is yet another one of those anchor points with which nostalgia comes crashing in waves.

Known by various names including Gur Cake; Chester Slice; Donkey’s Gudge, it was Chester Bread that I knew this by growing up in South-East Ireland. Many an early adolescent afternoon was spent munching on these en route to my childhood home from school- oblivious to not only the background the baked treat I clutched but also ignorant to dubious history of where I was buying them from. My only preoccupation was how could something so delicious be so cheap!

At the bottom of the hill to my school was a building known simply to us as “The Good Shepherds”. All I knew of it, at the time, was that it was a convent and former orphanage. The expression “If you don’t behave I’ll take ya to The Good Shepherds” was frustratingly hissed by many a Waterford parent to the offspring, uttered in ominous overtones akin to summoning The Boogey Man. A fuller investigation later in life revealed the title of the building to be The Good Shepherd Magdalene Asylum (Laundry) and Orphanage, Without going in to it in too much detail it was one of number of locations of a religious order whose ethos and modus operandi was of a particularly sordid and horrific nature.  A sordid blemish on the hem of Ireland’s pious petticoat. Google it if your’re intreest has been piqued- but consider yourself forewarned.

The main institute had ceased operation in 1982, however there were still some occupant nuns in residence and as a means of charitable support income they ran a small bakery onsite. It was here that myself and many another transient school-goer would purchase our after-school sugar rush. Chester breads; Vanilla Slices (a more rustic version of Mille-feuille with pastry, vanilla custard filling and water icing topping) and cream doughnuts (think Long John doughnuts filled with jam and cream) were all greedily snapped up to the point of selling out.

Whilst they all would bear mentioning, as nostalgia renders them supremely tasty, it’s Chester Bread that brings us here today. I’ve already mentioned that this bake is known throughout Ireland under various monikers such was its popularity. Originally used in the 19th century as a novel, but nonetheless innovative, method to use up stale offcuts and surplus bakes in bakeries, the cake was inexpensive to make using a basic recipe template of filler, binder and sweetener. The finished bakes were then sold cheaply (but not so cheap as to not yield a profit) to youngsters playing truant from school as something to fill the gap until dinner. In Ireland, particularly Dublin, such kids were called “gurriers” who would “mitch”, “mooch” or just generally bunk off school. Hence the ‘Gur Cake” name. I have yet to unearth the link as to why it’s called ‘Chester Bread” where I grew up when that name is apparently derived from it’s place of origin in Chester in the United Kingdom. As for the ‘Donkey’s Gudge” version? I don’t know what a donkey has to do with it, let alone what their gudge is! Feel free to comment should you be able to shed some light here.

Whatever way you call it, I find that the finished bake is definitely memorable. What starts as simple stale bread is baked to a fudgy, slightly gelatinous, sweetly spiced filling. It’s almost like a dense ginger cake. I’m sure the pastry serves as nothing more than a utilitarian purpose to allow the filling to be handled with minimal mess. Try it out and see what you think. It’s an ideal accompaniment to a cup of tea- perhaps whilst researching The Magdalene Laundries?

Ingredients

Shortcrust pastry

  • 2 1/2 cups All purpose flour
  • 3/4 cup Butter, cold and diced
  • 1/4 tspn salt
  • 3 tbspn ice cold water
  • Flour, for dusting

Filling

  • 15 Slices of bread, at least 1 day old
  • 1 1/2 cups Cold strong tea (preferably Irish)
  • 1 cup, packed Brown sugar
  • 2 tbspns Mixed spice
  • 1 tspn Baking powder
  • 1/2 cup All purpose flour
  • 1/4 cup Salted butter, cut into pieces
  • 1 cup Raisins
  • 2 tbspn Treacle
  • Icing or fine sugar for dusting, optional

img_7752

Method

To make shortcrust pastry

  1. Combine the flour and salt into a bowl, coarsely rub in the butter/margarine. Continue to rub together until you have the texture of coarse meal. Some pea-sized granules of butter may remain
  2. Sprinkle over the water  and bring the ingredients together to make a soft dough. Additional water may be needed depending on your kitchen’s temperature/ humidity
  3. Lightly knead to bring it together in a ball. Flatten to a disc, wrap in cling wrap and refrigerate until needed

*Pastry is best chilled before rolling.

To make filling

  1. Preheat your oven to 375°F
  2. Grease and line a 9′ x 9′ tin (2″ high)
  3. Remove the crusts from the slices of bread and lie in a shallow casserole or baking dish.
  4. Pour over the cold tea and leave to soak for 1 hr
  5. After the hour, drain of any excess tea and using a fork mash the wet bread to thick pulp
  6. In a large bowl combine the flour, baking powder, sugar and mixed spice, stirring well to combine
  7. Rub in the cold diced butter until you have something that resembles coarse meal in texture (similar to making the pastry above)
  8. Add the bread mixture and treacle to the other flour/ sugar/ spice mixture and stir well to combine

To assemble

  1. Remove the pastry from the fridge and divide into 2
  2. Roll one 1/2 of the pastry large enough to fit your baking tin and use to line the bottom of it. Prick the pastry all over with a fork or knife
  3. Pour and spread the bread mixture over this pastry layer
  4. Roll the remaining pastry to fit the top of the tin and place over the filling, pressing to form a lid. Again prick the second layer of pastry all over with a fork or knife (helpful hint: I roll to size and prick BEFORE placing the pastry lid on to the filling. This stops the pastry being pushed down into the soft filling mixture)
  5. Bake in your preheated oven for 1 hr, after which remove and let to cool completely in the tin. The finished bake should have firmed up considerably but still have a slight wobble. Dust with sugar if using.
  6. Once fully cooled, cut into squares (using this tin I usually divide into 4 x 4)
  • The finished Chester bread can be dusted with sugar or left plain if preferred
  • Baked Chester bread can be stored in an airtight container at room temperature for up to 4 days

img_7746


The Classic Waterford Blaa

img_7301

Coming from Waterford, in South-East Ireland, there are a few things that are corner stones of my childhood – Waterford Crystal; Hurling and…of course – the blaa. “The what?”, I hear you say. Well, are you sitting comfortably? The blaa is basically a bread roll. But there are a couple of features that set it apart. Roughly square-shaped, liberally dusted with flour, it has a soft chewy texture and pleasing bitter tasting crust that is dear to the heart of Waterford natives. Many a school lunch’s main feature was a buttered blaa with “Red Lead” (pink sliced deli sausage meat) or filled with Tayto crisps. Quintessential Deise fare if ever there was any!

Dating from 17th century, blaas are well ingrained into the history of Waterford. In their original form blaas were thought to be made from the scraps left over from families baking their own bread. The name “Blaa” is thought to have been possibly derived from the old Huguenot word ‘Blaad’ – an old French word for flour, or ‘Blanc,’ – a French word meaning white, which refers to the white floury appearance of the baked blaas. To the best of my knowledge there is yet to be a confirmed origin.

Such is the fame of the humble blaa that in 2013, the Waterford Blaa Bakers Association (yes there is such thing!) succeeded in getting PGI designation for the Waterford Blaa. “PGI”  stands for Protected Geographical Indication, which essentially means that only Blaas made by specialist bakers in Waterford city and county can be called Blaas. This guarantees an authentic heritage product, based on the traditional methods and the unique skills of the bakers- think champagne; Parmigiano-Reggiano and Melton Mowbray pork pies. Basically if you see something called a “Blaa” for sale outside of Waterford? It’s not the real deal. Waterford Blaas are now supplied by traditional family bakers operating since the 1800’s. Sadly these days the family bakers have deminished with but a handful remiaining.

Whilst this recipe isn’t PGI approved, it has stood the test of time in my family. Having been passed down through generations (to date I’ve confirmed 3) there apparently has been no tweaks or amends to the original recipe. It remains true with a form that conjures memories of frenzied Saturday morning sibling debates as to whose turn it was to fetch the weekly dozen from the local store. I’ve eaten in some fancy restaurants with both divine and questionable cuisine. However I’ll be perfectly honest and say I have yet to experience anything that makes my heart swell and induce instant comfort like biting into a buttered blaa filled with Tayto cheese & onion crisps. Flour-dusted lips savouring that sweet chew contrasting with crunchy savoriness. Bliss!

img_7304

Ingredients

  • 4 cups Bread flour
  • 2 1/4 tspns quick-rise instant yeast
  • 1 tspn fine salt
  • 1 tbspn fine sugar
  • 1 tbspn butter
  • 50ml milk
  • 325ml water
  • 1/2 cup AP flour (approximately) for final dusting

Method

  1. In a pan combine the milk and butter. Heat gently until the butter is melted. Set aside and leave to cool while you prep the rest of the ingredients, stirring occasionally
  2. Lightly oil a large bowl and set side until needed later
  3. Sift the flour into the bowl of a stand mixer. To one side of the bowl add the yeast and to the opposite side add the salt. Add the sugar in the middle
  4. Combine the warm water and milk/ butter mixture and stir well. With the dough hook attachment working on slow speed, slowly add the liquid to the dry ingredients in a steady stream. Continue to add until  50 ml remain. Depending on your kitchen conditions eg temperature and humidity, you may not need to add all the liquid- only add enough liquid for your dough to form a ball and clean the bottom of the bowl. Continue to knead on slow for 7 mins. The dough should come together in a ball that is smooth and elastic to touch, without cracking or breaking
  5. Remove the dough ball from your mixer bowl and place in the preoiled bowl. Cover and set aside to proof in a  warm place for between 50-60 mins until doubled in size
  6. After this time, remove the bowl and punch down the risen dough to knock back the air. Gather the dough in to a smooth ball shape, place back in the preoiled bowl and recover for a second proof. This proof won’t take as long, between 30 – 40 mins. DO NOT SKIP this step as it helps to add to the distinctive flavor of the finished blaas
  7. Once the second proofing has been done, remove the dough from the bowl and divide equally into 9 or 12,  depending on how big you want your final blaa to be. An amount of 9 will give a more traditional palm-sized blaa
  8. Roll each of the equally-sized pieces into a smooth ball and place together in a high-sided pan. I tend to use a roasting tray that I have dusted/ dredged with flour. Place the dough balls side by side until you have a “sheet formation”. Ideally they should be spaced so that when they finish rising they touch each other. The “mouths” that are formed from this at the sides of the baked blaa are a distinguishing feature allowing easy opening
  9. Cover the dough balls with oiled clingfilm and allow to rise in a warm place for a further 30 mins.
  10. Preheat your oven to 425 F. By this time the balls should have risen and be touching each other
  11. Dust the tops of the blaas liberally with flour and place on the middle shelf. Bake for 20-25 mins. The tops of the blaas should be lightly browned and bases sound hollow when tapped
  12. Remove the baked blaas from the tin and allow to cool to warm before serving
  13. Blaas are best eaten on the day they are baked. If you do have any left the following day you can refresh them by wrapping in foil and baking them at 375F for 10 mins. Overall they will keep in an airtight container for up to 3 days

Traditional fillings for blaas

  • Bacon (rashers)
  • Tayto crisps (Irish potato chips and they MUST be Tayto!)
  • Sausages
  • “Red Lead” (Irish deli meat sausage slices. Ultra-pink in color!)

Other fillings that can be delicious-

  • Sliced roast chicken and stuffing
  • Bacon and fried egg

img_7309

A meeting of worlds- The Waterford blaa filled with Canadian peameal bacon


Easy Pantry Recipes


I struggled for what to write here as anything I first attempted sounded flippant and vapid, making light of the situation and circumstances that each and every one of us are living through at the moment. What I wanted to do was…well to do “something“. I firmly believe in the calming and therapeutic powers of being in the kitchen. At the best of times baking for me offers a respite from daily chores and frantic everyday life, a place to get my headspace and mentally “breathe”.

My baking activity has definitely had an upsurge of late. In the uncertain circumstances of the world today I find there is a calming certainty in knowing that if I mix a certain bundle of ingredients together a known result will be achieved. Focusing on the task at hand helps to redirect my attention and anxiety away from the unnerving headlines and statistics we’re being bombarded with- a calm in the eye of the storm, no matter how briefly. I guess that’s what I’m trying to do here-  pass on these moments of calm to you in some small way. 

The recipes here offer little moments of indulgence and respite with minimal ingredients and skill needed. Hopefully most of the ingredients called for are already staples in your pantry or, failing that, will prove easy to get hold of. I hope you enjoy taking some time out and baking them.

Stay safe out there folks, see you on the other side.

You can find some further information on mental health considerations during COVID-19 Outbreak here

img_3281

Shown here served with crème anglaise

Chocolate Soufflé

Serves 4

Ingredients

• 2 cups chocolate hazelnut spread (I use Nutella – surprise!)

• 5 eggs

Method


  1. Preheat the oven to 375˚F (190˚C).
  2. Separate the egg yolks from the egg whites and place into two separate bowls
  3.  
  4. Mix the chocolate hazelnut spread into the bowl with the egg yolks
  5. In the second bowl, whisk the egg whites until stiff peaks form
  6.  
  7. Fold 1/3 of the whipped egg whites into the chocolate/egg yolk mixture until fully incorporated. Add the remaining egg whites to the mixture and fold gently, but thoroughly, until the mixture is smooth
  8. Pour the mixture into the greased ramekins and bake for 15-17 minutes until risen
  9. Serve immediately
img_3278

Shown here served with crème anglaise


img_3571

Shown here served w/ Blueberry, Rosemary & Juniper berry conserve

Soda Bread

Ingredients

  • 3 1/2 cups All Purpose flour
  • 1 teaspoon bicarbonate of soda
  • 1 teaspoon kosher salt
  • 1 1/2 cups buttermilk*

Method

  1. Preheat oven to 450°F
  2. Line a tray with baking parchment and dust lightly with flour. Set aside until needed
  3. In a large bowl combine the flour, bicarbonate of soda and salt. Whisk to combine and break down lumps. Make a well in the centre
  4. Pour in most of the buttermilk
  5. Using one hand stir the flour into the liquid from the outside of the bowl, turning the bowl as you do. Continue until the mixture comes together in a soft dough that is not too wet or sticky (you may need the remainder of the buttermilk here)
  6. Turn the dough out into a lightly floured surface and knead lightly for a few seconds. Don’t over-knead here- you just want to do it enough so that it holds it shape. Don’t do it to the extent that you would with standard bread dough!
  7. Using your hands, lightly floured, pat the dough into a round shape about 2 inches thick. Transfer to the floured baking sheet
  8. With a knife (I use a bench scraper) score a cross into the top of the loaf, so that it goes almost all the way through the thickness and over the sides of the loaf
  9. Bake in the preheated oven for 15mins then reduce the heat to 400°F and continue baking for an additional 20mins until cooked. The baked loaf will be deep golden in color and sound hollow when the bottom of it is tapped
  10. Remove and cool on a wire rack
  11. This type of loaf will cool with a hard, crispy crust. If a softer crust is desired wrap a clean kitchen towel around the hot loaf and allow it to cool

*If you don’t have buttermilk to hand you can make your own by combining 1 cup milk with 1 tablespoon squeezed lemon juice or distilled white vinegar in a jug. Stir to combine and leave to sit for 15 mins. After 15 mins the liquid will have thickened slightly and small curds can be seen. Use in the recipe as required. Any remaining milk can be stored in the fridge.

img_3568


img_3962

White Bread Bloomer

  • 4 cups bread flour
  • 2 1/2 teaspoons quick action yeast
  • 2 1/2 teaspoons kosher salt
  • 2 tablespoons granulated sugar
  • 1/4 Olive oil
  • 1 1/4cups warm water

Method

  1. Lightly oil a large bowl and set aside for the dough later
  2. In the bowl of a stand mixer combine the flour, salt (to one side), yeast (to opposite side) and brown sugar
  3. Add in olive oil and 250ml warm water and mix on low setting to combine the ingredients. Add in remaining water, if needed, to achieve a soft, slightly sticky dough. Continue to knead in the machine for a total of 7 minutes. Proceed to Step 4.(If you’re mixing the traditional way, combine all the ingredients in a large bowl and shaping you hand into a “claw shape”, with fingers slightly spaced, mix by hand until all the ingredients come together in a ball. Tip out onto a lightly oiled surface and continue to knead for 10 mins until the dough is soft and slightly sticky)
  4. Tip the dough from the mixer bowl into the prepared oiled bowl, cover with lightly oiled cling-wrap and set aside to proof for at least 45 minutes, or until doubled in size
  5. Once the dough has finished proofing, tip out onto a lightly oiled surface. Punch down the dough to knock bar the air and reduce it in size
  6. You can either leave it as one large load or divide into two for 2 smaller standard sized loafs
  7. Once the dough has been knocked back use oiled hands to shape into an oval shape and transfer to a large flour dusted baking sheet
  8. Cover with oiled cling wrap, set aside and leave to double inside for apx 30-40mins
  9. Whilst the dough is having it second proof, preheat your oven to 425°F
  10. Once the dough has proofed and risen, bake in the preheated oven for 15mins, after which reduce the temperature to 390°F and bake for further 10-15mins until deep golden in color and the base of the loaves sound hollow when tapped
  11. Remove from the oven, and allow to cool on a rack
  12. Baked loaves can easily be frozen and saved for later. Wrap in cling wrap, place in plastic bag, seal and place in freezer. Defrost for a few hours when needed

PB & J Oat Bars

Ingredients

  • 5 tablespoons salted butter, plus extra for the tin
  • 1 cup crunchy peanut butter
  • 8 tablespoons grape jelly (or favourite fruit flavour)
  • 1/2cup light brown soft sugar, packed
  • 2 cups rolled oats

Method


  1. Heat the oven to 350°F . Butter and line the base and sides of a 9” square cake tin with baking parchment
  2. Set aside 3 tablespoons each of the peanut butter and jam in separate bowls for later. Combine the remaining peanut butter, jam, butter and sugar into a pan over a medium heat and stir until everything has melted together. Quickly stir in the rolled oats, then leave to cool for 5 mins
  3. Spoon the mixture into the prepared cake tin and gently press down with a small measuring cup
  4. Dot over the reserved peanut butter and jam, then bake for 20-25 mins or until golden brown. Leave to cool completely in the tin, then turn out onto a board and cut into bars (2 x6)
  5. Bars are best kept refrigerated in a sealed container for 2-3 days


img_3992

Easy Shortbread Cookies


  • 1 cup salted butter
  • 1/2 cup icing sugar
  • 1 1/2 cups All Purpose Flour

Method

  1. Preheat oven to 275 degree
  2. In the bowl of a stand mixer (with paddle attachment) oe using an electric hand-mixer beat the butter and icing sugar together well.
  3. Slowly add in the flour (I use 1/4 cup increments) until it has all been added in. Once it all in, crank up the speed on you machine and whip it for 6 minutes. The mixture will become light and exceptionally fluffy
  4. Using a small cookie scoop (size about 1- 1/2 tablespoon) scoop the dough out onto the prepared  baking sheets
  5. Bake in the preheated oven for about 30-35 minutes until bottoms of the cookies are browned.
  6. Remove from the oven and leave to cool for a few minutes on the trays. Transfer to a rack to cool complely
  7. Baked cookies can be kept in an airtight container at room temperature for up to a week 

In the photographs shown I put a cherry on top of each prior to baking. The pre-baked cookies can be left plain or topped with whatever you like from your pantry such as chocolate chunks; nuts; candy pieces…whatever you have to hand in your pantry.

img_3993


img_3970

Peanut Butter Cookies

Makes 18-20

Ingredients

  • 1 cup Sugar
  • 1 cup Peanut Butter
  • 1 Egg


Method


  1. Preheat the oven to 350 degree. Line 2 cookie sheets with baking parchment
  2. In the bowl of a stand mixer, or a hand-held electric mixer, mix the ingredients together until well blended
  3. Using a small cookie scoop (about 1-1/2 tablespoon size) scoop doughballs on to ungreased cookie sheet
  4. Using a fork press down in one direction and then press again from the other side to form a criss-cross pattern on top
  5. Bake for 12 minutes
  6. Allow them cool on the cookie sheet for a couple of minutes before transferring to a wire rack to cool completely
  7. Baked cookies will keep for 3-4 days at room temperature in a sealed container

img_3964


Homemade Butter

I posted the recipe for this a couple of years ago. It such an easy thing to do but a lot of people think of it as a daunting task. You can find the recipe/method here