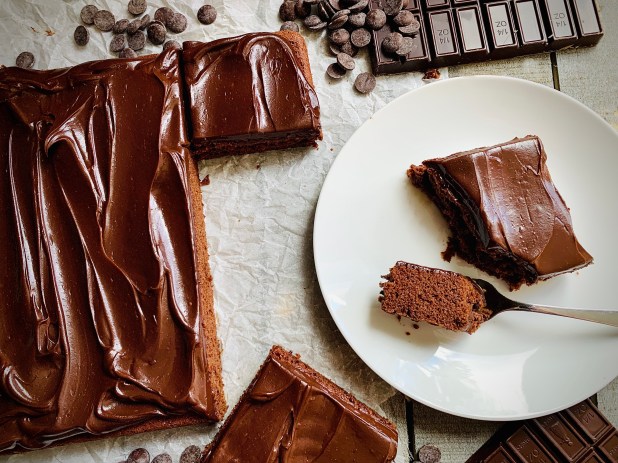
Now don’t raise your eyebrows like that! No, I it’s not a typo- there is indeed vinegar listed in this cake. Going by it’s other moniker “Depression Chocolate Cake”, this may well be one of those recipes that probably everyone’s baking inclined grandparent would probably have in their repertoire. Dating from a time of the Great Depression, when things like eggs, milk, butter and sugar were really expensive and scarce, this recipe keeps them to a minimum. So much that with it’s absence of eggs and dairy the sponge itself can be considered vegan. If you want to finish to completion with it’s delectable ganache topping and still remain vegan-friendly, I’ve included some recommendations at the end of the recipe.
Another bonus with this recipe? Minimal washing up! In fact if you choose to cake it the classic way as a sheet cake to be eaten from the pan, you can save on that singular, additional bowl for clean up. Just make sure to omit the baking parchment lining and use a non-stick pan. Dump everything in the pan, exert a bit more restraint when mixing together and away you go! No bowl, all-in-one sheet cake.
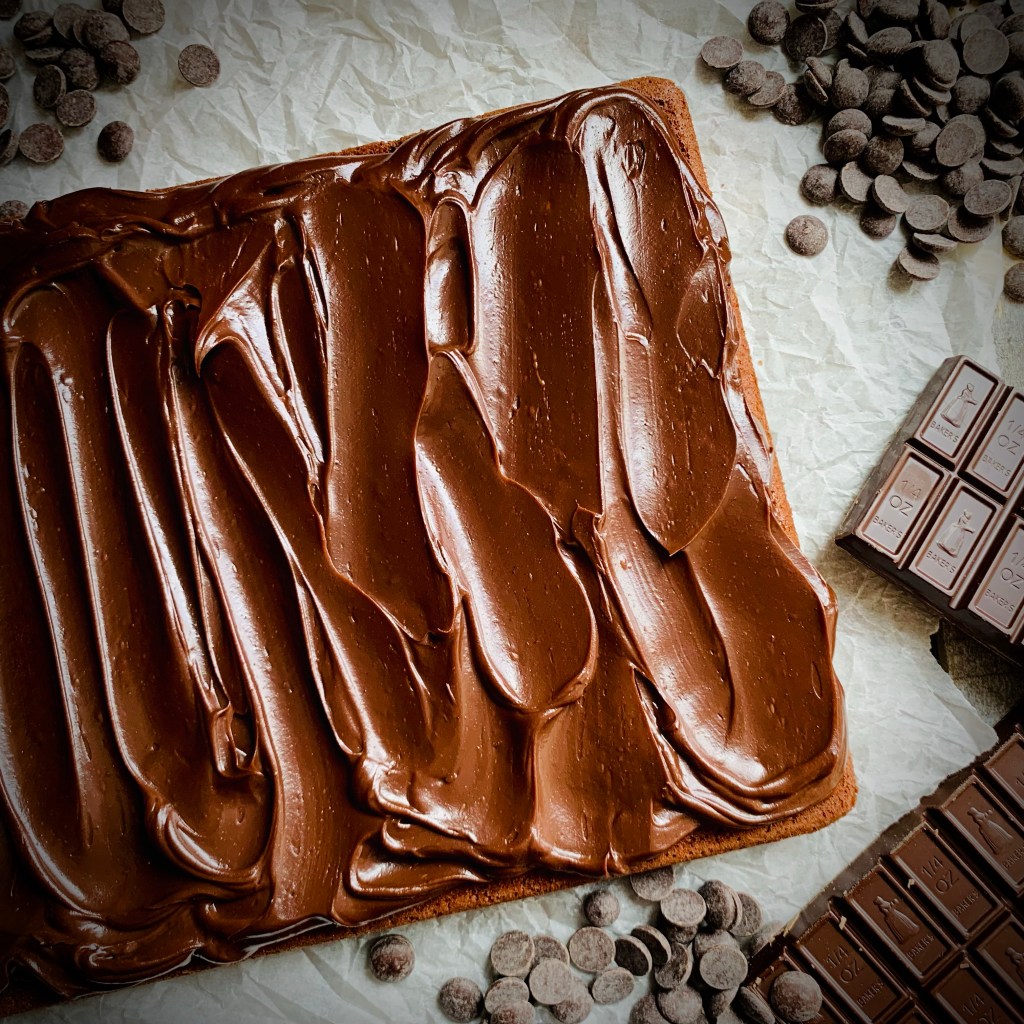
Finishing with chocolate ganache is entirely optional. Some people prefer just a simple dusting of powdered sugar, others prefer just to leave it completely naked and bask in the unadulterated chocolatiness of the sponge itself. Whatever way you decide to finish it, I’m pretty sure you wont be making it just the once!
For the ganache topping, place the chocolate pieces in a medium heatproof bowl
Heat the heavy cream/ whipping cream, in a small pan over a medium heat until just below boiling (look for small bubbles at the edge of the cream in the pan)
Remove the cream from the heat and gently pour the warmed cream over the chocolate pieces in the bowl. Leave to rest for 5 minutes
After 5 minutes, gently stir the chocolate/ cream mixture with a whisk to emulsify it. It will appear mottled and speckled at first but continue gently stirring until it thickens and is uniform in color
Once fully smooth and uniform in color, set aside and leave to fully cool before spreading (usually takes about 2 hours at room temperature). The mixture will thicken to spreadable consistency after this time
Preheat your oven to 350F
Prepare a 9” x 12” baking pan by greasing and lining with baking parchment
In a large bowl combine all the cake ingredients- the flour, sugar, cocoa powder, baking soda, salt, water, canola oil, vanilla extract, and vinegar
Whisk until fully combined, making sure to scrape the bottom of the bowl to avoid any dry ingredient residue. Continue mixing until fully blended and smooth
Pour into your prepared pan. If needed gently tilt the pan to allow the cake batter to flow into the corners
Bake in your preheated oven for between 20-25minutesm or until a cake tester, or skewer, comes out clean when inserted into the centre of the cake. Remove the cake from the oven allow to cool in tin for 5 minutes in a rack
After allowing to cool for 5 minutes, invert the cake onto a cooling rack lined with baking parchment
Remove the tin and lining baking parchment paper and allow the cake to cool fully below finishing with your chocolate ganache topping
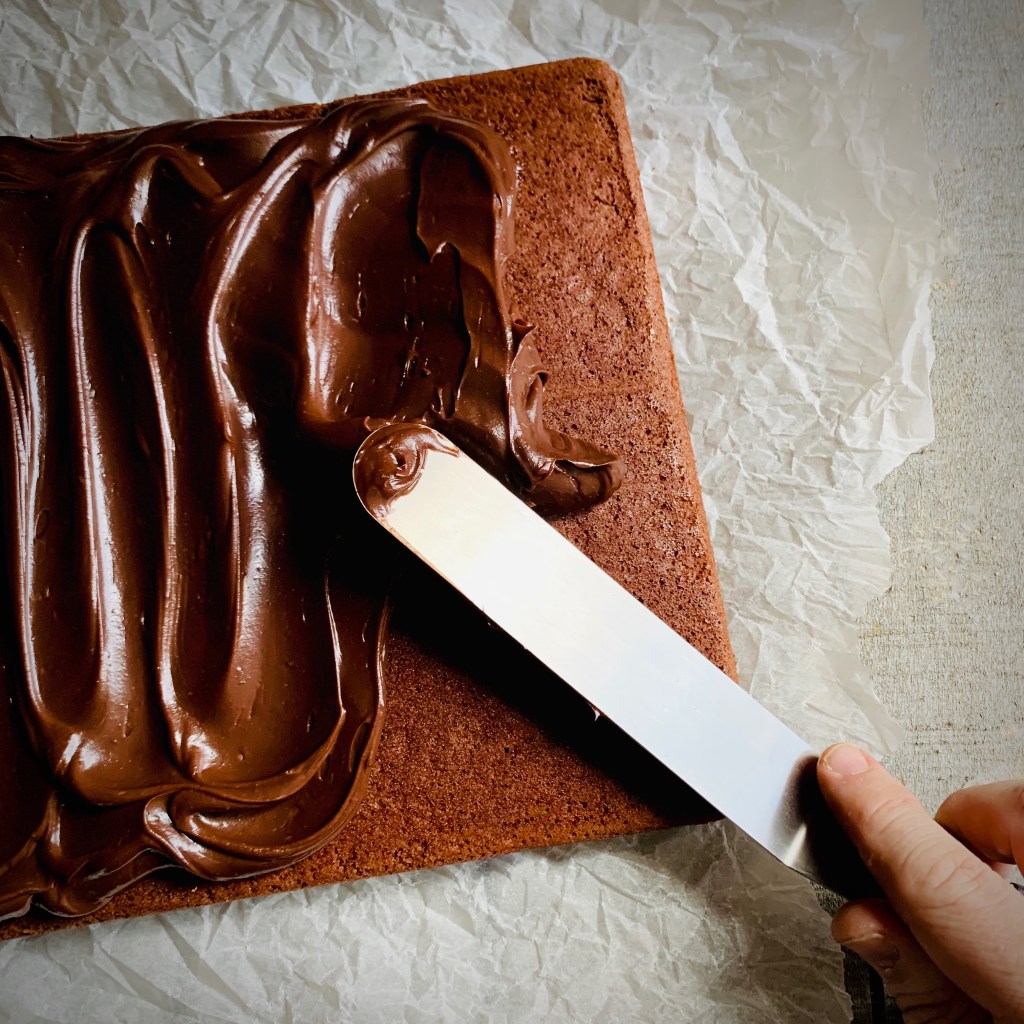
Once your cake has fully cooled, pour your chocolate ganache topping over the surface and spread with an offset spatula to cover the cake
Slice however you like and enjoy!
*Whilst the cake sponge in this recipe is vegan, the chocolate ganache isn’t. If you want a complete vegan friendly cake substitute 1 cup full-fat coconut milk (Make sure to fully shake it before using). Also make sure that your chocolate that your using is vegan-friendly.
Episode 5 of Food Network Canada’s Great Chocolate Showdown rolls around and it’s pushing the boundaries on flavor combinations. This one’s all about the TEA! Using tea leaves we have to incorporate the selected flavor into a selection of bakes/ desserts fit for a high tea party. Out of the tea flavors to be selected from (Rooibos; Mint; Sencha Green; Milk Oolong; Chai Masala and Earl Grey) I ended up with Mint. Although this is the most well known, and probably most popular, it could be seen as more of a curse than as blessing due to it’s popularity. Is it a flavor that has been done to death?
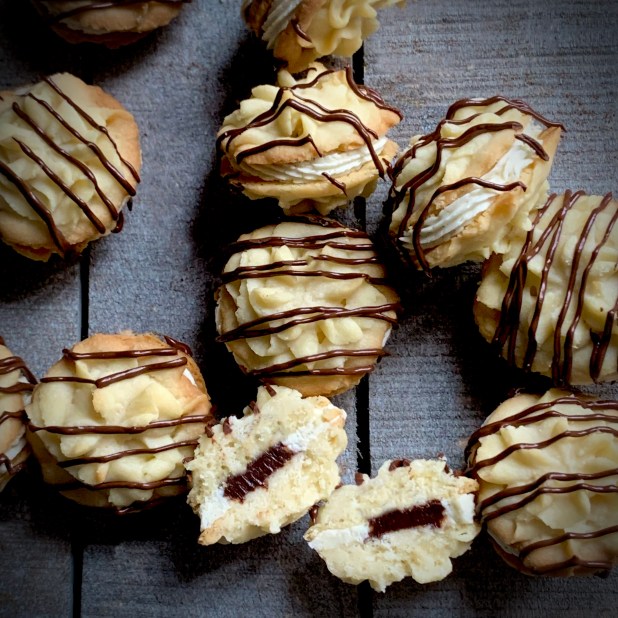
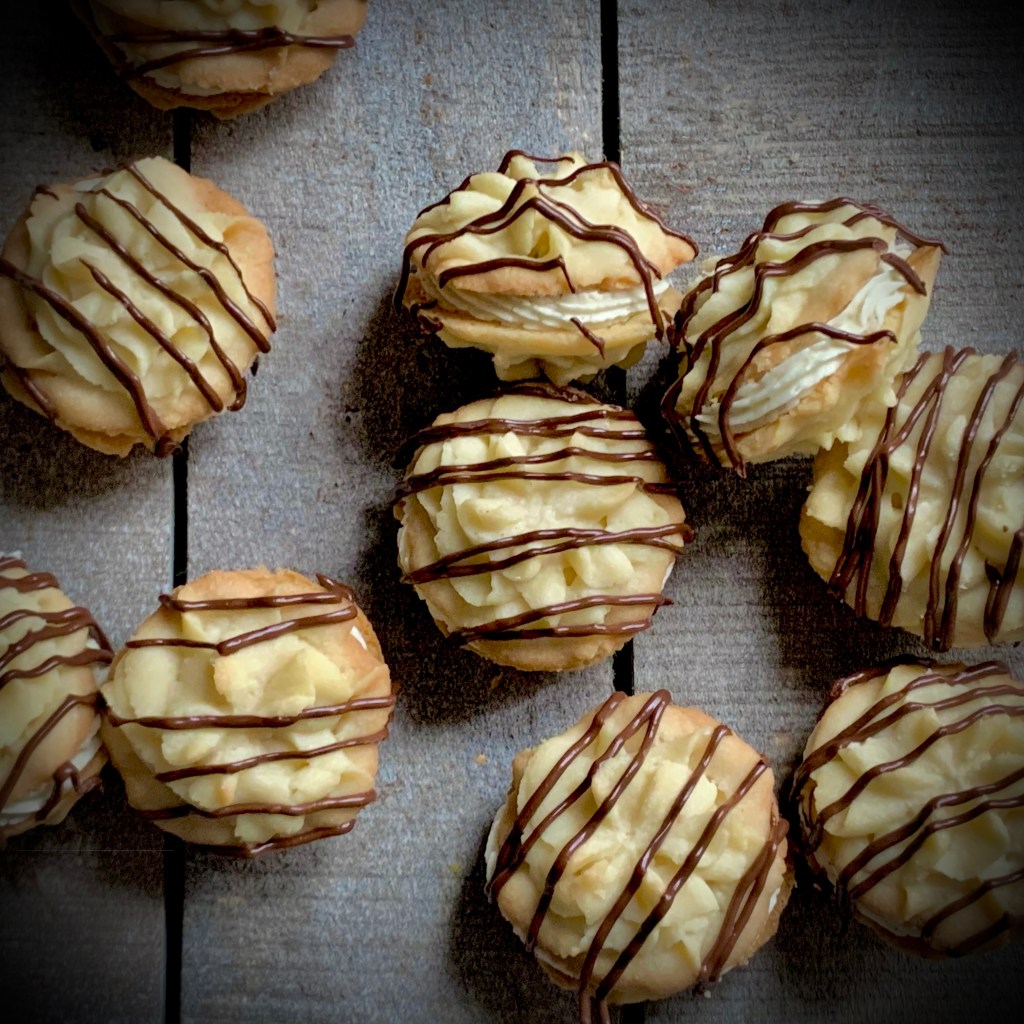
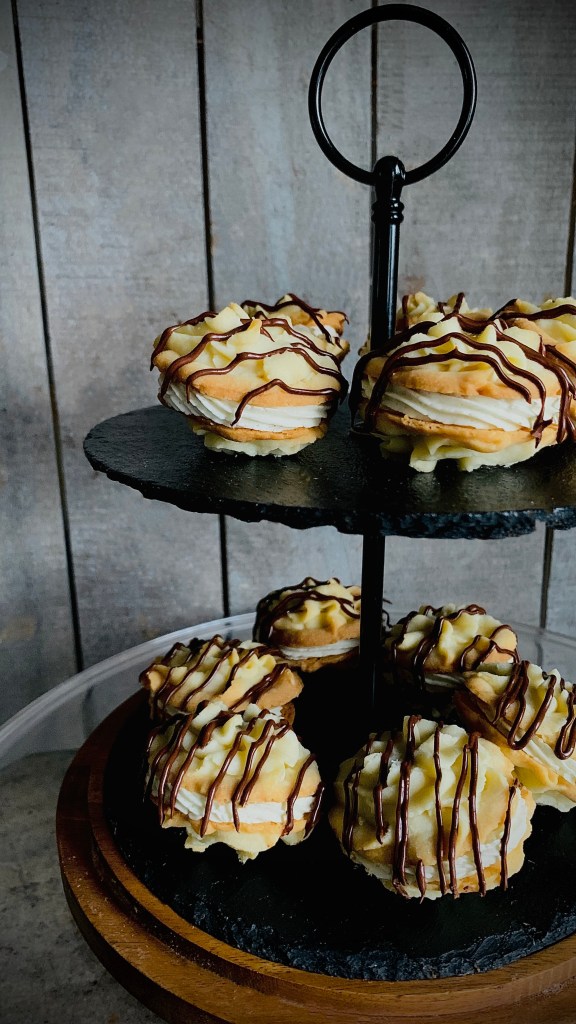
Of the two desserts that I chose to present, these Viennese Whirls are my personal favorite. Buttery crumbly shortbread like cookies that are usually sandwiched together with a duo of buttercream and jam, I chose here to use the fillings to incorporate the mint flavor. Infusing a heavy cream base allowed it to be added both the buttercream filling and the feature chocolate ganache. What results is a mint flavor that avoids falling into the cliched “mouthwash mint” territory but remains palatable and interesting in these 2-bite sandwich cookies.
Mint Viennese Whirls #recipe #greatchocolateshowdown
In a small pan combine the heavy cream and mint tea. Stir well
Heat and continue to stir until the cream reaches just below boiling
Remove from heat and leave to infuse for 15 minutes, stirring occasionally
After this time, pour through a sieve to strain the tea leaves, pressing to remove traces of cream and set aside until needed
Cookies
Preheat the oven to 350F. Line 2 baking sheets with non-stick baking parchment or pre-marked silpat sheets
Measure the butter and icing sugar into a bowl, beating until pale & fluffy
Sift in the flour with cornflour and beat on a medium high speed, until thoroughly mixed
Spoon the mixture into a piping bag fitted with a medium star nozzle (Wilton 2D). Pipe swirled rounds (size 1 1/2″ dia) on to prepared baking sheets
Bake in the center of the oven for 12—13 minutes, until a pale golden-brown at the edges. Cool cookies on the baking sheets for 5 minutes then carefully transfer, with a spatula or palette knife, to a wire rack to cool completely. Once cool divide cookies into 2 equal portions (I find it best here to sort through the batch and match up cookies of the same size)
Buttercream Filling
Measure the butter into a bowl, sift the icing sugar and tea powder on top
Add the infused cream, beat on medium speed until well combined. Increase to high speed and whip until very light and smooth
Spoon into a piping bag fitted with an open star nozzle (Wilton 32)
Taking one portion of the cookies, pipe a border onto the flat side of the cookies, leaving a void in the middle
Chocolate Ganache filling
Warm the infused cream to just below boiling. In a separate bowl combine the chocolate and icing sugar. Pour over the warmed cream
Leave for 5 minutes
Stir and whisk until smooth and fully emulsified
Leave to cool until semi-firm (transfer to fridge to firm up but not solid)
When firm pipe into center of the cookie with buttercream filling, and seal with it’s matching cookie from the second portion batch, twisting slightly to seal
To Decorate (optional)
Using a piping back with the end snipped off, drizzle some chocolate lightly over the assembled cookies. Leave for the chocolate to set- if you can wait that long!
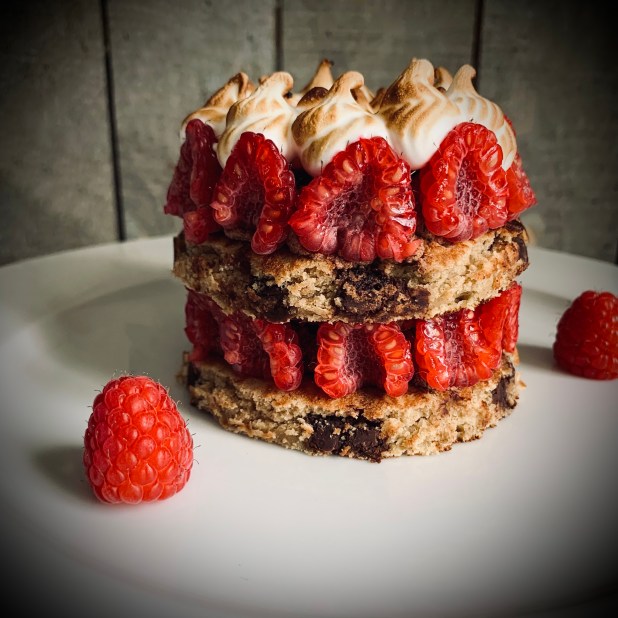
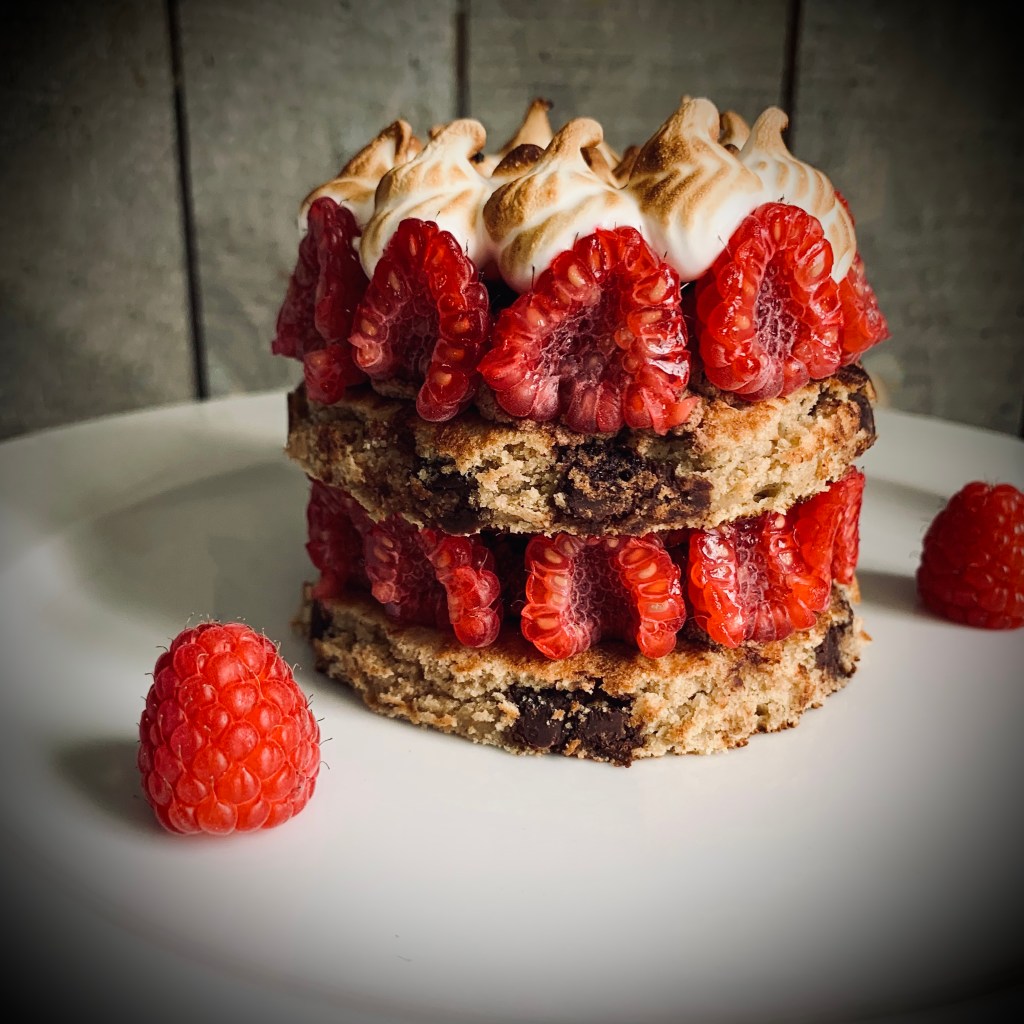
Yet another bake that came about from my time on Food Network Canada’s show Great Chocolate Showdown. The elimination challenge in Episode 4 was to bake a brunch dish inspired by a favorite childhood dessert, using QuakerTM oat flour. The items for selection were coffee cake, tart, pancakes, crepes and biscuits. While I’m definitely partial to a good breakfast biscuit, pancakes are much closer to my heart. Waffles give me a savory brunch option, whilst pancakes are the perfect vehicle for a sweet option.
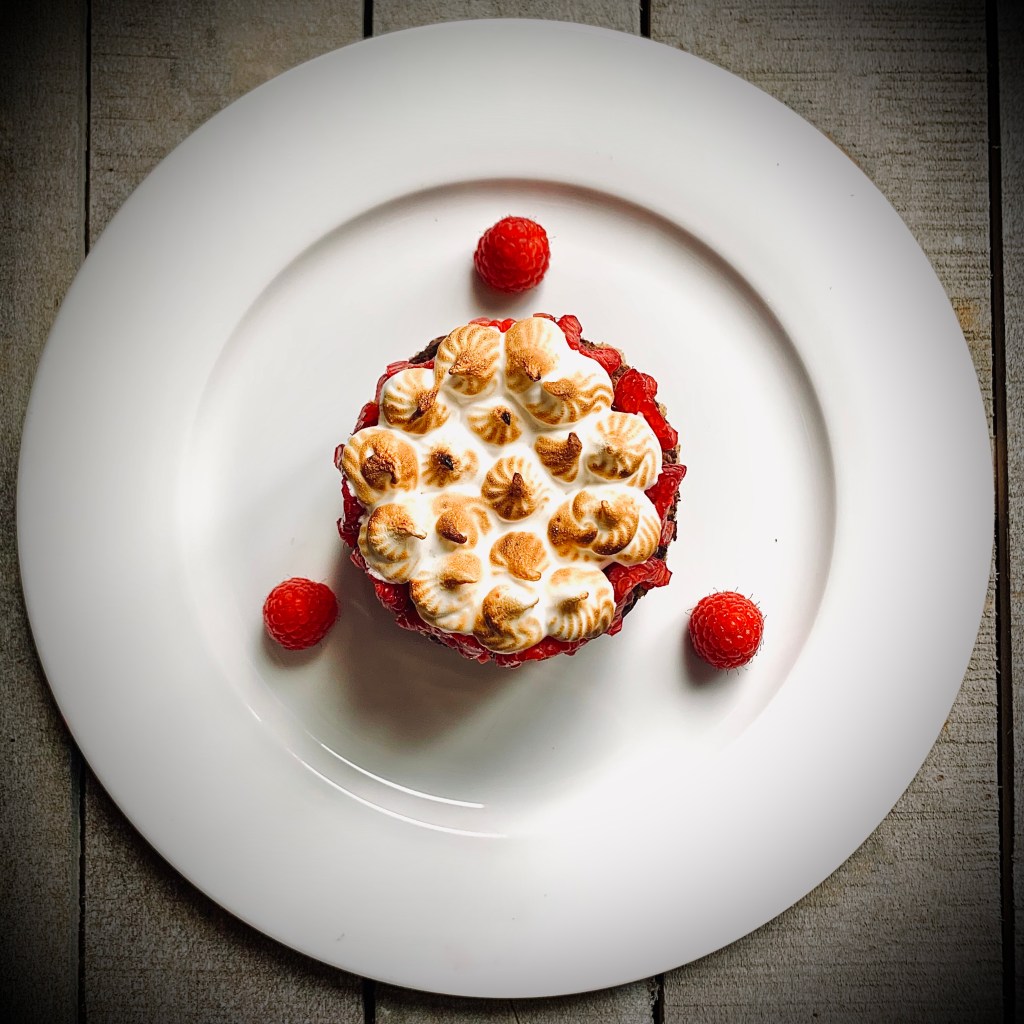
My childhood memory would have been firmly anchored in my mom and her synonymous dessert that is Queen of Puddings. My mother was solely responsible for my ability, passion and sometimes foolhardy ambition when I bake. In my childhood memories, she’s permanently enrobed in a gingham tabard, and there was nothing this woman couldn’t make, bake or generally concoct in the kitchen. If I were to sum up a childhood of kitchen memories in one delicious dessert, Queen Of Puddings, instantly springs to mind. With layers of breadcrumb enriched vanilla custard layered with sweet, tangy raspberry jam and topped with billowy clouds of fluffy, golden toasted meringue it was my mom’s go-to dessert when ingredients were scarce. For me it’s a classic case of my mom being a kitchen alchemist and turning a few mundane ingredients into something fantastic- a fine example of the whole being more than the sum of it’s parts. The original recipe is easy and comforting, and it’s warmth, familiarity and soothing nature will always remind me a a childhood at my mother’s hip.
Of course trying to marry such a quintessentially classic comfort pudding with the concept of brunch was always going to be a fun challenge at best! In my head the signature layers of the original recipe lend themselves perfectly to create a layered, stacked brunch dessert. Here I’ve created a pancake stack bordering on an entremet- layers of pancake with ganache, custard, and jelly regally crowned with peaks of soft, fluffy meringue. Anyone for a boujee brunch?
Yes I’ve taken shortcuts here with the use of Jello-O and custard powder. For me, when making brunch, shortcuts are ALWAYS welcome. Anything that helps me get to the table fast and get the bubbles flowing even faster is always acceptable in my books! I’m not one to stand on ceremony.
Bottoms up!
Queen of Puddings Brunch Pancakes #recipe #greatchocolateshowdown
1 1/2 cups fresh raspberries, sliced lengthwise in half
Method
Prosecco Raspberry Gelee
In a jug combine Jell-O powder and boiling water. Stir until dissolved
Slowly add in prosecco and stir gently to incorporate
Pour into 3″ dia silicone tartlet mold to 1/4″ depth
Place in refrigerator to set
Chocolate custard
Mix the custard powder and sugar together in a small pan
Add the milk, and stir to combine
Continue heating, stirring constantly, until the custard is smooth and well thickened
Remove pan from heat and stir in chocolate chunks until melted and fully incorporated
Leave to cool for 5 mins before placing into a piping bag fitted with a plain round tip
Pipe discs of the custard into a silicone tartlet mold to match your Jell-O tartlet mold
Cover the surface of the custard with cling wrap to prevent skin forming on the surface
Place in refrigerator to set
Whipped Chocolate Ganache
Gently heat the cream in a pan until just below boiling. (look for small bubble starting to appear at the edge of the cream)
Remove from heat, add the raspberry liqueur, salt and chocolate chunks and leave for 2-3 minutes
After this time gently stir to emulsify the mixture until it is smooth and uniform in color
Leave to cool to room temperature
Using a whisk or hand held mixer whip the mixture until light and fluffy. Be careful not to overwhisk in case of separation
Cover and set aside until needed
Oat Pancakes
In a medium bowl, whisk together the oat flour, baking powder, cinnamon, and salt
In a separate larger bowl, mix together the eggs, milk, melted butter, orange zest, and vanilla extract
Add the dry ingredients and stir to combine. Once nearly combined stir in the chocolate chips
Heat a griddle pan over a medium high heat. Lower heat to medium low, and using 1/3 cup measurement pour circles of pancake batter to give you 8 pancakes. Your pancakes should spread to approximately 4-4 1/2″ diameter
Cook on each side for 3-2 minutes until golden brown, flipping when done.
Remove from heat and set aside until serving
Meringue
In a stand mixer fitted with the whisk, beat the egg whites until soft peaks form
With the mixer on, gradually beat in the sugar until stiff peaks form. meringue should be glossy and smooth
Transfer to a piping bag fitted with a desired piping nozzle
Assembly/ To Serve
Remove whipped ganache from refrigerator and transfer to a piping bag fitted with a round plain nozzle
Pipe a round of ganache onto a pancake placed on a plate, leaving 1/4-1/2″ border
Set raspberries halves around on the border, standing up against the ganache
Place a second pancake on top
Carefully remove a round of chocolate custard* from the mold and place on top of second pancake
Carefully remove a round of raspberry gelee* from the mold and place on top of the chocolate custard round
Set raspberries halves around on the border, standing up against the custard & gelee rounds
Top with peaks of meringue piped in desired arrangement and torch to finish until toasted and browned
Serve with any remaining raspberries
*Chocolate custard and gelee rounds can be placed in the freezer, after setting, for 10-15mins to firm up to aid removal
Valentine’s Day. Love it or hate it, there’s no getting away from it- even here I’m afraid. BUT I am hoping to give you something a little bit different in the recipe department. Heart-shaped and pastel-pink hued? Yes. However that’s where the predictability ends- or at least I’m hoping you think so too.
These started inception as…well…I was hankering for something sweet in between grocery deliveries. I wish I could come up with a more romantic, Earth-shattering epiphany than that but alas, no. My recipe for shortbread has been tried, approved and is a breeze to rustle up in a hurry. The instantly seductive baking phrase comes to mind, ” Quick and with minimal ingredients“. So in an effort to kill two birds with one stone, I got to thinking of doing a Valentine’s Day recipe post on shortbread.
So how can I make it “Valentine-sy”? Heart-shaped chocolate chip cookies just didn’t cut it for me. and so the mental gears turned. I had recently stocked up the pantry of some baking ingredients. “Livin’ the lockdown” dream has me currently baking every couple days- can we say “Therapy Baking”? Anyway as part of a restock I had some crystalised (candied) ginger going spare. I have a love/ hate relationship with this ingredient. Whilst I absolutely LOVE it’s mellow, slow-burning, sweet heat (especially in combination with dark chocolate) and so that was at the front of my mind. Pink peppercorns was my initial selection for the next feature ingredient. My worry, however, was that it falls slightly into the territory of over-familiarity, bordering on a go-to spicy contributor to desserts. Sichuan peppercorns are ideal to fill this gap, lending their signature tongue-tingling sensation as an extra boon without the visual fanfare.
That, for me, was enough going on internally. I try to limit the flavors within a bake in order to stop them becoming a jumbled cacophony on the tongue. I was still thinking of how to finish the flavor experience that I had in mind. And of course- rose hits me! Now I don’t mean some random pensioner walking by whacks me with her Kate Spade tote- I mean Rose the flavor. Sure it can be a tricky ingredient to use but when handled properly it can really bring a decadent statement to a bake. And let’s face it (at the risk of being slightly predictable) what’s Valentine’s Day with roses in some form? I’ve combined it here with an understated addition of white chocolate to help compliment the heat from the spices baked into the shortbread, stopping it from sitting on your tongue too long and dominating your palette.
Finishing and decorating your baked shortbread cookie is entirely at your own discretion. Leave them plain and simple, or as I did add a few choice sprinkles and some edible glitter themed in the spirt of the amorous season. See? I can do pretty.
Whatever you choose to do, whether it’s make these and share them, or keep the all to yourself I hope you enjoy them.
Stay safe, and mask up.
*Updated to include Chocolate version as featured on Food Network Canada’s “Great Chocolate Showdown”.
Makes 16 heart cookies (I use a 2″ heart shape cutter), or 24 if cut into fingers
Ingredients
1 2/3 cups AP Flour
1/3 Semolina
2 Tablespoons Rice Flour (if you’re making a Chocolate shortbread version sub here with cocoa powder)
1 1/2 Tablespoons Cornstarch
1/2 cup and 2 tablespoons fine sugar, divided
1/2 tspn Kosher salt
1 cup/ 2 sticks salted butter, cold and cubed
1/2 cup crystalized (candied) ginger, chopped in to small pieces
2 tspn ground ginger
2 tspn Sichuan peppercorns, toasted and crushed/ ground
To decorate
3oz White chocolate, broken into pieces (use Dark chocolate for Chocolate shortbread version)
1 tspn coconut oil
1/2 tspn rosewater (omit for Chocolate shortbread version)
Candy sprinkles, dragees to suit
Method
Shortbread Cookies
Lightly grease and line a 9″ x 12″ traybake tin
In a large bowl combine the flour, semolina, rice flour, cornstarch, sugar, salt, round ginger and ground Sichuan peppercorns. Whisk together to further combine
Add in the cubed butter and rub together with your fingertips, or a pastry cutter, until the mixture is just beginning to bind together. Every so often do a quarter turn of the bowl to make sure you’re using all the dry mixture. You’ll want a texture somewhere between breadcrumbs and damp sand before you stop. Be wary of overworking the butter into the mixture – you want to avoid a dough that is feels slimey from the butter melting too much into the dry ingredients
Add in the chopped crystalized (candied) ginger and stir lightly to combine
Tip the crumb mixture into your prepared tin and press the dough so that it forms a solid layer. Level the surface with the back of a spoon or measuring cup, making sure the mixture is evenly spread and uniform.
Refrigerate for 30 mins minimum
Preheat your oven to 325°F
Remove the chilled dough from your fridge and using your cookie cutter mark 16 heart shapes by pushing the cutter roughly halfway into the dough. You don’t have to go the full way through to the bottom of the pan. If you’re not making heart-shaped cookies, you can use a knife or pizza cutter score the shortbread into 24 rectangular pieces (2 cuts by 7 cuts) taking care not to actually cut the full way through
Bake the dough for 30- 35 minutes or until a very pale golden brown, and deeper golden brown at the edges
Remove from the oven and using your heart-shaped cookie cutter, cut fully through the baked shortbread . The dough in the cutter should come away, giving you a heart-shaped cookie. On a wire cooling rack carefully push out the cookie. Repeat and leave to cool fully*
(If you’re not using a cookie cutter simply cut with a knife or pizza cutter at the score lines you previously made, cut the the bottom of the pan to complete the cut the full way through. Leave the full slab of shortbread to cool in the tin for 15 minutes. Carefully lift the fingers out of the tin with a palette knife or the parchment paper overhang and finish cooling on a wire rack)
To decorate
In a small bowl, set over a pan of simmering water, combine the white chocolate, coconut oil and rose water
Heat over a gentle simmer, stirring occasionally, until the chocolate is fully melted and all ingredients are combined
Turn off the heat and carefully remove the bowl
Dip the shortbread hearts or bars into the melted chocolate and set on a rack or tray lined with baking parchment or silpat mat. (If you find you’re chocolate is becoming stiff and hard to work with, place the bowl of chocolate back into the hot water pan and leave to re-melt to a more workable state
Whilst the chocolate is still setting finish decorating in your preferred way
Because of the oil in the chocolate, fully decorated cookies should be stored in an air-tight container in the fridge for up to a week. Separate layers of cookies using baking parchment. To serve remove the cookies about 15-20mind before serving – or just eat straight from the fridge!
Brace yourselves- it’s that time of year again. No, I’m not talking about the impending rush of Valentine’s Day. I’m speaking of Super Bowl. That annual tradition of swole men fighting to deposit an inflatable pig skin at one end of a grass field, only to fish it out again and start over upon successful completion. You can tell I’m a fan right?
Well what I am a fan of is the Super Bowl halftime show (this year it’s Scarborough’s own The Weeknd); the cinematic advert premiers and of course….the FOOD! What’s a Super Bowl without the food you say? Possibly 4 hours of my life I’ll never get back I say. But an ample supply of snacks, and edible treats, provide not only fuel for the event but a distracting highlight.
My advice is to take a two-pronged approach. During the game you want something snackable, easy to handle with minimum effort (I’m talking no utensils here people) and that you can eat on auto-pilot. Whether it’s because you’re too focused on the defense strategy of the Buccaneers, or Kansas City’s Tight End’s…well…tight end, less fuss is more eating here. There’s the old classic chips ‘n’ dip – Guacamole; Salsa; Blue Cheese and Ranch are all solid favorites. Have on hand a selection of chips and crackers and you’re good to go.
Speaking of crackers, another firm favorite that no Super Bowl viewing is complete without is the Cheese Ball. An amalgamation of cheese in it’s many forms and seasoned however you like, it’s sure to be a touchdown success (see what I did there?) In fact why not get into the spirit of the event and mold it into football shape- themed eating at it’s best! If you’re feeling particular artistic you can complete the look with a layer of pepperoni for…ahem… “authenticity”- much as I have below.
Halftime is when you want to bring out the big guns. I’m talking food that needs a plate, possibly a knife and fork. Heck we want convivence here so get yourself a spork! Right up there with the cheese ball, Super Bowl means “wings” to me. Crispy, succulent, and packed full of flavor wings. It’s a matter of personal taste as to whether you want them dripping in sauce, there for the dunking or dry coated to retain their crispy goodness. I’m a fan of the latter so I’ve included my recipe for “Chicken Dust”. Now before you get to thinking it’s some sort of anti-mite treatment for foul stock, I discovered the term whilst researching fried chicken treatments. I don’t spend ALL my time eating you know. It’s a versatile little number in that you can use it as a dry rub or, as I have done, combine it with some oil to lend extra crispiness to the finished wings. I’ve left the actual cooking method up to you as everyone seems to have their own preference. I, myself, air-fried them for 15mins, tuning occasionally to ensure even golden, crispness.
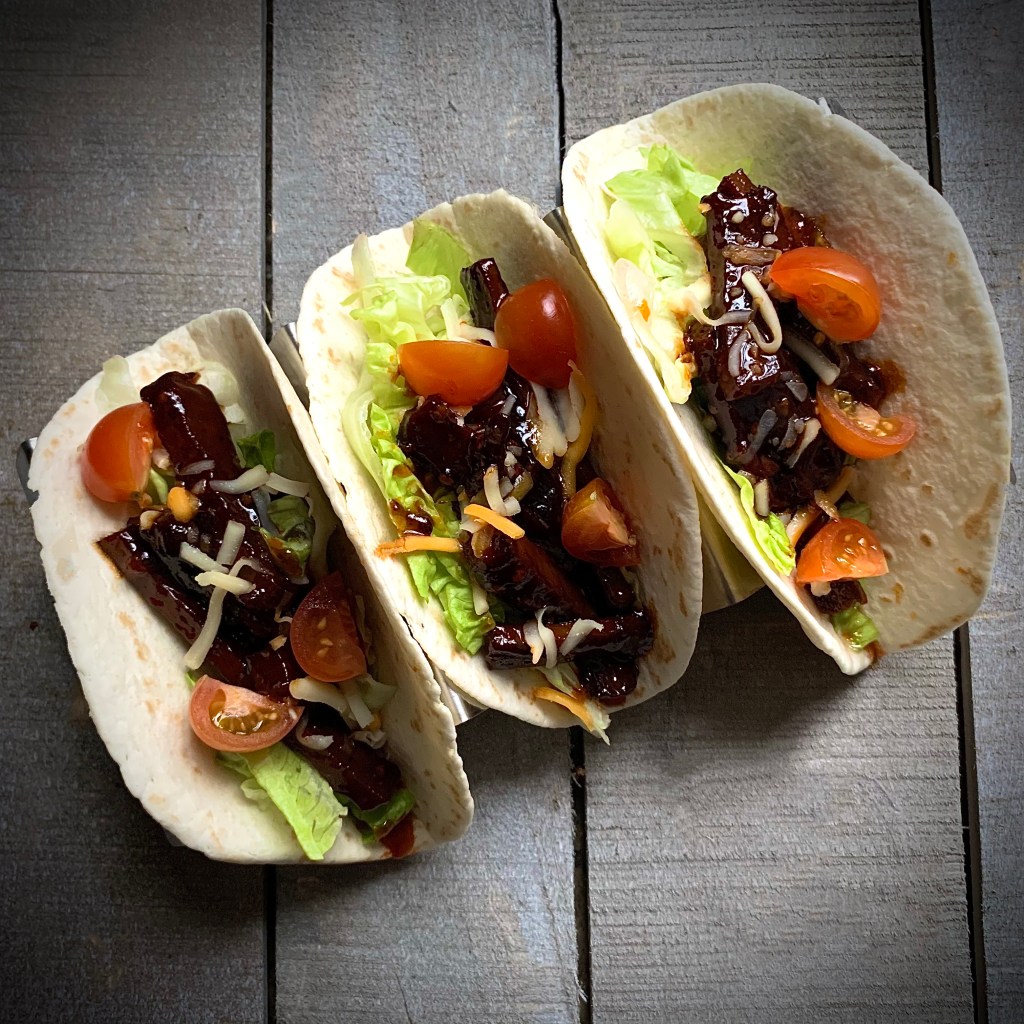
My last recipe is for that other feel-good favorite… tacos. I definitely do suggest you have a plate here, jam packing the tortilla with flavorsome fillings can often mean they’ll try to make a break for it! These tacos take advantage of one the prominent food trends emerging from this pandemic era…Plant-based alternatives to meat. Being confined indoors has brought about a dawn of a new age in the food world, the rise of the “Flexitarian”. Less strict than classic healthy diets it allows for the inclusion of occasional meat, with a prominence of plant based meat alternatives. Living in the time of Covid has people wanting a feeling of security and normalcy, often found in comfort food. But a deeper knowledge of associated health issues and ingredients has also meant a more health conscious approach. The abundance of plant based meat alternatives can now mean that people can enjoy their “meaty” experience and be content in the knowledge they’ve made a healthier, and at times more socially conscious, choice. The growth in the market means there are plenty of tasty varieties to try. Trust me- I love ribs and steak as much as your next carnivore so I was skeptical to say the least when plant based meat alternatives first arrived. But I have since been convinced (mainly due to Kristin & Justin at Guerilla Burger Co. ) and remain open to sampling the possibilities.
In this case with tacos. I’ve used ‘beef’ strips here coated in a sticky, glossy sweet ‘n’ spicy sauce with just the right amount of heat. The tacos themselves can be filled whatever way you like- be as restrained or as adventurous as you like. Just be plenty!
A parting word in the spirit of the weekend. Aside from food, the Super Bowl is also synonymous with gathering with friends at the likes of “tailgate parties”. However this year, like everything else since ‘Rona reared it’s head, we’re having to take a different approach to things. It’s definitely NOT a case of safety in numbers this time around. Think less Tailgating party and more ‘Homegating Huddle”. Let’s celebrate Super Bowl LV in fun way that’s still safe and socially responsible. Stay indoors, stick to your own family units, be adventurous and cook new things yourself. Celebrate separately this year, so that we can all celebrate together next year.
Enjoy the recipes, stay safe and mask up!
Superbowl Cheese Ball
Ingredients
16 oz cream cheese (2 x 8oz packs), room temperature
1 cup shredded mozzarella cheese blend
1 cup shredded sharp cheddar
1 cup finely grated parmesan
1 Tbsp Parsley
2 cloves Garlic, minced
1 tspn red pepper flakes
1 tspn Garlic powder
1 tspn Onion powder
1 tspn Hot sauce, or sriracha
1 tspn Worcestershire sauce
Kosher salt, to taste
Ground black pepper, to taste
2 cups Sliced pepperoni
1 slice Processed cheese
Method
In a large bowl, combine all the ingredients except the pepperoni slices and cheese slice, season with salt and pepper and stir together until fully combined
Gather the mixture into a rough ball shape and transfer to serving platter. Using a cranked spatula or spoons, smooth and form into a football shape
Finish the surface all over with a layer of pepperoni slices
Slice the processed cheese slice into strips and arrange in a “football lace” pattern on top of the cheese ball
Cover with cling wrap and refrigerate for at least 2 hours to allow the flavor to develop
Remove the cheese ball from the refrigerator 30 minutes before serving, and serve with crackers, vegetable crudités or pretzels
The cheese ball can be stored in the fridge wrapped in parchment paper and cling wrap for up to 1 week
Dusted Wings
Serves 1lb Chicken wings
Ingredients
For the Chicken Dust
2 Tbsp. Onion powder
2 Tbsp. Garlic powder
2 Tbsp. Brown sugar
1 Tbsp. Dried lemon peel
1 Tbsp. Dried oregano
1 Tbsp. Dried thyme
1 Tbsp. Dried parsley
1 Tbsp. White pepper
1 Tbsp. Szechuan peppercorns
1 Tbsp. Baking powder
1 tsp. Celery salt
1 tsp. Mace
1 tsp. Cayenne pepper
1 tsp. Mustard powder
1 tsp. Smoked paprika
1lb Chicken Wings
2 Tbsp Canola oil (if using)
Method
Place all the ingredients in a spice grinder, or clean coffee grinder. Blitz until a uniform powder, or dust, is formed
Transfer to an airtight plastic container for storage
The chicken dust can either be used in it’s own as a dry rub , or combined with the canola oil in a ziplock bag. Place the seasoning in a zip-lock bag, add in 1lb of prepared chicken wing pieces (drumettes and flats) and the tablespoons of canola oil. Shake and rub the bag contents together until the chicken pieces are fully coated
Cook by your preferred method – baking, air-frying
Remove and serve with preferred dip, or solo
Sit back and tuck in!
Sticky Beef-free Tacos
Makes 6 tacos
Ingredients
“Beef” Strip sticky glaze
2 Tbsp. Sesame oil
3 cloves Garlic, minced
1 Tbsp. fresh Ginger, minced
2 tsp. Rice wine vinegar (white vinegar also works here)
4 Tbsp. Honey (if vegan diet extends to honey, maple syrup can be used)
4 Tbsp. Sweet chili sauce
6 Tbsp. Vegan-friendly Tomato ketchup
4 Tbsp. Soy sauce
Taco Filling suggestions
500g Plant-based “Beef” (or “Chicken”) strips
6 medium (8″) soft flour tortillas
Shredded lettuce (I find Iceberg works best)
Sliced red onions
Shredded cheese, strength to preference
Soured cream
Guacamole, or sliced avocados
Method (for the sauce)
Combine all the sticky glaze ingredients in a medium pan
Heat over a high heat until boiling
Reduce heat to low/ medium and simmer until reduced by 1/3
Whilst the sticky glaze is reducing, prepare your protein in accordance with packet instructions
Toss the prepared/ cooked protein in the sticky glaze
Assembly tacos using additional ingredients to personal taste